Technical SEO: Improving your page loads with properly sized images
We all know that we should use properly sized images instead of using full-size images and making them smaller with HTML or CSS. Full-size images are larger in size, sometimes megabytes instead of a few kilobytes. When you're loading a page, this makes the load times take much longer, because all that information has to be served to the client. Using properly sized images, you're only serving what you need to. This could reduce your giant 5 megabyte image down to just a few kilobytes. Your page loads much faster, especially on mobile devices and Wi-Fi.
Only serving smaller images is half the battle though, there is still more you can do. Most latest browsers now support WebP images. This is a modern image format that is much smaller than png's and even jpg's. What if you could automatically resize your images to the proper size and serve your images in the smallest possible format to your clients? Well, there is a solution for that: Gumlet.
Setting up Gumlet
Using Gumlet to serve your images is easy. When creating an account, you can add a new source. A source in this case is a website. If you're hosting your own images, all you need to do to create a source is:
- Set the source type to "Web Folder"
- Set the Base URL to "https://my-domain.com"
- Choose a subdomain for Gumlet.
What this does is proxy the request you make to Gumlet to your own webserver. In the next step, we'll go over how this works. If you're not hosting any of your own image, you're using S3 for example, then you can select another source in the "Source type" dropdown and complete the steps from there.
How does it work?
In the previous step you've set up your image serving subdomain with Gumlet. In this step, I'm going to show you an example of how Gumlet serves image for your website. Imagine you have the following URL for an image:
<img src="https://my-domain.com/images/banner.jpg"
This image is 1200px by 800px.
To be able to take advantage of the compressing and resizing of the image we first need to determine what the size of the image ideally should be. As an example, we can determine that the image should be 300px by 200px. To tell Gumlet we want the compress image in that format, we can update the URL of the image to this:
<img src="https://my-domain.gumlet.io/images/banner.jpeg?w=300&h=200"
This will request the image from the Gumlet CDN. Gumlet, in turn, will fetch the image from the "Base URL" you set earlier, using the path you specified. This means Gumlet will request the image from your specified location, resize it, and compress it. Most likely you'll save more than 60% on file size and all of your images will now be of the webp format.
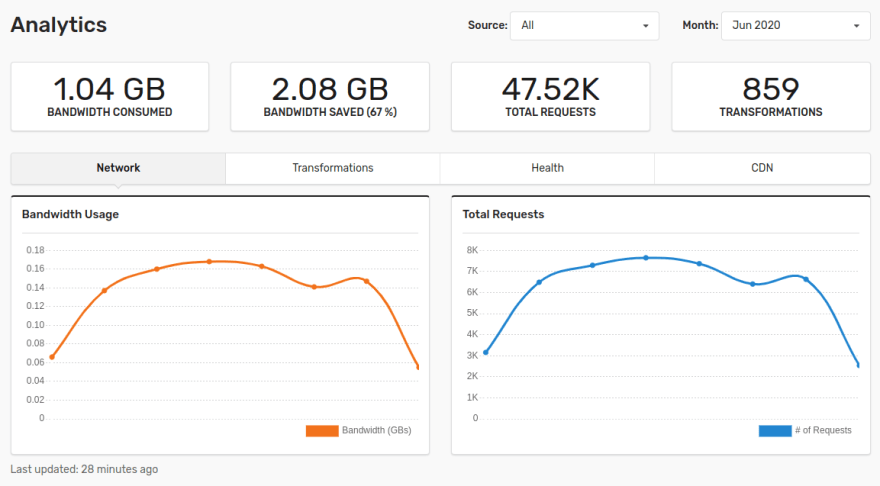
This is the result of using Gumlet for a week on Plant care for Beginners:
Conclusion
Now that you've set up Gumlet and update the image sources, you'll now see much faster page loads and properly sized images on your website. This relatively simple improvement could give your SEO a serious boost, especially if your website has a lot of images and has been slow because of this.


Top comments (0)