
Python is a beautiful programming language having a wide variety of usages. Ideal for beginners, the Flask module in Python is a very simple solution to build RESTful APIs. We’ll take a look at it in this article.
Flask a very simple framework for Python that allows you to build a REST API within minutes. If you have never used Python before, I strongly recommend you to check out the official guide on Python’s official website to kick start your Python experience.
The source code is available on my GitHub
Prerequisites
You need to have Python 3 and above and Pip installed on your system. You will also require an IDE that supports Python. Popular choices are Microsoft Visual Studio Code or JetBrains PyCharm.
Installing Flask
Open the terminal/command prompt and run the following to install the Flask module.
pip install Flask
Setup the work environment
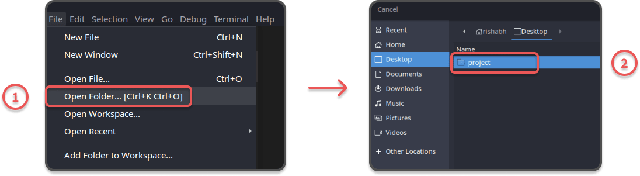
Let’s create a folder named project (you can name it whatever you want), and open it using your favorite IDE. I’ll be using Visual Studio Code (VSCode) for this tutorial. Refer to the screenshots below.
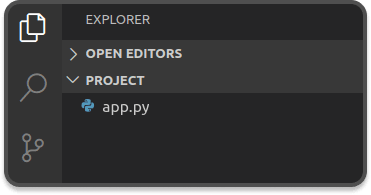
With our working directory created and opened in our IDE, we’ll start off by creating a file named app.py. You can name it whatever you wish to. This file will hold our REST API code.
Setting up Flask
Open the newly created file in your IDE. We’ll start by importing Flask into our Python code. To do this, type the following as the first line of the file.
from flask import Flask
With that step done, we can go ahead and create a Flask object which will be used for all our API related operations.
app = Flask(__name__)
The variable
__name__over here signifies a special variable in Python that points to the name of the current module. You need not worry about it at the moment, but remember that it is important to pass it as a parameter to the constructor.
Writing our first API
Now that we have initialized the Flask object, we can go ahead and write our first API. Let’s first quickly plan out what we will be doing. For now, assume you need an API that returns a simple text saying May the force be with you! once you hit the URL on the browser.
We’ll first decide the route of this API. An API route is, simply put, the URL on which the API will exist. Calling this URL from our browser (or any frontend) should give us the desired output. We’ll keep things simple and call this particular route /greetings.
If this part is a bit confusing, let’s consider a real-life example. Considering the URL
https://www.google.com/maps, what do you think would be the route and the domain name? Well, the route is/mapsand the domain name ishttp://www.google.com. Eventually, our REST API will be hosted on some server which will be having its own domain name, just like Google does over here.
Now that we have our route defined, and we know what data to return, let’s build our API!
We’ll start off with writing a function that will be called when we hit our API. Let’s name this function greetings(). This function will return the expected data, which is a string in our case. The code should look like the following:
def greetings():
    return 'May the force be with you!'
So, we have our function ready. How will we call this function when our API is fired? Flask achieves this with something called a Decorator in Python. Simply put, a decorator is a function that wraps another function’s execution within itself.
While it’s not important to understand how Decorators work for this tutorial, I strongly recommend you check out some material about Decorators after this lesson.
We can invoke decorators by using the @ symbol right before the function definition. For Flask, the decorator used to attach a function to a given API is:
@app.route('/your/api/route/here')
Writing this line above our function definition, we get:
@app.route('/greetings')
def greetings():
    return 'May the force be with you!'
By using this decorator, we are asking Flask to run this function whenever the route /greetings is called. Flask takes care of the rest for you, as long as the returned data is a valid serializable object (like a text or JSON).
The final content of the files should be as follows:
from flask import Flask

app = Flask(__name__)

@app.route('/greetings')
def greetings():
    return 'May the force be with you!'
Running our Flask server
With most of our code complete, we can now run our Flask server. Add the following line to the end of our file:
if __name__ == 'main':
    app.run()
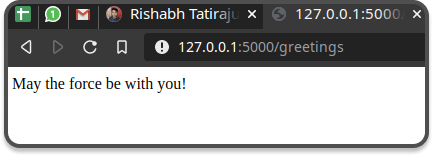
When you run this file, either by using the command python3 app.py on the console or by using the Run feature of your IDE, you should get the following output.

If you don’t see any errors, then congratulations, your Flask server is up! Go ahead and open http://127.0.0.1:5000/greetings on any browser to see your API in action!
Ending Notes
We saw how simple it is to build RESTful APIs using Python, thanks to the Flask module. In the upcoming articles of the series, we’ll look at more advanced features that we can build using Flask, including authentication (login/signup), data storage and serving static HTML files.
Let me know in the comments section if you have any feedback or queries, and keep coding!

Top comments (0)