
Flutter is Google's free and open-source UI application development toolkit. It is used to build high-quality native interfaces on Android and iOS using a single codebase. One interesting thing about Flutter is that it works with existing code and is used by developers and organizations worldwide. In this post, we will learn how to develop a custom plugin using Flutter.
As a part of our SDK roadmap at RudderStack, we wanted to develop a Flutter SDK. Our existing SDKs include features such as storing event details and persisting user details on the database, and much more. However, these features are already implemented in our Android and iOS SDKs.
The Flutter SDK that we intend to develop is also meant to run on either your Android or iOS devices. So, we wanted to develop a solution in which we can use our existing Android and iOS SDK and develop the Flutter SDK.
All the brainstorming finally led us to the idea of developing a custom plugin in Flutter. The custom plugin follows a basic mechanism based on Flutter's flexible system that allows calling platform-specific APIs available in Kotlin or Java on Android or Swift or Objective-C code on iOS.
Working of the Flutter SDK Across Different Channels
Flutter's built-in platform-specific API support does not rely on code generation but rather on a flexible message-passing style using a Platform Channel. To create a custom plugin, let us understand the Flutter architecture in detail:
- The Flutter portion of the app sends messages to its host - the iOS or Android portion of the app, over a platform channel.
- The host listens on the platform channel and receives the message. It then calls into any number of platform-specific APIs---using the native programming language---and sends a response back to the client, the app's Flutter portion, as shown below:
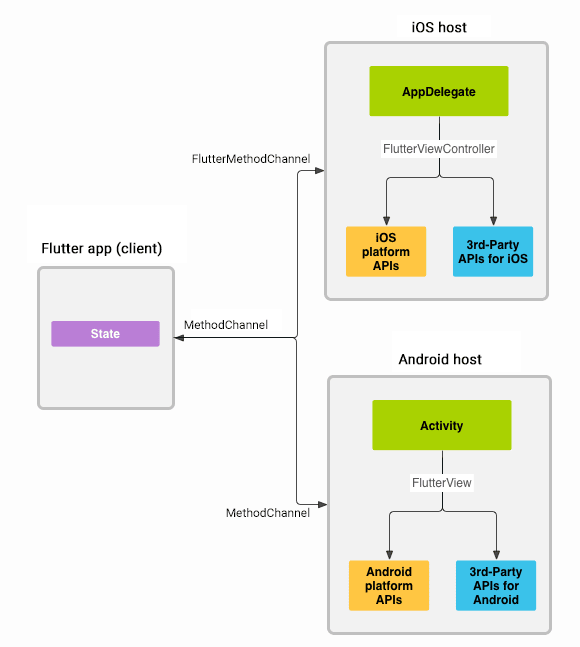
Architectural Overview of how Platform Channels Work Between Different Platforms
Building a Custom Plugin Using Flutter
Getting Started
The following example demonstrates how to call a platform-specific API to retrieve and display the current battery level. It uses the Android BatteryManager API and the iOS device.batteryLevel API, via a single platform message, getBatteryLevel().
Step 1: Create the Package
To create a plugin package,
- Use the
--template=pluginflag with the Fluttercreatecommand. - Use the
--platforms=option followed by a comma-separated list to specify the plugin supports platforms. Available platforms are Android, iOS, web, Linux, macOS, and Windows. - Use the
--orgoption to specify your organization, using reverse domain name notation. This value is used in various package and bundle identifiers in the generated plugin code. - Use the
-aoption to specify the language for Android or the -i option to specify the language for iOS. - Below is the example command to create a plugin package for Android, iOS platforms while using java for Android and Objective-C for iOS.
flutter create
- This command creates a plugin project in the
batteryLevelfolder with the specialized content given as follows:-
lib/batteryLevel.dart -The Dart API for the plugin. -
android/src/main/java/com/rudderstack/batteryLevel/BatteryLevelPlugin.java- The Android platform-specific implementation of the plugin API in Java. -
ios/Classes/BatteryLevelPlugin.m- The iOS-platform specific implementation of the plugin API in Objective-C. -
example/- A Flutter app that depends on the plugin and illustrates how to use it.
-
Check out how different dart values are received on the platform side and vice versa on the Flutter website.
Step 2: Create the Flutter Platform Client
The app's State class holds the current app state. Extend that to hold the current battery state.
- First, construct the channel by using
MethodChannelwith a single platform method that returns the battery level. - The client and host sides of a channel are connected through a channel name that's passed in the channel constructor.
Note: All channel names used in a single app must be unique.
- Prefix the channel name with a unique domain prefix. For example,
org.rudderstack.dev/battery. - Open the
batteryLevel.dartfile located in thelibfolder. - Create the
methodchannel object as shown below with the channel name asorg.rudderstack.dev/battery. - Please ensure that you are initializing the channel object with the same name as in Flutter across both the Android and iOS platforms.
import 'dart:async';
import 'package:flutter/services.dart';
class BatteryLevel {  static const MethodChannel _channel =      MethodChannel('org.rudderstack.dev/battery');
 // Get battery level.}
- Next, invoke a method on the method channel, specifying the concrete method to call using the string identifier
getBatteryLevel. For example, the call might fail if the platform does not support the platform API (such as when running in a simulator). So, wrap theinvokeMethodcall in atry-catchstatement. - Once you get the battery level, return it using the following code:
// Get battery level. static Future<String> getBatteryLevel() async { String batteryLevel; try { final int result = await _channel.invokeMethod('getBatteryLevel'); batteryLevel = 'Battery level: $result%.'; } on PlatformException { batteryLevel = 'Failed to get battery level.'; } return batteryLevel; }}
- Now, replace the
example/lib/main.dartfile to contain a small user interface that displays the battery state in a string and a button for refreshing the value:
import 'package:flutter/material.dart';import 'dart:async';
import 'package:flutter/services.dart';import 'package:batteryLevel/batteryLevel.dart';
void main() {  runApp(MaterialApp(home: MyApp()));}
class MyApp extends StatefulWidget {  @override  _MyAppState createState() => _MyAppState();}
class _MyAppState extends State<MyApp> {  String _batteryLevel = 'Unknown';
  @override  void initState() {    super.initState();  }
  // Platform messages are asynchronous, so we initialize in an async method.  Future<void> _getBatteryLevel() async {    String batteryLevel;    // Platform messages may fail, so we use a try/catch PlatformException.    try {      batteryLevel = await BatteryLevel.getBatteryLevel();    } on PlatformException {      batteryLevel = 'Failed to get platform version.';    }
    // If the widget was removed from the tree while the asynchronous platform    // message was in flight, and we want to discard the reply rather than calling    // setState to update our non-existent appearance.    if (!mounted) return;
    setState(() {      _batteryLevel = batteryLevel;    });  }
  @override  Widget build(BuildContext context) {    return Material(      child: Center(        child: Column(          mainAxisAlignment: MainAxisAlignment.spaceEvenly,          children: [            ElevatedButton(              child: Text('Get Battery Level'),              onPressed: _getBatteryLevel,            ),            Text(_batteryLevel),          ],        ),      ),    );  }}
Step 3: Add Android Platform-Specific Implementation
Open BatteryLevelPlugin.java within android/src/main/java/com/rudderstack/batteryLevel/ and make the changes as follows:
- First, change the channel name in the initialization of
MethodChannelobject toorg.rudderstack.dev/batteryas follows:
@Override public void onAttachedToEngine( @NonNull FlutterPluginBinding flutterPluginBinding ) { channel = new MethodChannel( flutterPluginBinding.getBinaryMessenger(), "org.rudderstack.dev/battery" ); channel.setMethodCallHandler(this); }
- Now, replace
onMethodCallwith the definition shown below to handle thegetBatteryLevelcall and respond withbatteryLevelas follows:
@Override public void onMethodCall(@NonNull MethodCall call, @NonNull Result result) { if (call.method.equals("getBatteryLevel")) { result.success(99); } else { result.notImplemented(); } }
Step 4: Add iOS Platform-Specific Implementation
Open BatteryLevelPlugin.m under ios/Classes/ and make the following changes:
- First, change the channel name in the initialization of
FlutterMethodChannelobject toorg.rudderstack.dev/batteryas follows:
+ (void)registerWithRegistrar:(NSObject<FlutterPluginRegistrar>*)registrar { FlutterMethodChannel* channel = [FlutterMethodChannel methodChannelWithName:@"org.rudderstack.dev/battery" binaryMessenger:[registrar messenger]]; BatteryLevelPlugin* instance = [[BatteryLevelPlugin alloc] init]; [registrar addMethodCallDelegate:instance channel:channel];}
- Next, replace the
handleMethodCallmethod with the definition below to handle thegetBatteryLevelcall and respond withbatteryLevelas follows:
- (void)handleMethodCall:(FlutterMethodCall*)call result:(FlutterResult)result { if ([@"getBatteryLevel" isEqualToString:call.method]) { result(@(99)); } else { result(FlutterMethodNotImplemented); }}
With this, we have successfully developed a custom plugin. Now you can run the plugin across any two platforms (Android and iOS) and understand how it works.
Publishing the Custom Plugin
Let's quickly look at a few instructions that you need to keep in mind after developing the custom plugin:
- After developing the custom plugin, you can publish the custom plugin at pub.dev so that other developers can easily use it. However, before publishing, review the
pubspec.yaml,README.md,CHANGELOG.md, andLICENSEfiles to ensure that the content is complete and correct. - Next, run the publish command in the
dry-runmode to see if everything passes the analysis:
$ flutter pub publish --dry-run
- The next step is publishing to pub.dev, but ensure that you are ready because publishing is a final step that cannot be reverted:
$ flutter pub publish
For more details on publishing, check out the publishing docs on dart.dev.
References:
- https://flutter.dev/docs/development/packages-and-plugins/developing-packages
- https://flutter.dev/docs/development/platform-integration/platform-channels?tab=android-channel-java-tab
You can also check out the following Github repositories:
You can download Rudderstack`s Flutter SDK as a dependency for your Flutter Apps from pub.dev.
If you're interested in app development, check out this post from G2i on React Native to learn more about the most important skills and attributes for React Native developers.
Sign up for Free and Start Sending Data
Test out our event stream, ELT, and reverse-ETL pipelines. Use our HTTP source to send data in less than 5 minutes, or install one of our 12 SDKs in your website or app. Get started.

Top comments (0)