
Server-Side Swift is rapidly evolving more than ever! Server-Side Swift opens exciting new possibilities to Swift developers. Things that weren't possible not long ago! Frameworks like Kitura and Vapor expose the amazing full power of Swift. Being able to have Swift from end to end can be game-changing for Swift developers and even companies!
A couple of months ago I started working on bringing Swift support to Azure Function and here I'll take you through creating your first Function!
Checklist
There are a couple of requirements to get started. If you have Xcode installed and you already work with Azure Functions on your mac, then you're almost ready!
- ✅ macOS 10.13 or later
- ✅ Xcode 11 & Swift 5 or later
- ✅ .NET Core SDK 2.2
- ✅ Azure Functions Core Tools
- ✅ Swift Functions tools, you can get them from Homebrew 🍺:
brew install salehalbuga/formulae/swift-func
You're all set! Let's create the function!
Creating a new Swift Functions project
In terminal run the following to create a new project:
swiftfunc init myFunctionsProj
If you're used to using Functions Core Tools, Swift Function Tools are pretty similar. The init command we ran above is similar to that of the Core Tools, but it's going to create a Swift Functions Project! You're going to get the follow folder structure:
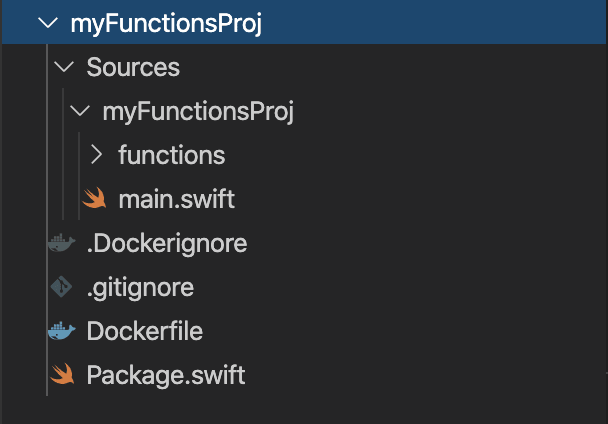
The project is basically a SwiftPM project with a couple of extra files for the purpose of Azure Functions framework.
The functions folder is going to be the home of your Functions!
Let's create a simple HTTP Function!
cd to the new project folder and run the following command to create a new HTTP Function named hello:
swiftfunc new http -n hello
the created hello.swift

This is optional but let's generate an Xcode project using SwiftPM for easier development.
swift package generate-xcodeproj
Open the Xcode project and let's examine the code of the Function we created
//
//  hello.swift
//  myFunctionsProj
//
//  Created on 07-12-19.
//

import Foundation
import AzureFunctions

class hello: Function {

    required init() {
        super.init()
        self.name = "hello"
        self.trigger = HttpRequest(name: "req", methods: ["GET", "POST"])
    }

    override func exec(request: HttpRequest, context: inout Context, callback: @escaping callback) throws {

        context.log("Function executing!")

        let res = HttpResponse()
        var name: String?

        if let data = request.body, let bodyObj: [String: Any] = try? JSONSerialization.jsonObject(with: data, options: []) as? [String: Any] {
            name = bodyObj["name"] as? String
        } else {
            name = request.query["name"]
        }
        res.body  = "Hello \(name ?? "buddy")!".data(using: .utf8)

        return callback(res);
    }
}
This an HTTP-triggered function, as you can see in the constructor.
exec is the method that's going to be called when the Function is triggered. It passes the triggering http request as the framework type HttpRequest in the first parameter.
The sample code searches for a name parameter value in the request body or the query string, and sets it as text in the response. It falls back to "buddy" if it doesn't exist anywhere.
Running our new Function locally
In terminal, run the following in the project directory to run your Swift Functions project locally. It will compile the code and start the host for you (as if you were running func host start). The host output should show you the URL of hello function created above. Click on it to run the function and see output!
swiftfunc run
After the compilation is done, you should see the Functions Host output

Click on the green function link and pass a name value in query string!
You've run your first Swift Azure Function locally! ✅💃💃
Deploying to Azure ☁️
Currently there's no one magical command to deploy, you'll need to build the docker image (from the provided Dockerfile), push to a registry and set it in the Container Settings of the Function App.
Build the image
docker build -t <imageTag> .
Then push it
docker push <imageTag>
In Azure portal, create a new Function App with Docker Container as the Publish option. Under Hosting options make sure Linux is selected as OS.
Once the app is created or in any existing Container Function App, under Platform Features, select Container settings and set the registry and select image you pushed.
You've made it this far! Amazing!💪 If you like the project, give it a 🌟 on GitHub.
This is project is an early stage and is being actively maintained and updated. For any issues or bug reports, please feel free to file an issue on GitHub.
Don't forget to check the docs Here📚

Top comments (0)