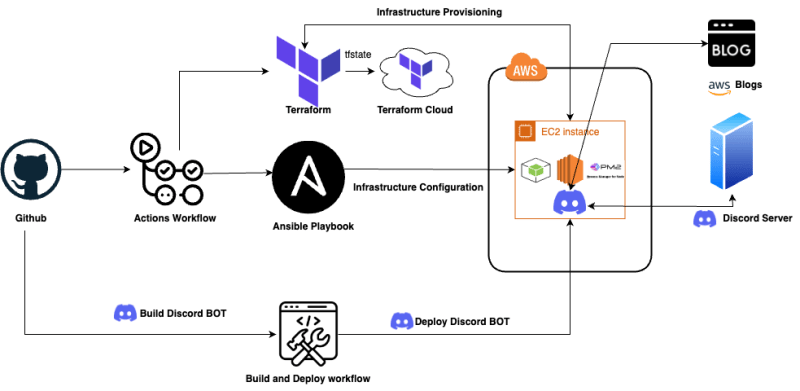
Build a discord bot that brings AWS devops blogs right into your Discord server. Starting from setting up our infrastructure using Terraform, we leverage Ansible to configure EC2 instances precisely as per our needs and use GitHub Actions, which facilitates continuous integration and deployment (CI/CD), ensuring that our bot is always running the latest code.
**
Introduction
**
In this blog post, we will create a dynamic discord bot specifically to fetch AWS DevOps blogs and bring them right into your discord server with ChatOps as the Discord Bot is a form of ChatOps working within your chat environment to keep you updated on AWS blogs.
Check out the Github code for reference : Discord BOT
Discord.js documentation: Discord.js
**
Setting up the Infrastructure
**
While there are a few examples of setting this up manually, lets dive into how this can be achieved through Infrastructure as Code with Terraform for provisioning EC2, associated AWS resources and we will leverage Ansible to configure the EC2 instance.
Terraform
In this blog, we will use the power of Terraform to provision our resources with expressive HCL syntax to define infrastructure’s desired state. This way, our infrastructure becomes easily replicable and version-controlled, promoting consistency and minimizing potential errors that can occur with manual configurations.
Here is the project structure that I have currently and lets define the resources required in each blocks.
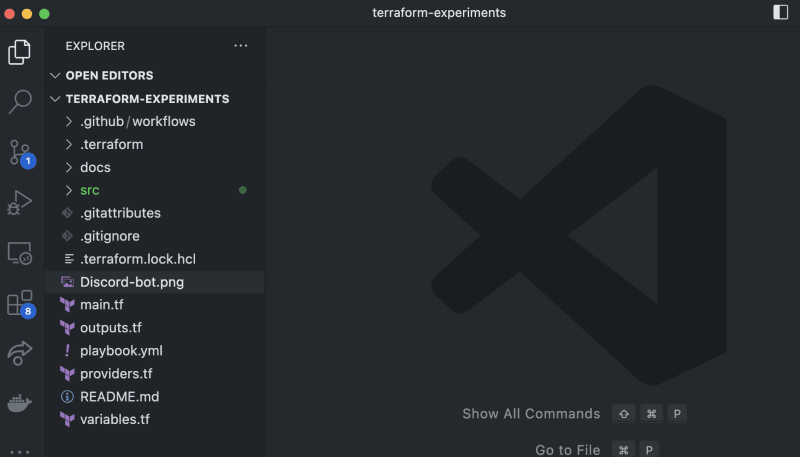
main.tf
Let us add the following in the main.tf file and please find the explanation for the code block right after the code snippet.
# Add provider
provider "aws" {
  region = "us-east-1"
}
# VPC
resource "aws_vpc" "cloudysky-vpc" {
  cidr_block           = "10.0.0.0/16"
  enable_dns_hostnames = true
  enable_dns_support   = true
  tags = {
    Name = "cloudysky-vpc"
  }
}
# Subnet
# Refer http://blog.itsjustcode.net/blog/2017/11/18/terraform-cidrsubnet-deconstructed/
resource "aws_subnet" "cloudysky-subnet" {
  vpc_id                  = aws_vpc.cloudysky-vpc.id
  cidr_block              = cidrsubnet(aws_vpc.cloudysky-vpc.cidr_block, 3, 1)
  availability_zone       = "us-east-1a"
  map_public_ip_on_launch = true
}
# Security Group
resource "aws_security_group" "cloudsky-ingress-all" {
  name   = "cloudsky-ingress-allow-all"
  vpc_id = aws_vpc.cloudysky-vpc.id
  ingress {
    from_port   = 22
    to_port     = 22
    protocol    = "tcp"
    cidr_blocks = ["0.0.0.0/0"]
  }
  ingress {
    from_port   = 80
    to_port     = 80
    protocol    = "tcp"
    cidr_blocks = ["0.0.0.0/0"]
  }
  ingress {
    from_port   = 443
    to_port     = 443
    protocol    = "tcp"
    cidr_blocks = ["0.0.0.0/0"]
  }
  // Terraform requires egress to be defined as it is disabled by default..
  egress {
    from_port   = 0
    to_port     = 0
    protocol    = "-1"
    cidr_blocks = ["0.0.0.0/0"]
  }
}
# EC2 Instance for testing
resource "aws_instance" "cloudysky-ec2" {
  ami                    = var.ami_id
  instance_type          = "t2.micro"
  key_name               = var.ami_key_pair
  subnet_id              = aws_subnet.cloudysky-subnet.id
  vpc_security_group_ids = [aws_security_group.cloudsky-ingress-all.id]
  tags = {
    Name = "cloudysky-ec2"
  }
}
# To access the instance, we would need an elastic IP
resource "aws_eip" "cloudysky-eip" {
  instance = aws_instance.cloudysky-ec2.id
  vpc      = true
}
# Route traffic from internet to the vpc
resource "aws_internet_gateway" "cloudysky-igw" {
  vpc_id = aws_vpc.cloudysky-vpc.id
  tags = {
    Name = "cloudysky-igw"
  }
}
# Setting up route table
resource "aws_route_table" "cloudysky-rt" {
  vpc_id = aws_vpc.cloudysky-vpc.id
  route {
    cidr_block = "0.0.0.0/0"
    gateway_id = aws_internet_gateway.cloudysky-igw.id
  }
  tags = {
    Name = "cloudysky-rt"
  }
}
# Associate the route table with the subnet
resource "aws_route_table_association" "cloudysky-rt-assoc" {
  subnet_id      = aws_subnet.cloudysky-subnet.id
  route_table_id = aws_route_table.cloudysky-rt.id
}
Provider: This block tells Terraform to use the AWS provider and to operate in the “us-east-1” region. The AWS provider is responsible for creating and managing resources on AWS.
VPC: A VPC (Virtual Private Cloud) is created, which is essentially a private network in AWS where you can launch your resources. The CIDR block “10.0.0.0/16” determines the IP range for the VPC. The parameters enable_dns_hostnames and enable_dns_support are set to true to enable DNS resolution and hostname support within the VPC.
Subnet: A subnet is created within the VPC. The subnet is assigned a subset of the IP range defined in the VPC (determined by the cidrsubnet function). The subnet is set to be in the “us-east-1a” availability zone and will automatically assign public IP addresses to instances launched within it.
Security Group: A security group acting as a virtual firewall for the EC2 instance is created. This security group is configured to allow incoming traffic on ports 22 (SSH), 80 (HTTP), and 443 (HTTPS) from any IP address (0.0.0.0/0). It also allows all outbound traffic.
EC2 Instance: An EC2 instance (a virtual server) is created with the specified AMI (Amazon Machine Image) and instance type. It’s launched within the created subnet and associated with the security group. You can SSH into this instance using the specified key pair.
Elastic IP (EIP): An Elastic IP address is a static, public IPv4 address, which is allocated to your AWS account. In this case, an EIP is associated with the EC2 instance to provide a fixed public IP address, useful if you restart your instance or it fails for some reason.
Internet Gateway: An internet gateway is a horizontally scaleable, redundant, and highly available VPC component that allows communication between your VPC and the internet. It’s attached to your VPC.
Route Table: A route table contains rules, called routes, that determine where network traffic from your subnet or gateway is directed. In this case, a route table is created which sends all traffic (0.0.0.0/0) to the Internet Gateway.
Route Table Association: Finally, the route table is associated with the subnet, which means that the routing rules defined in the route table will now apply to the subnet.
**
provider.tf
**
At the time of writing this blog, please refer the version that was used.
terraform {
  required_providers {
    aws = {
      source  = "hashicorp/aws"
      version = "5.8.0"
    }
  }
  cloud {
    organization = "cloudysky"
    workspaces {
      name = "terraform-sandeep-aws"
    }
  }
}
This code block is mainly about setting up your Terraform project with the necessary provider (AWS in this case) and configuring it to use Terraform Cloud for storing state and running operations.
required_providers: This block specifies which providers are necessary for your Terraform project. A provider is a plugin that Terraform uses to manage resources. In this case, it specifies that the AWS provider is required. The source attribute indicates that the AWS provider should be downloaded from the HashiCorp registry and the version attribute specifies that version 5.8.0 of the AWS provider should be used.
cloud: This block is used to configure the backend for your Terraform state. The state is a necessary component of Terraform that tracks the resources it has created. In this case, it is being configured to use Terraform Cloud, which is a service provided by HashiCorp for storing your Terraform state and running your Terraform operations. The organization attribute is used to specify the name of the Terraform Cloud organization to use.
workspaces: This block is used to specify which workspace in Terraform Cloud to use. A workspace in Terraform Cloud is a place where Terraform runs are executed. The name attribute is used to specify the name of the workspace. In this case, it specifies that the workspace “terraform-sandeep-aws” should be used.
variables.tf
This Terraform code defines two variables: ami_id and ami_key_pair. Here is a walkthrough of what each piece does:
variable "ami_id" {
  type    = string
  default = "ami-06ca3ca175f37dd66"
}
variable "ami_key_pair" {
  type    = string
  default = "terraform-ec2"
}
variable “ami_id”: This block declares a variable named ami_id. Variables in Terraform are a way to provide customizable, user-defined values that can be used within Terraform code. Please specify the AMI ID you would like to use.
variable “ami_key_pair”: Similarly, this block declares another variable named ami_key_pair. This variable is also of type string, and its default value is set to terraform-ec2. This terraform code expects you to create EC2 key pair manually from the AWS console and save the private key information securely.
output.tf
This Terraform code block defines an output value. In Terraform, outputs are like return values for a Terraform module. Once you run terraform apply, the outputs are displayed on the command line as a convenient way for users to retrieve and use these values.
output "instance_public_ip" {
  value = aws_instance.cloudysky-ec2.public_ip
}
Let’s break it down:
output “instance_public_ip”: This line is declaring an output named instance_public_ip. The string in the quotes is the identifier for this output, which you’ll use when referencing the output value.
value = aws_instance.cloudysky-ec2.public_ip: This is assigning a value to the output. In this case, the value is the public_ip attribute of the aws_instance resource named cloudysky-ec2
If you have followed so far, then you should have an fair idea on the terraform resources defined. We will use actions workflow to provision these resources, also store the terraform state in terraform cloud workspace.
Ansible
Ansible is an open-source software provisioning, configuration management, and application deployment tool. In this case, we will be using Ansible playbook to configure our EC2 instance which will be created by terraform. Primarily, we will be using playbook to install Nodejs 16 on EC2 and followed by PM2 installation process manager for production Node.js applications.
Here is walkthrough of the code after the code snippet.
- name: Install Node.js on EC2 instance
  hosts: ec2_instance
  gather_facts: no
  become: yes
  vars:
    ansible_ssh_private_key_file: /home/runner/.ssh/id_rsa
    ansible_python_interpreter: /usr/bin/python3
    ansible_user: ec2-user
    ansible_ssh_common_args: '-o StrictHostKeyChecking=no'
  tasks:
    - name: Wait for SSH to come up
      wait_for:
        host: "{{ inventory_hostname }}"
        port: 22
        delay: 60
        timeout: 900
        state: started
    - name: Gathering Facts
      setup:
    - name: Update all packages
      dnf:
        name: '*'
        state: latest
    - name: Install tar and xz for unpacking Node.js binaries
      dnf:
        name:
          - tar
          - xz
        state: present
    - name: Download Node.js binary tarball
      get_url:
        url: https://nodejs.org/dist/v16.14.2/node-v16.14.2-linux-x64.tar.xz
        dest: /tmp/node-v16.14.2-linux-x64.tar.xz
    - name: Extract Node.js binary tarball
      command:
        cmd: tar -xf /tmp/node-v16.14.2-linux-x64.tar.xz -C /usr/local --strip-components 1
    - name: Verify Node.js installation
      command:
        cmd: node -v
      register: node_version
    - name: Display Node.js version
      debug:
        msg: 'Node.js version is {{ node_version.stdout }}'
    - name: Install PM2 globally
      npm:
        name: pm2
        global: yes
Let’s break down this ansible playbook
The following tasks of the playbook are carried out on hosts belonging to the group ec2_instance.
Wait for SSH to come up: This task uses the wait_for module to pause the playbook execution until SSH is available on the host.
Gathering Facts: The setup module is used here to gather facts about the host. This was explicitly requested as a task, as gather_facts: no was specified at the beginning of the play.
Update all packages: The dnf module is used to update all installed packages on the host.
Install tar and xz: The dnf module is again used to install the specified packages (tar and xz), which will later be used for unpacking the Node.js binaries.
Download Node.js binary tarball: The get_url module is used to download the Node.js binaries from the specified URL to the temporary location /tmp.
Extract Node.js binary tarball: The command module is used to extract the downloaded Node.js binaries to /usr/local.
Verify Node.js installation: The command module is used again to verify the installed Node.js version, with the output registered into the node_version variable.
Display Node.js version: The debug module is used to display the installed Node.js version, retrieved from node_version.stdout.
Install PM2 globally: Finally, the npm module is used to install PM2 (a process manager for Node.js applications) globally on the host.
This playbook, therefore, provides an automated way to install and configure Node.js on an EC2 instance.
Creating the Discord Bot
Now let’s look at how to create discord bot using discord.js (a popular nodejs library to build discord bots )
We will be using the bot to fetch AWS blogs specifically devops blogs and for easier understanding, I have kept it simple to fetch top 5 devops blogs when you send the request in the ChatOps but there are several enhancements that can be made to this.
const Discord = require('discord.js');
const client = new Discord.Client();
const Parser = require('rss-parser');
let parser = new Parser();
require('dotenv').config();
const AWS_DEVOPS_BLOGS_RSS_URL =
  'https://aws.amazon.com/blogs/devops/category/devops/feed/';
client.on('ready', () => {
  console.log(`Bot is ready and logged in as ${client.user.tag}!`);
});
client.on('message', async (msg) => {
  if (msg.content === '!devops') {
    try {
      let feed = await parser.parseURL(AWS_DEVOPS_BLOGS_RSS_URL);
      feed = feed.items.slice(0, 5);
      feed.forEach((item) => {
        const embed = new Discord.MessageEmbed()
          .setColor('#0099ff')
          .setTitle(item.title)
          .setURL(item.link)
          .setAuthor('AWS DevOps Blog', 'https://aws.amazon.com/favicon.ico')
          .setDescription(item.contentSnippet)
          .setThumbnail('https://aws.amazon.com/favicon.ico')
          .setTimestamp(new Date(item.pubDate))
          .setFooter('AWS DevOps Blog', 'https://aws.amazon.com/favicon.ico');
        msg.channel.send(embed);
      });
    } catch (error) {
      console.log(error);
    }
  }
});
client.login(process.env.DISCORD_BOT_TOKEN);
Set Up: The necessary packages and modules are imported, including the Discord.js for interacting with the Discord API, and rss-parser to parse the RSS feed from the AWS DevOps blog. An instance of the Discord client and RSS Parser are created.
Initialization: The bot logs in using a token from the environment variables and indicates it’s ready in the console.
Listening for Messages: The bot starts listening for messages on any server it’s connected to. It reacts specifically to a message containing “!devops”.
Processing the “!devops” Command: Upon receiving the “!devops” command, the bot fetches the RSS feed from the AWS DevOps blog, parses it and slices the first five items (the five most recent blog posts).
Creating and Sending Message Embeds: For each of these five blog posts, it generates a rich content message, known as an ‘embed’, that contains the blog post’s title, URL, description, and other details. These embeds are then sent to the same channel where the “!devops” command was used.
Error Handling: If there’s an error at any point during the “!devops” command processing, it’s caught and logged to the console.
Github Actions
I have used Github Actions to build the discord bot application code, upload to github artifacts and then download the artifacts and deploy it to target host (EC2)
Prior to the that, I have also used Github actions to provision the required infrastructure, configuration.
Infrastructure Provisioning and Configuration
Lets look at the Github Actions workflow and pretty long workflow :) The idea was to share one of the approaches to do it and it can be improved with reusable workflows for better organization of workflow.
name: Provision EC2
on: workflow_dispatch
jobs:
  runterraform:
    runs-on: ubuntu-latest
    steps:
      - name: Checkout code
        uses: actions/checkout@v3
      - name: List out directory
        run: ls
      - name: Set up Terraform
        uses: hashicorp/setup-terraform@v2
        with:
          cli_config_credentials_token: ${{ secrets.TF_API_TOKEN }}
          terraform_wrapper: false
      - name: Terraform init
        run: terraform init -upgrade
      - name: Terraform apply
        id: terraform
        run: terraform apply -auto-approve
      - name: Configure AWS credentials
        uses: aws-actions/configure-aws-credentials@v1
        with:
          aws-access-key-id: ${{ secrets.AWS_ACCESS_KEY_ID }}
          aws-secret-access-key: ${{ secrets.AWS_SECRET_ACCESS_KEY }}
          aws-region: us-east-1
      - name: Output Instance Public IP
        id: ip
        run: |
          IP=$(terraform output -raw instance_public_ip)
          echo "::set-output name=PUBLIC_IP::$IP"
          echo "The public IP is $IP"
        env:
          TF_API_TOKEN: ${{ secrets.TF_API_TOKEN }}
    outputs:
      public_ip: ${{ steps.ip.outputs.PUBLIC_IP }}

  ansible:
    needs: runterraform  # Make this job depend on the `terraform` job
    runs-on: ubuntu-latest
    steps:
      - name: Set up SSH
        run: |
          mkdir -p ~/.ssh/
          echo "${{ secrets.SSH_PRIVATE_KEY }}" > ~/.ssh/id_rsa
          chmod 600 ~/.ssh/id_rsa
      - name: Checkout code
        uses: actions/checkout@v3
      - name: Use the IP
        run: |
          echo "The public IP from the terraform job is ${{ needs.runterraform.outputs.public_ip }}"
      - name: Setup Python
        uses: actions/setup-python@v4
        with:
          python-version: 3.x
      - name: Install Ansible
        run: python -m pip install --upgrade pip && pip install ansible
      - name: Create Ansible Inventory
        run: |
          echo '[ec2_instance]' > inventory.ini
          echo '${{ needs.runterraform.outputs.public_ip }}' >> inventory.ini
      - name: Run Ansible Playbook
        run: ansible-playbook -i inventory.ini playbook.yml
        env:
          ANSIBLE_HOST_KEY_CHECKING: False
There are 2 workflow jobs in this workflow template and one is for Terraform used in Infrastructure provisioning and 2nd job is for Ansible to infrastructure configuration.
Terraform job is responsible to checkout the source code from github repo mentioned above and then use setup-terraform actions to plan and apply the changes to provision the required AWS resources. It uses Terraform Teams token and it was created in the terraform cloud console and I have stored it in the github secrets. Refer this terraform docs for team token — Terraform token for CI / CD It also outputs the public IP that was assigned on the EC2 instance is created.
Ansible Job is responsible to create a SSH connection to the target EC2 instance, install ansible on github runner, create ansible inventory for EC2 host and then run the playbook on target to perform required configuration.
Discord BOT application build and deployment
Let’s look at how to use Github actions to build this NodeJs code and deploy to EC2 and leverage PM2 — Advanced Node Process Manager to start the BOT.
name: Build and Deploy to EC2
on: workflow_dispatch
jobs:
  build:
    name: Build
    runs-on: ubuntu-latest
    steps:
    - name: Checkout code
      uses: actions/checkout@v3
    - name: Setup Node.js
      uses: actions/setup-node@v3
      with:
        node-version: '16'
    - name: Install dependencies
      run: |
        cd src
        npm ci
    - name: Build project
      run: |
        cd src
        npm run build
    - name: Upload build files
      uses: actions/upload-artifact@v3
      with:
        name: build
        path: src/dist/
  deploy:
    name: Deploy
    needs: build
    runs-on: ubuntu-latest
    steps:
    - name: Download build files
      uses: actions/download-artifact@v3
      with:
        name: build
    - name: Deploy to EC2
      run: |
        echo "${{ secrets.SSH_PRIVATE_KEY }}" > id_rsa
        chmod 600 id_rsa
        ls
        ssh -o StrictHostKeyChecking=no -i id_rsa ${{ secrets.EC2_USER }}@${{ secrets.EC2_HOST }} "echo export DISCORD_BOT_TOKEN=${{ secrets.DISCORD_BOT_TOKEN }} >> ~/.bashrc && source ~/.bashrc"
        ssh -o StrictHostKeyChecking=no -i id_rsa ${{ secrets.EC2_USER }}@${{ secrets.EC2_HOST }} 'mkdir -p /home/ec2-user/discord-bot'
        scp -o StrictHostKeyChecking=no -i id_rsa -r dist/* ${{ secrets.EC2_USER }}@${{ secrets.EC2_HOST }}:/home/ec2-user/discord-bot
        ssh -o StrictHostKeyChecking=no -i id_rsa ${{ secrets.EC2_USER }}@${{ secrets.EC2_HOST }} 'cd /home/ec2-user/discord-bot && npm ci --production && pm2 kill && pm2 start main.js'
      shell: bash
This worklfow has couple of jobs called Build and deploy. Build job is responsible to checkout source code, build nodejs application, upload artifacts to github artifacts. Deploy job is responsible for deploying the application to EC2 using SSH using private key that I have stored in Secrets. Alternatively, you can use AWS CodeDeploy to deploy to target EC2 instance but I have gone with SSH route.
Once everything is all set, You should see the Discord Bot online and get a response for every command you send that has !DevOps

Watch out for more interesting blogs and happy reading!

Top comments (0)