
Recap
We have already seen how to enable HTTPS on a domain if you have a VPS and you are using Nginx. In one other post we have also talked about getting started with Ansible in which I wrote about basic concepts in Ansible such as inventory, module, playbook. We have also talked about roles which are about directory structures.
What we'll cover
In last post we saw how I went through steps of enabling HTTPS on all of the subdomains on a website. I did it manually, not with Ansible. This post is continuation of that where I am going to automate this process.
In last post I also refrained to add anything to the public repo as I found it creepy to store my security related data openly on the web. So instead of putting chuck of configuration openly on the tasks or templates, what we can use is something called variables. Good thing about vairables are that we can put it in a separate file and use it from there. And if we keep the variables separately, we can also override variables from command line, and use ansible-vaults to encrypt them. Variables are also used in substituting placeholder text in template files.
This is third post in the series of my Ansible learning and in this post I'll talk about:
- How to make use of Ansible in this automation process of fetching HTTPS certificates.
- On the Ansible side, I'll cover templating, variables. We'll also see how we can override variables from command line.
Pick up where we left off
Just so that everyone is on the same track (assuming you are following this on your own). I have this setup right now.
- 1 VPC running Ubuntu 20.04. I have leased from AWS. You can lease from anywhere you want. Make sure you can ssh to it and have sudo access to install stuff.
- 1 domain. HTTPS certificates are typically issued to domain names, not IP addresses.
- v0.1.0 of my Ansible configuration.
A side note. You can't have Windows as a control node. Although you can manage a Windows machine with a Linux/Mac. This means that if you are on Windows, please use WSL or switch to Linux or Mac, whichever is convenient.
Another side note. This time I don't have my santosh.pictures domain which I used in previous posts. Instead, I will use this santoshk.dev domain. A few things about this domain:
-
santoshk.devis mapped to netlify, which hosts my Hugo JAMStack website. So we only have*.santoshk.devto tinker with. - Unlike some previous posts in this series, this domain is not parked on Route53, but on namecheap.com.
You don't practically need to register/transfer your domain on namecheap. I've tried to make this article registrar agnostic.
Install Jenkins and Nginx with our Playbook
If you are following with me, you need to clone my ansible config > checkout to v.0.1.0 > install nginx and jenkins with our playbook.
This is the comamnd I used to install Jenkins and Nginx on my EC2 machine:
ansible-playbook -i inventory -u ubuntu playbooks/jenkins.yml
ansible-playbook -i inventory -u ubuntu playbooks/nginx.yml
If you don't find yourself familiar with above command, you should definately checkout my previous post.
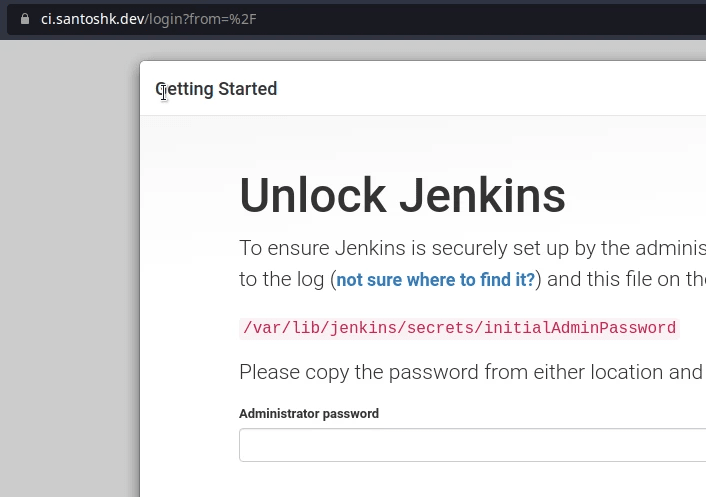
Once you run the nginx playbook which we have written by ourself, you should receive an IP address in the console output of the playbook. If you go to that address, you should see the Unlock Jenkins page.
The real need here on the Jenkins page is that we have to have secure connection between the browser and the Jenkins server on AWS. For that we need a domain.
Task 1: Put a DNS entry for subdomain
I will be mapping ci.santoshk.dev to point to the IP address we got after running our nginx playbook. This is a manual process and will depend on where you have your domain parked.
Basically what I have done is I have created an A Record, with host being the ci and Value being the IP of the nginx host.

Task 2: Separate nginx config for each subdomain
Look at nginx.conf of v0.1.0 in our role, specifically the server block:
    server {
        listen       80 default_server;
        listen       [::]:80 default_server;
        server_name  _;
        root         /usr/share/nginx/html;

        # Load configuration files for the default server block.
        include /etc/nginx/default.d/*.conf;

        location / {
            proxy_pass http://localhost:8080/;
        }

        error_page 404 /404.html;
            location = /40x.html {
        }

        error_page 500 502 503 504 /50x.html;
            location = /50x.html {
        }
    }
If we had planned to host the Jenkins on root domain then this config would work. But now that we are doing it on subdomain basis, we need to extract this to another file.
Task 2.1: Separate out core nginx and jenkins config
We are going to remove line 43-45 from nginx.conf, and then put it in a separate file called jenkins.conf. Here are the content of this file.
server {
    server_name ci.santoshk.dev;

    location / {
        proxy_pass http://localhost:8080/;
    }
}
A little bit of explanation now. As you can see, we are overriding server_name directive in this file to tell nginx that following reverse proxy entry is for ci.santoshk.dev subdomain. Every reverse proxy entry will here be mapped to ci.santoshk.dev + path, e.g. ci.santoshk.dev + / = ci.santoshk.dev/. Which would go to localhost:8080.
I hope I'm clear here, if not, please leave a comment and I'll do my best to explain this.
Please also note that above nginx.conf is destined to be stored at /etc/nginx/nginx.conf. And the jenkins.conf is destined to /etc/nginx/conf.d/ci.santoshk.dev.conf on the nginx host.
With Jenkins and Nginx running. And nginx restarted with above separation, let's check...
ubuntu@ip-10-2-1-10:/etc/nginx$ curl http://ci.santoshk.dev
<html><head><meta http-equiv='refresh' content='1;url=/login?from=%2F'/><script>window.location.replace('/login?from=%2F');</script></head><body style='background-color:white; color:white;'>


Authentication required
<!--
-->

</body></html>
Yeah, looks like we are going somewhere with this. Looks like this page is redirecting us to /login?from=%2F, which is the login page of Jenkins.
But same will not be true if you try to access the site http://ci.santoshk.dev on browser.

This happens because your browser is redirecting you from http://ci.santoshk.dev -> https://ci.santoshk.dev (note the s after http). In 2022, this is the default behaviour in all modern browsers.
We'll circle back to this problem soon, but let's first do the next thing.
Task 2.2: Make nginx config part of jenkins role
I haven't actually made any change in my ansible repo. Actually, the file I created above, it should go in jenkins role. For now, we are going to put it in roles/jenkins/files sub-directory.
$ tree roles/jenkins/
roles/jenkins/
├── files
│   └── jenkins.conf
└── tasks
    ├── debian.yml
    ├── main.yml
    └── redhat.yml

2 directories, 4 files
We are also going to copy this config while jenkins is being install. For that, I've added a new taskin roles/jenkins/tasks/main.yml:
 - include: redhat.yml
   when: ansible_os_family == "RedHat"

+- name: ensure /etc/nginx/conf.d/ directory exists
+  file: path=/etc/nginx/conf.d state=directory recurse=yes
+- name: copy jenkins nginx config
+  copy: src=jenkins.conf dest=/etc/nginx/conf.d/ci.santoshk.dev.conf
 - name: run systemctl daemon-reload
   ansible.builtin.systemd:
     daemon_reload: yes
If you do this, and run both the roles on a fresh instance, you should be able to run above mentioned curl and command and expect same result.
Take the action: If you are following this tutorial on your own, and really want knowledge to retain, then verify that playbook is working and that you are able to curl from nginx host with same output.
Task 3: Use variables and templates to refactor existing roles
Even at this stage we already have too many hard-coded keywords that we now need to use yet another concept in Ansible. This will make our work easy by allowing us to use different values for same variables. Yes, you guessed it right. We are going to use variables.
The documentation page for Using Variables is the first thing you should be consulting from. If you find it intimidating, I'm here to cover your back.
Even at this point there are multiple places we can imrove at. One big refactor would be to remove the hardcoding of root domain.
My actualy intend to make my ansible config public is to make it accessible by the world, and in that case the santoshk.dev does not makes much sense. This value should be dynamic and something which should be passed from the command line while playing the book
That way it will be easier for someone to use my roles. Let's take that initiative:
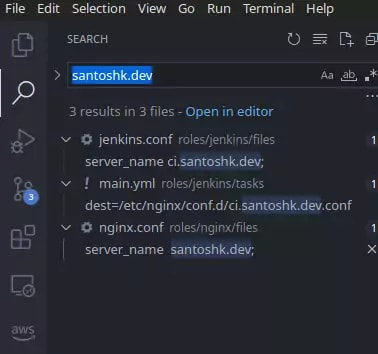
- Replace all the occurance of
santoshk.devto{{ fqdn }}. This can be simply done by running a project wide Find and Replace.
Task 3.1: Convert files to templates
If you replaced all the occurances of domain name with {{ fqdn }}, you'd have 2 .conf files, each in nginx and jenkins roles individually. These conf file in files sub-directory of roles are invalid now. This is because files can't have variables. Every file in files subdir are specifically for the purpose of moving from controller to controlled node without any dynamicity.
Changes not staged for commit:
        modified:   roles/jenkins/files/jenkins.conf
        modified:   roles/jenkins/tasks/main.yml
        modified:   roles/nginx/files/nginx.conf
We have to move them from files subdir to templates subdir. Also, let them have a .j2 extension which indicates a Jinja2 template file.
Changes to be committed:
        renamed:    roles/jenkins/files/jenkins.conf -> roles/jenkins/templates/jenkins.conf.j2
        renamed:    roles/nginx/files/nginx.conf -> roles/nginx/templates/nginx.conf.j2
You'd also want to change copy module in both the roles to template module.
-  copy: src=jenkins.conf dest=/etc/nginx/conf.d/ci.santoshk.dev.conf
+  template: src=jenkins.conf.j2 dest=/etc/nginx/conf.d/ci.{{ fqdn }}.conf
Don't forget the .j2.
-  copy: src=nginx.conf dest=/etc/nginx/nginx.conf mode=preserve
+  template: src=nginx.conf.j2 dest=/etc/nginx/nginx.conf mode=preserve
Before I commit above changes, I need to store a default value for fqdn somewhere in the file.
Task 3.2: Set defualt value to variables
Next, you need to define this fqdn variable somewhere in our ansible config repo. Where this variables goes is a good question to ask. The documentation says there could be 16 places where the declaration can go.
Out of those 16, Let's go through the most common ones to start with.
-
Inside role's
defaultsubdir.
This subdir is dedicated to static variables. Meaning that, if you have to construct a URL like https://archive.apache.org/dist/tomcat/tomcat-version/, then https://archive.apache.org/dist/tomcat/tomcat- part would go in default, as they are likely not to change.
-
Inside role's
varssubdir.
Continuing with above example, the version part would go in this subdir as they will keep increasing with time.
-
Inside
host_vars.
This is for overriding any variable in default or vars which is specific to any machine.
- Inside
group_vars.
This overrides everything listed above. group_vars is by convention used to override a specific group of machines. This grouping varies organisation to organisation.
The narrowest reasonable scope we can put this variable is in the jenkins role scope (vars and default). This could have worked, but if we do so, we'd have a duplicate. This is because nginx role also have the same domain name listed. And when we write our certbot role, we'd have the same duplicate. We need to think of something higher scope.
For this time, I'm going to go with group_vars approach this time. But later in this post, we'll use both default and vars.
For this, let's create a folder group_vars in root dir and have a file called all inside it.
$ mkdir group_vars
$ touch group_vars/all
Open that file and write this:
---

fqdn: santoshk.dev
All of this together, and this works without error.
PLAY RECAP ******************************************************************************************
10.2.1.10                  : ok=9    changed=3    unreachable=0    failed=0    skipped=1    rescued=0    ignored=0
I ssh'd into that machine and verify that fqdn was replaced with the actual value.
If you want to override the value of fqdn from command line, you can pass -e "fqdn=example.com" to ansible or ansible-playbook command. Example below:
ansible-playbook -i inventory -u ubuntu playbooks/nginx.yml -e "fqdn=example.com"
Update till here can be found at https://github.com/santosh/ansible/tree/v0.3.0
Task 4: Point Namecheap nameserver to CloudFlare for certbot
This situation is specific to me, as I'm using Namecheap to keep my domain, but I also want to do a DNS based validation to show ownership of the domain to Let's Encrypt. Namecheap's support for Let's Encrypt is controversial. Although it's right that you should be using paid certificates for business entity, but this does not apply for us who are learning to SSL. You might want to read this regarding support of certbot dns authentication on Namecheap.
You are good as long as you are using any of these DNS providers. As Namecheap is not one of them, I've decided to switch to one of those mentioned. If you have your domain not registered with any of those registrar in that list then I recommend you to switch to CloudFlare without spending any money.
I've decided to point my domain's nameserver to that of CloudFlare and manage DNS from there. I'll quickly go through the procedure for switching this DNS settings from Namecheap to CloudFlare.
- Sign up for and add site to CloudFlare
Signing up with CloudFlare is totally free. Once you have signed up, look for a button saying "Add Site".

Once you do so, choose the Free plan. This plan is enough for the stuff we are going to do.

- Review DNS records
Once you have selected the plan, CloudFlare will scan your existing domain for DNS entries and will offer you to create same entries with them to have the migration process seamless.

- Change you nameservers
The only step now remaining is the changing the nameserver entry. Look up where you can change your name servers of you domain with your registrar.
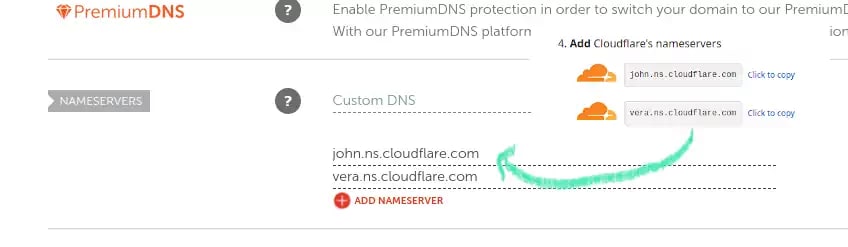
I have updated by nameservers to point to these:
john.ns.cloudflare.comvera.ns.cloudflare.com
So right now, I have domain with Namecheap, whose name servers are pointing towards CloudFlare.
Task 5: Automate cert generation with Ansible
Getting back to Ansible after the subdomain entry already created. We need to use certbot as we did before in our previous post. In that post we used route53 dns plugin. But this time we are going to use cloudflare plugin.
Task 5.1: Obtain CloudFlare API Token
certbot will have to talk to CloudFlare programatically to verify the ownership of the domain. For that reason, we have to have API Token from them to act on our behalf.
To do this...
- Head over to API Tokens section of you CloudFlare profile and hop on the button saying "Create Token".
- Scroll down and look for an option saying Create Custom Token choose "Get started".
- Create a custom token to edit DNS zone. Make sure to include all zones.
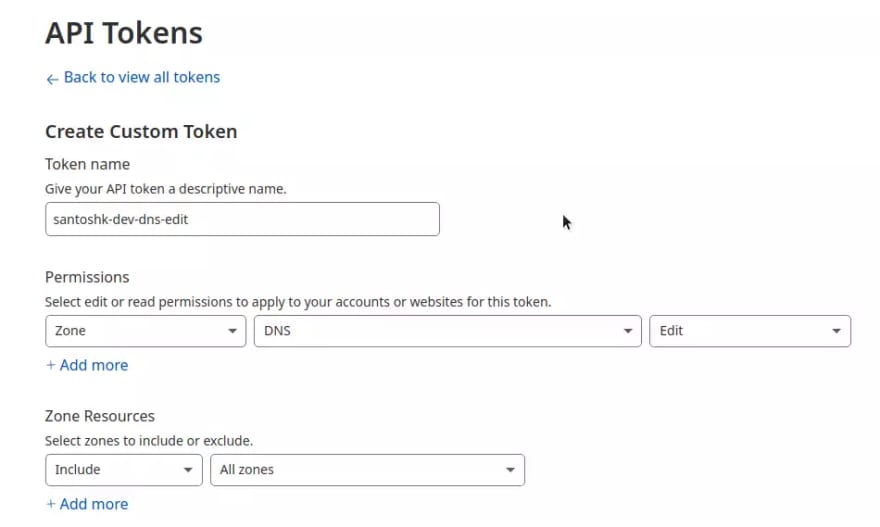
You may want replicate settings as indicated in above image.
- Continue to View Summary, then Create Token. You'll get something like
tqFnsPtJyFAKet0KENpeIpu8lt4j_eu6JlJlYhEM. Keep note of it.
Look at certbot-dns-cloudflare if you still have any confusion.
Task 5.2: Create a certbot role to to fetch cert
Now it's time to start working on actual certificate generation. Inspired from Enabling HTTPS on domain(s) manually, I'm going to write a equivalent ansible role. We are not including this process in either of existing role beacuse of separation of concern. First of all, we need decoupling from Jenkins or Nginx role, so that we can reuse this role in absense of those role. We can always use all of them in combination.
The major difference here from the last post is that we are using CloudFlare this time. The IAM and Route53 is not relevant.
It's better to first outline what we want to achive with this role:
- Install certbot
- Install certbot cloudflare dns plugin
- Store
dns_cloudflare_api_tokenin cloudflare.ini and run certbot
After this role written, we'll also need some updation in our existing roles.
So let's quickly go through the files in certbot role.
roles/certbot/tasks/main.yml
- include: debian.yml
  when: ansible_os_family == "Debian"

- name: create /etc/letsencrypt
  file: path=/etc/letsencrypt state=directory recurse=yes
- name: copy cloudflare.ini
  template: src=cloudflare.ini.j2 dest=/etc/letsencrypt/cloudflare.ini
- name: run certbot
  command: certbot certonly --dns-cloudflare --dns-cloudflare-credentials /etc/letsencrypt/cloudflare.ini --email '{{ letsencrypt_email }}' --domain '*.{{ fqdn }}' --agree-tos --non-interactive
roles/certbot/tasks/debian.yml
- name: update all packages on Debian
  apt: "upgrade=yes update_cache=yes cache_valid_time=86400"
- name: install pip3
  apt: name=python3-pip state=present
- name: install certbot and certbot-dns-cloudflare
  command: pip3 install certbot 'zope.interface>=5.3.0a1' certbot-dns-cloudflare
roles/certbot/vars/main.yml
---
letsencrypt_email: you@example.com
roles/certbot/templates/cloudflare.ini.j2
This API token is the same token we obtained previously.
dns_cloudflare_api_token = {{ dns_cloudflare_api_token }}
playbooks/nginx.yml
I have decided to run this role before nginx role, so this:
   hosts:
     - web
   roles:
+    - certbot
     - nginx
With above files in place, I run this command to execute:
ansible-playbook -i inventory -u ubuntu playbooks/nginx.yml -e "letsencrypt_email=<myemail@domain.com>" -e "dns_cloudflare_api_token=LtWvEXAMPLEvs8mZnqMs_syNvHdIMA2w9EcHPEhL"
New thing here is the -e syntax. We have already defined dns_cloudflare_api_token in one of our templates above.
PLAY RECAP *****************************************************************************************************
10.2.1.10                  : ok=14   changed=2    unreachable=0    failed=0    skipped=1    rescued=0    ignored=0
Our certbot role will generate and keep the certs at /etc/letsencrypt/live/{{ fqdn }}/.
Take the action: Run only the certbot role by disabling nginx role in the playbooks/nginx.yml. It should run without any error.
Task 5.3: Configure HTTPS at nginx
Certbot role will generate the certs, but we also need to update nginx and jenkins role to use the certs. There are the changes I came up with:
roles/nginx/templates/nginx.conf.j2
@@ -17,6 +17,8 @@ http {

     access_log  /var/log/nginx/access.log  main;

+    server_tokens       off;
+    ssl_protocols       TLSv1.2 TLSv1.3;
     sendfile            on;
     tcp_nopush          on;
     tcp_nodelay         on;
@@ -40,6 +42,17 @@ http {
         # Load configuration files for the default server block.
         include /etc/nginx/default.d/*.conf;

+        listen       443 ssl;
+
+        ssl_certificate /etc/letsencrypt/live/{{ fqdn }}/fullchain.pem;
+        ssl_certificate_key /etc/letsencrypt/live/{{ fqdn }}/privkey.pem;
+
+
+        # redirect non-https traffic to https
+        if ($scheme != "https") {
+            return 301 https://$host$request_uri;
+        }
+
         error_page 404 /404.html;
             location = /40x.html {
         }
With server_tokens off, the response header sent by nginx won't include anything which identifies this server as nginx server. Good for security purposes as the attacker won't be able to know which version of nginx is server using and use exploits specific to that version.
With ssl_protocols TLSv1.2 TLSv1.3 we tell nginx to use TLSv1.2, and TLSv1.3. There are other older versions which I have omitted. It's good to say with latest.
Along with port 80, we are listening on port 443. And for that to work, we need to configure ssl_certificate and ssl_certificate_key. Rest of the config is self-explanatory.
roles/jenkins/templates/jenkins.conf.j2
@@ -1,5 +1,11 @@
 server {
     server_name ci.{{ fqdn }};
+
+    listen       443 ssl;
+
+    ssl_certificate /etc/letsencrypt/live/{{ fqdn }}/fullchain.pem;
+    ssl_certificate_key /etc/letsencrypt/live/{{ fqdn }}/privkey.pem;
+
     location / {
        proxy_pass http://localhost:8080/;

+       proxy_set_header   Host              $host;
+       proxy_set_header   X-Real-IP         $remote_addr;
+       proxy_set_header   X-Forwarded-For   $proxy_add_x_forwarded_for;
+       proxy_set_header   X-Forwarded-Proto $scheme;
+
     }
We need same listen and ssl_certificate* directive for jenkins server block.
I ran the playbook and now ci.santoshk.dev does not refuses my connection.
The code till here can be found at https://github.com/santosh/ansible/tree/v0.4.1.
Conclusion
In this post we learned about variables and templates in roles. We also saw what different location we can put our variables in. We also saw how we can inject those variables into templates. And then also learned how to override them from command line. Along with all these, we learned how we can fetch HTTPS certificate from Let's Encrypt.
Unfortunately this post is getting longer and it would be good to post next part of the series. In next post I'll talk about setup cron for renewal, security hardening, and refactor roles.
If this post added value to your life, please consider sharing this with your network. And if you subscribe to my newsletter, you'll get tips & tricks, tutorials & how-tos about software development. Please subscribe below.

Top comments (0)