
How to Integrate ChatGPT to WhatsApp
Integrating ChatGPT to WhatsApp is a fancy way to get responses on the go without having to log into ChatGPT website
This tutorial will integrate ChatGpt to WhatsApp using ChatGPT API and the Cognigy platform.
To get started with this tutorial, we must have the following.
- Facebook Developer Account
- Cognigy Account
- OpenAI Secret Key
- Whatsapp Number

First, create a Cognigy account.

After creating an account, click on create agent; this would create a chat agent.

Next, fill in the details, and input our Virtual agent name and language; after filling in, click on create an empty agent.

This would open a panel, and by the left-hand side of our dashboard, click on flow to create a new conversation flow for our virtual agent.
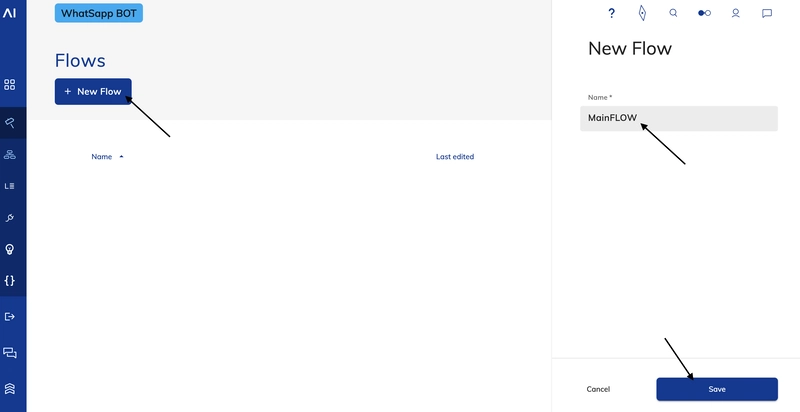
Create a new flow, give it a name, and click save.

Once the flow panel opens, we will see a start and end chart. Take our cursor to the middle of the plus icon and click on it.

Once the plus icon is clicked, it will open this panel for us to pick a command; here, I will pick a say command to allow our agent to greet the user when it is triggered.

Edit the Node and ensure the output type is text; the text could be whatever we want. I wrote Welcome to Scofield-Bot.

Next, let us create another prompt called the question; here, we allow the user to ask questions.
The question is text and write a text “Ask Scofield-Bot anything?

Next, we must integrate the OpenAi extension from our dashboard and go to Dashboard- Manage- Extensions.

Look out for OpenAI and click on it.

Install it and update it if we wish, but it is not compulsory.
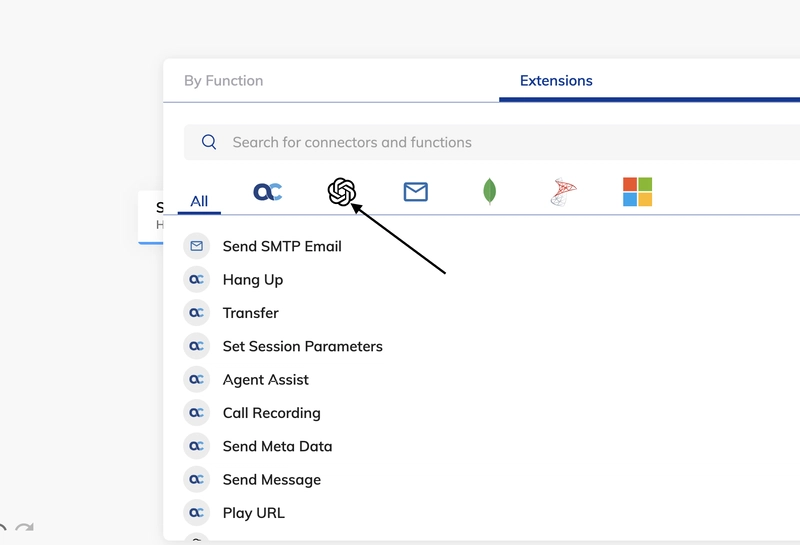
Once done, click on the plus icon after, say, and click on extensions; we will see the OpenAi extension icon. Click on it to integrate it into our agent.

We have our OpenAI showing here, and we have to generate text, but first, we must call the OpenAI API to our flow.

Once we click on the Generate Text OpenAI prompt, it would ask us for the OpenAI connections, which we do not have yet. Click on this link to generate our key.
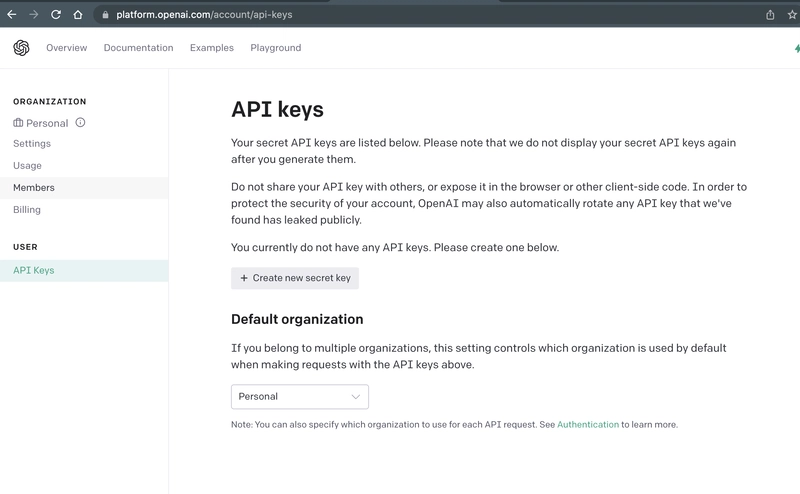
Generate a new secret key, copy it, and store it on a notepad, as we will be using it soon.


Click on the plus button by the side of OpenAI connections, paste the key we created on the OpenAi connection, and give it a name.
Click on create when done.
Now we can interact with OpenAI from the Cognigy dashboard, which is half of what we set out to achieve; next, we need to set the prompt to take instructions and give output.

Click on the OpenAI prompt and type the command {{context-result}}; this allows us to take the result from the question asked and pass it to the OpenAI, which would give us an answer.

Next, test our bot by clicking on the chat icon at the top and see the result.
If we get answers to our questions asked, then it works correctly.
Integrating WhatsApp

To integrate WhatsApp, go to our dashboard by the left and click on Deploy, look through the drop-down and click on Endpoint.
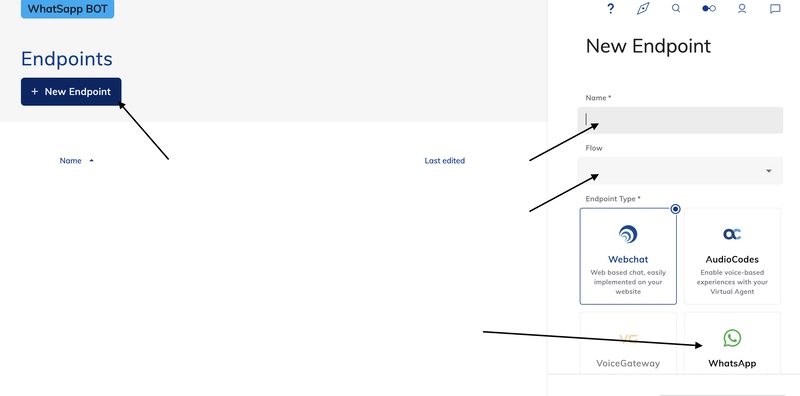
Click on the new Endpoint, give our end point a name, and click on the flow, pick the flow from the drop-down and pick WhatsApp as our integration point.

Next, click on WhatsApp set up by the right and we will be asked to fill this up.

Here we would need to create an API, open a new tab and click on this link to create one.
Click on My Apps

Click on create App.

Select Business and then create.

Select Whatsapp.

Once setup is complete, our dashboard will have the keys we need for the next step. Due to Facebook policy, we will be issued a temporary key that lasts for 24hrs before expiring, but if we want to learn how to get a permanent key, comment below.
Copy our ID, temporary access token, and phone number ID, do not use WhatsApp business Id as we will not get any messages.
Verify token is any password of our choice.
Paste the IDs correctly and then check the

Next is to create a webhook; to get our endpoint URL, go back to our Cognigy dashboard.

Go to Endpoint, and we will find our configuration information, copy the URL and paste it on the callback URL.

Test our bot by sending a message to our number here. If we follow the step, we will get a message.

Once we get this message, our bot is set.

Send a follow-up message, and we will be interacting with ChatGPT on our phone.
Conclusion
In this tutorial, we learned how to use Cognigy platform to set up ChatGPT and Whatsapp.
I hope we found this educative. If we want to learn more about integrating ChatGPT with Facebook Messager or Telegram, drop a comment below.
Read more insightful article here.

Top comments (1)
i want to learn how to get a permanent key to bypass Facebook policy, which issued temporary key that lasts for 24hrs