
If you love building apps in Vue.js but struggle to know where to start with UI design, look no further than Vuetify - a UI library containing handcrafted material components which give apps a beautiful finish and professional feel.
Why learn Vuetify?
Vuetify is the most popular component library for Vue.js, enabling you to create great-looking, accessible apps even if UI design isn't your area. While the library has over 80 elements ready to use straight out the box, it also allows you to create custom elements, giving your apps a clean yet bespoke feel.
This article takes you through Scrimba's free two-hour Vuetify course by Gwen Faraday. The course teaches you all the core skills needed to get started with Vuetify, including:
- Typography
- Spacing
- Buttons
- Navigation
- Grid
- Card
In the first half, Gwen introduces all the Vuetify elements needed to build a great app. As with all Scrimba courses, you can pause the scrims and explore the code.
The second half lets you get your hands dirty by building a webshop. This puts your new skills to good use and lets you apply your newfound knowledge.
By the end, you'll be fully versed in building professionally-styled apps with Vuetify.
Intro to the Instructor
Gwen Faraday is a software engineer, author, speaker, and & content creator who also runs a Youtube channel, the Faraday Academy, where she teaches a wide range of subjects including Vue.js and Vuetify. This makes her the perfect teacher to take you through this learning journey and bring your Vuetify skills to the next level.
Prerequisites
To learn the most from this tutorial, you'll need a decent understanding of HTML, CSS, Javascript and Vue.js. If you're not there yet, check out Scrimba's great free courses to get you up to speed:
If you’re ready to hit the ground running with Vuetify, let’s get into it!
Intro to Vuetify
In the first cast, Gwen introduces us to Vuetify and shares the two Github repositories where she has stored all the code, basic-components and vuetify-responsive. This allows us to download the code and try it out for ourselves.
What is Material Design?
Next up, we learn about Material Design, a standard developed by Google for implementing accessible, user-friendly interfaces.
The Material Standard provides a set of rules for the most common elements found on web pages including buttons, text, navigation and more advanced features such as movement and elevation.
Vuetify takes the hard work out of implementing this standard by providing a bunch of ready-made compliant UI elements which we can add to our Vue.js application straight out the box.
First Look at Vuetify Code
In the next cast, Gwen gives us our first look at Vuetify code by instantiating a Vue application, adding a Vuetify property and creating a new Vuetify object:
new Vue({
    el: "#app",
    vuetify: new Vuetify({}),
    data: {
        message: "Using Single File Components",
    },
});
Next, Gwen shows us the <v-app> element, which is the root component of all Vuetify elements (Vuetify components must fall within <v-app>):
<v-app>
     <v-content>
          <playground></playground>
     </v-content>
</v-app>
Typography

Click the image to access the course.
In the next scrim, we see some of the options Vuetify offers to handle typography, including headings, titles, subtitles and body text. We also see how to change text color and background color.
<v-card-text>
     <h1 class="display-4 purple yellow--text">Heading 1</h1>
     <h2 class="display-3">Heading 2</h2>
     <h3 class="display-2">Heading 3</h3>
     <h4 class="title">Title</h4>
     <h5 class="subtitle-1">Subtitle</h5>
     <p class="body-1">Body</p>
</v-card-text>
Finally, we see how to use Vuetify classes to adjust font weight and style:
<h1 class="font-italic font-weight-light">Heading 1</h1>
Note: Vuetify classes override any other styles that the browser applies to HTML tags.
Spacing
Next up, we explore some of the spacing classes in Vuetify, which allow us to add margins and padding. We also see how to change spacing size.
<h3 class="ml-5">Spacing</h3>
Best of all, Gwen also shows us how Vuetify classes can help with that holy grail of app styling - centering an element! Click through to the course to find out more.
Buttons
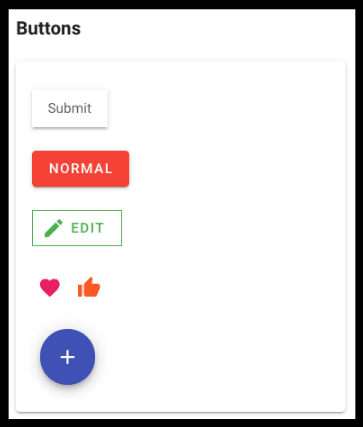
Click the image to access the course.
In the next scrim, we look at some of the options available with Vuetify's button component, including buttons with text, icons or both.
<v-btn large block>Submit</v-btn>
Lastly, we look at how to build custom buttons using classes from earlier.
<button v-ripple class="elevation-2 py-2 px-4">
     Submit
</button>
Navigation

Click the image to access the course.
Next up, we look at the two main navigation options available in Vuetify,<v-app-bar> and <v-toolbar>. Both navigation elements provide automatic button and icon sizing, navigation icons and the ability to handle list dropdowns.
<v-toolbar color="deep-purple accent-4" dense dark>
    <v-app-bar-nav-icon></v-app-bar-nav-icon>
    <v-toolbar-title>App Title</v-toolbar-title>
</v-toolbar>
Click through to see all this in action!
Grid

Click the image to access the course.
In the next scrim, Gwen takes us through Vuetify's grid system, which is split into 12 columns, with five built-in media breakpoints for handling different screen sizes.
<v-row>
    <v-col cols="12" sm="6">
        <v-card
        class="pa-2"
        outlined
        tile
        >
        Column
        </v-card>
    </v-col>
</v-row>
Card

Click the image to access the course.
In this cast, Gwen explains that Vuetify uses a <v-card> component as the wrapper for any UI card. This component can take props, classes and slots and has custom events, allowing for neat, well-aligned cards in any use case.
 <v-card-title>
    <v-icon
        large
        left
    >
        mdi-twitter
    </v-icon>
    </v-card-title>

    <v-card-text class="headline font-weight-bold">
    "Vue Rocks!"
    </v-card-text>

</v-card>
Gwen also introduces us to the <v-spacer> element, which lets us easily add whitespace between elements.
Finally, we check out the Playground.vue file - a space for us to explore the features of Vuetify Gwen has shown us so far. Head over to the course to try it out for yourself and see what Vuetify can do.
Store Navigation

Click the image to access the course.
Next, it's time to start building our store application. Gwen starts us off by adding a navigation bar including responsiveness and a drawer menu. We also run through some options for styling, including icons and a dense menu.
Home Page
Next up, it's time to add a home page. Gwen adds the header and a footer and then sets us the challenge of coding the mid-section using the mock-ups provided. Head over to the screencast to test out your new Vuetify skills and compare your work to Gwen's solution.
To finish off, Gwen shows us the <v-snackbar> element, which can be used to notify a user when a product has been added to the cart.
<v-snackbar
    v-model="$store.state.snackbar.show"
    :multi-line="true"
    :right="true"
    :top="true"
    :timeout="6000"
    :color="$store.state.snackbar.variant"
>
    {{ $store.state.snackbar.message }}
    <v-btn
    dark
    text
    @click="$store.commit('updateSnackbar', { show: false })"
    >
    Close
    </v-btn>
</v-snackbar>
Store Page

Click the image to access the course.
In the next Scrim we build out our store page using Vuetify grid elements. First up, we add product cards by reusing the cards we built for our home page. Next, Gwen challenges us to build out a sidebar with the <v-sheet> and <v-expansion-panels> elements.
Head over to the cast to give the challenge a try.
Cart Page
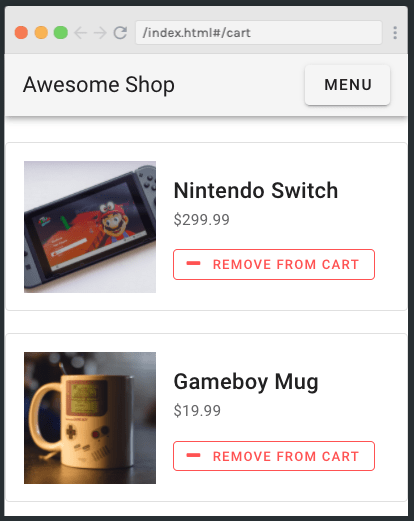
Click the image to access the course.
Next up, we add a cart page to our app. Once again, Gwen sets us the challenge of coding out the page as per her mock-ups, which is great practice for real-world coding and flexes the muscle memory needed to become a Vuetify wizard.
Click through to give the challenge your best shot before comparing your work with Gwen's final code. Don't forget, you can always look back at the previous scrims or check out the Vuetify docs if you're having trouble.
Checkout Screen
In the final code scrim, we build a simple checkout flow using the <v-stepper> element.
<v-stepper-header>
    <v-stepper-step
        step="1"
        :complete="step > 1"
    />
    <v-divider />
    <v-stepper-step
        step="2"
        :complete="step > 2"
    />
    <v-divider />
    <v-stepper-step
        step="3"
    />
    </v-stepper-header>
To finish the course, Gwen points out that there are a few features in the mockups which we haven't covered and encourages us to have a go at coding them ourselves using Scrimba's interactive interface.
Conclusion
A huge well done for completing the course! I hope you've found it useful and now have the confidence to build stunning apps using Vuetify. Why not continue your learning journey by checking out the huge range of other topics available over at Scrimba?
If you don't know where to start, you can check out our Learn React for Free course with Bob Ziroll.
Wherever you go next, happy coding :)

Top comments (2)
Thank you for the great course!
Cool, thank you!