
I love the classic game show Name That Tune where contestants start each round by bidding on how many notes they need to name a tune.
I can name that tune in three notes.
...
I can name that tune in two notes.
...and so on until the risk becomes too high for a contestant to bid any lower.
The same competitive spirits applies to software development. When starting a new project, how fast can you go from nothing to something?
Can you start that project in a day? An hour?
I can start that project in 5 minutes (and so can you).
In this tutorial, we will build a Next.js web application powered by a Fauna GraphQL API in 5 minutes. You can use this process over and over again, for any project you need.
What you will learn
In Part 1: Simple GraphQL with Fauna, we learned how to quickly construct a GraphQL API with Fauna, the data API for modern applications. It’s okay if you missed part 1, you can start right here in part 2 without missing a beat.
APIs are nice, but now we need a user interface to turn our project into an experience. We are going to leverage Next.js and a few other tools to add a user interface to the game of rock paper scissors we started in part 1.
By the end of this tutorial, you will understand:
- How to setup a Fauna GraphQL API
- How to integrate your Fauna GraphQL API with a Next.js application
- How to use Apollo, TypeScript, and code generation to establish a statically typed interface for your GraphQL API
Up and running in 5 minutes
In just 5 minutes, we are going to set up a Fauna database and bootstrap a Next.js project that connects to the database.
Setup your Fauna database
If you do not have a Fauna account, you can register a Fauna account for free.
Create a new database.

Enter “rock-paper-scissors” as the name and click Save.

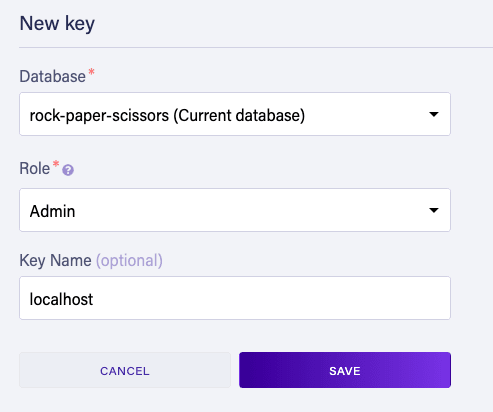
In the left nav, go to Security => New Key.
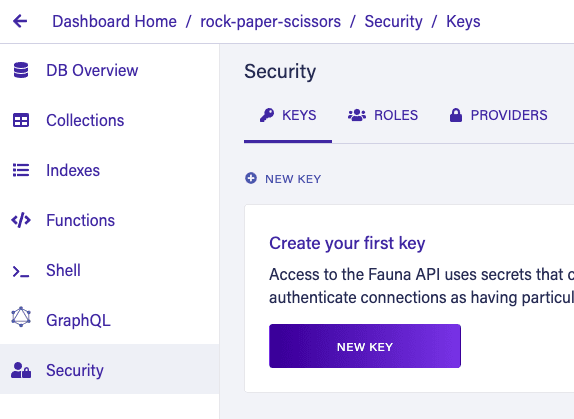
Make sure the “Admin” role is selected, enter “localhost” as the key and click Save.
You should see a secret key. Keep this window open while you switch to project setup.
Setup your Next.js project
Now that our Fauna database is set up, we can create our Next.js project.
In a terminal, clone the repository to a local directory, i.e.
git clone <repository url>.In the created directory, run
npx @seanconnolly/gen nextjs fauna.Follow the prompts to enter the name (rock-paper-scissors) for your project.
When prompted for your Fauna Admin key, enter the key you kept open in step 6 of the Setup your database step.


Initialize your Fauna GraphQL API
Now that you have your Fauna database and your Next.js project setup, you are ready to initialize your database.
Run
npm run faunato bootstrap your Fauna database with the resources defined in the project generator you just ran (we will examine these more closely later).Go back to the Fauna Dashboard and you should see that an example collection, index and function was created in your database. These were all created by the
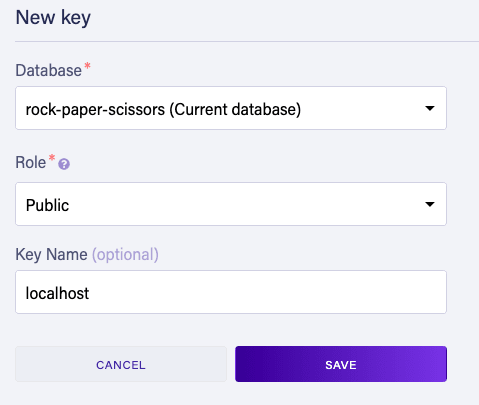
npm run faunacommand you just ran.Select Security and then New Key again.

In the Role dropdown, select the Public role (we will examine the importance of this role shortly). Enter "localhost" for the key name and then select Save.
Copy the secret key that was just generated and paste it in the .env.local file like so:
# Paste your secret key just after the = sign
NEXT_PUBLIC_FAUNA_CLIENT_KEY=
Test your Next.js project
Open a terminal and run npm run dev.
Now open http://localhost:3000 in your browser and you should see this message.
🎉 Success! We were able to successfully connect with your Fauna database.
You did it! 💥
In just 5* minutes, you created a Next.js web application and hooked it up with a Fauna database.
* It's okay if you took longer than 5 minutes. I've done this a few times so 5 minutes may be on the lower end, but after going through this process once or twice, 5 minutes is totally attainable!
Understand the setup process
While we were able to blaze through the setup process in just a few minutes, you are probably wondering what we just did exactly. Let’s walk through the key parts of the project so you understand how everything is working.
Next.js project setup
The npx @seanconnolly/dev nextjs fauna command you ran earlier is a Hygen.io generator I created to accelerate the process of setting up new projects that use Next.js and Fauna. Running the generator first adds the boilerplate files to our project directory and then installs all necessary packages from npm including Next.js, React and Apollo Client.
You are free to use this generator to kickstart any one of your projects or you can learn to create your own with Hygen’s Quick Start.
Initializing Fauna
If you joined us for Part 1: Simple GraphQL with Fauna, you hopefully already know about the fauna-gql-upload package. To summarize, fauna-gql-upload allows us to store Fauna schema and resource definition files alongside our project files and push them to Fauna as needed. When we ran the generator earlier, several of these files were generated to provide a baseline for our Fauna database.
For example, in our GraphQL schema definition file (fauna/schema.gql), we defined the Example type:
[Schema snippet]
type Example {
  foo: String!
}
When we ran npm run fauna earlier, that schema definition resulted in Fauna creating a Collection called Example.

The Public role
Earlier, we created a Fauna API key for the Public role, which is a custom role that was predefined with the project generator. Our Next.js application needs this API key to access our Fauna database from a web browser. We are calling it a “Public” role because our application does not require a user to authenticate with a password or via third-party authentication like Auth0 or Okta. Full user authentication is outside the scope of this tutorial, but the Public role is necessary in these unauthenticated cases to protect data and resources in our Fauna database.
By default, every Fauna database comes with two roles: Admin and Server. Fauna describes these roles in their Admin UI:
- Admin: Used to create, destroy, or manage any database or key. Protect admin keys very carefully.
- Server: Can be used to create, destroy, or manage the database to which they are assigned. Protect server keys carefully.
Both of these roles have too much privilege for us to expose their API keys to a web browser. If we did expose such keys, a savvy user could load your web application, inspect the key and use it to destroy or access valuable or sensitive resources in your Fauna account.
In your .env.local file, the FAUNA_ACCESS_KEY_ADMIN variable has Admin privilege, which means we do not want to expose that key to the browser. This key is required for you, the developer, to manage your Fauna database and it is not for your users. This Admin key should only be stored and accessible on your machine and should never be exposed to the browser.
We also added the NEXT_PUBLIC_FAUNA_CLIENT_KEY variable to .env.local, which has Public privilege. Opening fauna/roles/Public.ts, we see this definition of the Public role:
const Public = {
  name: 'Public',
  privileges: [
    {
      resource: Collection('Example'),
      actions: {
        read: true,
        create: true,
        delete: false,
      },
    },
  ],
};
Since this is a custom role, it only has privileges that are explicitly granted, in this case the ability to read and create documents in the Example collection.
By prefixing the environment variable with NEXT_PUBLIC_, Next.js automatically makes this environment variable accessible to the browser. If you open components/withApollo.tsx, you can see where this is read and then passed as an Authorization header to our Fauna GraphQL endpoint by Apollo Client.
const { NEXT_PUBLIC_FAUNA_CLIENT_KEY } = process.env;
/* ... */
return new ApolloClient({
  uri: 'https://graphql.fauna.com/graphql',
  cache: new InMemoryCache().restore(initialState || {}),
  headers: {
    Authorization: `Bearer ${NEXT_PUBLIC_FAUNA_CLIENT_KEY}`,
  },
});
GraphQL with Apollo
When we tested the project by hitting http://localhost:3000, we saw a “Success” message when the index page could successfully query the Fauna GraphQL API. If the API call were to fail, possibly due to some misconfiguration, we would have seen an error message instead. Let’s take a look at how all of this is working.
First, when running npm run dev, in addition to running the usual next dev script defined in package.json, we are also concurrently running a script called gen:gql:watch.
"scripts": {
  /* ... */
  "gen:gql": "dotenv -c -- graphql-codegen",
  "gen:gql:watch": "npm run gen:gql -- --watch",
  "dev": "concurrently \"next\" \"npm run gen:gql:watch\"",
  /* ... */
}
This is the graphql-codegen project at work and what it does for us is amazing. First, graphql-codegen is configured through the codegen.yml file that was created via the generator.
# codegen.yml
schema:
  - https://graphql.fauna.com/graphql:
      headers:
        Authorization: Bearer ${FAUNA_ACCESS_KEY_ADMIN}
documents: '{components,lib}/**/*.graphql'
generates:
  ./.gen/graphql.tsx:
    plugins:
      - typescript
      - typescript-operations
      - typescript-react-apollo
config:
  preResolveTypes: true
The schema points to Fauna’s GraphQL endpoint and is also configured to read the FAUNA_ACCESS_KEY_ADMIN environment variable that you entered when you first generated the project.
The documents configuration tells graphql-codegen to generate code from all files under the /components and /lib directories that end with .graphql.
The components/Example.graphql was created with the project setup generator and contains the content below. When Fauna received our schema.gql GraphQL definition file earlier, they automatically created CRUD queries and mutations for the Example type. findExampleByID is the “read” operation and allows us to get an Example by its ID.
# components/Example.graphql
query FindExample($id: ID!) {
  findExampleByID(id: $id) {
    _id
  }
}
The last part of the codegen.yml file is the generates section, which tells graphql-codegen to generate a TypeScript file at .gen/graphql.tsx that includes Apollo React hooks. If you are not familiar with Apollo’s hooks, you can read more about those in Apollo’s Hooks documentation.
If you open the generated .gen/graphql.tsx file you will see this useFindExampleQuery:
/* .gen/graphql.tsx */
export function useFindExampleQuery(baseOptions: Apollo.QueryHookOptions<FindExampleQuery, FindExampleQueryVariables>) {
  return Apollo.useQuery<FindExampleQuery, FindExampleQueryVariables>(FindExampleDocument, baseOptions);
}
This generated code and its associated TypeScript types are derived from the Example.graphql file we examined earlier.
The operation name dictates the name of the hook function:
# components/Example.graphql
query FindExample($id: ID!) {
  #   ^^^^^^^^^^^
  findExampleByID(id: $id) {
    _id
  }
}
/* .gen/graphql.tsx */
export function useFindExampleQuery(baseOptions: Apollo.QueryHookOptions<FindExampleQuery, FindExampleQueryVariables>) {
  return Apollo.useQuery<FindExampleQuery, FindExampleQueryVariables>(FindExampleDocument, baseOptions);
}
The query variables dictate the FindExampleQueryVariables type.
# components/Example.graphql
query FindExample($id: ID!) {
  #               ^^^^^^^^
  findExampleByID(id: $id) {
    _id
  }
}
/* .gen/graphql.tsx */
export type FindExampleQueryVariables = Exact<{
  id: Scalars['ID'];
}>;
The query body dictates the FindExampleQuery type.
# components/Example.graphql
query FindExample($id: ID!) {
  findExampleByID(id: $id) {
    _id
    # ^
  }
}
/* .gen/graphql.tsx */
export type FindExampleQuery = { __typename?: 'Query'; findExampleByID?: Maybe<{ __typename?: 'Example'; _id: string }> };
With our generated code, we can now consume it in a React component as demonstrated with the components/Example.tsx file.
/* components/Example.tsx */
import { FunctionComponent } from 'react';
import { useFindExampleQuery } from '@gen/graphql';

const Example: FunctionComponent = () => {
  const { data, error } = useFindExampleQuery({ variables: { id: '123' } });

  if (error) {
    console.error(error);
    return <div>‼️ Error! Inspect the console to see what happened.</div>;
  }

  if (data) {
    return <div>🎉 Success! We were able to successfully connect with your Fauna database.</div>;
  }

  return null;
};

export default Example;
Don’t worry about the hard-coded “123” id. At this stage we haven’t created any documents so no results will be returned. This is just enough to prove that we can successfully execute a query from our frontend Next.js application to our backend Fauna GraphQL API.
With code generation, we are able to reduce the amount of code we need to write and maintain in our React component to just one line:
/* components/Example.tsx */

/* Just one line! 💥 */
const { data, error } = useFindExampleQuery({ variables: { id: '123' } });
Without code generation, we would have needed to manually define the TypeScript types on our own and keep those types in sync with the data we are requesting via the GraphQL query. This is tedious work and error prone, so graphql-codegen helps us speed up development and reduce defects in our application.
Implementing the game UI
Now that we have everything wired up and we discussed how the generated code is all working together, we can now implement our Rock Paper Scissors game UI with Next.js and Fauna.
In Part 1: Simple GraphQL with Fauna, we played our game of Rock Paper Scissors in Fauna’s GraphQL Playground, which is fine for testing the API but not quite the experience we want for our users (unless they love GraphQL as much as you and I do!). In order to build UI for our own application, we are going to do 3 things:
- Setup our backend game logic
- Create a new GraphQL query in a .graphql file, which will generate a new React hook
- Use one of the hooks in a React component
First, we are going to pull some of our Fauna backend from the part 1 solution, which implements the game logic in Fauna. If you want to better understand what these are doing, check out the explanations in part 1.
Copy this into your fauna/schema.gql file:
# fauna/schema.gql
type Query {
  play(selection: Selection!): Result! @resolver(name: "play")
}

enum Selection {
  Rock
  Paper
  Scissors
}

type Result @embedded {
  selection: Selection!
  opponentSelection: Selection!
  message: String!
}
Create fauna/functions/Play.ts and copy this into it:
/* fauna/functions/Play.ts */
import { query } from 'faunadb';
import { RandomString, Switch } from 'faunadb-fql-lib';
import DetermineResult from '../lib/DetermineResult';
const { Lambda, Let, Query, Var } = query;

const selectionMap = {
  R: 'Rock',
  P: 'Paper',
  S: 'Scissors',
};

const Play = {
  name: 'play',
  body: Query(
    Lambda(
      ['selection'],
      Let(
        {
          randomCharacter: RandomString(1, 'RPS'),
          opponentSelection: Switch(Var('randomCharacter'), selectionMap),
        },
        DetermineResult(Var('selection'), Var('opponentSelection')),
      ),
    ),
  ),
};

export default Play;
Create fauna/lib/DetermineResult.ts and copy this into it:
/* fauna/lib/DetermineResult.ts */
import { ExprArg, ExprVal, query } from 'faunadb';
const { And, Equals, If, Or } = query;

export default function DetermineResult(selection: ExprArg, opponentSelection: ExprArg): ExprVal {
  return {
    selection,
    opponentSelection,
    message: If(
      Equals(selection, opponentSelection),
      "It's a tie!",
      If(
        Or(
          And(Equals(selection, 'Rock'), Equals(opponentSelection, 'Scissors')),
          And(Equals(selection, 'Paper'), Equals(opponentSelection, 'Rock')),
          And(Equals(selection, 'Scissors'), Equals(opponentSelection, 'Paper')),
        ),
        'You win!',
        'You lose!',
      ),
    ),
  };
}
Since we are creating a new resource in Fauna (the play function), we need to grant the Public role access to that function, otherwise we will encounter authorization errors when we try to invoke that function from our application. The fauna/roles/Public.ts file should be updated to this:
/* fauna/roles/Public.ts */
import { query } from 'faunadb';
const { Collection, Function } = query;

const Public = {
  name: 'Public',
  privileges: [
    {
      resource: Collection('Example'),
      actions: {
        read: true,
        create: true,
        delete: false,
      },
    },
    // This is new
    {
      resource: Function('play'),
      actions: {
        call: true,
      },
    },
  ],
};

export default Public;
Now run npm run fauna in your terminal to push your API changes to Fauna. You should see success all the way down.
✔️  Successfully updated schema.

✔️  Successfully uploaded indexes

✔️  Successfully uploaded functions

✔️  Successfully uploaded roles
Next, we need to define the client-side GraphQL query that our UI requires to play the game.
Create RockPaperScissors.graphql and copy this into it:
query Play($selection: Selection!) {
  play(selection: $selection) {
    selection
    opponentSelection
    message
  }
}
Since we are running graphql-codegen in watch mode, the GraphQL code is automatically regenerated. If you open .gen/graphql.tsx, you should see two new hooks are available for us:
/* .gen/graphql.tsx */
export function usePlayQuery(baseOptions: Apollo.QueryHookOptions<PlayQuery, PlayQueryVariables>) {
  return Apollo.useQuery<PlayQuery, PlayQueryVariables>(PlayDocument, baseOptions);
}
export function usePlayLazyQuery(baseOptions?: Apollo.LazyQueryHookOptions<PlayQuery, PlayQueryVariables>) {
  return Apollo.useLazyQuery<PlayQuery, PlayQueryVariables>(PlayDocument, baseOptions);
}
Now we can use these hooks in a React component, so create components/RockPaperScissors.tsx and copy this:
/* components/RockPaperScissors.tsx */
import { Selection, usePlayLazyQuery } from '@gen/graphql';
import { FunctionComponent } from 'react';

const RockPaperScissors: FunctionComponent = () => {
  const [playSelection, { data, loading }] = usePlayLazyQuery({
    fetchPolicy: 'no-cache',
  });

  const handleSelection = (selection: Selection) => {
    playSelection({
      variables: {
        selection,
      },
    });
  };

  return (
    <div className="root">
      <h1>Rock Paper Scissors</h1>
      <h3>Choose wisely</h3>
      <div className="player-selections">
        <PlayerSelection selection={Selection.Rock} onSelect={handleSelection} />
        <PlayerSelection selection={Selection.Paper} onSelect={handleSelection} />
        <PlayerSelection selection={Selection.Scissors} onSelect={handleSelection} />
      </div>
      {loading && <p>Waiting on opponent...</p>}
      {data?.play && (
        <div>
          <p>{`Opponent chose ${data.play.opponentSelection} ${emojiFor(data.play.opponentSelection)}`}</p>
          <h3>{data.play.message}</h3>
        </div>
      )}
      <style jsx>{`
        font-family: Verdana, sans-serif;
        .root {
          text-align: center;
        }

        .player-selections {
          display: flex;
          justify-content: center;
        }
      `}</style>
    </div>
  );
};

interface PlayerSelectionProps {
  selection: Selection;
  onSelect: (selection: Selection) => void;
}
const PlayerSelection: FunctionComponent<PlayerSelectionProps> = (props) => {
  const { selection, onSelect } = props;

  return (
    <button type="button" className="root" onClick={() => onSelect(selection)}>
      <div className="emoji">{emojiFor(selection)}</div>
      <div className="selection">{selection}</div>
      <style jsx>{`
        font-family: Verdana, sans-serif;

        .root {
          padding: 16px 32px;
          margin: 16px;
          text-align: center;
          cursor: pointer;
        }

        .emoji {
          font-size: 4.8rem;
          line-height: 1;
          margin-bottom: 16px;
        }

        @media only screen and (max-width: 600px) {
          .root {
            padding: 8px 16px;
            margin: 8px;
          }
          .emoji {
            font-size: 1rem;
          }
        }
      `}</style>
    </button>
  );
};

function emojiFor(selection: Selection): string {
  switch (selection) {
    case Selection.Rock:
      return '✊🏼';
    case Selection.Paper:
      return '🖐🏼';
    case Selection.Scissors:
      return '✌🏼';
    default:
      throw new Error('Unrecognized selection');
  }
}

export default RockPaperScissors;
I tried to keep the styling code minimal here so it isn’t the most elegant game of Rock Paper Scissors you can find on the internet, but let’s look at a few key code snippets in this component.
First, we are using a hook called usePlayLazyQuery, which is a bit different from usePlayQuery.
/* components/RockPaperScissors.tsx */
const [playSelection, { data, loading }] = usePlayLazyQuery({
  fetchPolicy: 'no-cache',
});
The main difference in our use case is that we don’t want to initiate the GraphQL request until the user makes a selection. If we used usePlayQuery, the query would occur after the component mounts during initial page load. That wouldn’t make sense for the sequence of our game. Keep the following guidance in mind for your own applications:
-
use*Query: Fetch after the component mounts. -
use*LazyQuery: Fetch in response to user action.
We also passed fetchPolicy: “no-cache” to tell Apollo that we always want this request to execute fully against our Fauna GraphQL endpoint without checking the local browser cache. This prevents our game from returning the same opponent selection over and over. In most use cases, you do not need to set an explicit fetchPolicy. Refer to Apollo’s Setting a fetch policy docs for more information on fetch policies and caching.
Next, we have the handleSelection callback function:
/* components/RockPaperScissors.tsx */
const handleSelection = (selection: Selection) => {
  playSelection({
    variables: {
      selection,
    },
  });
};
This function is called whenever the user makes a selection. It calls playSelection, another callback function defined by the result of the call to usePlayLazyQuery above and the function that triggers the network call to our GraphQL API.
Last, we define how we want to present responses from the GraphQL request.
/* components/RockPaperScissors.tsx */
<div className="root">
  {/* ... */}
  {loading && <p>Waiting on opponent...</p>}
  {data?.play && (
    <div>
      <p>{`Opponent chose ${data.play.opponentSelection} ${emojiFor(data.play.opponentSelection)}`}</p>
      <h3>{data.play.message}</h3>
    </div>
  )}
  {/* ... */}
</div>
The loading boolean value will be true while Apollo waits for the network response to complete, so the user sees the message “Waiting on opponent…”
When data.play is truthy, this means the network response is complete and we know the result of the game. The user sees the selection of the computer opponent and a message with the final game verdict.
The final step is to update the pages/index.tsx file to use your new component rather than the default Example component.
import RockPaperScissors from '@components/RockPaperScissors';
import { FunctionComponent } from 'react';

const Index: FunctionComponent = () => {
  return <RockPaperScissors />;
};

export default Index;
Now you should be able to refresh http://localhost:3000 in your browser and see this screen:

Open up your browser dev tools and go to the Network tab. As you make each selection, you can inspect the requests hitting your Fauna GraphQL endpoint that should look like this:

And now you have a fully functioning game complete with a Next.js frontend user interface and a backend Fauna GraphQL API. Nice work! 👏🏻
Close
Hopefully you now see the power of this awesome pairing of Next.js and Fauna. It is the most delightful full stack development experience I have ever encountered and with Fauna I never need to worry about database maintenance, scaling, or correctness.
In the next and final part of this series, we are going to learn about Fauna’s recently released streaming capability, which will allow us to turn our game of Rock Paper Scissors into a real-time multiplayer experience. Be the first to know when it’s published by subscribing to the newsletter over at seanconnolly.dev.

Top comments (0)