
I'm planning to start a YouTube series on Mini Micro tutorials soon, but before that, I'll be creating them as blog posts.
This is the first part of the series, where we'll learn how to render a sprite in Mini Micro.
How to render a sprite in mini-micro
clear
grandpa = new Sprite
grandpa.image = file.loadImage("/usr/Grandpa1.png")
display(4).sprites.push grandpa
grandpa.x = 480; grandpa.y = 100
grandpa.scale = 5
i have already written a code above now explain what its each like does
clear
This line clears anything previously displayed on the screen. It's essential because, without it, the display wouldn't refresh properly, resulting in a solid color covering everything instead of rendering sprite.
grandpa = new Sprite
grandpa.image = file.loadImage("/usr/Grandpa1.png")
By using grandpa = new Sprite, we create a new sprite and assign it the name grandpa. You can change this variable name to anything you prefer.
Next, we use variable_name.image = file.loadImage("") to set an image as the sprite's texture. The argument inside file.loadImage("") should be the file path of the image you want to use. In my case, the path is "/usr/Grandpa1.png".
display(4).sprites.push grandpa
This code renders the sprite grandpa on display(4).
But what is display(4)?
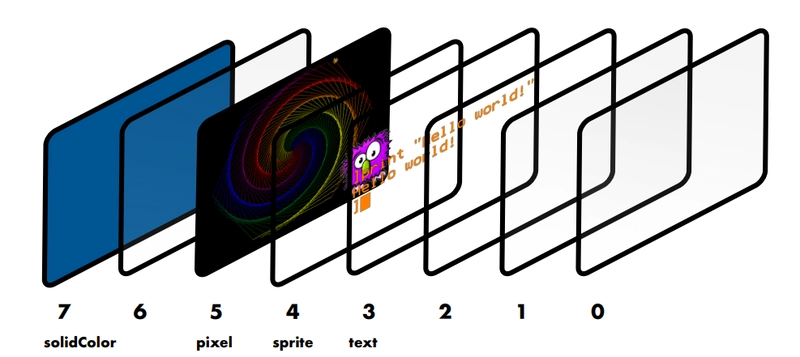
Mini Micro has 7 displays, each designed to handle different types of content. Display 4 is dedicated to rendering sprites, which is why we use display(4) to draw the grandpa sprite on the screen.
grandpa.x = 480; grandpa.y = 100
grandpa.scale = 5
Now that we've successfully rendered the sprite on the screen, we can tweak some of its properties to customize its appearance.
grandpa.scale
grandpa.x
grandpa.y
grandpa.rotation
grandpa.tint
End
Now we have successfully rendered a sprite on display.
Here are some links which would be helpful for you

Top comments (0)