
Photo by Robert Baker on Unsplash
This post covers:
- Making a case for automation
- Defining what is a Pipeline
- Defining a game plan to automatically ship an application to a container repository
- Setting up a Continuous Integration Platform
- Breaking down the implementation
Making a Case for Automation
Building a compiler is not an easy task. It involves the development of many modules such as a lexer, parser and a virtual machine. It also involves the processing of variable declarations (e.g. int a = 0) and the evaluation of simple arithmetic expressions ( e.g. a = 4 * 10 + 2) all the way to calling returning functions with parameter such as factorial recursive function:
Along the process we found out a lot of things during the development phase that were not considered during the design phase (I swear I’ve never heard of this problem before). As a result, we were constantly moving the grammar to make sure edge cases worked. That is why we decided to take a step back and take advantage of the unittest module that python3 provides. For each .tl file, our programming language file extension, we created a test. This allowed us to make changes faster while eliminating the fear of breaking previous working code.
Tests were focused on three different categories:
- Correctness of the intermediate code generation (quadruples)
- Expected failures of .tl files with the expected number of errors
- Correctness in expected executed output
As a result, doing make test (Viva la Makefile) runs 50+ tests. But what happens if a developer forgets to run the tests before doing a pull request or merging to master? Thankfully we use GitHub, so going back to a specific commit is possible, but is it practical? Do we really want to go through that painful way?
Furthermore, trendlit, our compiler, is meant to be cloud-based. So that means that we also need an easy way to deploy it. On top of that, since trendlit runs inside a Docker container, we also need a way to build the Docker image, check if the current version already exists in the container repository (e.g. Docker Hub), and eventually push that image to the registry. Therefore, we decided to do it the DevOps way.
But First, What is a Pipeline?

Photo by tian kuan on Unsplash
A pipeline is a set of automated processes that allow Developers and DevOps professionals to reliably and efficiently compile, build and deploy their code to their production compute platforms. There is no hard and fast rule stating what a pipeline should like like and the tools it must utilize, however the most common components of a pipeline are; build automation/continuous integration, test automation, and deployment automation.
Implementation Roadmap
As we previously mentioned, we want to manage trendlit the DevOps way. To do this, we will implement steps of Continuous Integration (CI), Continuous Delivery (CD) and Infrastructure as a Service (IaaS). For this post, we are going to focus on the Continuous Integration part.
Why would we even want CI?
Continuous Integration is a development practice that requires developers to integrate code into a shared repository several times a day. Each check-in is then verified by an automated build, allowing teams to detect problems early. [5]
As a result, errors can be detected faster and can be located more easily. This allows an organization to deliver software more rapidly, while reducing the risk for each release.
For this example, the idea is that a developer, while adding or fixing a feature, can go from localhost to the application being pushed to a registry within minutes, while relying on an automated process. How are we going to achieve this? Well, you guessed it: we are going to use a pipeline. So the workflow will look something like this:
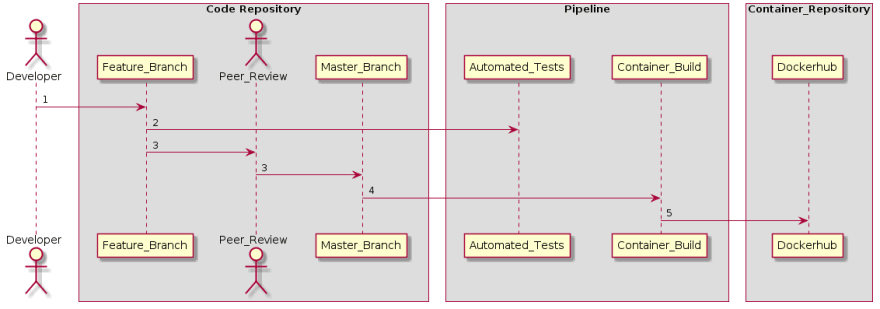
Diagram generated by PlantUML: https://bit.ly/2W1D6OR
- A developer adds new feature to the application.
- The application goes through an automated testing process.
- When the developer makes a pull request, the application goes under the four-eyes principle [4] and if it is approved by another peer and the automated tests pass, the new feature is merged to the master branch of the code repository.
- A new version of the application is automatically built and packaged into a container.
- The container is pushed to a container repository.
Getting Started

In order to run the implementation roadmap described above, we chose to use the following tech stack:
Code Repository
We will use GitHub in order to host the application’s source code.
CI Platform
When it comes down to pipelines, we can find them in all colors and flavors. For this project, we chose to go with CircleCI because it integrates easily with GitHub and allows SSH access to build instances, which is handy for debugging the build steps. Is worth mentioning that we could have replaced CicleCI with another automation server such as Jenkins, but it takes longer to setup because it is self-hosted.
Container Repository
We’ll use the repository that is provided by Docker Hub.
Setting up CircleCI
This is the application’s code repository: https://github.com/shekodn/trendlit-tutorial-1
Here you can also find all the scripts that the pipeline is going to run in order to test, build, check, and push the application to Docker Hub.
Steps
- Fork the project, so you can create your own pipeline.
- Go to hub.docker.com and create an account and a repository with trendlit-tutorial-1 as namespace.
- Sign up to CircleCI and link your GitHub account.
- Select the forked version of trendlit-tutorial-1 and build the project. The build will fail because you need to put your Docker Hub’s credentials. Also, you need to change the REPOSITORY variable in each bash script (or at least in docker_build.sh, docker_check.sh and docker_push.sh) inside the scripts directory to the name of your Docker Hub’s repository.
- Don’t forget to push the changes to the master branch.
- In your CircleCI’s dashboard in the project list go to trendlit-tutorial-1 settings located in https://circleci.com/gh/YOURUSERNAME/trendlit-tutorial-1/edit
- Under Build Settings you will see Environment Variables. Click there and add DOCKER_USER and DOCKER_PASS (a.k.a. your Docker Hub’s credentials) as variables with their respective values. These variables will allow CircleCI to upload the application’s container into your Docker Hub’s repository.
- Rerun the workflow and this time it should succeed.
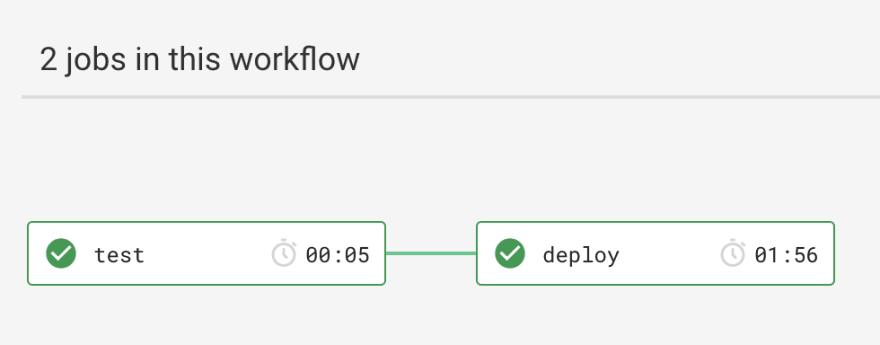
This is the desired workflow after a Pull Request is merged to the master branch.
- Afterwards, go to your Docker Hub and you should see three new tags. One with the trendlit’s RELEASE (a.k.a version) that was specified at the top of the Makefile, other one with a shortened version of the commit hash and the other one named latest. If you want to learn more about tagging docker images, you can have a look here.
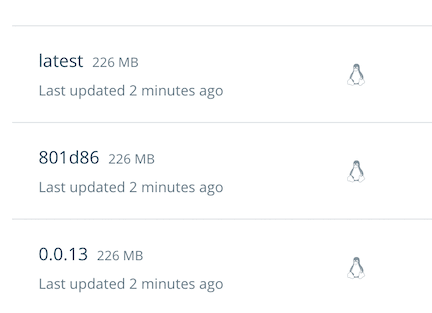
Tags were automatically generated by the Pipeline
How does it work?
Webhooks
The pipeline is able to listen each time there is a change in the repository thanks to a webhook. According to GitHub, webhooks allow external services to be notified when certain events happen. When the specified events happen, GitHub sends a POST request to each of the URLs provided [3].
In other words, when you link your GitHub account with CircleCI, you allow the latter to perform some actions in your repositories. One of them, is automatically configuring a webhook. Do you remember when we built the application for the first time? Well, it was created back then. So every time there is an event such as a pushed commit or a pull request, this webhook sends a notification to CircleCI in order to trigger the build.
If you want to see how the webhook looks like, go to your project’s settings on GitHub and have a look. There you will be able to see which events trigger the webhook.
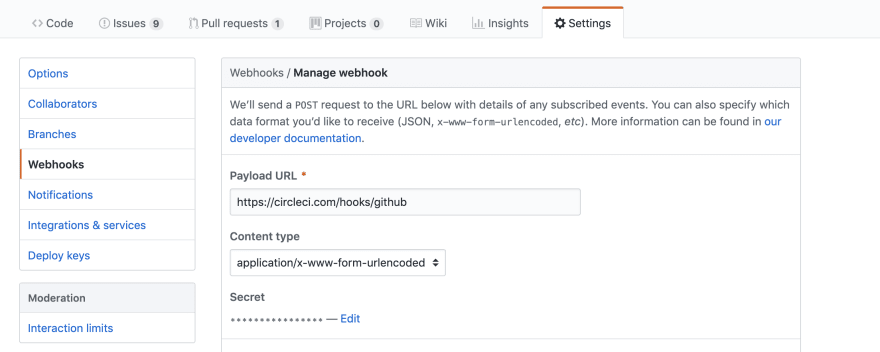
Repository/Settings/Webhooks
Decomposing the Config File
Once the build is triggered by the webhook, CircleCI goes to the config.yml file located inside the .circleci directory.
1. Jobs
The pipeline consists of 2 main jobs: Test and Deploy.
2. Tests
Here we select Docker as an executor type. Then, we use the python:3.7-alpine image in order to to run some tests.
3. Deploy
Here we use an official Docker image called docker:stable-git, because we need a Docker image that installs Docker and has git [1].
Then we use setup_remote_docker, because according to jpetazzo, we should think twice before using Docker inside Docker [2]. As a result, all the Docker commands such as docker build and docker push will be safely executed in this new environment.
As you may have noticed, Deploy has several run steps:
- We run apk add make in order to get trendlit’s release version. You can get it in your terminal by running make version. The latter prints the RELEASE variable located at the top of the project’s Makefile.
- Remember when we set some environmental variables? Well, there you go: We run docker login so the pipeline has permission to push the docker container to the respective container repository.
- We use docker_build.sh in order to build the Docker container with the following format: REPOSITORY/IMAGE:TAG.
- Afterwards, we use the docker_check script in order to check if the current release already exists in the respective container repository. Do you remember the RELEASE variable located at the top of the Makefile? Well, if the version already exists IT WILL BREAK THE PIPELINE, because you don’t want to overwrite an existing version right? You can manually fix this by editing the Makefile and assigning a different version or you can run make bump to increase the version in a smoother way ;)
- Last but not least, we push the image that docker_build.sh previously built to Docker Hub.
4. Workflows
Here we defined a workflow with 2 jobs: Test and Deploy. Test will occur each time a change is made to the application in any given branch, while Deploy will always wait for the Test job to finish and will only run in the master branch. This is because we don’t want to build and ship a container to the registry each time we do a change in a feature branch.
Wrapping it up
Although we finished the Implementation Roadmap, the implementation as a whole is far from done. It is easy to look at all the missing things and considerations, but remember where we started. Now we have a fully automated process that tests our application and pushes it to a container repository without any human interaction. It’s worth pointing out that some important aspects such as security were neglected, but this is only one part of the implementation’s MVP (Continuous Delivery is coming soon).
If you have any suggestions, I would love to hear them. I’m pretty sure we can include them in future roadmaps. BTW, Pull Requests are open ;) so I would like to collaborate with you if you think we can improve the process. In the meantime, I will be working on part 2.
References
[0] https://www.bmc.com/blogs/deployment-pipeline/
[1] https://circleci.com/docs/2.0/executor-types/
[2] https://jpetazzo.github.io/2015/09/03/do-not-use-docker-in-docker-for-ci/
[3] https://developer.github.com/webhooks/
[4] https://whatis.techtarget.com/definition/four-eyes-principle
[5] https://www.thoughtworks.com/continuous-integration
Also published on Medium.

Top comments (0)