Originally posted at Serverless on December 8th, 2017
It’s pretty easy to set up a simple Serverless app with the Serverless Framework. But -in real life, the process of continuous integration and deployment (CI/CD) of that application can be much more involved.
Never fear! In this post, we’re going to take a deep look at the end-to-end workflow of automating a CI/CD process for a serverless application via CircleCI.
We will cover:
Defining the CI/CD process
Creating an app with testable code
Preparing the app for automation
Integrating with a CI/CD toolchain
End-to-end automation for our app
Advanced deployment patterns
If you already know some CI/CD basics, then you’ll probably want to skip straight to the application testing bit.
The Basics: CI/CD Overview
In an agile development environment, small teams work autonomously and add a lot of churn to the code base. Each developer works on different aspects of the project and commits code frequently.
This is a healthy practice, but it comes with some challenges. Without close watch and proper communication about changes, the updates can cause existing code to break. To minimize manual scrutiny and redundant communication across teams, we need to invest in automating CI/CD processes.
Figure 1: The CI/CD Process Flow
Continuous Integration
The CI process starts with the developer checking code into a code repository. The developer makes their code changes in a local branch, then adds units tests and integration tests. They ensure that the tests don’t lower the overall code coverage. It’s possible to automate this process by having a common script that can run the unit tests, integration tests and code coverage.
Once the code is tested in the context of the local branch, the developer needs to merge the master branch into their local branch, and then run the tests/code coverage again. The above process happens repeatedly for every code commit and thereby continuously integrates the new code changes into the existing software.
Continuous Delivery
Although the continuous integration process ensures that the code in the master branch is always pristine and well-tested, it cannot help catch usability issues. A QA team and other stakeholders are usually responsible for usability and acceptance testing.
A successful exit from the CI process triggers the continuous delivery process and delivers the software system to a QA staging area. The QA environment usually closely resembles the production environment but with less redundancy. The continuous delivery process can have a mixed bag of automated and manual usability/acceptance testing phases.
While continuous delivery provides a process to create frequent releases, the releases may not be deployed at all times.
Continuous Deployment
In case of continuous deployment, every change that is made to the code gets deployed to production, unless tests fail the process. This process is highly automated with new code built, tested, versioned, tagged and deployed to the production environment.
In a special scenario, where major bugs and issues are found in a recently deployed version of the software, a “rollback” can be initiated. A rollback process takes a previous release version and delivers it to the production environment. This process can be automated but is usually manually triggered.
Application Testing
Now that we’ve gone over some basics, let’s get started!
For this project, we’ll use a serverless app, hello-world-ci, which I created using the hello-world template from the Serverless Framework. We'll keep the app very simple so that we can focus on the CI process.
You can install the sample app from the source repo using the Serverless Framework, like so:
sls install --url [https://github.com/rupakg/hello-world-ci](https://github.com/rupakg/hello-world-ci)
Having proper tests in place safeguards against subsequent code updates. We’d like to run tests and code coverage against our code. If the tests pass, we’ll deploy our app.
It’s this-running tests against our code whenever new code is committed-that allows for continuous integration.
Testable Code
We have some tests that we’ll run as part of the testing phase. Notice that we have a spec that tests if our function is being called.
We are also separating out the actual testable logic of our function into a class:
The handler.js code is refactored to use the above sayHello method from the HelloWorld class:
This makes testing the core logic of the app easy and also decouples it from the provider-specific function signature.
Running Tests
Now that we’ve got our tests written up, let’s run them locally before we include them as part of our CI/CD process.
The tests results look like this on the terminal:
> hello-world-ci@1.0.0 test /Users/rupakg/projects/svrless/apps/hello-world-ci
> jest

PASS  tests/hello-world.spec.js
  helloWorld
    ✓ should **call** helloWorld **function** with success (9ms)
  sayHello
    ✓ should **call** sayHello and **return** message (1ms)

Test Suites: 1 passed, 1 total
Tests:       2 passed, 2 total
Snapshots:   0 total
Time:        0.627s, estimated 1s
Ran **all** test suites.
The code coverage looks like this in the terminal:
--------------------|----------|----------|----------|----------|----------------|
File                |  % Stmts | % Branch |  % Funcs |  % Lines |Uncovered Lines |
--------------------|----------|----------|----------|----------|----------------|
All files           |      100 |      100 |      100 |      100 |                |
 hello-world-ci     |      100 |      100 |      100 |      100 |                |
  handler.js        |      100 |      100 |      100 |      100 |                |
 hello-world-ci/lib |      100 |      100 |      100 |      100 |                |
  hello-world.js    |      100 |      100 |      100 |      100 |                |
--------------------|----------|----------|----------|----------|----------------|
We also get an HTML page with the code coverage results depicted visually, like so:
Figure 2: Visual code coverage results Excluding Testing Artifacts
After running the tests, you should see that a coverage folder has been created. This holds the files that are generated by Jest. You'll also have a .circleci folder-that one is required to enable build automation with CircleCI.
When we deploy our serverless app via the Serverless Framework, all the files in your current folder will be zipped up and part of the deployment to AWS.
Since the coverage and .circleci files are not necessary for running our app, let's exclude them from our final deployment by excluding them in our serverless.yml file:
service: hello-world-ci

# exclude the code coverage files and circle ci files
package:
  exclude:
  - coverage/**
  - .circleci/**
See more details on packaging options with the Serverless Framework.
Preparing for CI Automation
We’ll be using CircleCI for automating the CI/CD pipeline for our hello-world-ci app.
Let’s get everything ready to go.
Setting up a CircleCI Account
Sign up for a CircleCI account if you don’t already have one. As part of the sign-up process, we’ll authorize CircleCI to access our public Github repo so that it can run builds.
Creating an AWS IAM User
It is a good practice to have a separate IAM user just for the CI build process. We’ll create a new IAM user called circleci in the AWS console. Give the user programmatic access and save the AWS credentials, which we'll use later to configure our project in CircleCI.
Note: More on setting up IAM users here.
Configuring CircleCI with AWS Credentials
We have to configure AWS credentials with CircleCI in order to deploy our app to AWS.
Go to your project hello-world-ci -> Project Settings -> AWS Permissions, and add your AWS credentials for the circleci IAM user we created earlier.
Figure 3: Adding AWS credentials
End-to-End Automation
Now that we’ve completed our CircleCI setup, let’s work on implementing the CI/CD workflow for our project.
Configuration
We’ll configure CircleCI via a config file named config.yml and keep it in the .circleci directory. Explanation of how CircleCI works is out of scope for this article, but we'll look at the steps needed to automate our deployments.
If you want some further reading, CircleCI introduces concepts of Jobs, Steps and Workflows.
To keep things simple and get started, we’ll use a simple configuration wherein everything we do will be in one job and under one step. CircleCI allows for multiple jobs with multiple steps all orchestrated via a workflow.
Here is a snippet of the config file that we’ll use:
We have a job named build, and we have a few steps. The checkout step will check out the files from the attached source repo. We also have a few run steps that just execute bash commands.
We’ll install the serverless cli and the project dependencies, then run our tests with code coverage enabled, and finally deploy the application.
Note: The save_cache and restore_cache sections in the above config file, allows for caching the node_modules between builds, as long as the package.json file has not changed. It significantly reduces build times.
Note: You can review the full config file for our app. And you can review a full CircleCI sample configuration file with more options as well.
Implementing the Workflow
To add our app project to CircleCI, do the following:
Push the local app from your machine to your Github account or fork the sample project on your Github account.
Go to Projects -> Add Projects, and click the ‘Setup project’ button next to your project. Make sure the ‘Show forks’ checkbox is checked.
Since we have our CircleCI config file already placed at the root of our project, some of the configuration is picked up automatically:
Pick ‘Linux’ as the Operating System.
Pick ‘2.0’ as the Platform.
Pick ‘Node’ as the Language.
Skip steps 1–4. Click on ‘Start building’.
You’ll see the system running the build for your project.
Figure 4: Build running on CircleCI
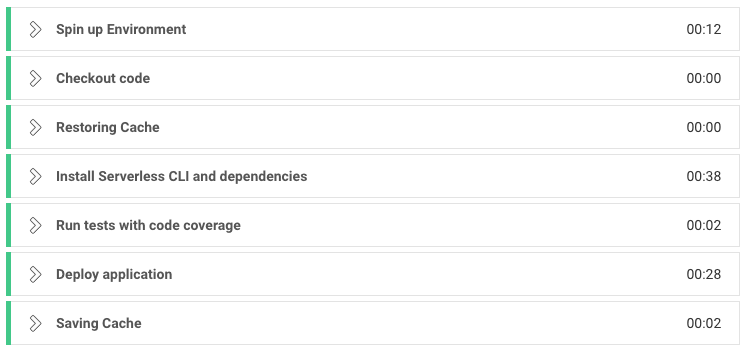
You can drill down to see the steps on the UI that matches our steps in the config file. While it is executing each step, you can see the activity.
Figure 5: Build steps for the project
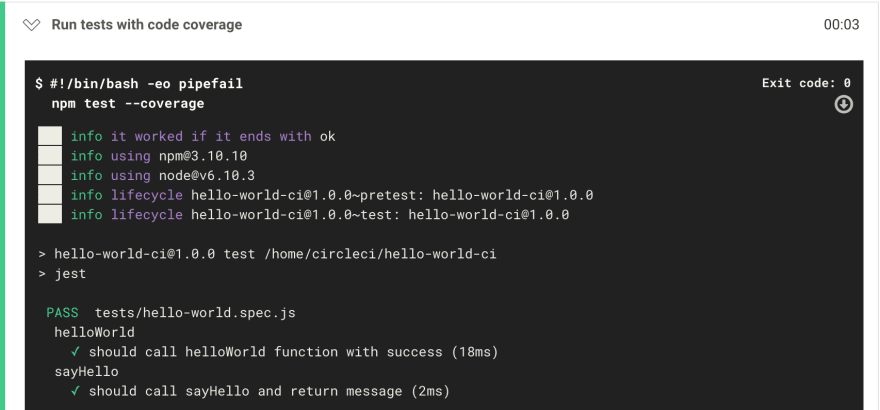
You can see the tests running as part of the ‘Run tests with code coverage’ step.
Figure 6: Running tests for the project
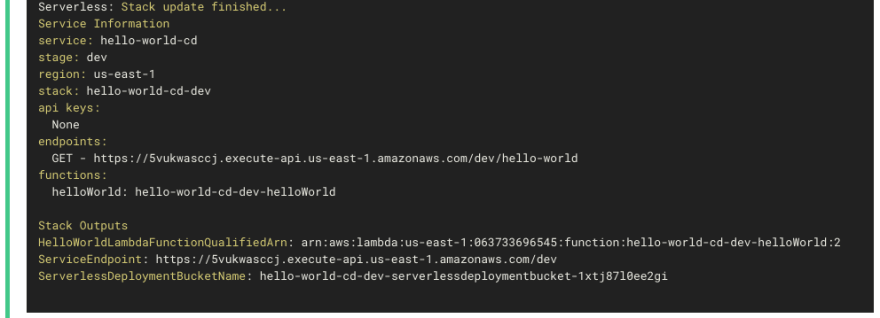
And finally, you see that our app has been deployed under the ‘Deploy application’ step.
Figure 7: Deploying the project
Last but not least, we can copy the endpoint shown in the output onto a browser and see the app run!
Figure 8: Running the app
Hopefully, the full rundown of the process and its implementation on a CI/CD platform such as CircleCI gives you a better understanding of automating your own applications.
Advanced Deployment Patterns
In real-life enterprise scenarios, there’s a lot of complexity involved in deploying an application. There are concerns about redundancy, high-availability, versioning & rollback, A/B testing and incremental rollouts.
All of this needs to be achieved without sacrificing the flexibility & ease of the deployment process, and at the same time keeping the customer happy.
In this section, we’ll look at some of these concerns and ways the Serverless Framework can help solve it.
Multi-region Deployments
A popular pattern for introducing redundancy and achieving high-availability is to deploy your application into multiple regions. In our use case, we will deploy our application to two AWS regions — us-east-1 and us-east-2.
Note: It is more complex to do multi-region deployments when databases are involved, as you need to take care of replicating and syncing data across multiple regions. A DNS service like AWS Route 53 with domain mappings would have to be put in place to maintain high availability.
Multiple Deploys
We can start off with a simple workflow using the Serverless Framework. Using the framework, we can execute multiple sls deploy commands targeting a particular region.
$ sls deploy --stage qa --region us-east-1

$ sls deploy --stage qa --region us-east-2
Although this method for deploying to multi-region is simple, it poses a challenge. Since there are two different commands, the Serverless Framework packages & deploys the app twice. It’s practically impossible to make sure that the exact same copy of the code has been deployed.
Separating Packaging and Deployment
Keeping the above challenge in mind, the Serverless Framework provides an advanced workflow for deploying to multiple regions. It provides a way to separate the packaging and deploying portions of the overall deploy process.
The Serverless Framework provides a sls package command to package code and then allows you to use that package in the sls deploy command to deploy it.
# package the code once
$ sls package --package <path_to_package>

# deploy the same package to multiple regions
$ sls deploy --package <path_to_package> --stage qa \
             --region us-east-1

$ sls deploy --package <path_to_package> --stage qa \
             --region eu-central-1

$ sls deploy --package <path_to_package> --stage qa \
             --region eu-west-1
The Serverless Framework allows the convenience for applications to be **packaged once **and **deployed multiple times.
Let’s look at the implementation of this deployment pattern and ways we can automate it.
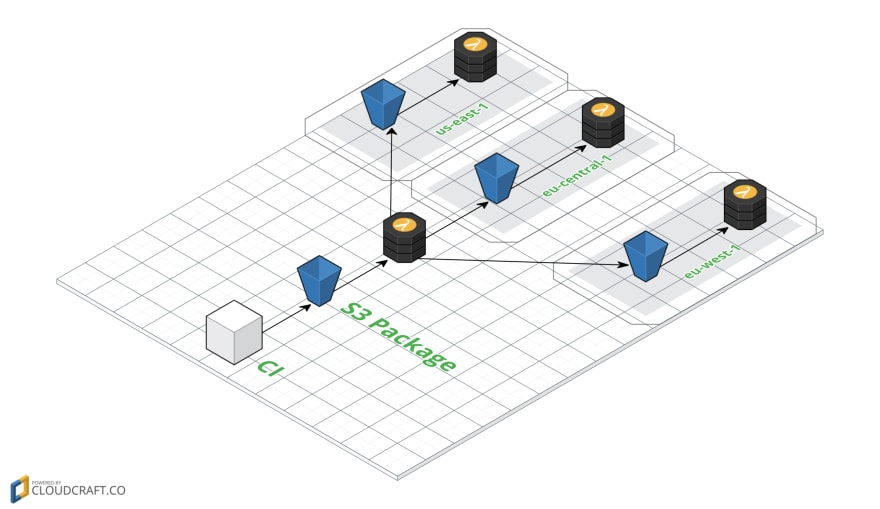
Figure 9: Separating packaging and deployment
Here are the details of the workflow:
A step in the CI process packages the app code into a package and uploads it to a S3 bucket. This S3 bucket could be a generic storage for all deployment packages. The CI process uses the sls package command to package the app code.
An S3 event triggers a Lambda function, that takes the package and uploads it to separate S3 buckets in multiple regions.
-
The S3 instances in each region, then trigger another Lambda function, that deploys the package to that particular region. The Lambda functions use sls deploy passing it the package to deploy.
The Serverless Framework provides an easy & automated way to deploy serverless applications across multiple regions for adding redundancy and achieving high-availability.
Canary Deployments
Another popular deployment pattern is canary deployments. Canary releases are used to reduce risk when releasing new software versions.
The pattern lays down a workflow that enables the slow and incremental rollout of new versions by gating it to a small subset of end users. Once the new software version has been tested to be satisfactory for mass consumption, the release is opened to all user traffic.
Figure 10: Canary deployment flow
Here are the details of the flow:
Current State: Imagine a current state of the environment where an existing version of the software is running in an isolated region. All user traffic is redirected to this environment (denoted by the gray box).
Canary State: Next, a new version of the software is ready to be tested and deployed. This new version will be deployed to another isolated region. To test the new version, a subset of user traffic (5% in our case) is redirected to the new environment (denoted by the blue box).
End State: Once the testing is complete and the results are found to be satisfactory, all user traffic is redirected to the new environment with the new version of the software.
Rollback State: Unfortunately, sometimes serious bugs are discovered in the new version and code have to be rolled back. In this scenario, all user traffic is redirected back to the old version of the software (denoted by the gray box).
After a certain amount of time that the new version of the software has been live, the old environment with the old version can be taken down.
An off-shoot use case of canary deployment pattern is, using it for A/B testing as well. In case of A/B testing scenarios, tweaking the amount of user traffic gives the developers a good idea of the performance and usability of each individual version of the software.
Canary deployments are used to reduce the risk of releasing new software versions by incremental rollouts with gated user traffic. They are also used to perform A/B testing.
Update: AWS announced API Gateway support for canary deployments at AWS re:Invent 2017.
Blue/Green Deployments
Yet another deployment pattern in use is the blue/green deployment. The blue/green deployment pattern is very similar to canary deployments-but instead of gating user traffic, two separate identical environments are used in parallel to mitigate risks of introducing new software versions.
One environment is used for go-live, and the other is used for staging new changes. The workflow dictates switching environments back and forth between staging and live.
Figure 11: Blue/Green deployment flow
Here are the details of the flow:
Live (blue): Initially, the current version of the software is deployed to the blue environment with the all user traffic being redirected to the blue environment.
Staging to Live (green): After a new version of the software is developed, it is deployed to the staging environment (green) for testing. After the testing of the new version of the software is considered satisfactory, all traffic is redirected to the green environment and the green environment is considered as live.
Live to Staging (blue): Since the green environment is now the live version, the blue environment is considered staging. The new version of the code is deployed to the blue environment for testing.
Rollback scenario: Unfortunately, sometimes serious bugs are discovered in the new version (blue) and code have to be rolled back. In this case, all traffic is redirected back to the blue environment. The blue environment is back being the live version. The green environment becomes staging.
Routing Mechanics
The traffic routing is done by setting up a DNS service (AWS Route 53) in front of the API Gateway.
In the case of canary deployments, AWS Route 53 is switched from ‘simple routing’ to ‘weighted routing’ to achieve a percentage mix of user traffic between environments. In case of blue/green deployments, the ‘weighted routing’ is toggled between 0% and 100% across the blue/green environments.
Benefits of Serverless
In traditional architectures, the canary and blue/green deployments are used after a lot of consideration and planning. The reason being, there’s a high cost to provisioning hardware and maintaining multiple environments required in order to realize the potential of such deployment patterns.
The benefits of embracing serverless architectures are immediately evident here-it means no provisioning or maintenance costs for multiple environments. On top of that, the fact that serverless is pay-per-execution reduces execution costs significantly; you never pay for any idle infrastructure, in any environment.
Advanced deployment patterns like canary and blue/green deployments are practically **feasible, more **cost-effective **and **easily managed **when used with serverless architectures.
Quick summary
In this post, we looked at the overall CI/CD process flow, detailing each process step. We then created a serverless application and refactored the code to be testable.
We then ran the tests and code coverage locally to make sure our code was working. Once we had our app running locally, we set up an automated CI workflow for our app on CircleCI.
At the end of the post, we looked at some of the more complex deployment patterns and how serverless architectures could help make them more cost-effective & feasible.
Any comments or questions? Drop them below!
Originally published at https://www.serverless.com.







Top comments (0)