Hello Friends,
Welcome to yet another HTML & CSS Project. In this tutorial we will learn how to create Help section to the website using HTML and CSS. So lets get started...
Project setup:
make a folder helpSection (I created it on my desktop you can create it wherever you want)
Here we are gonna need 2 files index.html and styles.css;
As this is a small tutorial i will not creating separate folder i will dump everything in the helpSection folder...
I will now open my project in VS code., You can use your favorite code editor of your choice doesn't matter what you use.
in the index.html i will create a container and in that container we will have a image section and info section and add classes to it so that we can style them later on.
<!DOCTYPE html>
<html lang="en">
<head>
    <meta charset="UTF-8">
    <meta http-equiv="X-UA-Compatible" content="IE=edge">
    <meta name="viewport" content="width=device-width, initial-scale=1.0">
    <title>Help Section</title>
<link rel="stylesheet" href="styles.css" />
</head>
<body>
    <main>
        <section class="container">
          <section class="img-section">
          </section>
          <section class="info">
          </section>
        </section>
      </main>
</body>
</html>
now lets style our container and I would also like to add google fonts default fonts are so boring😜😜 Just kidding, I personally like to use google fonts in all my projects its not a must though it just depends on someone's personal preferences.
To import google fonts to in our project open sytles.css file and use @import url();
@import url('https://fonts.googleapis.com/css2?family=Akshar:wght@300;400;500;600&display=swap');
let's also reset the default padding and margin and set the font-family what we just imported
@import url('https://fonts.googleapis.com/css2?family=Akshar:wght@300;400;500;600&display=swap');
*{
  margin: 0;
  padding:0;
  box-sizing: border-box;
 font-family: 'Akshar', sans-serif;
  transition: all 200ms ease-in;

}
body{
  padding:20px;
  margin: auto;
}
section.container{
  margin: auto;
  margin-top: 50px;
  min-width: 500px;
  width: 80%;
  display: flex;
  justify-content: center;
  align-items: center;
  gap: 40px;
  border-radius: 20px;
  box-shadow: 0 0 15px rgba(0,0,0,0.25);
  padding: 20px;
}
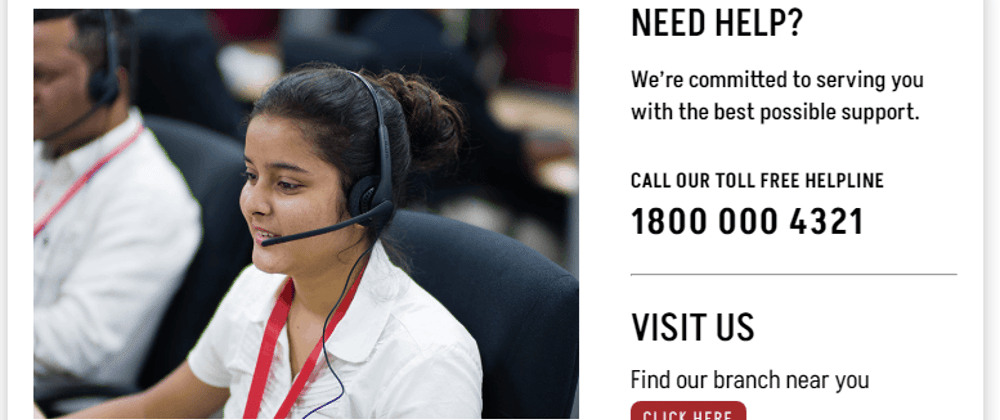
the output should look something like this:
Now lets comeback to our index.html and add the contents to our sections;
<section class="img-section">
        <img src="https://i.postimg.cc/7YZF63WQ/help-banner.png" alt="help image" />
      </section>
      <section class="info">
        <h3>NEED HELP?</h3>
        <p class="text1">We’re committed to serving you with the best possible support.</p>

        <p class="text2">CALL OUR TOLL FREE HELPLINE</p>
        <h3 class="head2">1800 000 4321</h3>
        <hr />
        <h3>VISIT US</h3>
        <p class="text3">Find our branch near you
           <button>Click Here</button>
        </p>
      </section>
now that we have added the contents to our HTML let us now add some styles; Open styles.css and add the following code.,
section.info{
  display: flex;
  flex-direction: column;
  gap: 20px;

}
section.info h3{
  font-size: 30px;
  font-weight: 500;
}
section.info p.text1{
  margin-top: -10px;
  font-size: 18px;
  font-weight: 500;
}
section.info p.text2{
  letter-spacing: 0.25px;
  font-weight: bold;
  margin-top: 10px;
}
section.info h3.head2{
  margin-top: -18px;
  letter-spacing: 1px;
  font-weight: 600;
  font-size: 1.75em;
}
section.info p.text3{
  margin-top: -15px;
  font-size: 1.25em;
}
section.info p.text3 button{
  padding: 5px 10px;
  border-radius: 8px;
  outline: none;
  border: none;
  background: brown;
  color: #fff;
  text-transform: uppercase;
  font-weight: 300;
  letter-spacing: 0.15em;
  cursor: pointer;
}
the output should look like below image:
it looks almost similar to the final project i intend to make..
But there is one thing here, its not responsive. Let's add a media query to make it responsive for the small screen sizes.
Open style.css
@media screen and (max-width:900px){
  section.container{
    width:80%;
    display: flex;
    flex-direction: column;
  }
  section.container section.img-section{
    text-align: center;
  }
  section.container section.img-section img{
    width: 100%;


  }
}
@media screen and (max-width: 480px){
  section.container{
    width: 100%;
  }
  section.container section.img-section img{
    padding: 0;
    width: 100%;
    overflow: hidden;

  }
}
Our page should look like this in the smaller screens...
That's all for today!
let me know in the comments section below how did you like this one. Your comments are most welcome it helps me improve on my code.
Please Like and Follow. It encourages me to share more stuff like this..
Have a great one!


Oldest comments (1)
Thanks 🙏