
In this blog we will use serverless-stack; with Typescript and Python to build an API Gateway HTTP API
API Gateway HTTP APIs are roughly a third of the cost of API Gateway REST APIs. They do not support all integrations and features of REST APIs, you can read more here: Choosing between HTTP APIs and REST APIs
Background
I have been writing Python for serverless deployments to AWS Lambda for the last 8 months. One thing I miss from my previous time writing Typescript are type hints.
So I have been exploring ways to bring typing into Python; and looking at Python type hints with extended libraries like pydantic. I ended up reading this great article by Sebastián Ramírez last week, and was instantly inspired to put Python typing into action.
I have also been working a lot with serverless-stack, an abstraction layer over the AWS-CDK that offers an un-paralleled DEV experience (IMO). Out of the box you will have a local development environment that brings you closer to the code; and helps you iterate more quickly.
Problem Statement
Given we are creating an MVP for a project, we have some requirements:
- Create a Rest-fully routed HTTP API:
- The API must have documentation.
- The API must have authentication.
- The API should be scalable.
In AWS we have some main staples to use for these kind of tasks:
- API Gateway, for creating a HTTP endpoint.
- Lambda for handling scalable compute.
- AWS IAM for authentication and authorization.
Part 1: Coding the API
The source code is available in full here: https://github.com/simonireilly/sst-python-api
Setup
The tools we need are:
- Python
- Node
- A package manager like Yarn
- An AWS account, configured with AWS cli so we have credentials for local deployment
Boot Strapping the Project
We can begin in a new folder; creating a typescript stack for the api.
npx create-serverless-stack@latest \
  api-stack \
  --language typescript \
  --use-yarn
This will give us an initial serverless stack with constructs written in typescript. We do however want to use python as the programming language for our lambda functions. So, update the file api-stack/lib/index.ts, removing lines 6,7 and 8, so it looks like this:
// api-stack/lib/index.ts
import MyStack from "./MyStack";
import * as sst from "@serverless-stack/resources";

export default function main(
  app: sst.App
): void {
  new MyStack(app, "my-stack");
}
Staying at this level, we need to set up our python virtual environment.
python3 -m venv env
source $PWD/env/bin/activate
pip3 install mangum fastapi pydantic
That is everything we need to get started. It is not a lot, but we will cover a great distance with these tools.
Spiking the API
Inside the src folder there is currently a api-stack/src/lambda.ts file. This file is not needed, and we can replace that file with a new one, that will be python based.
.
├── api-stack
│   ├── src
│   │   └── api.py
And in that file, we can create an API like so:
# api-stack/src/api.py

from mangum import Mangum
from fastapi import FastAPI

APP = FastAPI(
    title="Example Test API",
    description="Describe API documentation to be served; types come from "
    "pydantic, routes from the decorators, and docs from the fastapi internal",
    version="0.0.1",
)


@APP.get("/v1/items")
def list_items():
    """
    Return a collection of items
    """
    return {
        'message': 'Hello, world!'
    }


handler = Mangum(APP, lifespan="off")
This code is our serverless-stack for the API; now we can look at deploying it.
In the below we specify that we will be deploying a lambda with the python3.8 runtime from the src directory. We have also define a proxy route, that will route all API requests to our API handler created above.
// api-stack/lib/MyStack.ts

import * as sst from "@serverless-stack/resources";

export default class MyStack extends sst.Stack {
  constructor(scope: sst.App, id: string, props?: sst.StackProps) {
    super(scope, id, props);

    // Create a HTTP API
    const api = new sst.Api(this, "Api", {
      defaultFunctionProps: {
        srcPath: "src",
        runtime: "python3.8"
      },
      routes: {
        "ANY /{proxy+}": "api.handler",
      },
    });

    // Show the endpoint in the output
    this.addOutputs({
      "ApiEndpoint": api.url,
    });
  }
}
This architecture follows the Lambda-lith type pattern, where we essential have no AWS specific integration in our src/api.py. Later, we can transition to something that looks more like a Fat-Lambda.
Really there are many schools of thought on this topic. If you want to delve deeper then this is quite a nice round up that includes the thoughts of some serverless Hero's. I personally favour operational agility and every pattern has a use case, but its best to know the pros and cons.
Deploying
Ok, we are going to deploy the stack to AWS using yarn:
yarn start
The output will be an API url. We can test the API using curl; with the url that was provided:
curl https://qpk7n59tz3.execute-api.us-east-1.amazonaws.com/v1/items | jq .
{
  "message": "Hello, world!"
}
How exciting it worked.
Looking under the hood, we have just deployed two cloud formation stacks, and these stacks work together so we can develop locally; read more here to understand how serverless-stack creates its live development environment
Lets test this out, we can add a print statement to our API handler to see it in action:
@APP.get("/v1/items")
def list_items():
    """
    Return a collection of items
    """
    print("Hello, local world!")
    return {
        'message': 'Hello, world!'
    }
And in our terminal we can see the output:
d2755156-e548-4e91-a5f3-e6a1733ef248 REQUEST dev-api-stack-my-stack-ApiLambdaANYproxyB463B5F1-cBeRkQMraTip [src/api.handler] invoked by API GET /v1/items
Hello, local world!
INFO:mangum.http:HTTPCycleState.REQUEST:  'http.response.start' event received from application.
INFO:mangum.http:HTTPCycleState.RESPONSE:  'http.response.body' event received from application.
d2755156-e548-4e91-a5f3-e6a1733ef248 RESPONSE {"isBase64Encoded":false,"statusCode":200,"headers":{"content-length":"27","content-type":"application/json"},"body":"{\"message\":\"Hello, world!\"}"}
Deploying the Docs
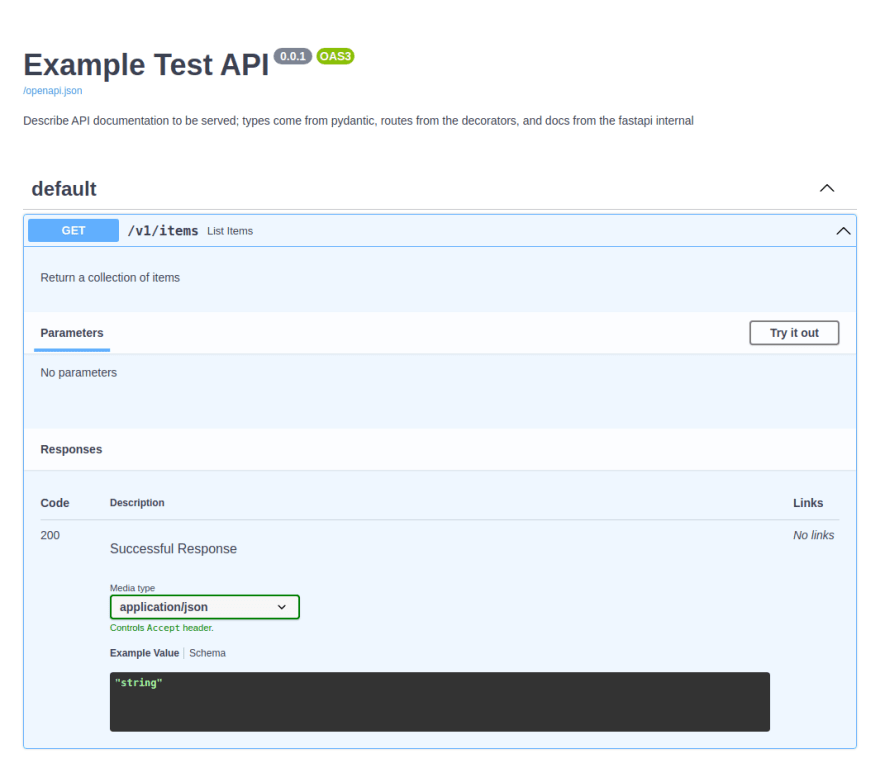
Ok, so I lied, we don't need to deploy the docs; you can view the docs at the GET /docs URL of the API:
Adding an Item
Our example API could do with a better use case. We can pretend that we are selling clothes, and write a model using pydantic that will act as a good example. Lets update the api.py file:
# api-stack/src/api.py

from typing import List, Optional
from mangum import Mangum
from fastapi import FastAPI

from pydantic import BaseModel, validator
from datetime import date, timedelta


class Item(BaseModel):
    """
    This model will have validation of the below fields
    """
    name: str
    description: Optional[str] = None
    price: float
    date: date

    @validator('date')
    def check_date_is_valid(cls, v):
        """
        We also have specific validation on the date
        """
        if v > date.today():
            raise ValueError('Date must be in the past.')
        if v < date.today() - timedelta(days=120):
            raise ValueError('Date must be within 120 days')
        return v


APP = FastAPI(
    title="Example Test API",
    description="Describe API documentation to be served; types come from "
    "pydantic, routes from the decorators, and docs from the fastapi internal",
    version="0.0.2",
)


@APP.get("/v1/items", response_model=List[Item])
def list_items():
    """
    Return a collection of items
    """
    return [
        Item(
            name="Purple Jumper",
            price=10.99,
            date=date.today()
        ),
        Item(
            name="Red Jumper",
            price=11.99,
            date=date.today() - timedelta(days=10)
        )
    ]

@APP.post("/v1/items", response_model=Item)
def create_item(item: Item):
    """
    Adds a new Item
    """
    return item


handler = Mangum(APP, lifespan="off")
We have updated our code, and it will all be hot reloaded, so now, we can look at the docs again:
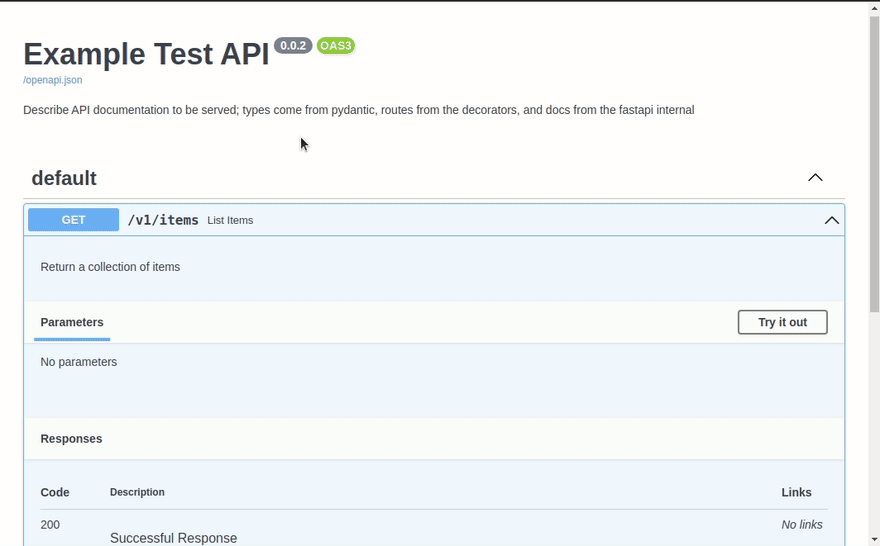
Here we can see that the OpenAPI documentation has also been updated; and we even have a working execute to test the API 🎉.
Adding Authentication
Our API is up and running, it has a schema, and documentation, but every route is currently public.
To secure the API, we can add a Lambda Authorizer to the HTTP API Gateway deployment. I think we should leave our GET /docs publicly accessible to encourage collaborators. Every other route can be secured.
We can use AWS IAM authentication to secure the private routes of the API.
Other options include using a Lambda Authorizer, to write fully custom authentication, it is worth reading the documentation for @aws-cdk/aws-apigatewayv2-authorizers if you have a deeper interest and then exploring the developer guide for AWS API Gateway HTTP API authorizers
We can configure the authorization by updating the stack:
// api-stack/lib/MyStack.ts

import * as sst from "@serverless-stack/resources";

export default class MyStack extends sst.Stack {
  constructor(scope: sst.App, id: string, props?: sst.StackProps) {
    super(scope, id, props);

    // Create a HTTP API
    const api = new sst.Api(this, "Api", {
      defaultFunctionProps: {
        srcPath: "src",
        runtime: "python3.8"
      },
      routes: {
        "ANY /{proxy+}": {
          function: {
            handler: "api.handler",
          },
          authorizationType: sst.ApiAuthorizationType.AWS_IAM,
        },
        "GET /docs": "api.handler",
        "GET /openapi.json": "api.handler"
      }
    });

    this.addOutputs({
      "ApiEndpoint": api.url
    });
  }
}
Part 2: Using the API
This part is optional and has nothing specific to add to the code pattern, read on if you like, Postman, Non-Functional Testing, and graphs.
Now we have a fully scalable API; we can look at how to authenticate with AWS IAM.
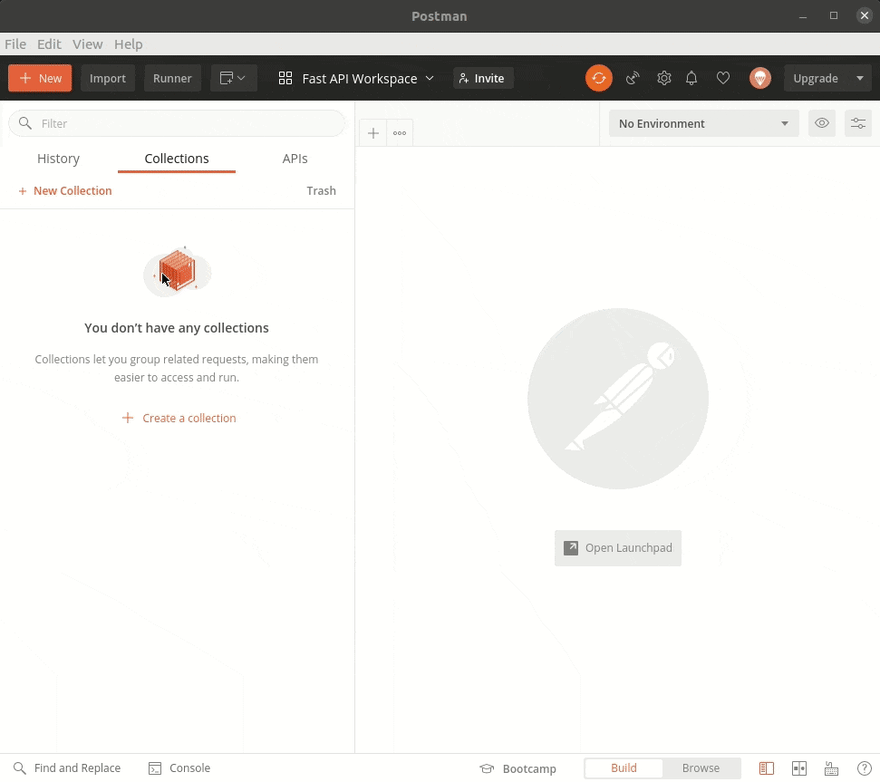
We can use Postman to test the API; or we can use the AWS CLI; which will automatically create a signature to sign the requests that we make to invoke our API.
Given we have published our docs to a public link, and have used the OpenAPI specification we can import them directly into Postman.
That was pretty seamless, we can now setup authentication as-well. In the authentication tab, we need to supply AWS Access Key ID, and AWS Secret Access Key values that have permissions to invoke the API Gateway stage ($default). Then, Postman will handle generating the AWS V4 signature for authentication.
Firing a quick test API call, we can even see that our advanced validation returns errors that we have handled in our schema using the pydantic custom validator:

Production Deploy
To get deployed to production, we need allow the Docker image that builds the python lambda to discover the dependencies we have installed.
To get the requirements file we can run the following:
pip3 freeze > ./api-stack/src/requirements.txt
This gives the full list of requirements to the underlying packager, and will ensure that our lambda environment has the correct dependencies.
Then, we can deploy the production stack.
yarn deploy
And we have finished up for now.
Load Testing
I'd like to stress this API now, and look at how it will perform for a medium scale.
API Load Test
K6s was used to stress test for a duration of 1 minute and 30 seconds.
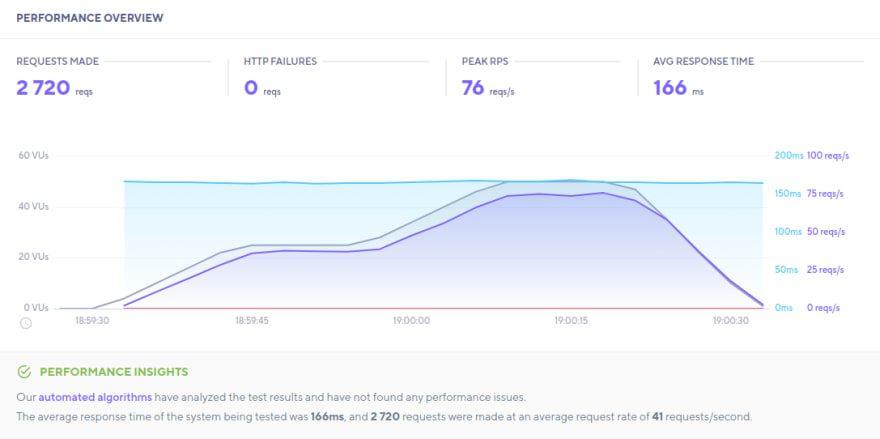
AWS Statistics Under Load Test
A round up using some metrics from AWS:
| Metric | Average | Max |
|---|---|---|
| Lambda Concurrent executions | N/A | 5 |
| Lambda Duration | 3.9 ms | 45 ms |
Wrap Up
I found this to be an interesting pattern to explore. If you are looking to do something similar in NodeJS, then maybe check out serverless express.
Thanks for reading.

Top comments (0)