Introduction
REST has been the industry standard for creating web APIs in recent years. It offers a set of guidelines that can produce completely functional web services, but Rest's rules and restrictions become problematic. GraphQL enters software development to address Rest's issues.
API development is made simpler and more widely available by GraphQL. The purpose of this article is to introduce you to GraphQL and show you how to integrate the GraphQL client with React.
What is GraphQL?
GraphQL is a query language for APIs. It gives clients the power to ask for exactly what they need and nothing more, makes it easier to evolve APIs over time, and enables powerful developer tools. Being able to request the precise or exact data format that the client requires makes it more versatile than REST APIs.
Why NestJS?
NestJS is a framework for building efficient, scalable Node.js server-side applications. It uses progressive JavaScript, is built with and fully supports TypeScript (yet still enables developers to code in pure JavaScript) and combines elements of OOP (Object Oriented Programming), FP (Functional Programming), and FRP (Functional Reactive Programming). GraphQL and NestJS
combined with TypeScript helps you develop better type safety with your GraphQL queries, giving you end-to-end typing.
Code First
Instead of generating our GraphQL schema by manually writing GraphQL SDL, we use the code first methodology. Instead, we create the SDL from TypeScript class definitions using TypeScript decorators. The @nestjs/graphql package automatically creates the schema for you by reading the metadata specified by the decorators.
Nest.js GraphQL - The Code First Approach
Installation
First create a new project using Nest CLI and cd into that folder.
nest new your_project_name
Now let’s install the GraphQL dependencies.
npm i @nestjs/graphql @nestjs/apollo graphql apollo-server-express
Let’s install other dependencies we’ll be needing.
npm i class-transformer class-validator @prisma/client bson-objectid npm i -D prisma
Configure GraphQL Module
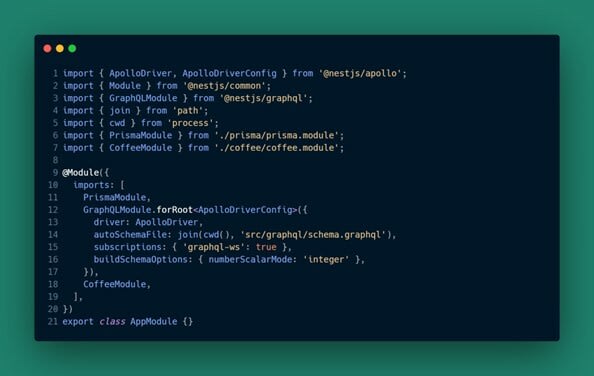
Once the required packages have been installed, we can import the GraphQLModule and set its forRoot() static method configuration.

Nest.js GraphQL - The Code First Approach
The forRoot() takes an options object as an argument. These options are passed through to the underlying driver instance. Here we’re using Apollo as our driver.
Initialize Prisma Schema
Since we’ll be using prisma let’s generate the schema for it. To generate a prisma schema run the following command
npx prisma generate
This command will create a prisma folder and a schema.prisma file inside it. Let’s modify it add the following code.
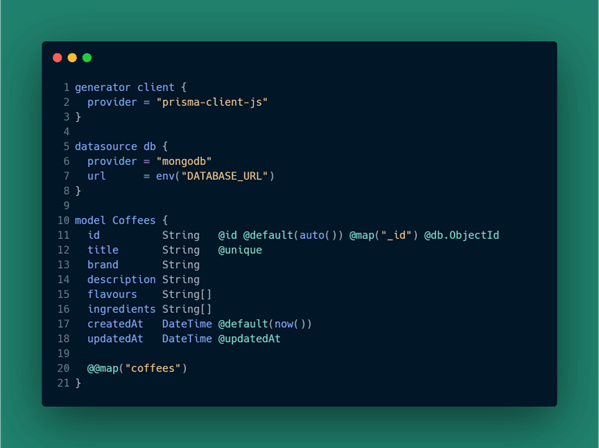
This Coffees model will represent out collection in the database. You can add more fields if you want to.
That prisma command will also generate a .env file where you can put your database URL. I’ll be using MongoDB Atlas for this project. So create a database and add that to your .env file. Don’t forget to add it to your .gitignore file.
Prisma Module
Let’s generate the prisma module and service we’ll be using throughout the app for database interactions.
nest g mo prisma

nest g service prisma --no-spec
These command will create a prisma folder inside src and add two files prisma.module.ts and prisma.service.ts Open the prisma.service.ts file and the following code.

Coffee Module
We’ll be building an imaginary coffee GraphQL api. Let’s generate the module, resolver and service for coffees.
nest g mo coffee

nest g resolver coffee --no-spec nest g service coffee --no-spec
Before continuing let’s add the following code in your nest-cli.json file. This will help us to remove a lot of redundant typing.
"compilerOptions": {

"plugins": ["@nestjs/graphql"]
Coffee Model
Coffee model will represent the coffee collection and ObjectType which is required if you want to use that as response type. Create a model folder inside coffee folder and coffee.model.ts and add the following code.
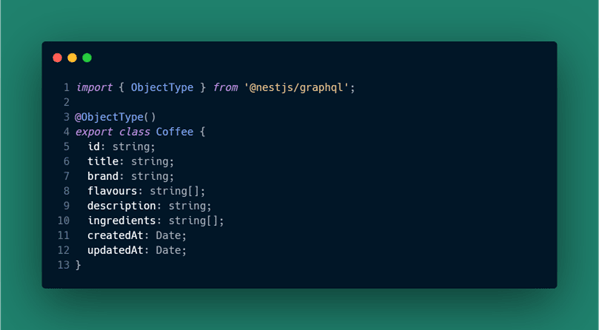
Most of the definitions in a GraphQL schema are object types. Each object type you define should represent a domain object that an application client might need to interact with. Coffee will be the response type that’s why we’ve use the ObjectType decorator.
Generating Input Types
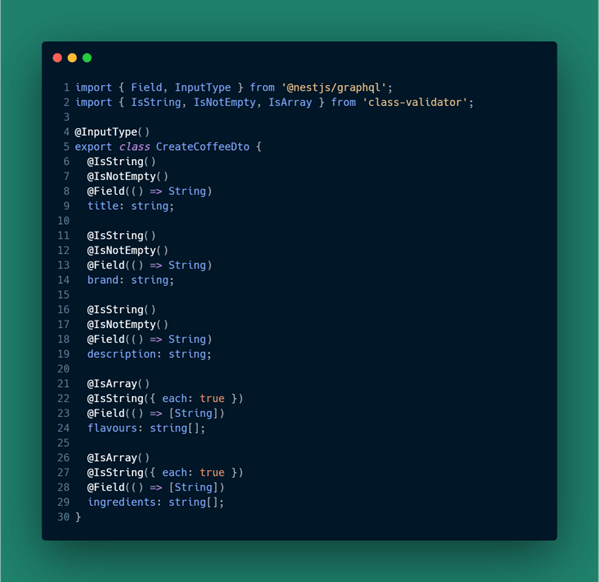
If the mutation or query needs to take an object as an argument, we can create an input type. The input type is a special kind of object type that can be passed in as an argument. To declare an input type, use the @InputType() decorator. We’ll need 3 input types for creating coffee, updating coffee and pagination. So, create a folder tscoffee/dto and add 3 files, create-coffee.dto.ts , update-coffee.dto.ts and pagination.dto.ts and add the following code.
create-coffee.dto.ts
update-coffee.dto.ts

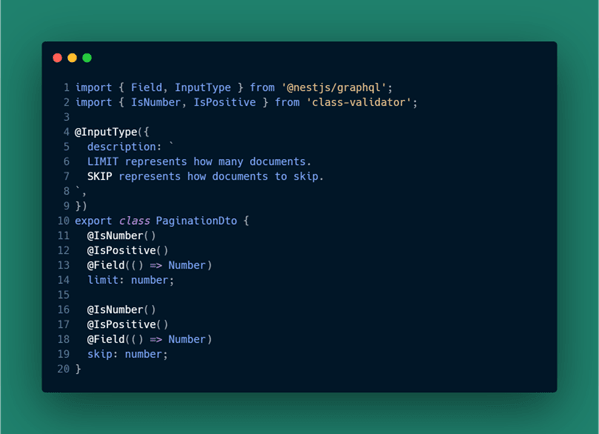
pagination.dto.ts
Providers
An essential idea in Nest is the concept of providers. The core Nest classes, such as services, repositories, factories, helpers, and so forth, can be be thought of as providers. The fundamental benefit of a provider is that it may be injected as a dependency.
As a result, objects can establish a variety of connections with one another, and the Nest runtime system can take on a considerable portion of the work of "wiring up" instances of objects.
Our coffee.service.ts file will act as abstract layer for interacting with the coffees collection. Open it and add the following code.
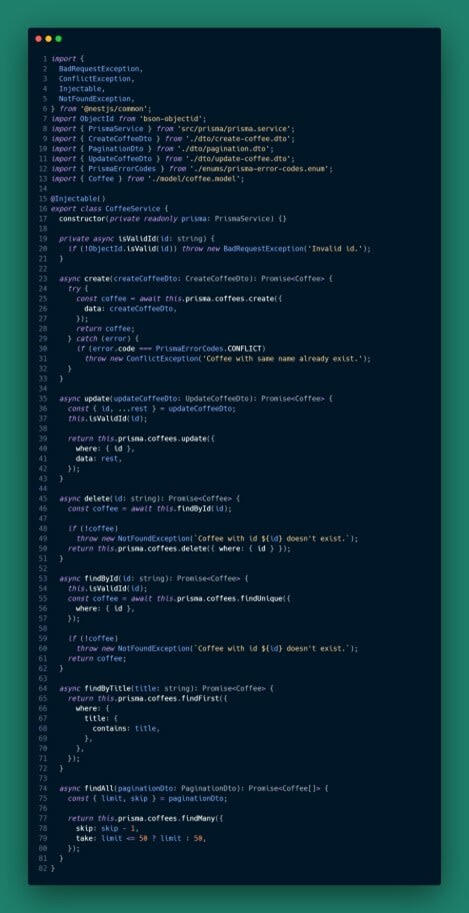
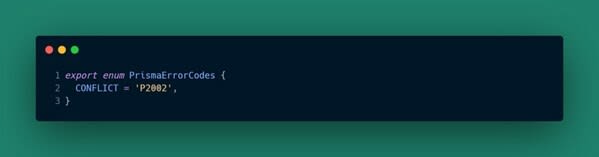
This is our typical CRUD operations logic. Here I’m using the PrismaErrorCodes enum to store the conflict error code.
prisma-error-codes.enum.ts
Resolvers
Resolvers offer the guidelines for converting a GraphQL operation (a query, mutation, or subscription) into data. They deliver the exact data shape that we specify in our schema, either synchronously or as a promise that resolves to that shape's result. A resolver map is often made by hand. On the other hand, the @nestjs/graphql package automatically creates a resolver map using the metadata supplied by the decorators you use to annotate classes.
At this point, we've defined the objects (type definitions) that can exist in our data graph, but clients don't yet have a way to interact with those objects. To address that, we need to create a resolver class. Resolver decorator exported from @nestjs/graphql package marks a class as a resolver. To query something we need to use the Query decorator exported from @nestjs/graphql. For example -

Here I’m using @Query() decorator to mark findAll method as a query type. I’m returning an array of coffees to indicate that when this query is resolved it will return an array of coffee. By default the query will be named as same as the method name that is findAll. Using the name property will override it. If you need any arguments to your query or mutation use can use the @Args() decorator.
For normal types like string or number NestJS GraphQL package will automatically infer them. But sometimes our input types are complicated which can’t be inferred. In that case we can use the type property to provide metadata. You mutate we use the
@Mutation() decorator.
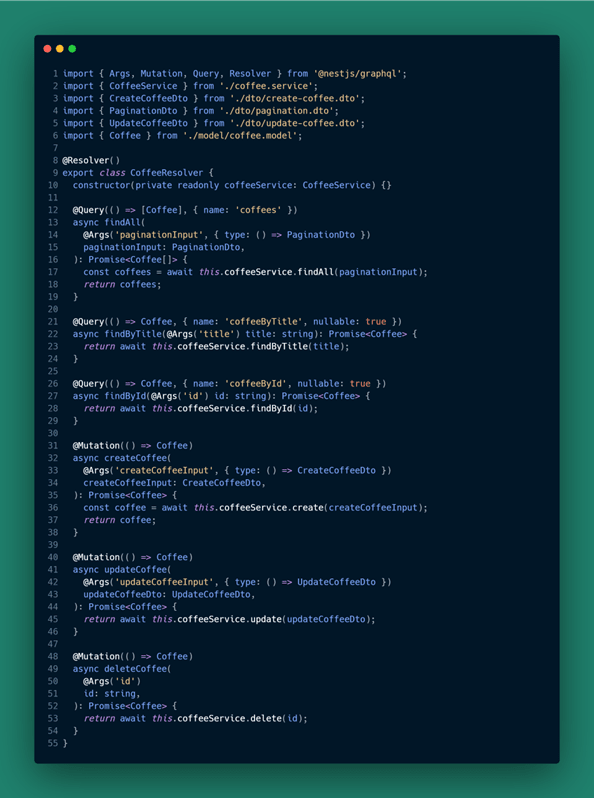
Now that you understand all the decorators open the coffee.resolver.ts file that we generated a while ago and add the following code.
Subscriptions
The GraphQL specification includes a third operation type called subscription in addition to query-based data retrieval and mutation-based data modification. Data can be pushed from the server to clients who opt to receive real-time messages from the server via GraphQL subscriptions. Similar to queries in that they describe a collection of fields to be supplied to the client, subscriptions establish a channel and send a result to the client each time a specific event occurs on the server rather than returning a single answer right away.
To add subscriptions to our API we need to add the subscriptions property in app.module.ts. Let’s modify the app.module.ts and replace with the following code.
We utilize the @Subscription() decorator (exported from the @nestjs/graphql package) and the PubSub class from the graphql-subscriptions package, which provides a straightforward publish/subscribe API, to construct a subscription using the code first methodology.
npm i graphql-subscriptions
Add the following code to coffee/constants/subscriptions.ts
We’ll add subscriptions to createCoffee . So each time we create a new coffee we’ll get the real time updates.
Import the PubSub constructor from graphql-subscriptions and create an instance.
Now open coffee.resolver.ts file and add the following code.
Remember to import the @Subscription decorator from @nestjs/graphql and the COFFEE_ADDED constants.
Now replace the createCoffee mutation code with the following.

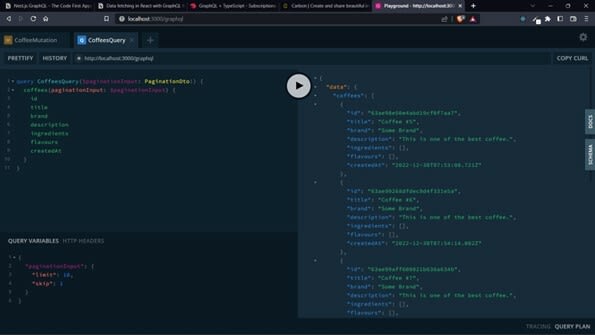
Generated Schema
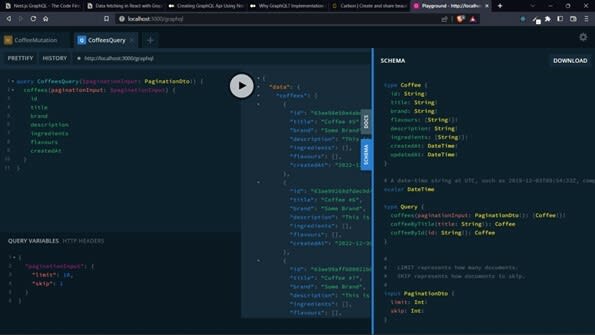
Query Examples

Read an article on Care Insider

Top comments (0)