This quick tutorial is aimed at dev with a basic understanding of the rust language and who want to dive into game developpement
Goal
The goal of the tutorial is to show how easy you can develop a simple 2D camera in Rust. At the end you will have a camera moving freely around a 2D world.
Prerequisites
You will only need rustup. We will use the following libraries:
- ggez
- rand
If someone want to only see the code that will be produced, you can directly go to the project on Github. I have tagged every step so you can directly skip from step to step.
Step 1: The Setup
Let's create a new project with cargo first:
cargo new camera-system
or any name you want to give it
Now that it's done, you should as usual be rewarded with a new project and a "Hello World" main. The first step will be to include the external libraries into the cargo.toml files:
[dependencies]
ggez = "0.5.1"
rand = "0.7.3"
please not that the version are the latest as of 4/25/2020 and may not be still the one to use
We will then copy directly the standard boilerplate from the ggez page. It's well documented so hopefuly you can understand the basics.
The two parts that will be of interest during the tutorial are this part:
struct MyGame {
    // Your state here...
}
Basically, the state of our game. You can think of it as a store to put datas, and the main point to attach our function to.
And this one:
impl EventHandler for MyGame {
    fn update(&mut self, _ctx: &mut Context) -> GameResult<()> {
        // Update code here...
        Ok(())
    }

    fn draw(&mut self, ctx: &mut Context) -> GameResult<()> {
        graphics::clear(ctx, graphics::WHITE);
        // Draw code here...
        graphics::present(ctx)
    }
}
You can see that it's divided in two function, and understanding the difference between the two is crucial.
- The update function is run at every cycle. The faster your PC is, the faster this function will be run
- The draw function is called at every frame that is shown on the screen What you can take of it right now is: update -> game logic, draw -> presentation.
Anyway, you can then run your game with
cargo run
You should be awarded with the following amazing screen:

Step 2: Let's draw something!
It would be nice to have something else to stare at instead of a blank screen. Let's put something on that window!
First of all, let's declare a small helper, a struct that will represent a 2 dimension Point (later in your game experience you will notice that there is alread something for that called Point2, but for the sake of clarity let's do that ourselves).
struct Point {
    x: f32,
    y: f32,
}
Let's get back quickly into basic mathematics lessons: A point in a two dimension universe is defined by two values: x for the absciss and y for the ordinate.
You should also be aware that in math lesson you have an upward ordinate axis. It is not the case here: the more y grow, the lower it will display.
Now that we have points, we will draw some of them at random on the screen. We have something to store all those points: our state.
struct MyGame {
    points: Vec<Point>,
}
How many points are we drawing? Let's not bother about that and store the number of point we use in a constant:
const NB_OF_POINTS: i32 = 50;
The MyGame's constructor is now in need of a value for the points. Let's feed him:
impl MyGame {
    pub fn new(ctx: &mut Context) -> MyGame {
        // Load/create resources such as images here.
        MyGame {
            points: generate_points(ctx, NB_OF_POINTS),
        }
    }
}
Something may bother you right here: the context. The context store everything about the application current state and is the main ggez part you will need to manipulate. Why are we transmitting this to a function that should just generate numbers? Because we will need to restrict them to the size of the screen:
fn generate_points(ctx: &Context, nb: i32) -> Vec<Point> {
    let mut rng = rand::thread_rng();
    let mut points = Vec::new();
    let screen = screen_coordinates(ctx);
    for _ in 0..nb {
        let point = Point {
            x: rng.gen_range(0.0, screen.w),
            y: rng.gen_range(0.0, screen.h),
        };
        points.push(point);
    }
    points
}
As you can see, ggez is providing us with a usefull function screen_coordinates that send us the current size of the window (by default it's 800x600). This methode use the Context to determine this.
Let's do a quick recap: we have randomly generated points stored. But for now, nothing is on the screen, we actually have drawn nothing. Let's get on that:
    fn draw(&mut self, ctx: &mut Context) -> GameResult<()> {
        graphics::clear(ctx, graphics::BLACK);
        let mb = &mut graphics::MeshBuilder::new();
        for p in &self.points {
            draw_point(mb, p)
        }
        let mesh = mb.build(ctx)?;
        match graphics::draw(ctx, &mesh, DrawParam::new()) {
            Ok(_) => (),
            Err(e) => println!("ERROR : {:#?}", e)
        }
        graphics::present(ctx)
    }
We are modifying the draw function as we have no game logic yet, we just want to show stuff in our window.
The first difference is that we will draw the window black instead of white. The goal is to for a "night sky" sort of thing.
Then the harder part: the Meshes. Meshes are stuff that will be drawn, to be quick. In order to create them we will use a MeshBuilder, lend it to our draw_point function that will populate it with stuff, and then take them with the MeshBuilder.build().
Once we have our meshes, we draw them simply with graphics::draw.
Let's have a quick look at the draw_point function:
fn draw_point(mb: &mut graphics::MeshBuilder, point: &Point) {
    mb.line(
        &[
            na::Point2::new(point.x, point.y ),
            na::Point2::new(point.x, point.y + 1.0),
        ],
        1.0,
        graphics::WHITE,
    ).unwrap();
}
You will notice that we are not actually drawing Points. We are drawing lines. A point have no substance, it can't be drawn, so we are doing a quick hack with very small lines.
If you run, you should see the following (not exactly, because we randomly generated the points):

Step 3: Expand the world!
Everything we have now exist in the realm of our window. The goal now is to expand this further.
We will grow our number of point and declare the size of our world:
const NB_OF_POINTS: i32 = 10_000;
const WORLD_WIDTH: f32 = 10_000.0;
const WORLD_HEIGHT: f32 = 10_000.0;
We can also simplify our point generation by removing the context and just use those values:
fn generate_points(nb: i32) -> Vec<Point> {
    let mut rng = rand::thread_rng();
    let mut points = Vec::new();
    for _ in 0..nb {
        let point = Point {
            x: rng.gen_range(0.0, WORLD_WIDTH),
            y: rng.gen_range(0.0, WORLD_HEIGHT),
        };
        points.push(point);
    }
    points
}
If you run, you will see approximatly the same thing than before. Let's have in our mind a picture of what's happening here, we will need to have that in mind in the next steps:
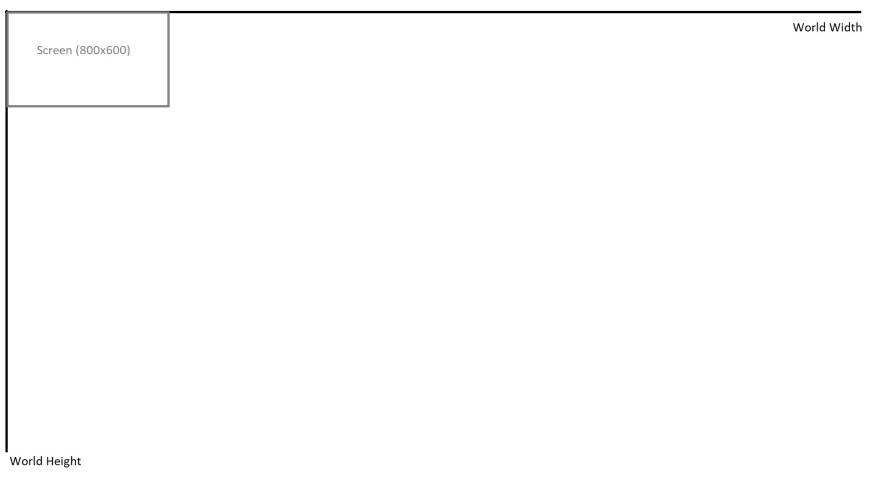
As you can see, our window is depicting a small portion of our world. The rest exists, it is just not in our scope.
Step 4: EXPLORATION!
We have the basics of a camera: a small point of view, and a large world to explore. In order to move around freely in this world, we need to keep track of where we are, and a way to know where we want to move. And you guessed it right, we will store that in our state:
struct MyGame {
    points: Vec<Point>,
    keysdown: Vec<KeyCode>,
    origin: Point,
}
The origin will be the upper left corner of our camera (the size of our camera being the size of our window), and the keysdown is a way to know what keyboards input are pressed.
We modify our constructor accordingly:
impl MyGame {
    pub fn new(_ctx: &mut Context) -> MyGame {
        // Load/create resources such as images here.
        MyGame {
            points: generate_points(NB_OF_POINTS),
            keysdown: Vec::new(),
            origin: Point {x: 0.0, y: 0.0},
        }
    }
}
In the implementation of EventHandler of MyGame we will implement two more functions. One to add keys when they are pressed, and one to remove them when they are released:
    fn key_down_event(&mut self, _ctx: &mut Context, keycode: KeyCode, _keymod: KeyMods, _repeat: bool) {
        self.keysdown.push(keycode);
        self.keysdown.dedup_by_key(|x| *x);
    }

    fn key_up_event(&mut self, _ctx: &mut Context, keycode: KeyCode, _keymod: KeyMods) {
        self.keysdown.retain(|&x| x != keycode);
    }
As movement is a game logic and should not be defined by the GPU speed to render, it need to be done in the game logic part of the code: the update function.
    fn update(&mut self, ctx: &mut Context) -> GameResult<()> {
        const DESIRED_FPS: u32 = 60;

        while timer::check_update_time(ctx, DESIRED_FPS) {
            for keycode in &self.keysdown {
                if keycode == &KeyCode::Up {
                    self.origin.y = self.origin.y - 2.0;
                }
                if keycode == &KeyCode::Down {
                    self.origin.y = self.origin.y + 2.0;
                }
                if keycode == &KeyCode::Left {
                    self.origin.x = self.origin.x - 2.0;
                }
                if keycode == &KeyCode::Right {
                    self.origin.x = self.origin.x + 2.0;
                }
            }
            if self.origin.x < 0.0 {
                self.origin.x = 0.0;
            } else if self.origin.x > WORLD_WIDTH {
                self.origin.x = WORLD_WIDTH
            }
            if self.origin.y < 0.0 {
                self.origin.y = 0.0;
            } else if self.origin.y > WORLD_HEIGHT {
                self.origin.y = WORLD_HEIGHT;
            }
        }


        Ok(())
    }
Nothing really outstanding here, we just move the origin according to the key that are pressed, bounded in the world coordinates. The only part that require attention is the DESIRED_FPS as it's the speed at which this code will be executed (as we use it for the check_update_time). It allow us to have a code that will be run at the same speed on every cpu.
We will then use the origin as an offset in the draw_point function. The idea is to use the origin as the drawing reference point.
fn draw_point(mb: &mut graphics::MeshBuilder, point: &Point, offset: &Point) {
    mb.line(
        &[
            na::Point2::new(point.x - offset.x, point.y - offset.y ),
            na::Point2::new(point.x - offset.x, point.y + 1.0 - offset.y),
        ],
        1.0,
        graphics::WHITE,
    ).unwrap();
}
Now by pressing the arrows of your keyboard you should be able to move around the world.

Step 5: And then there was a mouse
We can also add movement based on the mouse cursor: if the cursor is close to an edge, the camera will move toward that position. Fortunatly, ggez provide us we the necessary tools to implement that.
Let's first declare two points to give us the edges we need:
const LOWER_BOUND: Point = Point { x: 10.0, y: 10.0};
const UPPER_BOUND: Point = Point { x: 790.0, y: 590.0};
As the screensize is by default 800x600, we have a border of 10 that will be triggering the camera movement.
GGEZ library is giving us a function to get the mouse position:
pub fn position(ctx: &Context) -> mint::Point2<f32>
We just have to insert the following code in our update function and we are moving with the mouse.
            let mouse_position = position(ctx);

            if mouse_position.x < LOWER_BOUND.x {
                self.origin.x = self.origin.x - 2.0;
            } else if mouse_position.x > UPPER_BOUND.x {
                self.origin.x = self.origin.x + 2.0;
            }
            if mouse_position.y < LOWER_BOUND.y {
                self.origin.y = self.origin.y - 2.0;
            } else if mouse_position.y > UPPER_BOUND.y {
                self.origin.y = self.origin.y + 2.0;
            }
Nothing really spectacular over there either, we are just glad it's that simple.

Step 6: Let's have a closer look. Or the contrary.
As you maybe got from the title, we will implement a zoom in/out to our game.
First, we will need to store, once again in our state, the current zoom level, and initialize it to 1.0.
struct MyGame {
    points: Vec<Point>,
    keysdown: Vec<KeyCode>,
    origin: Point,
    zoom: f32,
}
//...in constructor:
            zoom: 1.0
This zoom should be modified when we roll up or down the mouse wheel. Once again, GGEZ to the rescue, provide us with another EventHandler function to implement:
    fn mouse_wheel_event(&mut self, _ctx: &mut Context, _x: f32, y: f32) {
        if y > 0.0 {
            self.zoom = self.zoom - 0.1;
        } else if y < 0.0 {
            self.zoom = self.zoom + 0.1;
        }
    }
The function send us a positive y if the wheel is rolled up, and negative if rolled down. We can then ajust our zoom accordingly. And then what else?
Remember the bad schema I pasted about the window versus the world? The key takeway is that our window is rendering a mathematical projection of our world. We just need to adjust this projection in the part that take care of the calculus: the draw_point function.
fn draw_point(mb: &mut graphics::MeshBuilder, point: &Point, offset: &Point, zoom: f32) {
    mb.line(
        &[
            na::Point2::new((point.x - offset.x) * zoom, (point.y - offset.y) * zoom ),
            na::Point2::new((point.x - offset.x) * zoom, (point.y + 1.0 - offset.y) * zoom),
        ],
        1.0,
        graphics::WHITE,
    ).unwrap();
}
We just multiply our coordinates by the zoom factor to adjust our projection.
And tadam:

Bonus point: Exercises
This example needs 2 additionnal stuff, that you can do as an exercise:
- Optimization: just call draw_point on the points that needs to be actually drawn (ie: displayed on the window)
- UX: The zoom should zoom either on the mouse cursor coordinates or to the middle of the screen. Currently the zoom is just adjusting the camera size from it's origin (upper left corner).

Top comments (7)
Hi, I´m new to Rust and your article was very useful for learning the game structure.
Perhaps you could help me with a problem I could´t find a solution.
I could easily change the lines into circles, but it was to worried all circles white, so I put random colour for each circle but they continuously change colour because I don´t know how to create some type of array to store the colour of each circle. Thanks in advance.
Hi,
What you may end up doing is something like a Vec that will be inside your State.
It should be something like
You just populate your Vec once at game launch and you should be fine.
So fast, so easy.
I´ll work on it.
Thanks for your quick answer.
Great I got it.
Thanks again , any recommendation to go deeper in Rust/ggez
I think next step should be spritebatch, and sprite animation. If I find the time I will do another post on that.
hi, very helpful article :)
But I wonder why not Amethyst
Thanks!
I went for GGEZ mostly because my previous gamedev experience is on C++/SDL related stuff and I was less lost going with this one. I like to do everything myself, and I have the feeling (I may be wrong) that Amethyst have a lot more logics coded in itself.