
Coding for the cloud can seem a mountainous challenge at the start. What resources do you need, how can you best use them, and just what will it cost to run your solution?
In this walkthrough, we'll make a simple application that can be used as a kick-off point for building a disconnected way to store data from our users for future processing.
We'll use a WebAPI to get data from the user, a queue to disconnect the user from the processing, a function to read the queue and, finally, table storage to safely store our user's data.
We are going to use a static Angular app as the front end. A single page that gathers three bits of information about the user and passes it to the WebAPI. This post doesn't cover that app, but you can find the code in the repo for this tutorial.
Our journey begins
We are going to start with a near-empty application, and add the code we need to make it fully functional throughout this project. You can find the starting point here
Clone the repo and checkout step-one-start
The Web API
Lets's quickly go over our starting project, it is an almost empty WebAPI application.
The Controller
It contains a controller, with just one POST method:
using System.Threading.Tasks;
using Microsoft.AspNetCore.Mvc;
using Widget.Models;

namespace Widget.Controllers
{
  [Route("api/[controller]")]
  [ApiController]
  public class BookClubSignupController : ControllerBase
  {
    [HttpPost]
    public async Task Post([FromBody]BookClubSignupRequest request)
    {

    }
  }
}
The Model
So that we can pass some data into the POST method we have a class to model our book club signup request
namespace Widget.Models
{
  public class BookClubSignupRequest
  {
    public string Email { get; set; }
    public string Name { get; set; }
    public string Genre { get; set; }
  }
}
Startup.cs
Finally, one change to the Startup.cs file so that we can access this API from anywhere. We have to set CORS to allow all requests from different URLs - because this is a pure WebAPI and doesn't have any frontend associated with it. My static app runs on localhost:4200 locally, so this URL has been added.
Note: The URL in the code must not have a trailing /. This is important! If we add the trailing / CORS will not see the headers and cause you to pull your hair out looking for the problem!
Don't be me and waste hours looking for this 😁
We add CORS to the ConfigureServices method with these lines:
  services.AddCors(options =>
  {
  options.AddPolicy("AngularApplication",
  builder =>
  {
    builder.WithOrigins(
      "http://localhost:4200")
      .AllowAnyHeader()
      .WithMethods("POST");
    });
  });
And use this policy in the Configure method:
app.UseCors("AngularApplication");
The rest of the code is as it was when created by Visual Studio.
Here is an overview of our solution in Visual Studio 2019:

Write Request to Queue
That is the API, now we need to use that to write to our Azure Storage Account Queue.
Creating the QueueAccess class
- In the root of the project create a folder named 'QueueHelper'
- In the 'QueueHelper' folder create a new class and call it 'QueueAccess'
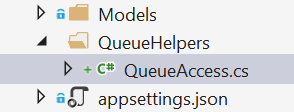
- Paste the following code over into the newly created class to replace the generated code
using Azure.Storage.Queues;
using System;
using System.Net;
using System.Text;
using System.Threading.Tasks;

namespace SignupApi.QueueHelper
{
  public class QueueAccess
 {
    private const string _connectionString = "<Your connection string here>";
    private readonly string _queueName;

    public QueueAccess(string queueName)
    {
      _queueName = queueName;
    }
  }
}
Starting with the using statements we see that we want to access the Azure.Storage.Queues. This is in the current NuGet package for working with queues.
This means that we also need to add the NuGet package to the solution.
- Right-click the project
- Select 'Manage NuGet Packages...' to open the package manager for the project
- Click 'Browse'
- Search for the
Azure.Storage.Queuespackage - Choose
Azure.Storage.Queuesfrom the list of available packages - Click install, and accept all the license agreements.
Make sure that the version being installed is the March 2020 update, version 12.3.0 or higher
Within our class itself, we see a connection string, this is the connection string to our Azure Storage Account. For now, we don't have a storage account so we are going to use the Azure Storage Emulator. Click the link to get quick instructions for setting this up, and getting the connection string.
Hopefully, we now have emulated storage working, and we can continue.
The other property that we have in our class holds the name of the queue that we are going to be writing to. We don't want to repeat our code for every queue that we use, so we pass this in the constructor and can then use this class for all of our queues.
Writing the message to the queue
The next step is to write our Add function. This allows us to send messages to the queue:
- Copy the code below
- Paste it to the end of the
QueueAccessclass
public async Task<string> Add(object message)
{
  // Get a queue client to use for accessing the Azure Storage Account Queue
  var queueClient = await GetQueueClient();

  // Encode our message as JSON
  var json = EncodeMessage(message);

  // Send the encoded message
  var result = await queueClient.SendMessageAsync(json);

  // Do something with the result
  return result.Value.MessageId;
}
When we paste that code we see some squiggles under GetQueueClient and EncodeMessage. These don't exist yet, so let's make them now.
Getting access to the queue
We'll start with GetQueueClient this gives us a reference to the Azure queue that we are going to be writing to.
- Copy the code below
- Paste it to the end of the
QueueAccessclass
private async Task<QueueClient> GetQueueClient()
{
  // Get a queue service client using the connection string property from our code
  var queueServiceClient = new QueueServiceClient(_connectionString);

  // Use the queue service client to get a reference to a queue
  var queueClient = queueServiceClient.GetQueueClient(_queueName);

  // Check the queue exists, and if it doesn't, create it (requires Azure.Storage.Queues version `12.3.0` or higher)
  await queueClient.CreateIfNotExistsAsync();

  // Return the `QueueClient`
  return queueClient;
}
Encoding the message
Now we have our QueueClient, we need to encode our message to store it
- Copy the code below
- Paste it to the end of the
QueueAccessclass
private string EncodeMessage(object message)
{
  // Serialise the object as a JSON string
  string messageAsString = JsonConvert.SerializeObject(message);

  // Encode the string as Base64 before returning it
  return ToBase64(messageAsString);
}
In order to use JsonConvert, we will need to add another package Newtonsoft.Json to the project
- Right-click the project
- Select 'Manage NuGet Packages...' to open the package manager for the project
- Click 'Browse'
- Search for the
Newtonsoft.Jsonpackage - Choose
Newtonsoft.Jsonfrom the list of available packages - Click install, and accept all the licenses agreements.
- Copy the code below and paste it at the top of the
QueueAccessclass
using Newtonsoft.Json;
Convert the string to Base64
We need to serialise the object as JSON data for storing in the queue, but we also need to perform an additional step. Whilst we do not need to write data as Base64 into a queue, Azure Functions, that we will be writing later, need this encoding to read the queue.
In previous packages used to write to the queue, Microsoft.Azure.Storage.Queue - now legacy, this was handled for the developer automatically. But the new API doesn't yet have this built-in, so we need to write a function to encode it ourselves.
- Copy the code below
- Paste it to the end of the
QueueAccessclass
private string ToBase64(string input)
{
  // Get a byte array from the input string
  byte[] inputAsBytes = Encoding.UTF8.GetBytes(input);

  // Convert those bytes to a Base64 string
  return Convert.ToBase64String(inputAsBytes);
}
If all has gone well we now have a solution that builds and we can start to use the queue helper in our controller!
Send requests to the queue
The last step in sending messages to the queue is to update the BookClubSignupController to use the new class that we have made.
- Copy the code below
- Paste it into the
BookClubSignupControllerto replace the current emptyPostmethod
[HttpPost]
public async Task Post([FromBody] BookClubSignupRequest request)
{
  await new QueueAccess("bookclubsignups").Add(request);
}
You also need to be able to access the QueueAccess class in the controller.
- Copy the code below
- Paste it at the top of the
BookClubSignupControllerclass
using SignupApi.QueueHelper;
We create a new instance of the QueueAccess with the name of the queue that we want to write to, and then call the Add method to store the request in our queue.
There are two things of note here:
- We used the await keyword because our
addfunction is asynchronous - The name of our queue is all lower case
The second point makes the queue name harder to read, but unfortunately, it's a requirement of Azure Storage Account queues. We can only use lowercase letters or numbers in the name. No camel case, no pascal case and no kebab case. Sorry.
We can run our WebAPI and store a request in the emulated storage we have created.
Check the queue
Aside from running the WebAPI and not seeing errors, how do we know that our request has been stored?
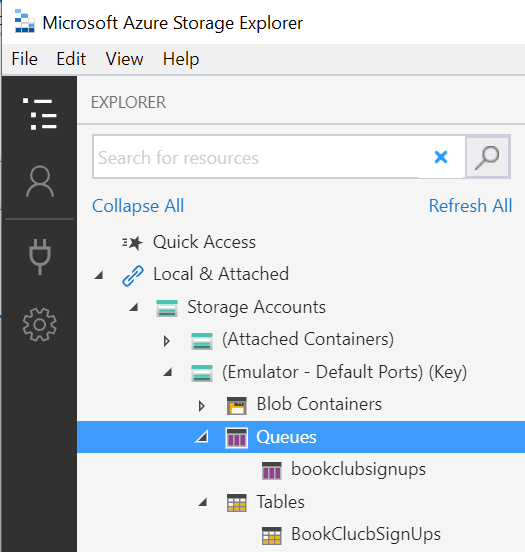
Well, we can install the Azure Storage Explorer to take a look. Follow the link to download and install the app.
Opening the Azure Storage Explorer we should be able to navigate to our emulated storage and see the Queue has been created, as with the example below.

And we should be able to see the JSON string that we have stored in our queue:

We can see that the string is readable, even though we have Base64 encoded it. The Storage Explorer decodes it to us so that we can see it.
Read the queue
Now that we have written to our queue, the next step is to write a function to retrieve it and perform our processing! For this example, that processing is going to be limited to putting the data into an Azure Storage Account table.
Create the Function App
Out first step on this part of the journey is to create the function app.
- Open a new instance of Visual Studio and create a new project.
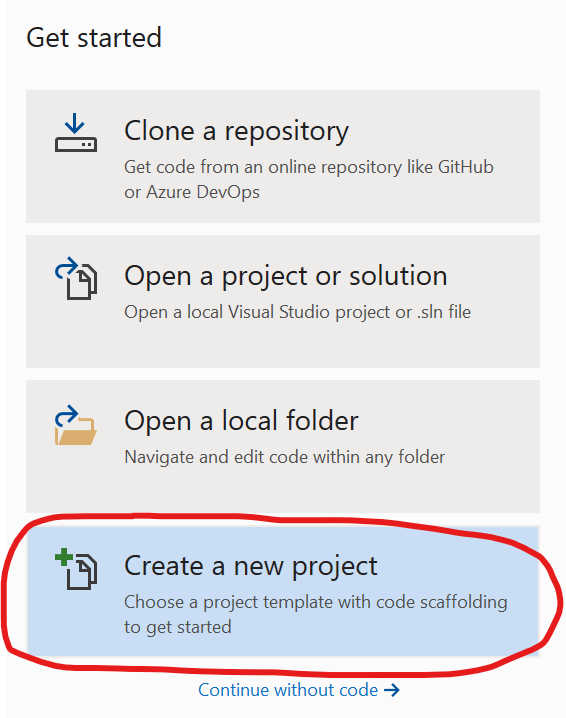
- Select Azure Function project and click Next

- Name the project
BookClubSignupProcessor, set the location and click Create

- Set the function trigger to Queue

- Select Queue trigger
- Set the Storage account to Storage Emulator
- Leave the Connection string setting name empty, we'll cover this in a later tutorial
- Add the Queue name, the same as we had in the WebAPI app
There are many types of trigger available. As we can see in the screenshot one is an HTTP trigger. We can use this to replace our WebAPI, but there are disadvantages to this that we will cover in the next tutorial where we set up our Azure Environment for this code.
- Click Create to finish generating the project.
We should now have a project that looks like this:

A little housekeeping before we continue
- Rename the
Function1.cstoBookClubSignupProcessor.cs, let Visual Studio also rename the class for us. - Change the
[FunctionName("Function1")]attribute of the Function method to[FunctionName("BookClubSignupProcessor")].
This is the name of the function as it will appear in the Azure portal. Make sure there are no spaces in this name. Otherwise, it will build, and deploy, without a problem. But it won't work, and there won't be error messages.
- Remove
, Connection = ""from theQueueTriggerattribute of theRunfunction
public static void Run([QueueTrigger("bookclubsignups", Connection = "")]string myQueueItem, ILogger log)
Remember the Connection string setting name that we left empty when making the project? That translates to this Connection = "" property. As we are not using a connection name for our demo, but just using the default storage for the function, we need to remove this.
Because we chose Storage emulator for our Storage account we don't need to do anything to access the Azure Storage Emulator where our current request is waiting for us. This happens automagically, but I think it's a good idea to at least see how this works.
Open the local.settings.json file. It should look something like this
{
    "IsEncrypted": false,
    "Values": {
        "AzureWebJobsStorage": "UseDevelopmentStorage=true",
        "FUNCTIONS_WORKER_RUNTIME": "dotnet"
    }
}
The AzureWebJobsStorage is set to UseDevelopmentStorage=true. This allows us to access the Emulated Storage without a connection string. As Emulated Storage always has the same connection string this is all we need to run our function. Let's do that now!
Put a breakpoint in the function and run the app. The app should pick up the waiting message in the queue and stop at the breakpoint.
If we look at the myQueueItem string we can see that it has the JSON string we stored in the WebAPI app.
We can now deserialise this string and use the resulting object in our function.
Add the model
- In the root of the project create a folder named 'Models'
- In the 'Models' folder create a new class and call it 'BookClubSignupRequest'
- Paste the following code over into the newly created class to replace the generated code
namespace BookClubSignupProcessor.Models
{
  public class BookClubSignupRequest
  {
    public string Email { get; set; }
    public string Name { get; set; }
    public string Genre { get; set; }
  }
}
- Open the
BookClubSignupProcessorclass - Change the argument name
request - Change the type of
requesttoBookClubSignupRequest - Copy the code below
- Paste it at the top of the
BookClubSignupProcessorclass
using BookClubSignupProcessor.Models;
The function should now look like this:
using System;
using BookClubSignupProcessor.Models;
using Microsoft.Azure.WebJobs;
using Microsoft.Azure.WebJobs.Host;
using Microsoft.Extensions.Logging;

namespace BookClubSignupProcessor
{
    public static class BookClubSignupProcessor
    {
        [FunctionName("BookClubSignupProcessor")]
        public static void Run([QueueTrigger("bookclubsignups")] BookClubSignupRequest request, ILogger log)
        {
            log.LogInformation($"C# Queue trigger function processed: {request}");
        }
    }
}
Refill the queue with our WebAPI app and run the function again. This time we should see that request has been deserialised for us.
Write the data to an Azure table
We want to take the request we have available to us now and write it to an Azure Storage Account Table.
- In the root of the project create a folder named 'TableAccess'
- In the 'TableAccess' folder create a new class and call it 'StorageTableAccess'
- In the 'TableAccess' folder create a new class and call it 'BookClubSignupEntity'

StorageTableAccess
The StorageTableAccess class is used to get access to all tables in our Azure Storage Account
Here is the start of our class
- Open the
StorageTableAccessclass - Copy the code below
- Paste the following code over into the created class to replace the generated code
using Microsoft.Azure.Cosmos.Table;
using System.Threading.Tasks;

namespace BookClubSignupProcessor.TableAccess
{
  public class StorageTableAccess
  {
    private const string _connectionString = "Your Connection String here";
    private readonly string _tableName;

    public StorageTableAccess(string tableName)
    {
      _tableName = tableName;
    }
  }
}
Let's take a look at what we have in the above snippet.
The first line says that we are going to be using the Microsoft.Azure.Cosmos.Table namespace.
I know, we are using Azure Storage Account Tables, but the API is the same. We don't have access to this namespace yet, so we need to add a NuGet package reference to it.
- Right-click the project
- Select 'Manage NuGet Packages...' to open the package manager for the project
- Click 'Browse'
- Search for the
Microsoft.Azure.Cosmos.Tablepackage - Choose
Microsoft.Azure.Cosmos.Tablefrom the list of available packages - Click install, and accept all the licenses agreements.
In the code, there is a _connectionString defined. This is the same connection string as we used for writing to the Queue, so we can copy it from our WebAPI QueueHelper class. As a single Azure Storage Account can contain both Queues and Tables there is no need to create one just for the table storage.
We also have the _tableName defined, and this is passed into the constructor. As with the QueueHelper we want to reuse this class for all tables we are going to access, and not have to rewrite it each time.
- Copy the code below
- Paste the following code and paste at the end of the
StorageTableAccessclass
public async Task Insert(BookClubSignupEntity entity)
{
  // Get a reference to our table
  var table = await GetTableAsync();

  // Create an insert operation for the entity we wish to store
  var insert = TableOperation.Insert(entity);

  // Execute that operation using our table reference
  await table.ExecuteAsync(insert);
}
The TableOperation and ExecuteAsync are from the Cosmos Table namespace we are using.
But not the GetTableAsync and the BookClubSignupEntity, these we need to write ourselves.
- Copy the code below
- Paste the following code and paste at the end of the
StorageTableAccessclass
private async Task<CloudTable> GetTableAsync()
{
  // Using our connection string, get access to our CloudStorageAccount
  var storageAccount = CloudStorageAccount.Parse(_connectionString);

  // From the storage account get a table client
  var tableClient = storageAccount.CreateCloudTableClient();

  // Use this table client to get a reference to our table
  var table = tableClient.GetTableReference(_tableName);

  // Create the table if it doesn't exist
  await table.CreateIfNotExistsAsync();

  // Return the table reference
  return table;
}
As with the queue, when we ask for a table reference we will always get that reference back, even if the table does not exist.
But if we try to use that reference we'll get errors. So we want to check that it's there before we use it! The upside here is that as long as we have a storage account available in our connection string, we know that we can use it without having to manually set up all of our tables!
And that is it for this class. We can now use it to store our signup request!
BookClubSignupEntity
Well, almost...
We are still missing the BookClubSignupEntity that we pass into our Insert method. Let's do that now.
- Open the
BookClubSignupEntityclass - Copy the code below
- Paste the following code over into the created class to replace the generated code
using Microsoft.Azure.Cosmos.Table;

namespace BookClubSignupProcessor.TableAccess
{
  public class BookClubSignupEntity : TableEntity
  {
    [IgnoreProperty]
    public string GenreSubscription
    {
      get { return PartitionKey; }
      set { PartitionKey = value; }
    }

    [IgnoreProperty]
    public string UniqueName
    {
      get { return RowKey; }
      set { RowKey = value; }
    }

    public string Name { get; set; }
    public string Email { get; set; }
    public string Genre { get; set; }
  }
}
We'll start by inheriting from the TableEntity class, we need to do this to be able to use this class with the TableOperation object.
A TableEntity has two important properties that we need to use when accessing our data
- PartitionKey: How we split our data in across data partitions
- RowKey: The unique identifier within our data partition.
Between the two properties, our entity needs to be unique in our Table, otherwise, we are going to get errors.
We've wrapped these fields inside of properties that are ignored when the data is serialised to the table itself. This is primarily so that our code remains readable. Rather than have Azure information spread throughout our code, we now have properties which have meaning to the code.
To complete our class we still need the actual data that we are going to be storing. Now we can consume these classes in our function to store our data.
Write to the table
We need to change the function itself to use our new classes.
- Open the
BookClubSignupProcessorclass - Replace the code in the
Runmethod with the code snippet below
var tableAccess = new StorageTableAccess("BookClucbSignups");
await tableAccess.Insert(AdaptRequest(request));
We need to update our using statements so that we can use the StorageTableAccess class. If we put the cursor on the StorageTableAccess in the code and press ctrl + . Visual Studio will offer to do this for us.
Complete the BookClubSignupProcessor class
- Copy the code below
- Paste the following code at the end of the
BookClubSignupProcessorclass
private static BookClubSignupEntity AdaptRequest(BookClubSignupRequest request)
{
  var ticks = DateTime.Now.Ticks;
  return new BookClubSignupEntity
  {
    GenreSubscription = $"{request.Genre}",
    UniqueName = $"{request.Name}:{ticks}",
    Name = request.Name,
    Email = request.Email,
    Genre = request.Genre
  };
}
This takes our request and adapts it to a BookClubSignupEntity to be stored.
One more thing that needs to be done before we can run this code. We can see that the asynchronous call to the tableAccess.Insert has a squiggle. That's because the Run method created by the new project wizard makes the function synchronous by default.
- Add
asyncto the function signature as below.
public static async void Run([QueueTrigger("bookclubsignups")] BookClubSignupRequest request, ILogger log)
The the function
Now we can run our function! Make sure that we have some data waiting in the queue again and hit F5!
When the function has fired we should be able to refresh the view in our Azure Storage Explorer and see the following table has been created:
And if we look in the table we should see the data that we sent to the WebAPI waiting for us!

Closure and Next Steps
You can find the endpoint in the GitHub repo here
Clone the repo, if you haven't already and check out step-two-start
You now have a solution that will write your users request to a queue, read that queue with a function and then turn that request into data stored in a function table.
This has been a quick skim through and is just the start of making a maintainable cloud solution. In the following posts, over the coming months, we'll be
- Provisioning an environment in Azure that can host this app so that we can see it in action
- Taking a look at the Azure cost calculator so that we can check what the associated costs of that environment will be
- Taking a deeper dive into each of the Azure resources we need for this experiment
- Taking a deeper dive into each of the APIs that we are using to access them!
- Finally, we'll be automating the deployment, using Azure DevOps, and quickly throwing a static Angular site into the air so that we can interact with our API
Further Reading
Azure.Storage.Queues Namespace
Microsoft.Azure.Cosmos.Table Namespace
- Introduction to Azure Cosmos DB: Table API - This is aimed more at the Cosmos DB usage, but is also relevant for Azure Table Storage
- Documentation

Oldest comments (0)