Ensure Upgrade
I think the very first step that you need to do is ensure that your Visual Studio 2019 installation is upgraded to the latest version. Mine is Microsoft Visual Studio Enterprise 2019 Version 16.9.6. If it is not at least that version go through the update process to get it updated.
Setting Up
In this example I chose to one of our service to debug. Of course the next step is to do an installation in your namespace which includes this pod. Open the dashboard and toggle to your namespace and then deployments. Edit the deployment for it and add the following lines:
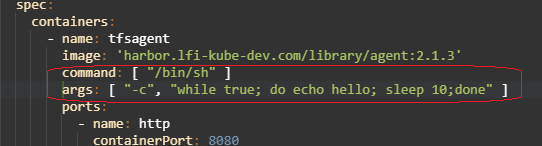
Doing this will override the default entry point of the pod, so the actual service would have to be started manually. But since the loop will run indefinitely, you can remote in again and again without Kubernetes taking it down when your app is terminated. (You might want to make a test change and copy in new test code and restart it.)
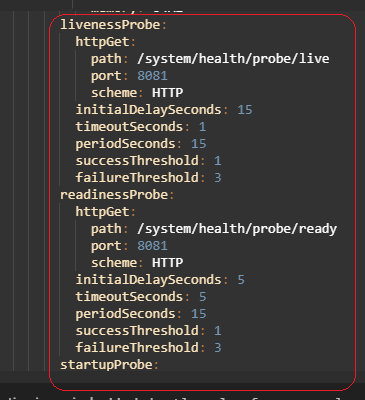
Incidentally if your deployment has a probes section, you might want to remove those for the duration of the debugging session. Since the service is not running, as this is, none of the Kubernetes probes can be responded to. Therefore, the pod will be flagged as "sick", it will not be considered READY, and it will not pass STARTUP, LIVELINESS, or READINESS probes. This would be okay if you remote in and start the service manually within a minute or two. But if you want a more carefree experience, the solution for this is simple. Simply delete the probes section from the deployment yaml.
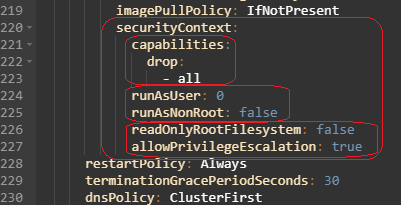
One more consideration is that if your service specifies a securityContext, you might run into issues installing ssh or other utilities. Consider removing this section from the deployment temporarily as well.
Install Utilities (SSH)
Using the dashboard, remote into the pod. Use the following commands to install OpenSSH.
Alpine
apk update
apk add openssh
Ubuntu
apt-get update
apt-get install openssh-server
For the rest of my post I'll be writing from the perspective of a pod based on an Alpine image.
You need to setup SSH and get the daemon running. There are two things to do here. First open a new text file in the root of the pod by typing:
vi key
The editor will open in its terminal full screen mode. Press the i key to enable input. Copy the following script and paste it into the window:
#!/bin/sh

if [ ! -f "/etc/ssh/ssh_host_rsa_key" ]; then
        # generate fresh rsa key
        ssh-keygen -f /etc/ssh/ssh_host_rsa_key -N '' -t rsa
fi
if [ ! -f "/etc/ssh/ssh_host_dsa_key" ]; then
        # generate fresh dsa key
        ssh-keygen -f /etc/ssh/ssh_host_dsa_key -N '' -t dsa
fi

#prepare run dir
if [ ! -d "/var/run/sshd" ]; then
  mkdir -p /var/run/sshd
fi

exec "$@"
Press ESC to leave input mode, and then press :wq, to write and quit.
Set the permissions of the newly created file to enable execution, and then execute it:
chmod 777 key
./key
This will create the RSA key needed for OpenSSL to work.
Next modify the sshd config file to allow root login. Type the following:
vi /etc/ssh/sshd_config
Use the arrow keys, i command and ESC to find and edit this file and make the changes to the lines circled in this screenshot:
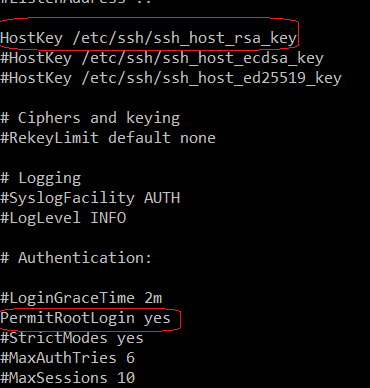
As before, press ESC and then :wq to save and exit the file.
You now need to give the root account a password. Type:
passwd
And it will prompt you twice for a new password. If it warns you that the password you entered was too short thats ok, it saves it anyway.
Now you need to start the SSHD daemon. Type:
/usr/sbin/sshd
ps -A
Verify that sshd appears in the process list.
At this point, start the application code.
cd /<yourappfolder>
dotnet <YourApp.WebAPI>.dll
It won't return to the prompt so you will need to refresh the browser window to get a new shell, if you even need one.
At this point, sshd is running, as well as the application. sshd is listening on pod port 22 which is the default. How can we get access to that port from the desktop where Visual Studio is running?
In order to do that, we need to create a service that exposes a NodePort and forwards traffic from that port to a port on the master node of the cluster.
I created a yaml template for such a service. I'll paste mine and describe which fields you will need to change for your installation. Here is mine.
kind: Service
apiVersion: v1
metadata:
  name: mm-app-ssh-service
  namespace: steve-sims
spec:
  ports:
    - name: ssh
      protocol: TCP
      port: 22
      targetPort: 22
  selector:
    app.kubernetes.io/instance: <instancename>
    app.kubernetes.io/name: <name>
    pod-template-hash: <hash>
  type: NodePort
  sessionAffinity: None
  externalTrafficPolicy: Cluster
The two (or three) fields that you will need to change are in the selector section, as well as the namespace at the top.
Open the dashboard and go to pods and click on the pod link for the pod that is running your application. Locate this section:

The fields I have circled are the ones that you need to replace in your service.yaml shown above.
You can create the service using the + sign in the upper right part of the dashboard. Or alternatively, you can save it to a file on your disk, and do a
kubectl apply -f <filename>
either way.
To find the port that was exposed for your ssh instance, from your desktop type:
kubectl get svc

Note that, for me, the port was forwarded to port 31295 of my master node machine.
Test your ssh instance from a command prompt window on your desktop. Type:
ssh -p 31295 -l root
except replace the machine name with the master node name of your cluster, and the port number from the one assigned for your service. Here you can see my session where I am testing it:
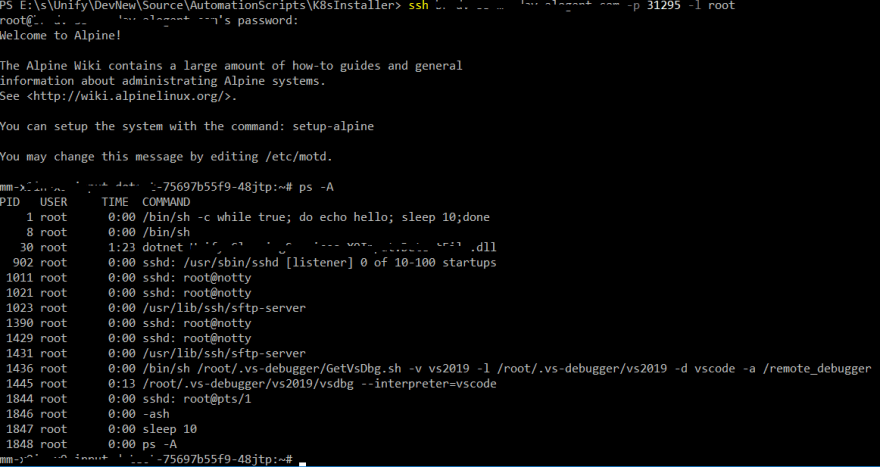
Get your desktop ready for debugging
Ok now, open Visual Studio 2019, and get the sources that match the code running on your pod. Compile them. Set the project for your app as the Startup Project. Choose Debug -> Attach to Process.

Oldest comments (2)
Ah...ran out of room. I will continue in a Part 2 post.
dev.to/stevesims2/step-through-deb...
In the above text the line that appears as
ssh -p 31295 -l rootshould bessh masternode.yourdomain.com -p 31295 -l rootI cannot edit this post any longer due to length limitations.