
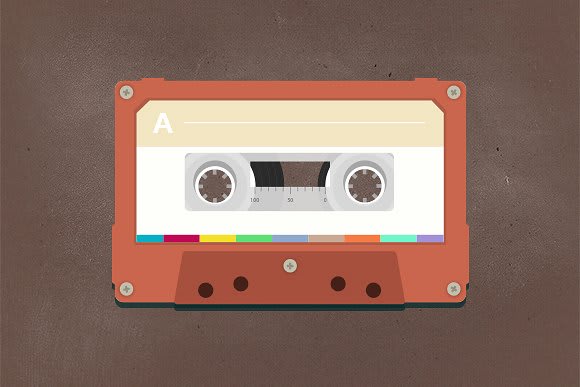
For mid-aged generations and mine included, it is always nice to see the carriers of the music of the previous time. There is always that nostalgia of back in the days when you turned from page A to page B to hear the rest of the music on the tape.
So I have decided to devote this project to those times.
Short HTML DOM definition
With the HTML DOM(Document Object Model) we are making it possible for JavaScript to make changes to CSS, HTML, to add or remove objects, to move objects etc.
And today I will show you what I think is the basic HTML DOM example, and I hope that it will be helpful in any way.
The design and code
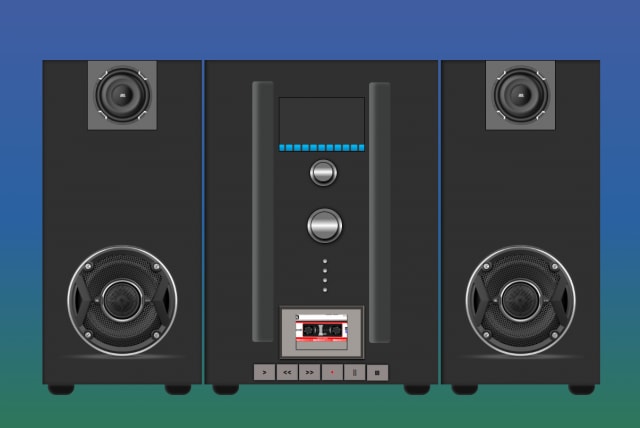
For this project, I decided to use a music system with a cassette player, in the HTML code I have put the left speaker right speaker and the main body, and most of it is explained with the comments in the HTML code. The play and pause button are working while the rest of the buttons are for decoration. I have used basic keyboard shapes for the buttons, and yes I could have drawn them with CSS, but because it is a personal project have decided to use shapes from keyboard buttons. And the following HTML code looks like this :
<div class="player-container" style="width:1050px ">
 <!--Left speaker of the music system-->
 <section class="left-speaker">
 <img src="https://preview.ibb.co/bY9thd/0018207_fpr_series_fpr12_02_12_inch_400w_rms_2_shallow_mount_car_audio_subwoofer.png" alt="left-woofer" height="130" width="130">
<img src="https://preview.ibb.co/n6mENd/GTO429_sq_001_1_3000x3000_300dpi_dv_HAMaster.png" alt="left-speaker" height="240" width="240">
     </section>
 <!--The main edit of the music system and its design-->
   <section class="main">
   <div class="left-border"></div>
   <img src="https://orig00.deviantart.net/2c76/f/2013/103/8/f/equalizer_gif_by_harlequinamidst-d61k0al.gif" alt="radio-menu" height="100" width="160" style="margin: 70px -80px; display: none; border: 1px solid black;">
        <img src="https://image.ibb.co/d7YVA8/equalizer_gif_by_harlequinamidst_d61k0al.jpg" alt="beginner-Phase"height="100" width="160" style="margin: 70px -80px; border: 1px solid black;" >
 <div class="outerCircle"><div class="inner-circle"></div></div>
<div class="volume"><div class="volume-circle"></div></div>
<div class="right-border"></div>
<!--Decoration buttons-->
<div class="buttons">
       <button></button>
       <button></button>
       <button></button>
       <button></button>
             </div>
<!--Positioning the cassete player-->
    <div class="Casette-and-Buttons">
 <img src="https://preview.ibb.co/ghdUxd/compact_cassette_157537_960_720.png" height="85" width="130" alt="tape" style="margin:128px -62px">
 <img src="https://image.ibb.co/nwmv3J/roll_1.png" id="roll" height="15" width="15" style="margin:166px 11px;">
  <img src="https://image.ibb.co/nwmv3J/roll_1.png" id="scndroll" height="15" width="15" style="margin:166px -83px;">
  <img src="https://image.ibb.co/mSYCHd/boombox_wallpaper_HD3.png" alt="boombox_wallpaper_HD3" border="0" height="100" width="160" style="margin:120px 17px; box-shadow: 0px 1px 4px 0px black">
    <div class="tape-buttons">
    <button id="play"onmousedown="music.play()">></button>
     <button> << </button>
     <button> >> </button>
    <button  style="color: red;"> • </button>
    <button onmousedown="music.pause();" id="pause"> ||</button>
     <button style="height: 30px; font-size: 10px;">  ⬛ </button>
     </div>
     </div>

    </section>
   <!--Right speaker of the music system-->
 <section class="right-speaker">
  <img src="https://preview.ibb.co/bY9thd/0018207_fpr_series_fpr12_02_12_inch_400w_rms_2_shallow_mount_car_audio_subwoofer.png" alt="right-woofer" height="130" width="130">
  <img src="https://preview.ibb.co/n6mENd/GTO429_sq_001_1_3000x3000_300dpi_dv_HAMaster.png" alt="right-speaker"  height="240" width="240">
        </section>

            <!--Legs of the system-->
  <div class="legs" style="margin: 0px 10px;"></div>
  <div class="legs"  style="margin: -20px 230px;"></div>
  <div class="legs"  style="margin: 0px 320px;"></div>
  <div class="legs"  style="margin: -20px 680px;"></div>
  <div class="legs"  style="margin: 0px 770px;"></div>
  <div class="legs"  style="margin: -20px 990px;"></div>
    </div>
The styling
With the CSS design of the cassette player, I have included some photo edit for the tape holder and made a hole within the tape so I could include some animation effect when buttons are active that I will show you in the JavaScript code, I won't show you a bigger detail of the CSS, as the main topic is the HTML DOM, you can find more details on the Codepen page whose link I will put as at the end of the page. But first to show you some of the CSS code :
.left-speaker{
    float: left;
    background:rgb(48, 48, 48);
    height: 610px;
    width:300px;
    text-align: center;
    box-shadow: inset 1px 1px 10px 0px rgba(0, 0, 0, 0.548);
}

.main{
    width:440px;
    height: 610px;
    background:rgb(48, 48, 48);
    margin: 0 auto;
    box-shadow: inset 4px 1px 8px 0px rgba(0, 0, 0, 0.555);
   }

.right-speaker{
    float: right;
    background:rgb(48, 48, 48);
    height: 610px;
    width:300px;
    margin:-610px 0;
    text-align: center;
    box-shadow: inset 4px 2px 10px 0px rgba(0, 0, 0, 0.548);
}
After positioning and designing the sides and the middle of the player, it was time to put a further detail into the mainboard, and that is the deco buttons, volume and radio search wheel, and positioning of the equalizer animation. Here a short view on the CSS
.outerCircle{
    background: linear-gradient(rgb(117, 117, 117),rgb(117, 117, 117),white,rgb(117, 117, 117),rgb(117, 117, 117));
    height: 50px;
    width: 50px;
    border-radius: 80px;
    margin: -60px 198px;
    text-align: center;
    box-shadow: 1px 1px 8px 1px rgba(0, 0, 0, 0.658);
    border:1px solid black;
}

.inner-circle{
height:35px;
width: 35px;
border-radius:90px;
border:1px solid black;
margin:5px auto;
box-shadow: 1px 3px 5px 1px black;
background: linear-gradient(rgb(117, 117, 117),rgb(117, 117, 117),white,rgb(117, 117, 117),rgb(117, 117, 117));
}


.volume-circle{
height:50px;
width: 50px;
border-radius:90px;
border:1px solid black;
margin:5.5px auto;
box-shadow: 1px 3px 5px 1px black;
background: linear-gradient(rgb(117, 117, 117),rgb(117, 117, 117),white,rgb(117, 117, 117),rgb(117, 117, 117));
}


button{
    height:8px;
    padding:2px 3px;
    border-radius: 80px;
    box-shadow: 1px 1px 4px 0px black;
    background:linear-gradient(rgb(117, 117, 117),white);
    border:1px solid rgb(117, 117, 117);
    margin: 0px 2px;
     }
After the further design of colors and backgrounds the Music system should look like this :
So finally it is time to use the HTML DOM, with the DOM we will be able to use the animation and import a song.
For importing a song I have used soundjay.com that has lots of free music effects and songs, feel free to check it out, in the code I have shown the main example of importing a sound in JavaScript.
To come back to the topic, I have used the const declaration and selected the elements and ID's that I have put in HTML.
With importing the sound, I have set a playBtn click event and its function that I named playClick. So basically when I click on the play button following event will happen and the CSS changes will occur.
//Setting up the animation to react on the play button
const animation = document.querySelector("#roll");
const scndAnimation = document.querySelector("#scndroll")
const noEqualizer = document.querySelector('img[alt="beginner-Phase"]');
const equalizer = document.querySelector('img[alt="radio-menu"]');
const playBtn = document.querySelector("#play");

//Importing music
//Basic way of importing a song or a music tone
const music = new Audio();
music.src = "https://www.soundjay.com/free-music/sounds/iron-man-01.mp3";

//Triggering the click event

playBtn.addEventListener("mousedown", playClick);

function playClick(){
    animation.style.animationName = "spin";
    scndAnimation.style.animationName = "spin";
    equalizer.style.display = "inline";
    noEqualizer.style.display = "none";

}


//Setting up the pause button

const pauseBtn = document.querySelector("#pause");

pauseBtn.addEventListener("mousedown", pauseClick);

function pauseClick(){
    animation.style.animationName = "none";
    scndAnimation.style.animationName = "none"
    equalizer.style.display = "none";
    noEqualizer.style.display = "inline";
}
By pressing the pause button pauseClick function will be activated and events and CSS changes will pause when the button is activated, with that we have made the play and the pause button active.
In the end, the finished project looks like this:
NOTE the pen is optimized for desktop and laptop, the screen here is small you can either scroll to the buttons or you can check the full project on CodePen which I highly recommend 🙂
Thank you for taking the time to read this article, I hope sincerely that you enjoyed it, and if you had any troubles understanding DOM, hopefully, this article was able to help you in any way. 🙂

Top comments (0)