
Introduction
With the evolution of technology, mobile application development processes are also evolving. In this article, we will explore how using Flutter and Riverpod for Strapi API and GraphQL integration can simplify and even transform application development processes.
The modern application development process with Flutter, Riverpod, and Strapi offers developers flexibility and scalability. With these technologies, you can create user-friendly and high-performance mobile applications. These aspects of application development play a critical role in the success of your project.
Prerequisites
Before starting the tutorial on developing a personal target tracking application with Flutter, Riverpod, Strapi, and GraphQL, ensure you meet the following requirements:
- Development Environment: Install Flutter and the Dart SDK from flutter.dev. Ensure you have Node.js installed for running Strapi.
- Knowledge Base: Basic familiarity with Flutter and Dart for mobile development, understanding of GraphQL for data handling, and experience with Node.js-based CMS like Strapi.
- Tools: A code editor like Visual Studio Code or Android Studio, equipped with support for Flutter and JavaScript.
Why Choose Riverpod for State Management?
In the realm of Flutter development, managing the state of an application can often become complex as the app grows. This is where Flutter Riverpod comes into play, offering a refined and advanced solution for state management that addresses the limitations of its predecessor, Provider. Here’s why Riverpod stands out:
- Scoped Access to State: Riverpod allows for the scoped access of state, ensuring widgets have access to the state they need and nothing more. This encapsulation enhances performance and reduces the likelihood of unintended side effects.
- Flexible State Modification: Riverpod simplifies state modification with its support for immutable state objects. By embracing the principles of immutability, it ensures that state changes are predictable and manageable.
-
Incorporating Riverpod with Freezed for Immutable State Management: To leverage Riverpod alongside Freezed in your Flutter project for even more robust state management, you'll be enhancing components like
GoalNotifierto efficiently handle immutable state. Freezed complements Riverpod by enabling the use of immutable objects in Dart, which aids in making your state management more predictable and safer. - Combining Strapi with GraphQL for your Flutter application: When managed with Riverpod, creates a robust, efficient, and flexible development ecosystem.
- Flexibility and Customizability: Strapi is a headless CMS that provides the flexibility to define your data structures (models), content types, and relations tailored to your application needs. This adaptability is crucial for Flutter apps requiring a custom data set.
Strapi, GraphQL, Flutter, and Riverpod create a cohesive development ecosystem that balances backend flexibility, efficient data management, cross-platform UI development, and robust state management. This combination is particularly potent for building modern, scalable, high-performance mobile applications requiring real-time data updates, custom content structures, and a smooth user experience across multiple platforms.
Content Flow
Requirements
- UI Development: Flutter widgets can easily create your application's user interface. This shapes the look and feel of your application.
- State Management: Developing the core part of your application with a state management system enhances the scalability and maintainability of your app. Riverpod offers a strong and flexible solution in this regard.
- Backend Integration: The ease provided by the Strapi API makes backend integration less cumbersome at this stage of the project. Working with Strapi offers a significant advantage in terms of data management and API calls.
Integration Steps:
- Setting Up Components: Create your application's user interface (UI) components.
- Creating Providers: Use Riverpod to create providers for state management. These providers manage the data flow between different parts of your application.
- Adding Routers: Set up routers to manage transitions between pages. This ensures a smooth navigation experience within the app.
- Testing with Mock Data: In the initial stage, test your providers and UI components with mock data. This provides quick feedback on your application's data structures and workflows.
Transition from Mock Data to Strapi and GraphQL:
- Strapi Setup and Configuration: Set up your Strapi project and create the necessary API endpoints. These endpoints define the data types and structures your application needs.
- Defining GraphQL Schemas: From the Strapi administration panel, define your GraphQL schemas. These schemas determine the structure of the data your application will query from Strapi.
- Updating Your Providers: Update the providers in your application to make queries to real Strapi endpoints instead of mock data. Configure your Riverpod providers to execute your GraphQL queries and connect the data to your application.
- Queries and Mutations: Write your GraphQL queries and mutations. These queries enable your application to fetch or send data to Strapi.
Before starting your project, it's essential to have your Flutter development environment properly set up. This requires having the Dart SDK and downloading Flutter directly from its official website (flutter.dev). To verify you are using the latest version of Flutter, run the flutter doctor command in your terminal.
flutter doctor
Doctor summary (to see all details, run flutter doctor -v):
[✓] Flutter (Channel stable, 3.19.6, on macOS 14.4.1 23E224 darwin-arm64, locale en-DE)
[✓] Android toolchain - develop for Android devices (Android SDK version 34.0.0)
[✓] Xcode - develop for iOS and macOS (Xcode 15.3)
[✓] Chrome - develop for the web
[✓] Android Studio (version 2023.1)
[✓] VS Code (version 1.88.1)
[✓] Connected device (3 available)
[✓] Network resources
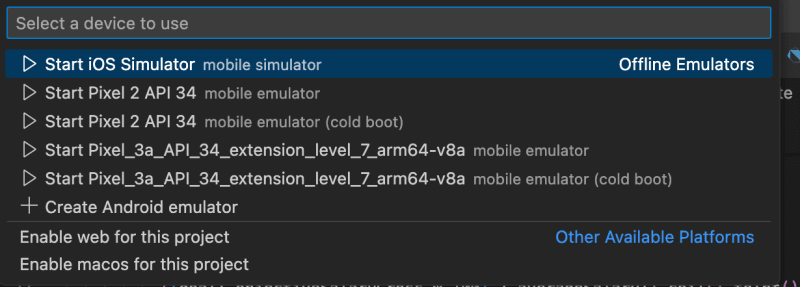
Additionally, if you're using an advanced Integrated Development Environment (IDE) like Visual Studio Code (VSCode), you can directly use iOS or Android emulators through the IDE.
We named our project personal_goals_app. This name reflects our aim to create an application where users can set personal goals. A clean Flutter setup and the establishment of a state management system with Riverpod greatly facilitate Strapi API integration.
Set Up Flutter Project
Through the terminal or command prompt, run the command below to create a new Flutter project named personal_goals_app.
flutter create personal_goals_app

Navigate to the created project directory by running the command below:
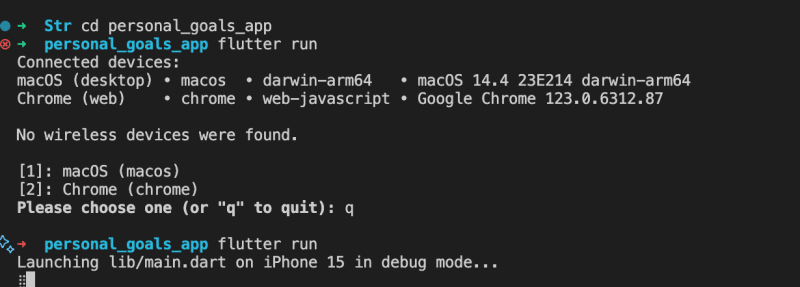
cd personal_goals_app
Start your application with the command below:
flutter run
This confirms that your first Flutter application is running successfully.
VSCode Command Palette:
VSCode Terminal:
The src/goals/components and src/goals/provider directories hold your UI components and state management logic, respectively. This separation makes your code more readable and manageable.
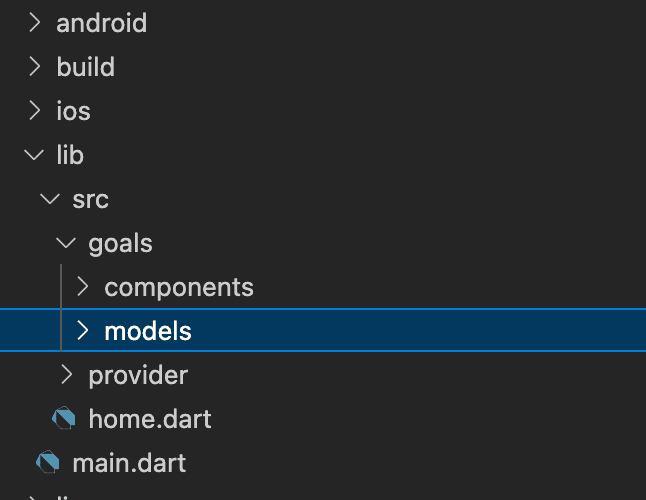
The src/goals directory contains your Goal model and general files. The main.dart file includes your application's navigation and basic settings.
Set Up Providers with Riverpod
State management is one of the cornerstones of modern application development. Riverpod stands out for its flexibility and ease of use in this area.
Navigate to your pubspec.yaml file and add the following line under dependencies to include Riverpod in your project:
dependencies:
  flutter:
    sdk: flutter

  # The following adds the Cupertino Icons font to your application.
  # Use with the CupertinoIcons class for iOS style icons.
  cupertino_icons: ^1.0.2
  flutter_riverpod: ^2.5.1
  intl: ^0.18.0
Define Goal Model
In the goal_model.dart file, define Goal model. Use the Goal class and GoalStatus enum.
enum GoalStatus { active, completed, pending }

enum GoalCategory { vacation, money, exercise, smoke, language }

class Goal {
  final String id;
  final String name;
  final String description;
  final DateTime startDate;
  final DateTime?
      endDate; // End date is optional because some goals might not have a specific end date
  final GoalCategory category;
  GoalStatus status;
  double?
      targetValue; // Numeric value representing the goal target (e.g., amount to save)
  double?
      currentValue; // Current progress towards the goal (e.g., current savings)

  Goal({
    required this.id,
    required this.name,
    required this.description,
    required this.startDate,
    this.endDate,
    required this.category,
    this.status = GoalStatus.pending,
    this.targetValue,
    this.currentValue,
  });

  // Calculate the status of the goal based on dates
  static GoalStatus calculateStatus(DateTime startDate, DateTime endDate) {
    final currentDate = DateTime.now();
    if (currentDate.isAfter(endDate)) {
      return GoalStatus.completed;
    } else if (currentDate.isAfter(startDate)) {
      return GoalStatus.active;
    } else {
      return GoalStatus.pending;
    }
  }
}
Define Your State with Freezed
Create a new file for your state, e.g., goal_state.dart. Use Freezed to define an immutable state class. In this example, the state will directly hold a list of goals, but you could expand it to include other state properties as needed.
import 'package:freezed_annotation/freezed_annotation.dart';
import 'package:personal_goals_app/src/goals/models/goal_model.dart';
part 'goal_state.freezed.dart';

@freezed
class GoalState with _$GoalState {
  const factory GoalState({
    @Default([]) List<Goal> goals,
  }) = _GoalState;
}
Create a State Notifier:
In the lib/src/providers directory, create a file named goal_provider.dart. In this file, set up a structure using StateNotifier that allows you to add, update, and delete goals.
import 'package:flutter_riverpod/flutter_riverpod.dart';
import 'package:personal_goals_app/src/goals/models/goal_model.dart';
import 'package:personal_goals_app/src/provider/goal_state.dart';

class GoalNotifier extends StateNotifier<GoalState> {
  GoalNotifier()
      : super(GoalState(goals: [
          Goal(
            id: '1',
            name: 'Vacation in Milan',
            description: 'Enjoy the beauty of Milan',
            startDate: DateTime(2024, 04, 29),
            endDate: DateTime(2024, 11, 1),
            category: GoalCategory.vacation,
            status: GoalStatus.active,
          ),
          Goal(
            id: '2',
            name: 'Quit Smoking',
            description:
                'Reduce cigarette intake gradually and increase smoke-free days',
            startDate: DateTime.now(),
            endDate: DateTime.now().add(const Duration(days: 90)),
            category: GoalCategory.smoke,
          ),
        ]));

  // Add a new goal
  void addGoal(Goal goal) {
    state = state.copyWith(goals: [...state.goals, goal]);
  }

  // Update an existing goal
  void updateGoal(String id, Goal updatedGoal) {
    state = state.copyWith(
      goals: state.goals
          .map((goal) => goal.id == id ? updatedGoal : goal)
          .toList(),
    );
  }

  // Delete a goal
  void deleteGoal(String id) {
    state = state.copyWith(
      goals: state.goals.where((goal) => goal.id != id).toList(),
    );
  }
}

final goalProvider = StateNotifierProvider<GoalNotifier, GoalState>((ref) {
  return GoalNotifier();
});
Wrap Your Application with ProviderScope:
In the main.dart file, which is the main entry point of your application, wrap your MaterialApp widget with ProviderScope to make Flutter Riverpod's state management system available throughout your application.
void main() {
  runApp(const ProviderScope(child: MyApp()));
}
Setting Up Your Router and Components
Flutter operates through the main.dart file. In this file, you use the MaterialApp widget to bring your application to life and start it with runApp. Here, you can set up routing, define themes, and launch your homepage.
In the main.dart file, set up the navigation logic that will manage your application's transitions between pages.
void main() {
  runApp(const ProviderScope(child: MyApp()));
}

class MyApp extends StatelessWidget {
  const MyApp({super.key});

  @override
  Widget build(BuildContext context) {
    return MaterialApp(
      title: 'Flutter Strapi Api Demo',
      theme: ThemeData(
        colorScheme: ColorScheme.fromSeed(seedColor: Colors.deepPurple),
        useMaterial3: true,
      ),
      home: const HomePage(),
      initialRoute: '/',
      routes: {
        '/start': (context) => StartGoal(),
        '/add': (context) => const GoalFormPage(),
      },
      onGenerateRoute: (settings) {
        if (settings.name == '/edit') {
          final goal = settings.arguments as Goal;
          return MaterialPageRoute(
            builder: (context) {
              return GoalEditPage(goal: goal);
            },
          );
        }
        return null;
      },
    );
  }
}
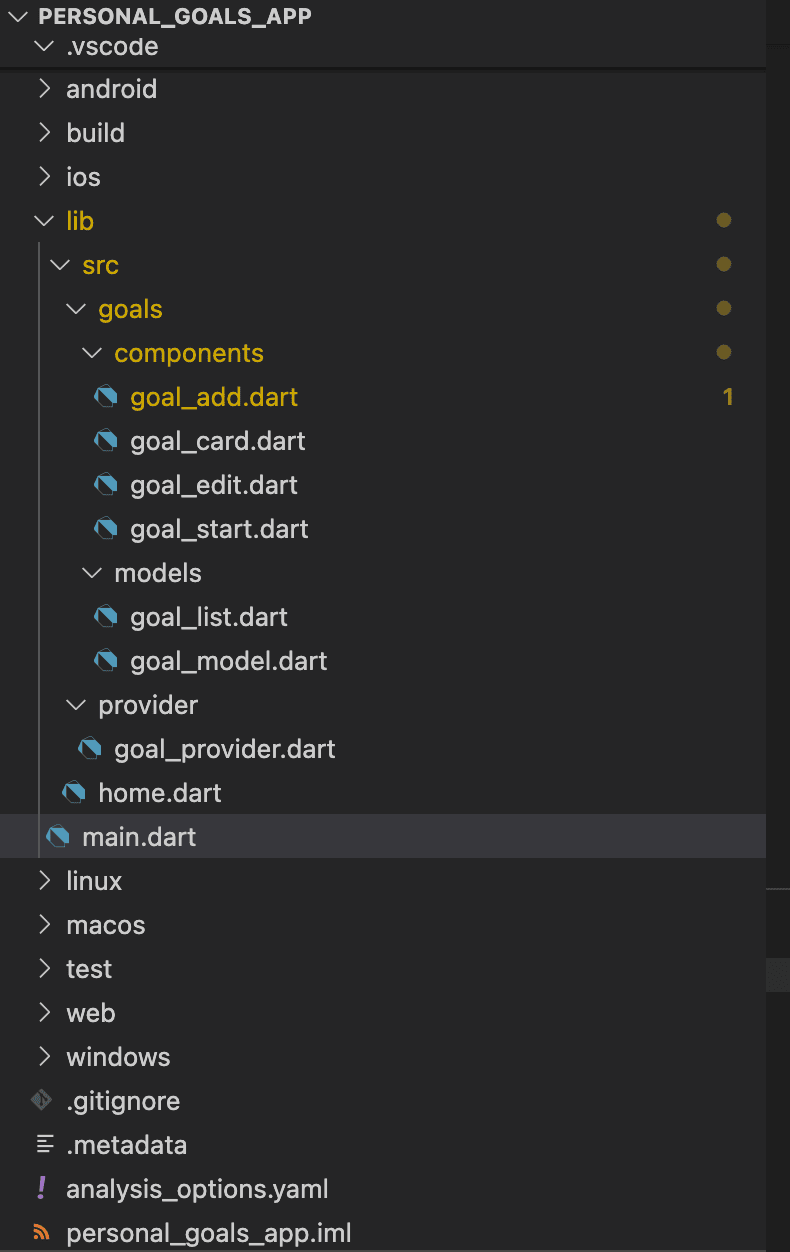
Create UI Components:
Now we need to expand the component structure in the src directory. So home.dart will list our goals. Creating detailed components like goal_add.dart, goal_edit.dart, goal_start.dart, goal_card.dart will make our work and state management easier as the project progresses.
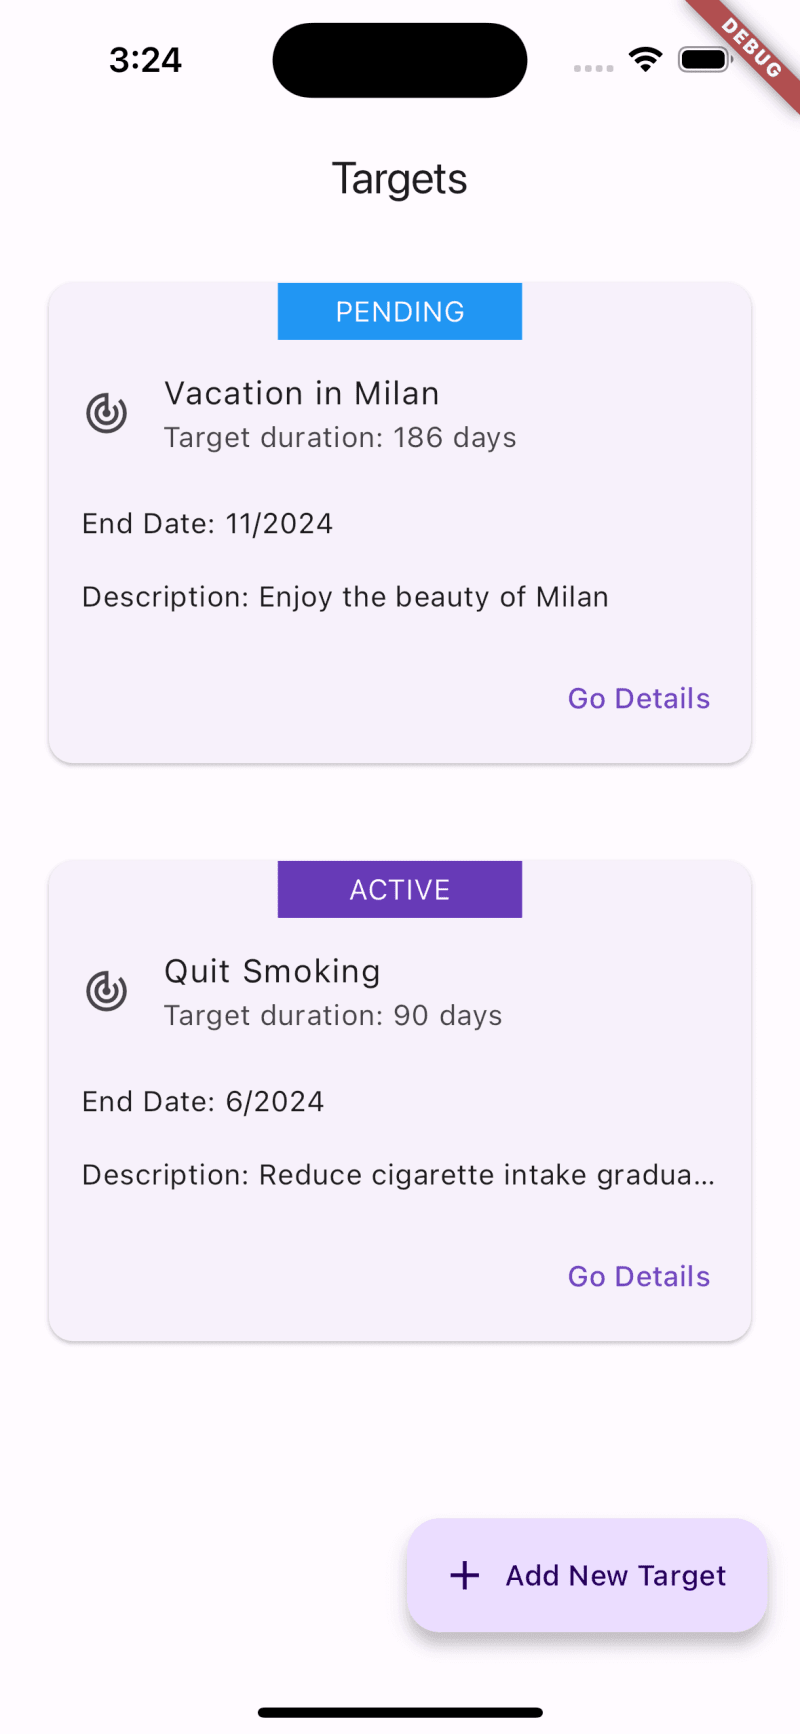
Implement Home Page:
Implement the Home page in home.dart.
- Display a list of goal cards.
- Use a
FloatingActionButtonto navigate to the “Add Goal” page. - Call the provider here to read data.
class HomePage extends ConsumerWidget {
  const HomePage({Key? key}) : super(key: key);

  @override
  Widget build(BuildContext context, WidgetRef ref) {
    final goals = ref.watch(goalProvider).goals;

    return Scaffold(
      appBar: AppBar(
        title: const Text('Targets'),
      ),
      body: ListView.builder(
        itemCount: goals.length,
        itemBuilder: (context, index) {
          final goal = goals[index];
          return GoalCard(goal: goal);
        },
      ),
      floatingActionButton: FloatingActionButton.extended(
        onPressed: () {
          Navigator.pushNamed(context, '/start');
        },
        label: const Text('Add New Target'),
        icon: const Icon(Icons.add),
      ),
    );
  }
}
Create Goal Cards:
Create Goal cards in goal_card.dart.
- Design a card widget that displays goal information.
- Add buttons or gestures to each card to trigger edit or delete actions.
class GoalCard extends StatelessWidget {
  final Goal goal;

  const GoalCard({Key? key, required this.goal}) : super(key: key);

  String formatDate(DateTime date) {
    return '${date.month}/${date.year}';
  }

  Color getStatusColor(GoalStatus status) {
    switch (status) {
      case GoalStatus.active:
        return Colors.deepPurple;
      case GoalStatus.pending:
        return Colors.blue;
      case GoalStatus.completed:
        return Colors.green;
      default:
        return Colors.grey;
    }
  }

  @override
  Widget build(BuildContext context) {
    goal.status = Goal.calculateStatus(goal.startDate, goal.endDate!);

    return Card(
      margin: const EdgeInsets.all(24),
      child: Column(
        mainAxisSize: MainAxisSize.min,
        children: <Widget>[
          Container(
            width: 120,
            color: getStatusColor(goal.status),
            padding: const EdgeInsets.symmetric(vertical: 4, horizontal: 16),
            alignment: Alignment.center,
            child: Text(
              goal.status.toString().split('.').last.toUpperCase(),
              style: const TextStyle(color: Colors.white),
            ),
          ),
          ListTile(
            leading: const Icon(Icons.track_changes),
            title: Text(goal.name),
            subtitle: Text(
              'Target duration: ${goal.endDate?.difference(goal.startDate).inDays ?? 'N/A'} days',
            ),
          ),
          Padding(
            padding: const EdgeInsets.symmetric(horizontal: 16.0, vertical: 8),
            child: Row(
              mainAxisAlignment: MainAxisAlignment.spaceBetween,
              children: [
                Expanded(
                  child: Text(
                    "End Date: ${goal.endDate != null ? formatDate(goal.endDate!) : 'N/A'}",
                    textAlign: TextAlign.left,
                  ),
                ),
              ],
            ),
          ),
          Padding(
            padding: const EdgeInsets.symmetric(horizontal: 16.0, vertical: 8),
            child: Row(
              mainAxisAlignment: MainAxisAlignment.spaceBetween,
              children: [
                Expanded(
                  child: Text(
                    "Description: ${goal.description}",
                    overflow: TextOverflow.ellipsis,
                  ),
                ),
              ],
            ),
          ),
          ButtonBar(
            children: [
              TextButton(
                child: const Text('Go Details'),
                onPressed: () {
                  Navigator.pushNamed(context, '/edit', arguments: goal);
                },
              ),
            ],
          ),
          const SizedBox(height: 40)
        ],
      ),
    );
  }
}
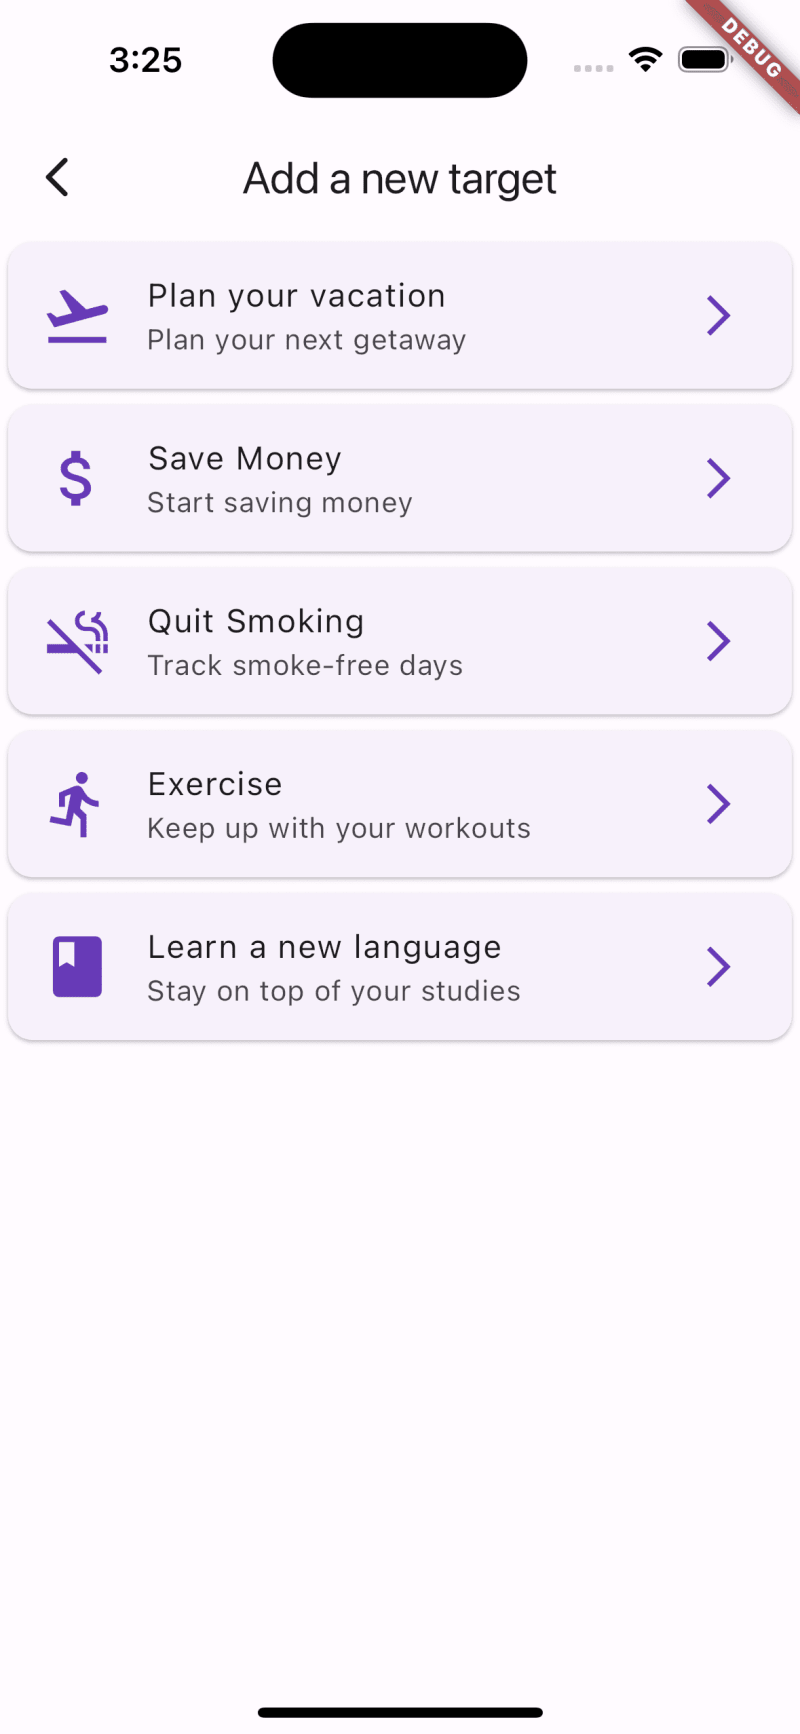
Build the Start Goal Page in goal_start.dart:
Inside the goal_start.dart file, build the "Start Goal” page.
class StartGoal extends StatelessWidget {
  StartGoal({super.key});

  final List<GoalList> targetList = [
    GoalList(
      title: 'Plan your vacation',
      icon: Icons.flight_takeoff,
      subtitle: 'Plan your next getaway',
    ),
    GoalList(
      title: 'Save Money',
      icon: Icons.attach_money,
      subtitle: 'Start saving money',
    ),
    GoalList(
      title: 'Quit Smoking',
      icon: Icons.smoke_free,
      subtitle: 'Track smoke-free days',
    ),
    GoalList(
      title: 'Exercise',
      icon: Icons.directions_run,
      subtitle: 'Keep up with your workouts',
    ),
    GoalList(
      title: 'Learn a new language',
      icon: Icons.book,
      subtitle: 'Stay on top of your studies',
    ),
  ];

  @override
  Widget build(BuildContext context) {
    return Scaffold(
      appBar: AppBar(title: const Text('Add a new target')),
      body: ListView.builder(
        itemCount: targetList.length,
        itemBuilder: (BuildContext context, int index) {
          return Card(
            child: ListTile(
              leading: Icon(
                targetList[index].icon,
                size: 36,
                color: Colors.deepPurple,
              ),
              title: Text(targetList[index].title),
              subtitle: Text(targetList[index].subtitle),
              trailing: const Icon(
                Icons.arrow_forward_ios,
                color: Colors.deepPurple,
              ),
              onTap: () {
                Navigator.pushNamed(context, '/add');
              },
            ),
          );
        },
      ),
    );
  }
}
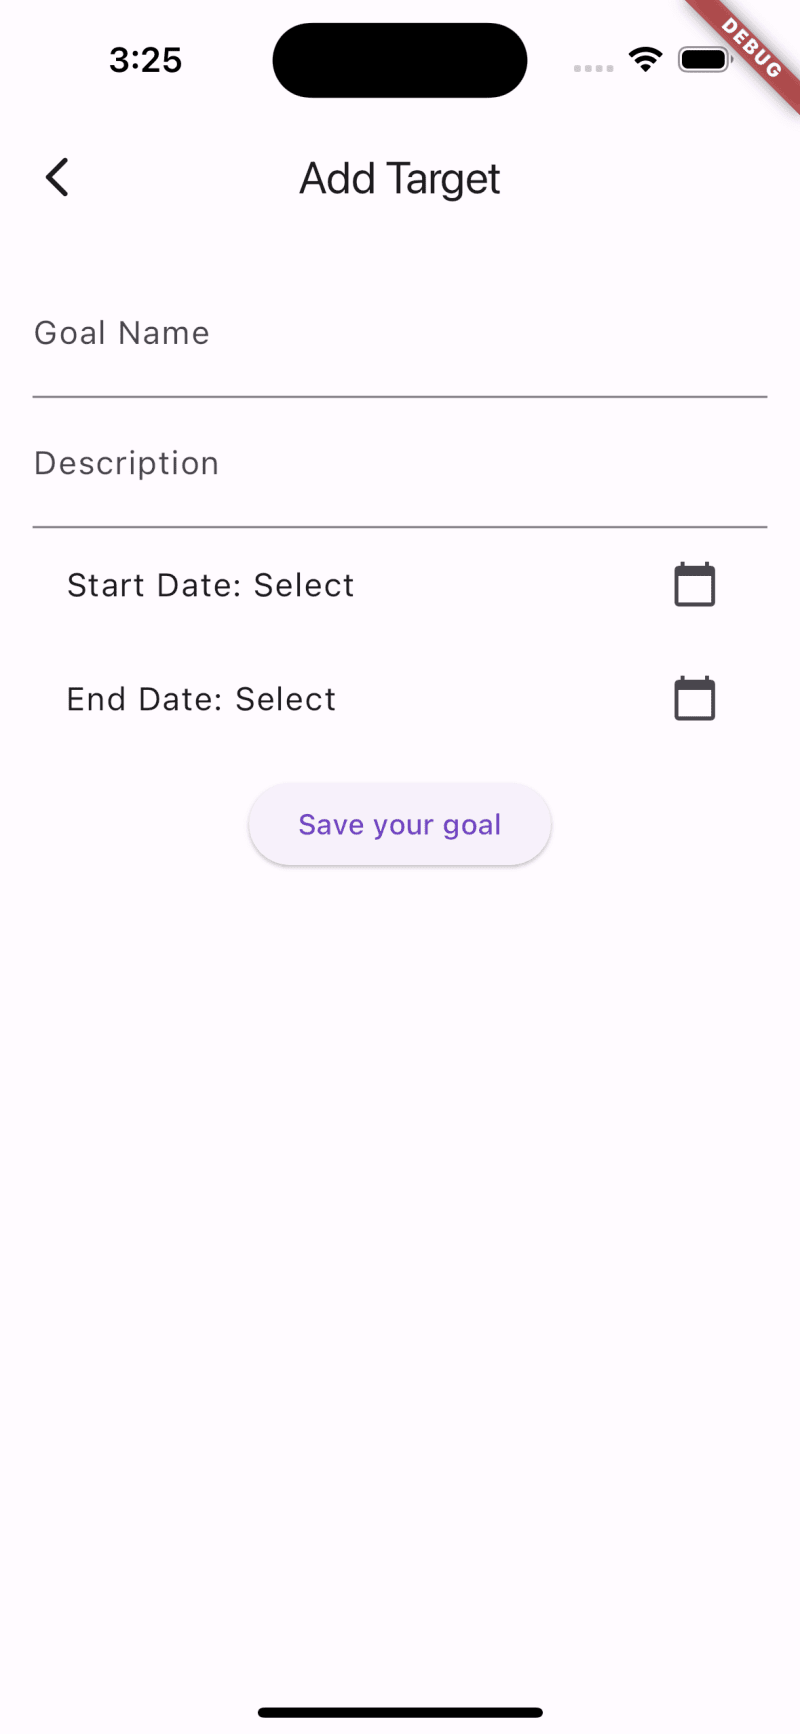
Build the “Add Goal” Page:
Inside the goal_add.dart, build the “Add Goal” page.
- Create a form for adding a new goal.
- Consider using a
PageViewif you want a step-by-step guide to input the information, but a single form would be simpler and is usually sufficient.
class GoalFormPage extends ConsumerStatefulWidget {
  const GoalFormPage({Key? key}) : super(key: key);

  @override
  GoalFormPageState createState() => GoalFormPageState();
}

class GoalFormPageState extends ConsumerState<GoalFormPage> {
  final _formKey = GlobalKey<FormState>();
  final TextEditingController _nameController = TextEditingController();
  final TextEditingController _descriptionController = TextEditingController();

  DateTime? _startDate;
  DateTime? _endDate;

  @override
  Widget build(BuildContext context) {
    return Scaffold(
        appBar: AppBar(title: const Text('Add Target')),
        body: Form(
            key: _formKey,
            child: SingleChildScrollView(
                padding: const EdgeInsets.all(16.0),
                child: Column(children: [
                  TextFormField(
                    controller: _nameController,
                    decoration: const InputDecoration(labelText: 'Goal Name'),
                    validator: (value) {
                      if (value == null || value.isEmpty) {
                        return 'Please enter a goal name';
                      }
                      return null;
                    },
                  ),
                  TextFormField(
                    controller: _descriptionController,
                    decoration: const InputDecoration(labelText: 'Description'),
                    validator: (value) {
                      if (value == null || value.isEmpty) {
                        return 'Please enter a description';
                      }
                      return null;
                    },
                  ),
                  ListTile(
                    title: Text(
                        'Start Date: ${_startDate != null ? DateFormat('yyyy-MM-dd').format(_startDate!) : 'Select'}'),
                    trailing: const Icon(Icons.calendar_today),
                    onTap: () async {
                      final picked = await showDatePicker(
                        context: context,
                        initialDate: DateTime.now(),
                        firstDate: DateTime.now(),
                        lastDate: DateTime(2050),
                      );
                      if (picked != null && picked != _startDate) {
                        setState(() {
                          _startDate = picked;
                        });
                      }
                    },
                  ),
                  ListTile(
                    title: Text(
                        'End Date: ${_endDate != null ? DateFormat('yyyy-MM-dd').format(_endDate!) : 'Select'}'),
                    trailing: const Icon(Icons.calendar_today),
                    onTap: () async {
                      final picked = await showDatePicker(
                        context: context,
                        initialDate: DateTime.now(),
                        firstDate: DateTime(2000),
                        lastDate: DateTime(2100),
                      );
                      if (picked != null && picked != _endDate) {
                        setState(() {
                          _endDate = picked;
                        });
                      }
                    },
                  ),
                  const SizedBox(
                    height: 10,
                  ),
                  ElevatedButton(
                    onPressed: _saveGoal,
                    child: const Text("Save your goal"),
                  )
                ]))));
  }

  void _saveGoal() {
    if (_formKey.currentState!.validate()) {
      final newGoal = Goal(
        id: DateTime.now().millisecondsSinceEpoch.toString(),
        name: _nameController.text,
        description: _descriptionController.text,
        startDate: _startDate ?? DateTime.now(),
        endDate: _endDate,
        category: GoalCategory.vacation,
        status: GoalStatus.active,
      );

      ref.read(goalProvider.notifier).addGoal(newGoal);

      Navigator.pop(context);
    }
  }
}
Craft the Edit Goal Page in goal_edit.dart:
- This will be similar to
goal_add.dartbut for editing existing goals. - Ensure you pass the
goalobject to be edited to this page.
class GoalEditPage extends ConsumerStatefulWidget {
  final Goal goal;

  const GoalEditPage({Key? key, required this.goal}) : super(key: key);

  @override
  ConsumerState<GoalEditPage> createState() => _GoalEditFormPageState();
}

class _GoalEditFormPageState extends ConsumerState<GoalEditPage> {
  final _formKey = GlobalKey<FormState>();
  final TextEditingController _nameController = TextEditingController();
  final TextEditingController _descriptionController = TextEditingController();

  DateTime? _startDate;
  DateTime? _endDate;
  @override
  void initState() {
    super.initState();
    _nameController.text = widget.goal.name;
    _descriptionController.text = widget.goal.description;
    _startDate = widget.goal.startDate;
    _endDate = widget.goal.endDate;
  }

  @override
  Widget build(BuildContext context) {
    return Scaffold(
        appBar: AppBar(title: const Text('Edit Target')),
        body: Form(
            key: _formKey,
            child: SingleChildScrollView(
                padding: const EdgeInsets.all(16.0),
                child: Column(children: [
                  TextFormField(
                    controller: _nameController,
                    decoration: const InputDecoration(labelText: 'Goal Name'),
                    validator: (value) {
                      if (value == null || value.isEmpty) {
                        return 'Please enter a goal name';
                      }
                      return null;
                    },
                  ),
                  TextFormField(
                    controller: _descriptionController,
                    decoration: const InputDecoration(labelText: 'Description'),
                    validator: (value) {
                      if (value == null || value.isEmpty) {
                        return 'Please enter a description';
                      }
                      return null;
                    },
                  ),
                  ListTile(
                    title: Text(
                        'Start Date: ${_startDate != null ? DateFormat('yyyy-MM-dd').format(_startDate!) : 'Select'}'),
                    trailing: const Icon(Icons.calendar_today),
                    onTap: () async {
                      final picked = await showDatePicker(
                        context: context,
                        initialDate: DateTime.now(),
                        firstDate: DateTime(2000),
                        lastDate: DateTime(2100),
                      );
                      if (picked != null && picked != _startDate) {
                        setState(() {
                          _startDate = picked;
                        });
                      }
                    },
                  ),
                  ListTile(
                    title: Text(
                        'End Date: ${_endDate != null ? DateFormat('yyyy-MM-dd').format(_endDate!) : 'Select'}'),
                    trailing: const Icon(Icons.calendar_today),
                    onTap: () async {
                      final picked = await showDatePicker(
                        context: context,
                        initialDate: DateTime.now(),
                        firstDate: DateTime(2000),
                        lastDate: DateTime(2100),
                      );
                      if (picked != null && picked != _endDate) {
                        setState(() {
                          _endDate = picked;
                        });
                      }
                    },
                  ),
                  const SizedBox(
                    height: 10,
                  ),
                  ElevatedButton(
                    onPressed: () {
                      if (_formKey.currentState!.validate()) {
                        Goal updatedGoal = Goal(
                          id: widget.goal.id,
                          name: _nameController.text,
                          description: _descriptionController.text,
                          startDate: _startDate!,
                          endDate: _endDate,
                          category: widget.goal.category,
                          status: widget.goal.status,
                        );

                        ref
                            .read(goalProvider.notifier)
                            .updateGoal(widget.goal.id, updatedGoal);

                        Navigator.pop(context);
                      }
                    },
                    child: const Text("Edit your goal"),
                  ),
                  const SizedBox(
                    height: 20,
                  ),
                  IconButton(
                    color: Theme.of(context).hintColor,
                    icon: Icon(
                      Icons.delete,
                      color: Theme.of(context).primaryColor,
                    ),
                    onPressed: () {
                      if (_formKey.currentState!.validate()) {
                        ref
                            .read(goalProvider.notifier)
                            .deleteGoal(widget.goal.id);

                        Navigator.pop(context);
                      }
                    },
                  )
                ]))));
  }
}

Transition from Mock Data to Strapi and GraphQL:
If you haven't already, start by installing Strapi CMS. You can choose to use Strapi in a project-specific manner or globally. For a new project, running the command below will set up a new Strapi project and start it with a SQLite database for quick development.
npx create-strapi-app my-project --quickstart
It's generally a good idea to keep your backend and frontend projects in separate directories to maintain a clear separation of concerns. This separation helps manage dependencies, version control, and deployment processes more efficiently for each part of your application.
In this setup, both your Flutter project (personal_goals_app) and your Strapi project (strapi_goals_app) are located under the same parent directory (strapi_flutter), but they are kept in separate folders.
strapi_flutter/
│
├── personal_goals_app/ # Your Flutter project
│ ├── lib/
│ ├── android/
│ ├── ios/
│ └── ...
│
└── strapi_goals_app/ # Your Strapi project
├── api/
├── config/
├── extensions/
└── ...

Setting up Strapi Content Types
Before you begin interacting with data in your Flutter app, you must define the appropriate content types in Strapi that mirror the structure of your app's goals.
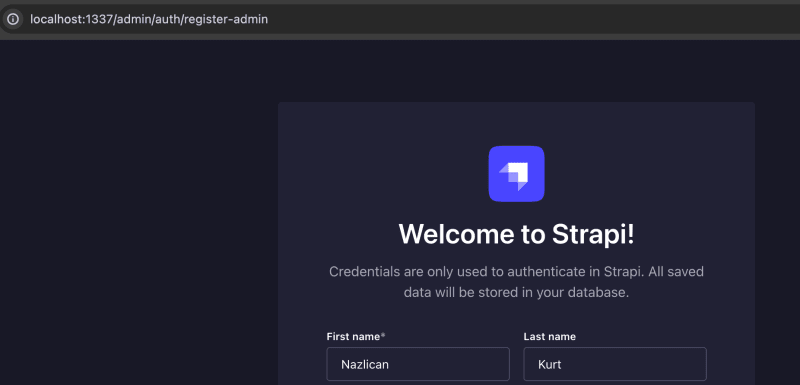
Log in to Strapi to access your Strapi admin panel.
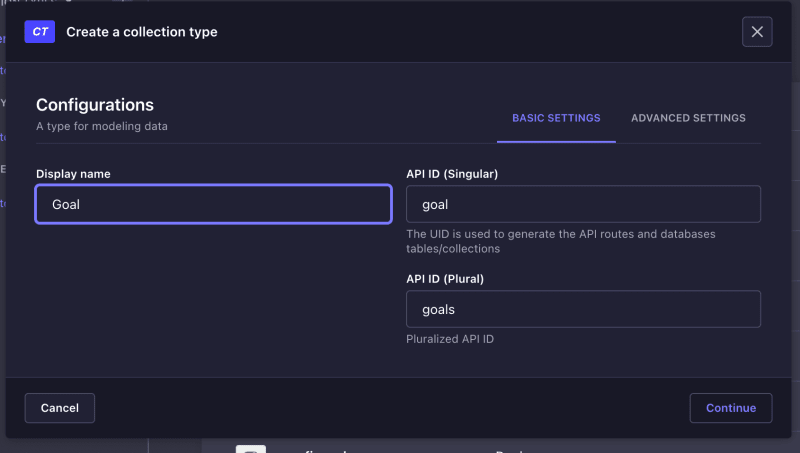
Head to the "Content-Types Builder" section.
Create a new content type named
Goal.
- Add fields corresponding to your Flutter app's goal model, such as:
- Name (Text)
- Description (Text)
- Start Date and End Date (Date)
- Category (Enumeration)
- Status (Enumeration with values like active, completed, pending, drafted).
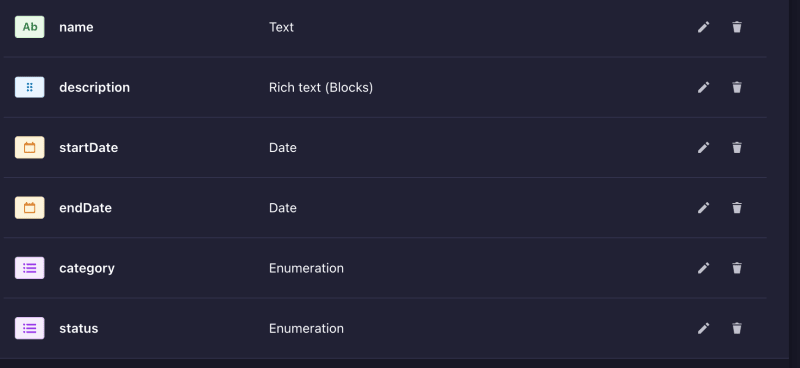
- Save Content Type: Save the content type, and Strapi will automatically restart.
Setting Permissions
In the Settings > Users & Permissions plugin > Roles section, configure the public role (or your preferred role) to have permissions to create, read, update, and delete entries for the Goal content types. This step is crucial for enabling interaction between your Flutter app and Strapi.

Defining GraphQL Schemas
- Enable GraphQL: Note that in Strapi v4, the GraphQL plugin is not installed by default. Install it by running the command below in your Strapi project directory.
npm run strapi install graphql
Strapi will auto-generate the GraphQL schema based on your content types, accessible at /graphql endpoint on your Strapi server.
See more here: https://pub.dev/packages/graphql_flutter
The final shape of my yaml file:
dependencies:
  flutter:
    sdk: flutter
  cupertino_icons: ^1.0.2
  flutter_riverpod: ^2.5.1
  build_runner: ^2.4.9
  freezed: ^2.4.7
  freezed_annotation: ^2.4.1
  intl: ^0.18.0
  graphql_flutter: ^5.1.0 —>newly added
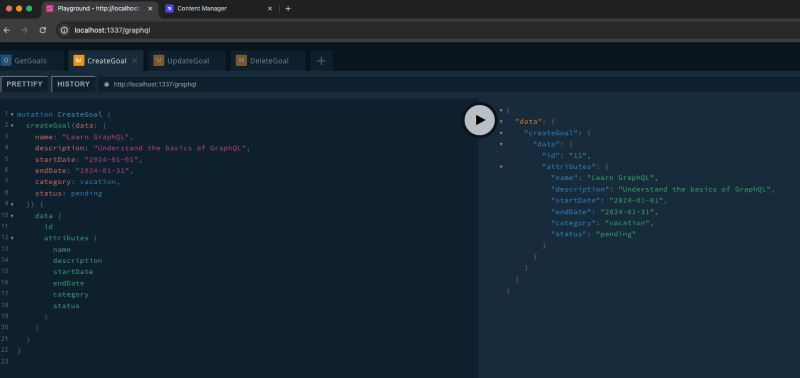
- Exploring with GraphQL Playground
Utilize the built-in GraphQL Playground at http://localhost:1337/graphql to explore schemas, test queries, and mutations. Define all necessary queries and mutations for your Flutter app, test them, and observe changes in Strapi.
Update Flutter App for Strapi and GraphQL Integration
Replace mock data in your GoalNotifier with real data fetched from Strapi.
- Creating
goal_graphql_provider.dart: Create a provider to handle GraphQL client calls.
import 'package:flutter/material.dart';
import 'package:flutter_riverpod/flutter_riverpod.dart';
import 'package:graphql_flutter/graphql_flutter.dart';
import 'package:personal_goals_app/graphql_client.dart';

final graphqlClientProvider = Provider<GraphQLClient>((ref) {
  final ValueNotifier<GraphQLClient> client = graphqlClient;
  return client.value;
});
- Creating
graphql_client.dart: Define the GraphQL client with the Strapi GraphQL URL.
import 'package:flutter/material.dart';
import 'package:graphql_flutter/graphql_flutter.dart';

ValueNotifier<GraphQLClient> initializeClient(String graphqlEndpoint) {
  final HttpLink httpLink = HttpLink(graphqlEndpoint);
  return ValueNotifier(
    GraphQLClient(
      link: httpLink,
      cache: GraphQLCache(store: InMemoryStore()),
    ),
  );
}

const String strapiGraphQLURL = 'http://localhost:1337/graphql';
final graphqlClient = initializeClient(strapiGraphQLURL);
Creating GraphQL Mutations and Queries
To enable communication between your Flutter app and the Strapi backend, you'll need to define Strapi GraphQL mutations and queries that correspond to the actions you want to perform on the Goal content type.
- Mutations (
mutations.dart) In this file, you'll define Strapi GraphQL mutations for creating, updating, and deleting goals.
- Create Goal Mutation: This mutation creates a new goal in the Strapi database. It includes parameters for the goal's name, description, start date, end date, category, and status.
- Update Goal Mutation: This mutation updates an existing goal in the Strapi database. It includes parameters for the goal's ID and updated fields such as name, description, start date, end date, category, and status.
- Delete Goal Mutation: This mutation deletes a goal from the Strapi database based on its ID.
// Create a new goal
const String createGoalMutation = """
mutation CreateGoal(\$name: String!, \$description: String!, \$startDate: Date!, \$endDate: Date, \$category: ENUM_GOAL_CATEGORY!, \$status: ENUM_GOAL_STATUS!) {
  createGoal(data: {
    name: \$name,
    description: \$description,
    startDate: \$startDate,
    endDate: \$endDate,
    category: \$category,
    status: \$status
  }) {
    data {
      id
      attributes {
        name
        description
        startDate
        endDate
        category
        status
      }
    }
  }
}
""";

// Update an existing goal
const String updateGoalMutation = """
mutation UpdateGoal(\$id: ID!, \$name: String, \$description: String, \$startDate: Date, \$endDate: Date, \$category: ENUM_GOAL_CATEGORY, \$status: ENUM_GOAL_STATUS) {
  updateGoal(id: \$id, data: {
    name: \$name,
    description: \$description,
    startDate: \$startDate,
    endDate: \$endDate,
    category: \$category,
    status: \$status
  }) {
    data {
      id
      attributes {
        name
        description
        startDate
        endDate
        category
        status
      }
    }
  }
}
""";

// Delete a goal
const String deleteGoalMutation = """
mutation DeleteGoal(\$id: ID!) {
  deleteGoal(id: \$id) {
    data {
      id
    }
  }
}
""";
- Queries (
queries.dart) In this file, you'll define a GraphQL query for fetching all goals from the Strapi database.
- Get Goals Query: This query fetches all goals stored in the Strapi database. It retrieves the ID, name, description, start date, end date, category, and status for each goal.
const String getGoalsQuery = """
query GetGoals {
  goals {
    data {
      id
      attributes {
        name
        description
        startDate
        endDate
        category
        status
      }
    }
  }
}
""";
Updating Riverpod Provider
To integrate these mutations and queries into your Flutter app, you'll need to update the Riverpod provider (goalProvider) to use the real queries and mutations defined above. This provider is responsible for managing the state of goals in your app and facilitating communication with the Strapi backend through GraphQL mutations and queries.
In summary, by defining GraphQL mutations and queries and updating your Riverpod provider to use them, you'll enable your Flutter app to interact seamlessly with the Strapi backend, allowing users to perform actions such as creating, updating, and deleting goals.
 import 'package:flutter_riverpod/flutter_riverpod.dart';
import 'package:graphql_flutter/graphql_flutter.dart';
import 'package:intl/intl.dart';
import 'package:personal_goals_app/src/goals/models/goal_model.dart';
import 'package:personal_goals_app/src/graphql/mutations.dart';
import 'package:personal_goals_app/src/graphql/queries.dart';
import 'package:personal_goals_app/src/provider/goal_graphql_provider.dart';
import 'package:personal_goals_app/src/provider/goal_state.dart';

class GoalNotifier extends StateNotifier<GoalState> {
  final GraphQLClient client;

  GoalNotifier(this.client) : super(const GoalState(goals: []));

  //Get all goals
  Future<void> getGoals() async {
    final QueryOptions options = QueryOptions(
      document: gql(getGoalsQuery),
    );

    final QueryResult result = await client.query(options);

    if (result.hasException) {
      print("Exception fetching goals: ${result.exception.toString()}");
      return;
    }

    final List<dynamic> fetchedGoals = result.data?['goals']['data'] ?? [];
    final List<Goal> goalsList =
        fetchedGoals.map((goalData) => Goal.fromJson(goalData)).toList();

    state = state.copyWith(goals: goalsList);
  }

  // Add a new goal
  Future<void> addGoal(Goal goal) async {
    final MutationOptions options = MutationOptions(
      document: gql(createGoalMutation),
      variables: {
        'name': goal.name,
        'description': goal.description,
        'startDate': DateFormat('yyyy-MM-dd').format(goal.startDate),
        'endDate': goal.endDate != null
            ? DateFormat('yyyy-MM-dd').format(goal.endDate!)
            : null,
        'category': goal.category.toString().split('.').last,
        'status': goal.status.toString().split('.').last,
      },
    );

    final QueryResult result = await client.mutate(options);

    if (result.hasException) {
      print("Exception adding goal: ${result.exception.toString()}");
      return;
    }

    final newGoalData = result.data?['createGoal']['data'];
    if (newGoalData != null) {
      final newGoal = Goal.fromJson(newGoalData);
      state = state.copyWith(goals: [...state.goals, newGoal]);
    }
  }

  // Update an existing goal
  Future<void> updateGoal(String id, Goal updatedGoal) async {
    final MutationOptions options = MutationOptions(
      document: gql(updateGoalMutation),
      variables: {
        'id': id,
        'name': updatedGoal.name,
        'description': updatedGoal.description,
        'startDate': DateFormat('yyyy-MM-dd').format(updatedGoal.startDate),
        'endDate': updatedGoal.endDate != null
            ? DateFormat('yyyy-MM-dd').format(updatedGoal.endDate!)
            : null,
        'category': updatedGoal.category.toString().split('.').last,
        'status': updatedGoal.status.toString().split('.').last,
      },
    );

    final QueryResult result = await client.mutate(options);

    if (result.hasException) {
      print("Exception updating goal: ${result.exception.toString()}");
      return;
    }

    await getGoals();
  }

// Delete a goal
  Future<void> deleteGoal(String id) async {
    final MutationOptions options = MutationOptions(
      document: gql(deleteGoalMutation),
      variables: {'id': id},
    );

    final QueryResult result = await client.mutate(options);

    if (result.hasException) {
      print("Exception deleting goal: ${result.exception.toString()}");
      return;
    }

    state = state.copyWith(
        goals: state.goals.where((goal) => goal.id != id).toList());
  }
}

final goalProvider = StateNotifierProvider<GoalNotifier, GoalState>((ref) {
  final client = ref.read(graphqlClientProvider);
  return GoalNotifier(client);
});
Updating Goal Model
In the process of integrating GraphQL queries and mutations to interact with a Strapi backend, several enhancements have been made to the Goal model. These enhancements aim to optimize data handling, ensure compatibility with GraphQL operations, and align with Strapi's data structure. Let's delve into the specific changes made to accommodate these requirements:
- With the introduction of GraphQL queries, data is often retrieved in JSON format. To efficiently parse JSON data into the Goal model, a factory method
fromJsonhas been added. This method takes a Map representing JSON data and constructs aGoalobject from it. This enhancement enables seamless conversion of JSON data retrieved from GraphQL queries intoGoalobjects within the Flutter application. - The
GoalStatusandGoalCategoryenums play a crucial role in representing the status and category of goals. To enhance the model's versatility and compatibility with GraphQL and Strapi, methods_stringToGoalCategoryand_stringToGoalStatushave been introduced. These methods convert string representations of enums retrieved from JSON data into their corresponding enum values. By incorporating these methods into the JSON parsing process, the model ensures consistent handling of enumerated types across different data sources and operations.
enum GoalStatus { active, completed, pending }

enum GoalCategory { vacation, money, exercise, smoke, language }

class Goal {
  final String id;
  final String name;
  final String description;
  final DateTime startDate;
  final DateTime?
      endDate; // End date is optional because some goals might not have a specific end date
  final GoalCategory category;
  GoalStatus status;
  double?
      targetValue; // Numeric value representing the goal target (e.g., amount to save)
  double?
      currentValue; // Current progress towards the goal (e.g., current savings)

  Goal({
    required this.id,
    required this.name,
    required this.description,
    required this.startDate,
    this.endDate,
    required this.category,
    this.status = GoalStatus.pending,
    this.targetValue,
    this.currentValue,
  });

  factory Goal.fromJson(Map<String, dynamic> json) {
    var attributes = json['attributes'];
    return Goal(
      id: json['id'].toString(), // Ensuring `id` is treated as a String.
      name: attributes['name'] ??
          '', // Providing a default empty string if `name` is null.
      description: attributes['description'] ?? '',
      startDate: DateTime.parse(attributes['startDate']),
      endDate: attributes['endDate'] != null
          ? DateTime.parse(attributes['endDate'])
          : null,
      category: _stringToGoalCategory(attributes['category'] ?? 'vacation'),
      status: _stringToGoalStatus(attributes['status'] ?? 'pending'),
      targetValue: attributes['targetValue'],
      currentValue: attributes['currentValue'],
    );
  }
  // Calculate the status of the goal based on dates
  static GoalStatus calculateStatus(DateTime startDate, DateTime endDate) {
    final currentDate = DateTime.now();
    if (currentDate.isAfter(endDate)) {
      return GoalStatus.completed;
    } else if (currentDate.isAfter(startDate)) {
      return GoalStatus.active;
    } else {
      return GoalStatus.pending;
    }
  }

  static GoalCategory _stringToGoalCategory(String category) {
    return GoalCategory.values.firstWhere(
      (e) => e.toString().split('.').last == category,
      orElse: () => GoalCategory.vacation,
    );
  }

  static GoalStatus _stringToGoalStatus(String status) {
    return GoalStatus.values.firstWhere(
      (e) => e.toString().split('.').last == status,
      orElse: () => GoalStatus.pending,
    );
  }
}
Fetching Data from Strapi in HomePage
To display the goals fetched from Strapi in your Flutter app, you'll need to call the published data from Strapi in your home page (home.dart).
import 'package:flutter/material.dart';
import 'package:flutter_riverpod/flutter_riverpod.dart';
import 'package:personal_goals_app/src/goals/components/goal_card.dart';
import 'package:personal_goals_app/src/provider/goal_provider.dart';

class HomePage extends ConsumerStatefulWidget {
  const HomePage({Key? key}) : super(key: key);

  @override
  HomePageState createState() => HomePageState();
}

class HomePageState extends ConsumerState<HomePage> {
  @override
  void initState() {
    super.initState();
    Future.microtask(() => ref.read(goalProvider.notifier).getGoals());
  }

  @override
  Widget build(BuildContext context) {
    final goals = ref.watch(goalProvider).goals;

    return Scaffold(
        appBar: AppBar(title: const Text('Targets')),
        body: ListView.builder(
          itemCount: goals.length,
          itemBuilder: (context, index) {
            final goal = goals[index];
            return GoalCard(goal: goal);
          },
        ),
        floatingActionButton: FloatingActionButton.extended(
          onPressed: () async {
            final refreshNeeded = await Navigator.pushNamed(context, '/start');
            if (refreshNeeded == true) {
              ref.read(goalProvider.notifier).getGoals();
            }
          },
          label: const Text('Add New Target'),
          icon: const Icon(Icons.add),
        ));
  }
}
In this file, you'll use the ConsumerWidget provided by Riverpod to fetch the goals from Strapi and display them in a list view.
Fetching Goals: Inside the build method, you'll call the getGoals method from the goalProvider notifier to fetch the goals from Strapi. The ref.watch(goalProvider) statement will ensure that the widget rebuilds whenever the state of the goalProvider changes. By following this approach, you'll have a clean and efficient way to fetch and display the goals from Strapi in your Flutter app's home page.
NOTE: Lastly, ensure that the draft mode is disabled in Strapi to see the published data in your app.

This integration enables seamless communication between your Flutter app and Strapi CMS, allowing users to view and interact with the goals stored in the backend.
Demo Time!
By the end of this tutorial, you should have a working personal tracking application that allows a user add, start and edit a goal or target.
![]()
Conclusion
Strapi API provides a powerful and customizable API for managing content and data. With Strapi, we can define custom content types, set permissions, and expose APIs tailored to our application's needs. Personally, It is very easy to use and quick to learn.
Benefits of Using Riverpod, Flutter, GraphQL, and Strapi Together:
- Efficiency: Flutter Riverpod and GraphQL enable efficient state management and data fetching, reducing unnecessary network requests and enhancing app performance.
- Flexibility: GraphQL's flexible query language and Strapi's customizable APIs empower developers to tailor data interactions precisely to their application's requirements.
- Scalability: With Riverpod, Flutter, GraphQL, and Strapi, applications can easily scale to accommodate growing user bases and evolving feature sets.
- Productivity: The combination of these technologies streamlines development workflows, allowing developers to focus on building features rather than managing complex data flows.

Top comments (1)
superb✨