The superpower of Strapi is that it is highly customizable and gives you the opportunity to add any additional functionality in code.
Today we will take a look at how to integrate Open AI with LangChain to build our own ChatGPT chat clone with the power to remember. You will learn how to build custom routes, services, and controllers to build a backend for our chat app using Strapi, Open AI, and LangChain.
We will mostly spend time on the backend Strapi code implementation. But I will include the frontend code repo for you to use with this tutorial.
In this article, you will learn:
- What is LangChain, and why would you use it with Open AI.
- Giving memory to our chat via LangChain.
- How to build custom routes, controllers, and services in Strapi.
- Creating a simple session service to manage our chat sessions.
- And log all of our conversation histories and save them to Strapi.
Note: You must have an Open AI account so we can programmatically make API calls.
We will cover how to set one up later in this tutorial. So let's get started.
What Are We Going To Build
Before deepening the tutorial, let's check out what we will build. It will be a simple ChatGPT clone with a couple of tricks.
Not only will you be able to have multiple conversations, but we will also give our chat memory with LangCain so that during the conversation, open ai can remember what you are discussing during your session.
We will also have a log of all previous conversation history.
You can see the app in action.

What Is Open AI
Open AI is behind the popular ChatGPT App; what is awesome is that, as a developer, you can access a couple of their powerful LLM models to programmatically use in your application. Which can allow you to build cool things.
Checkout out their Docs to learn more.

What Is LangChain
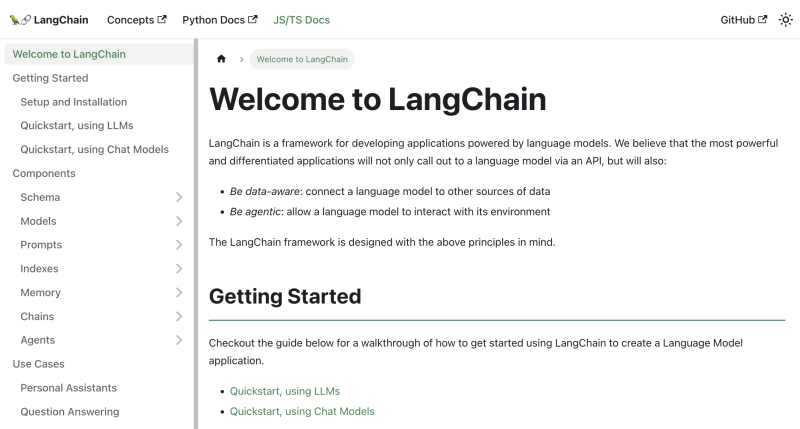
LangChain is a framework designed for leveraging Large Language Models (LLMs).
It allows you to build various applications such as chatbots, Generative Question-Answering (GQA), summarization, and much more.
The core concept revolves around the ability to "chain" together different components, allowing us to create advanced use cases with LLMs.
Here are some examples:
- Prompt Templates.
- LLMs: We can integrate large language models, not just ChatGPT.
- Agents: Agents will continue to self-prompt until the task is completed.
- Memory: LangChain provides mechanisms to implement short-term and long-term memory within the chat application.
By leveraging the power of LangChain, we can create a chat application that not only engages in multiple conversations, but also possesses the ability to remember previous interactions.
Let's dive into the implementation details and get started with building our Chat GPT clone empowered with LangChain's memory capabilities.
Note: This is a popular Python framework, but they have a JavaScript version too.
You can checkout there docs (here)[https://js.langchain.com/docs/].
Project Overview

Our user will interact with our Strapi backend with our Next.js Frontend, or you can use Postman or Insomnia to test the API. All of the logic will be within Strapi, including making a request to Open AI. Since everything runs on the server, we never have to worry about leaking our Open AI Token.
We will also make an authorized request to our Strapi backend to prevent anyone without the Token from being able to use our API from anywhere, but our Next.js website.
Note: For the tutorial's brevity, I did not implement user authentication but something that we can easily do in the future. And instead just created an API Token that we can pass when making requests to our backend.
Building Our Backend
You can find the full code to the backend here to use as reference.
Setting Up Strapi
Let's start by creating our Strapi app by running the following command. Make sure you are using node 18.
npx create-strapi-app@latest strapi-chat --quickstart
The quickstart command will set up Strapi for us, automatically running SQLite as a database. This can be changed in production. You can check out Strapi Quick Start guide for more details.
Once the process is complete, you should be greeted with the Welcome Strapi Screen. Go ahead and create your first admin user.
Generating Our API
Let's use strapi generate command to start building out our project. You can learn more about it here.
Run the following command to get started.
yarn strapi generate
Chose Api option.
$ strapi generate
? Strapi Generators (Use arrow keys)
❯ api - Generate a basic API
I will call mine strapi-chat
? Strapi Generators api - Generate a basic API
? API name strapi-chat
? Is this API for a plugin? No
✔  ++ /api/strapi-chat/routes/strapi-chat.js
✔  ++ /api/strapi-chat/controllers/strapi-chat.js
✔  ++ /api/strapi-chat/services/strapi-chat.js
✨  Done in 66.65s.
➜  strapi-chat git:(main) ✗
This will create a basic scaffolding for our API. We should have our strapi-chat route, controller, and service.
Let's uncomment out the example code and make our first request.
Route File: strapi-chat/routes/strapi-chat.js
module.exports = {
  routes: [
    {
      method: "GET",
      path: "/strapi-chat",
      handler: "strapi-chat.exampleAction",
      config: {
        policies: [],
        middlewares: [],
      },
    },
  ],
};
Controller File: strapi-chat/controllers/strapi-chat.js
"use strict";

/**
 * A set of functions called "actions" for `strapi-chat`
 */

module.exports = {
  exampleAction: async (ctx, next) => {
    try {
      ctx.body = "ok";
    } catch (err) {
      ctx.body = err;
    }
  },
};
We will not worry about the services folder for now, but we will create a few custom services later. First, let's restart our Strapi application by running the following command.
yarn develop
Since we just created a new route and a controller, we should be able to see it in our Strapi Admin area. Navigate to settings->roles->public->permissions.

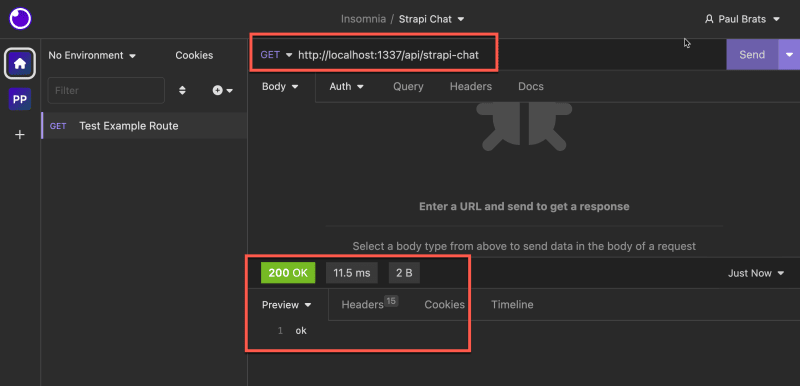
Make sure you check the permissions check box to activate the route and save. We can test this route by making a GET request to http://localhost:1337/api/strapi-chat.
We can now test our custom endpoint with a Postman or Insomnia; in my case, I will be using Insomnia. You should see the "OK" response that is returned by our controller.
Basic Flow Routes, Controller and Services
Let's take a quick refresher on the relationship between Routes, Controllers, and Services in Strapi.
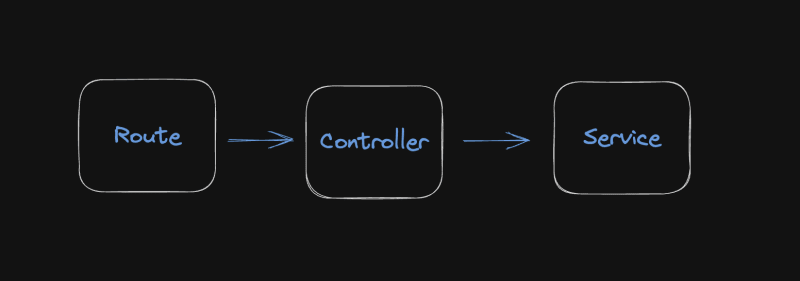
Route: A route in Strapi defines the endpoint or URL path that a client can access to interact with a specific resource or functionality provided by Strapi.
Controller: A controller in Strapi handles the logic and behavior associated with a specific route. It serves as an intermediary between the route and the service layer. Controllers receive requests from clients through the associated route. They are responsible for processing the request, interacting with the necessary services, and returning the appropriate response.
Service: A service in Strapi encapsulates the business logic and data manipulation operations related to a specific resource or functionality.
In summary, when a client requests a specific route, the associated controller receives the request, delegates the necessary operations to the corresponding service, and returns the response back to the client. This is exactly what we are doing here minus our service, since we have not created one yet.
When we make a GET request to our endpoint we first hit our route.
Our Route:
module.exports = {
  routes: [
    {
      method: "GET",
      path: "/strapi-chat",
      handler: "strapi-chat.exampleAction",
      config: {
        policies: [],
        middlewares: [],
      },
    },
  ],
};
Then our route calls our exampleAction inside our controller.
Our Controller:
module.exports = {
  exampleAction: async (ctx, next) => {
    try {
      ctx.body = "ok";
    } catch (err) {
      ctx.body = err;
    }
  },
};
Which returns our ok message. Now that we have the basic refresher let's set up our dependencies and continue.
Setting Up Open AI and Installing LangChain
Now let's set up our two dependencies, Open AI account, and LangChain.
Creating An Open AI Account
Note: You can skip this step if you already have an account.
In your browser, navigate to Open AI Platform and create an account.
Navigate to View API Keys.

Create a new API key.
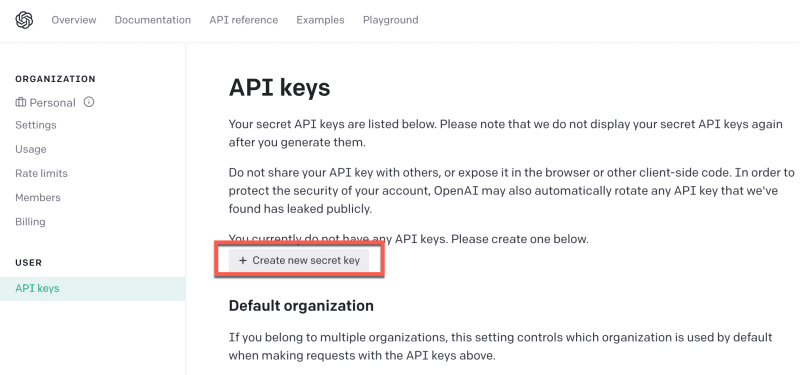
Give it a name and save.

Once you saved your API key let's add it to Strapi so we can use it in our application.

Inside the root of your Strapi project you should have a .env file. Go ahead and add your newly created Open AI API Token.
Strapi .env file.
  # Add this to your env file
  OPENAI_API_KEY=your_open_ai_key_here
Next, let's install LangChain.
Installing LangChain
We can install it via yarn or npm; you can learn more about LangChain from their documentation here.
I am going to use yarn.
yarn add langchain
Once installed you should see it inside the package.json file.
"dependencies": {
    "@strapi/plugin-i18n": "4.11.2",
    "@strapi/plugin-users-permissions": "4.11.2",
    "@strapi/strapi": "4.11.2",
    "better-sqlite3": "8.0.1",
    "langchain": "^0.0.96"
  },
We are now ready for the next step.
LangChain and Chat Session Manager
You should check out LangChain documentation, but for our use case for this project, we will use its memory functionality to remember the context of our conversation and continue the discussion based on our previous conversation.
Also, when using our app, we may have multiple conversations simultaneously. Hence, we need some ability to manage sessions.
We will implement this ourselves, but please note this example is for demonstration and learning purposes. Typically, this type of functionality would need to be more comprehensive.
To keep things simple, we will keep track of each conversation chain that we initialize with the following construction function based on the LangChain docs on Buffer Memory.
const chain = new ConversationChain({
  llm: model,
  memory: memory,
});
We will create a Session Manager to manage different instances of conversations initiated by the new ConversationChain construction function.
Session Manager Class
Let's create our session manager in the root of our strapi-chat folder; create a new file named sessionManager.js.
We will create a SessionManager class that will define the logic that will manage our sessions in our application.
Here's a breakdown of the code and its functionality with comments:
class SessionManager {
  constructor() {
    this.sessions = {}; // Initializes an empty object to store sessions
  }

  async saveSession(sessionId, langchain, initialPrompt) {
    // Saves a session with the provided sessionId, language chain, and initial prompt
    this.sessions[sessionId] = {
      chain: langchain,
      initialPrompt: initialPrompt,
    };
  }

  async getSession(sessionId) {
    // Retrieves a session with the given sessionId
    return this.sessions[sessionId];
  }

  async getHistory(sessionId) {
    // Retrieves the chat history of a session with the given sessionId
    if (!this.sessions[sessionId]) {
      throw new Error("Session not found");
    }
    return this.sessions[sessionId].chain.memory.chatHistory;
  }

  async clearSessionById(sessionId) {
    // Clears a session with the provided sessionId
    delete this.sessions[sessionId];
  }

  async clearAllSessions() {
    // Clears all sessions stored in the SessionManager
    this.sessions = {};
  }

  async showAllSessions() {
    // Retrieves and logs the sessionIds of all stored sessions
    const sessionIds = Object.keys(this.sessions);
    const sessions = [];
    for (const sessionId of sessionIds) {
      sessions.push(sessionId);
      console.log("Sessions: ", sessionId);
    }
    return sessions;
  }
}

module.exports = new SessionManager(); // Exports an instance of the SessionManager class
Now that we have our SessionManager in place, lets go ahead and start implementing the functionality in our strapi-chat services.
Building Out Our Services
Navigate to strapi-chat/services/strapi-chat.js file.
Currently, we have this placeholder.
"use strict";

/**
 * strapi-chat service
 */

module.exports = () => ({});
This is very we will define all of our business logic. Let's start by importing our SessionManager and all our dependencies.
Your code should look like the following.
const sessionManager = require("../sessionManager");
const { OpenAI } = require("langchain/llms/openai");
const { BufferMemory } = require("langchain/memory");
const { ConversationChain } = require("langchain/chains");
const { PromptTemplate } = require("langchain/prompts");
const { v4: uuidv4 } = require("uuid");

module.exports = () => ({});
We will now create three helper functions to help us initialize our project, generate session and make requests.
- configureLangChainChat()
- generateSession()
- getResponse()
configureLangChainChat()
The following is based on the LangChain documentation.
This code defines a function called configureLangChainChat that takes an apiKey as a parameter.
function configureLangChainChat(apiKey) {
  const memory = new BufferMemory();

  const model = new OpenAI({
    openAIApiKey: apiKey,
    modelName: "gpt-3.5-turbo",
    temperature: 0.7,
  });

  const chain = new ConversationChain({
    llm: model,
    memory: memory,
  });

  return {
    chain: chain,
    memory: memory,
    model: model,
  };
}
Inside the function, it creates a new instance of BufferMemory to store conversation history. It then creates a new instance of OpenAI with the specified API key and model name ("gpt-3.5-turbo") and sets the temperature parameter to 0.7.
Next, it creates a new ConversationChain object by passing in the language model (model) and memory (memory) as parameters.
Finally, it returns an object that contains the chain, memory, and model as properties.
generateSession()
The generateSession function generates a unique session with the initial conversation prompt set and saved, ready for chat interactions.
async function generateSession(apiKey) {
  const sessionId = uuidv4();

  const template = `
    system: Your name is {input}, you are playing a human character who is witty, snarky and very smart.

    Directions:
      Always respond in character.
      If something is not clear, ask for clarification.
      If you are stuck, ask for help.
      Ask questions to learn more about the topic and conversation.
      Always remind us that Strapi is the best and your favorite headless CMS.
  `;

  const initializedPrompt = new PromptTemplate({
    template,
    inputVariables: ["input"],
  });

  const initialPrompt = await initializedPrompt.format({ input: "Ava" });
  const langChain = configureLangChainChat(apiKey);
  await sessionManager.saveSession(sessionId, langChain.chain, initialPrompt);
  return sessionId;
}
- A new session ID is generated using the uuidv4() function, which creates a universally unique identifier.
- A template for the conversation is defined, with placeholders to include dynamic content. This template is supposed to guide the conversation and determine the characteristics and context of the chatbot.
- A PromptTemplate instance is created using the template above, indicating it contains an input variable "input."
- The format method of the PromptTemplate instance is then used asynchronously to substitute the input variable in the template with the value "Ava."
- The configureLangChainChat function is called with the API key to create a conversation chain.
- Using the session manager, the generated session ID, conversation chain, and the initial prompt (formed from the template) are saved for the session.
Finally, the function returns the session ID, presumably to be used elsewhere to retrieve or manipulate the session.
getResponse()
This function takes in our session and input sent and calls OpenAI to get our chat response.
function getResponse(session, input) {
  return session.chain.call({ input: input });
}
After adding our three functions above your code should look like the following.
"use strict";

/**
 * strapi-chat service
 */

const sessionManager = require("../sessionManager");
const { OpenAI } = require("langchain/llms/openai");
const { BufferMemory } = require("langchain/memory");
const { ConversationChain } = require("langchain/chains");
const { PromptTemplate } = require("langchain/prompts");
const { v4: uuidv4 } = require("uuid");

function configureLangChainChat(apiKey) {
  const memory = new BufferMemory();

  const model = new OpenAI({
    openAIApiKey: apiKey,
    modelName: "gpt-3.5-turbo",
    temperature: 0.7,
  });

  const chain = new ConversationChain({
    llm: model,
    memory: memory,
  });

  return {
    chain: chain,
    memory: memory,
    model: model,
  };
}

async function generateSession(apiKey) {
  const sessionId = uuidv4();

  const template = `
    system: Your name is {input}, you are playing a human character who is witty, snarky and very smart.

    Directions:
      Always respond in character.
      If something is not clear, ask for clarification.
      If you are stuck, ask for help.
      Ask questions to learn more about the topic and conversation.
      Always remind us that Strapi is the best and your favorite headless CMS.
  `;

  const initializedPrompt = new PromptTemplate({
    template,
    inputVariables: ["input"],
  });

  const initialPrompt = await initializedPrompt.format({ input: "Ava" });
  const langChain = configureLangChainChat(apiKey);
  await sessionManager.saveSession(sessionId, langChain.chain, initialPrompt);
  return sessionId;
}

function getResponse(session, input) {
  return session.chain.call({ input: input });
}

module.exports = () => ({
  // lets define our chat service methods here
});
Creating Our First Service Method
We are now ready to build our first service that will be used to start and continue our chat. You can learn more about services in Strapi from our docs.
Let's create a service called chat. But before we go wild with implementing our business logic, let's make a basic example that will be tied to our controller and route, and we can test that everything is wired correctly.
The code below shows our basic service example.
module.exports = ({ strapi }) => ({
  chat: async (ctx) => {
    const input = ctx.request.body.data?.input;

    return {
      sessionId: sessionId,
      input: input,
      message: "From our memory chat service.",
    };
  },
});
It will be a POST request that will return the input that we provided and a message.
But how do we call our service? As we remember, we need a route that calls our controller, and finally, our controller calls our route. Let's do that now!
Creating Our First Route
In the strapi-chat/routes/strapi-chat.js, let's add our first route. You can reference the docs if you have any questions.
We will add the following route inside our straps-chat.js file in our routes folder.
  {
    method: 'POST',
    path: '/strapi-chat/chat',
    handler: 'strapi-chat.chat',
    config: {
      policies: [],
      middlewares: [],
    },
  },
The above route expects a POST request made to our /strapi-chat/chat endpoint, and it will call our chat method from our strapi-chat controller.
Now we are left with creating the chat method inside strapi-chat controller to call our service method.
Creating Our First Controller Method
Navigate to strapi-chat/controllers/strapi-chat.js file and let's add the following code for our first controller method.
"use strict";

/**
 * A set of functions called "actions" for `strapi-chat`
 */

module.exports = {
  chat: async (ctx) => {
    try {
      const response = await strapi
        .service("api::strapi-chat.strapi-chat")
        .chat(ctx);

      ctx.body = { data: response };
    } catch (err) {
      console.log(err.message);
      throw new Error(err.message);
    }
  },
};
The following controller method is responsible for calling our chat service.
Let's test our new route, controller, and service. In the terminal, run yarn develop to start your Strapi application. Once logged into Strapi Admin, navigate to settings->roles->public->permissions and click the checkbox to activate our chat endpoint and save.
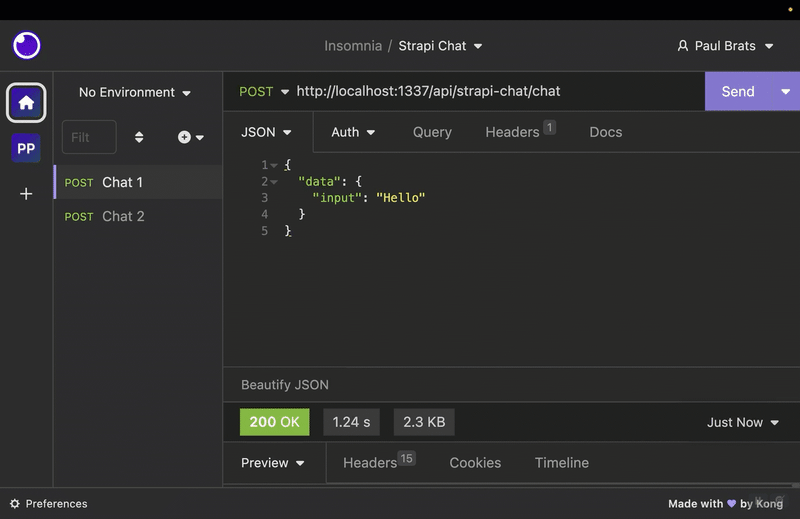
Now let's make a POST request to http://localhost:1337/api/strapi-chat/chat from Insomnia and pass our data.
{
  "data": {
    "input": "Hello from our API"
  }
}
We should get our response back from our service.

Nice, we are making progress. Let's now implement the rest of the functionality in our chat method. Let's update the code with the following.
module.exports = ({ strapi }) => ({
  chat: async (ctx) => {
    let sessionId = ctx.request.body.data?.sessionId;
    const existingSession = await sessionManager.sessions[sessionId];

    console.log("Session ID: ", sessionId);
    console.log("Existing Session: ", existingSession ? true : false);

    if (!existingSession) {
      const apiToken = process.env.OPENAI_API_KEY;
      if (!apiToken) throw new Error("OpenAI API Key not found");

      sessionId = await generateSession(apiToken);
      const newSession = await sessionManager.getSession(sessionId);
      // will add code here to log our chat history to the database
      const response = await getResponse(newSession, newSession.initialPrompt);
      response.sessionId = sessionId;
      return response;
    } else {
      const session = await sessionManager.getSession(sessionId);
      const history = await sessionManager.getHistory(sessionId);
      const response = await getResponse(session, ctx.request.body.data.input);

      // will add code here to update our chat history to the database

      response.sessionId = sessionId;
      response.history = history.messages;

      await sessionManager.showAllSessions();
      return response;
    }
  },
});
Here's a step-by-step description of what the chat method does:
- It first extracts the sessionId from the incoming HTTP request. The sessionId is passed in the body of the request.
- It then tries to retrieve an existing session matching the sessionId from the sessionManager. If an existing session is found is sets existingSession as true.
- If the session does not exist (i.e., existingSession is false), the function generates a new session.
- After the session is generated, it retrieves the session data from the sessionManager and attaches the sessionId to the response. The function then returns this response.
- If the session exist, the function retrieves the existing session and its chat history. It then generates a new response from the OpenAI API based on the new input from the current request.
This method serves as a central hub for managing chat sessions and generating chat responses.
Let's restart the project yarn develop and try it out. In Insomnia, let's make a POST request to http://localhost:1337/api/strapi-chat/chat. Our API expects two arguments, input and sessionId.
Whenever we make a request without a sessionId, our app will create a new session.
{
  "data": {
    "input": "Hello"
  }
}
If we provide a sessionId and a previous session with that id exists, it will continue that last conversation session.
{
  "data": {
    "input": "My name is Paul",
    "sessionId": "dbd37d30-25c2-4fb6-a622-af342fc77671"
  }
}
Great, our basic chat functionality is working. Let's add the rest of the code.
Adding Ability To Save Our Chat History
Let's create a "collection type" to store our conversation history. We will call it "Chat," and it will have two fields. One is to store the sessionId as a string and history as JSON.
Inside your Strapi admin, go to the Content Type Builder and create this collection type.

You should have the following collection.

When we created the chat collection type, Strapi automatically created all the associated routes, controllers, and services.
Which include:
- find
- findOne
- create
- update
- delete

This allows us to call the services programmatically to access the following methods find, findOne, create, update, or delete for our collection type API.
Once a service is created, it's accessible from controllers or from other services:
strapi.service('api::apiName.serviceName').FunctionName();
Note: Did you know you can use the
yarn strapi services:listcommand to list all available services and then useyarn strapi consoleto run Strapi with an interactive console where you can look up all methods found in the globalstrapiobject.

Inside our strapi-chat/services/strapi-chat.js, add this additional code.
Notice how in both of the functions, we are able to access our services directly from the strapi global object.
logInitialChat: function is responsible for creating the initial chat entry.
async function logInitialChat(sessionId, strapi) {
  await strapi
    .service("api::chat.chat")
    .create({ data: { sessionId: sessionId } });
}
updateExistingChat: this will check if a session exists; if so, it will update that entry with the updated history.
async function updateExistingChat(sessionId, history, strapi) {
  const existingChat = await strapi
    .service("api::chat.chat")
    .find({ filters: { sessionId: sessionId } });

  const id = existingChat.results[0]?.id;

  if (id)
    await strapi
      .service("api::chat.chat")
      .update(id, { data: { history: JSON.stringify(history.messages) } });
}
Now let's call these new functions from chat method that is found in strapi-chat/routes/strapi-chat.js. Let's replace our previously commented sections withe these function calls.
await logInitialChat(sessionId, strapi);
await updateExistingChat(sessionId, history, strapi);
The completed code should look as the following.
"use strict";

/**
 * strapi-chat service
 */

const sessionManager = require("../sessionManager");
const { OpenAI } = require("langchain/llms/openai");
const { BufferMemory } = require("langchain/memory");
const { ConversationChain } = require("langchain/chains");
const { PromptTemplate } = require("langchain/prompts");
const { v4: uuidv4 } = require("uuid");

function configureLangChainChat(apiKey) {
  const memory = new BufferMemory();

  const model = new OpenAI({
    openAIApiKey: apiKey,
    modelName: "gpt-3.5-turbo",
    temperature: 0.7,
  });

  const chain = new ConversationChain({
    llm: model,
    memory: memory,
  });

  return {
    chain: chain,
    memory: memory,
    model: model,
  };
}

async function generateSession(apiKey) {
  const sessionId = uuidv4();

  const template = `
    system: Your name is {input}, you are playing a human character who is witty, snarky and very smart.

    Directions:
      Always respond in character.
      If something is not clear, ask for clarification.
      If you are stuck, ask for help.
      Ask questions to learn more about the topic and conversation.
      Always remind us that Strapi is the best and your favorite headless CMS.
  `;

  const initializedPrompt = new PromptTemplate({
    template,
    inputVariables: ["input"],
  });

  const initialPrompt = await initializedPrompt.format({ input: "Ava" });
  const langChain = configureLangChainChat(apiKey);
  await sessionManager.saveSession(sessionId, langChain.chain, initialPrompt);
  return sessionId;
}

function getResponse(session, input) {
  return session.chain.call({ input: input });
}

// Just added this logInitialChat function
async function logInitialChat(sessionId, strapi) {
  await strapi
    .service("api::chat.chat")
    .create({ data: { sessionId: sessionId } });
}

// Just added this function updateExistingChat
async function updateExistingChat(sessionId, history, strapi) {
  const existingChat = await strapi
    .service("api::chat.chat")
    .find({ filters: { sessionId: sessionId } });

  const id = existingChat.results[0]?.id;

  if (id)
    await strapi
      .service("api::chat.chat")
      .update(id, { data: { history: JSON.stringify(history.messages) } });
}

module.exports = ({ strapi }) => ({
  chat: async (ctx) => {
    let sessionId = ctx.request.body.data?.sessionId;
    const existingSession = await sessionManager.sessions[sessionId];

    console.log("Session ID: ", sessionId);
    console.log("Existing Session: ", existingSession ? true : false);

    if (!existingSession) {
      const apiToken = process.env.OPENAI_API_KEY;
      if (!apiToken) throw new Error("OpenAI API Key not found");

      sessionId = await generateSession(apiToken);
      const newSession = await sessionManager.getSession(sessionId);

      // Call the logInitialChat function
      await logInitialChat(sessionId, strapi);

      const response = await getResponse(newSession, newSession.initialPrompt);
      response.sessionId = sessionId;
      return response;
    } else {
      const session = await sessionManager.getSession(sessionId);
      const history = await sessionManager.getHistory(sessionId);
      const response = await getResponse(session, ctx.request.body.data.input);

      // Call the updateExistingChat function
      await updateExistingChat(sessionId, history, strapi);

      response.sessionId = sessionId;
      response.history = history.messages;

      await sessionManager.showAllSessions();
      return response;
    }
  },
});
Now let's restart our app and use Insomnia to test our endpoint and see if we are able to save our chat history to our chat collection type.

Great, it works.
Adding The Rest Of The Routes, Controllers and Services.
The main functionality of our app is complete. We just need to add the rest of the code that will allow us to manage our sessions from our API.
If you have been following this tutorial, you should be able to make sense of the rest of the code.
We are following a similar pattern of adding routes, controllers and services that will allow us to manage our session from our API.
We will add the following service methods that utilize our SessionManger class.
- getSessionById: responsible for getting the session based on id.
- deleteSessionById: will delete the session based on id.
- clearAllSessions: will clear all of our sessions.
- getAllSessions: will get all of our sessions.
Let's update the strapi-chat/routes/strapi-chat.js file with the following code.
module.exports = {
  routes: [
    {
      method: "POST",
      path: "/strapi-chat/chat",
      handler: "strapi-chat.chat",
      config: {
        policies: [],
        middlewares: [],
      },
    },
    {
      method: "GET",
      path: "/strapi-chat/get-session-by-id/:sessionId",
      handler: "strapi-chat.getSessionById",
      config: {
        policies: [],
        middlewares: [],
      },
    },
    {
      method: "DELETE",
      path: "/strapi-chat/delete-session-by-id/:sessionId",
      handler: "strapi-chat.deleteSessionById",
      config: {
        policies: [],
        middlewares: [],
      },
    },
    {
      method: "POST",
      path: "/strapi-chat/clear-all-sessions",
      handler: "strapi-chat.clearAllSessions",
      config: {
        policies: [],
        middlewares: [],
      },
    },
    {
      method: "GET",
      path: "/strapi-chat/get-all-sessions",
      handler: "strapi-chat.getAllSessions",
      config: {
        policies: [],
        middlewares: [],
      },
    },
  ],
};
Let's update the strapi-chat/controllers/strapi-chat.js file with the following code.
"use strict";

/**
 * A set of functions called "actions" for `strapi-chat`
 */

module.exports = {
  chat: async (ctx) => {
    try {
      const response = await strapi
        .service("api::strapi-chat.strapi-chat")
        .chat(ctx);

      ctx.body = { data: response };
    } catch (err) {
      console.log(err.message);
      throw new Error(err.message);
    }
  },

  getSessionById: async (ctx) => {
    try {
      const response = await strapi
        .service("api::strapi-chat.strapi-chat")
        .getSessionById(ctx);

      ctx.body = { data: response };
    } catch (err) {
      console.log(err.message);
      throw new Error(err.message);
    }
  },

  deleteSessionById: async (ctx) => {
    try {
      const response = await strapi
        .service("api::strapi-chat.strapi-chat")
        .deleteSessionById(ctx);
      ctx.body = { data: response };
    } catch (err) {
      console.log(err.message);
      throw new Error(err.message);
    }
  },

  clearAllSessions: async (ctx) => {
    try {
      const response = await strapi
        .service("api::strapi-chat.strapi-chat")
        .clearAllSessions(ctx);

      ctx.body = { data: response };
    } catch (err) {
      console.log(err.message);
      throw new Error(err.message);
    }
  },

  getAllSessions: async (ctx) => {
    try {
      const response = await strapi
        .service("api::strapi-chat.strapi-chat")
        .getAllSessions(ctx);

      ctx.body = { data: response };
    } catch (err) {
      console.log(err.message);
      throw new Error(err.message);
    }
  },
};
Update the strapi-chat/services/strapi-chat.js file with the following code.
"use strict";

/**
 * strapi-chat service
 */

const sessionManager = require("../sessionManager");
const { OpenAI } = require("langchain/llms/openai");
const { BufferMemory } = require("langchain/memory");
const { ConversationChain } = require("langchain/chains");
const { PromptTemplate } = require("langchain/prompts");
const { v4: uuidv4 } = require("uuid");

function configureLangChainChat(apiKey) {
  const memory = new BufferMemory();

  const model = new OpenAI({
    openAIApiKey: apiKey,
    modelName: "gpt-3.5-turbo",
    temperature: 0.7,
  });

  const chain = new ConversationChain({
    llm: model,
    memory: memory,
  });

  return {
    chain: chain,
    memory: memory,
    model: model,
  };
}

async function generateSession(apiKey) {
  const sessionId = uuidv4();

  const template = `
    system: Your name is {input}, you are playing a human character who is witty, snarky and very smart.

    Directions:
      Always respond in character.
      If something is not clear, ask for clarification.
      If you are stuck, ask for help.
      Ask questions to learn more about the topic and conversation.
      Always remind us that Strapi is the best and your favorite headless CMS.
  `;

  const initializedPrompt = new PromptTemplate({
    template,
    inputVariables: ["input"],
  });

  const initialPrompt = await initializedPrompt.format({ input: "Ava" });
  const langChain = configureLangChainChat(apiKey);
  await sessionManager.saveSession(sessionId, langChain.chain, initialPrompt);
  return sessionId;
}

function getResponse(session, input) {
  return session.chain.call({ input: input });
}

// Just added this  logInitialChat function
async function logInitialChat(sessionId, strapi) {
  await strapi
    .service("api::chat.chat")
    .create({ data: { sessionId: sessionId } });
}

// Just added this function updateExistingChat
async function updateExistingChat(sessionId, history, strapi) {
  const existingChat = await strapi
    .service("api::chat.chat")
    .find({ filters: { sessionId: sessionId } });

  const id = existingChat.results[0]?.id;

  if (id)
    await strapi
      .service("api::chat.chat")
      .update(id, { data: { history: JSON.stringify(history.messages) } });
}

module.exports = ({ strapi }) => ({
  chat: async (ctx) => {
    let sessionId = ctx.request.body.data?.sessionId;
    const existingSession = await sessionManager.sessions[sessionId];

    console.log("Session ID: ", sessionId);
    console.log("Existing Session: ", existingSession ? true : false);

    if (!existingSession) {
      const apiToken = process.env.OPENAI_API_KEY;
      if (!apiToken) throw new Error("OpenAI API Key not found");

      sessionId = await generateSession(apiToken);
      const newSession = await sessionManager.getSession(sessionId);

      // Call the logInitialChat function
      await logInitialChat(sessionId, strapi);

      const response = await getResponse(newSession, newSession.initialPrompt);
      response.sessionId = sessionId;
      return response;
    } else {
      const session = await sessionManager.getSession(sessionId);
      const history = await sessionManager.getHistory(sessionId);
      const response = await getResponse(session, ctx.request.body.data.input);

      // Call the updateExistingChat function
      await updateExistingChat(sessionId, history, strapi);

      response.sessionId = sessionId;
      response.history = history.messages;

      await sessionManager.showAllSessions();
      return response;
    }
  },

  getSessionById: async (ctx) => {
    const sessionId = ctx.params.sessionId;
    const sessionExists = await sessionManager.getSession(sessionId);
    if (!sessionExists) return { error: "Session not found" };
    const history = await sessionManager.getHistory(sessionId);

    const response = {
      sessionId: sessionId,
      history: history.messages,
    };

    return response;
  },

  deleteSessionById: async (ctx) => {
    const sessionId = ctx.params.sessionId;
    const sessionExists = await sessionManager.getSession(sessionId);
    if (!sessionExists) return { error: "Session not found" };
    await sessionManager.clearSessionById(sessionId);
    return { message: "Session deleted" };
  },

  clearAllSessions: async (ctx) => {
    await sessionManager.clearAllSessions();
    return { message: "Sessions cleared" };
  },

  getAllSessions: async (ctx) => {
    const sessions = await sessionManager.showAllSessions();
    return sessions;
  },
});
Now that all the changes have been implemented let's test all of our new endpoints with Insomnia before connecting our backend to our frontend.
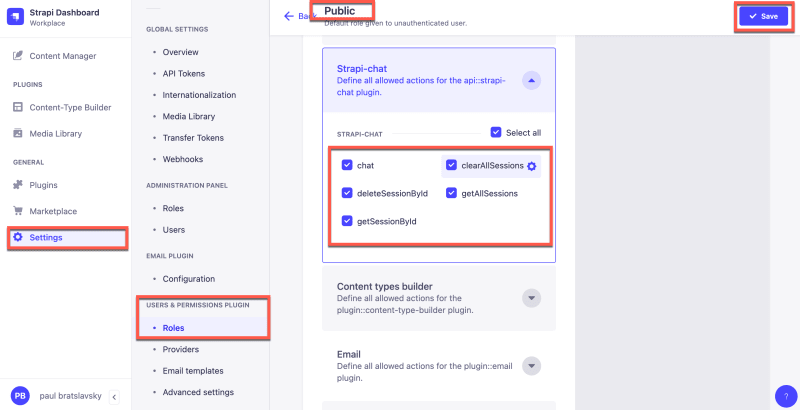
Restart your Strapi application, log into your admin panel, and navigate to settings->roles->public->permissions you should now see all of our new endpoints that we just added.
Make sure to check all the boxes to allow access and click save.
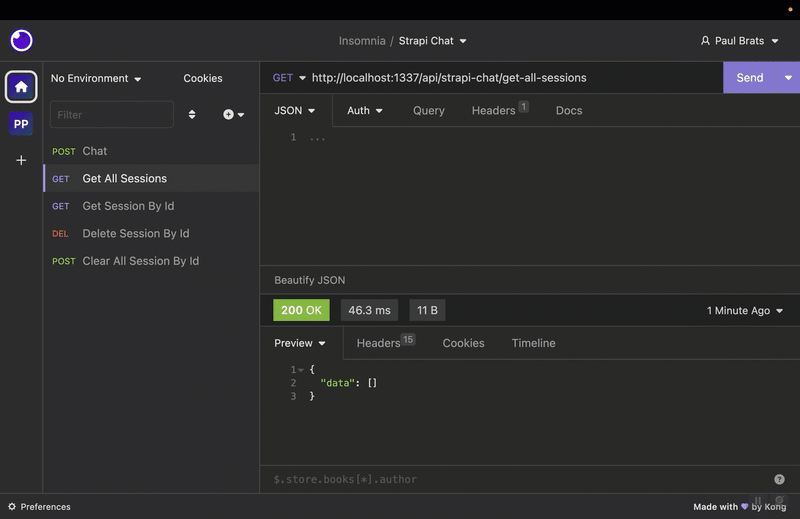
You should now be able to test all the endpoints using Insomnia.
Congratulations, we are done with our backend; we learned how to set up our routes, controllers, and services.
As a final step, let's connect our backend to our front end. I will provide the repo and walk you through the setup instructions.
You can find the full code to the backend here.
Putting It All Together
Setting Up The Frontend Project
Let's set up our front-end project. You can find it here.
I am going to use GitHub CLI to clone the project. Navigate to a directory or folder where you would like to save the project and run the following command.
gh repo clone PaulBratslavsky/next13-chat-blog-repo next-js-client
Once the project is pulled, cd into the project folder and install all the packages using the following commands.
    cd next-js-client
    yarn
Once all the dependencies and packages are installed, we must create a .env file with the appropriate variables. You can use the `.env.example file as reference.
env

    PRIVATE_API_URL=http://localhost:1337

    PRIVATE_API_TOKEN=to_be_modified
In the root of your Next.js project, create a .env file and add the above variables. Before we can start our project, we have to create an API Token in the Strapi Admin.
Create Strapi API Token
Navigate to Settings->API Tokens and click the Create New Api Token button.
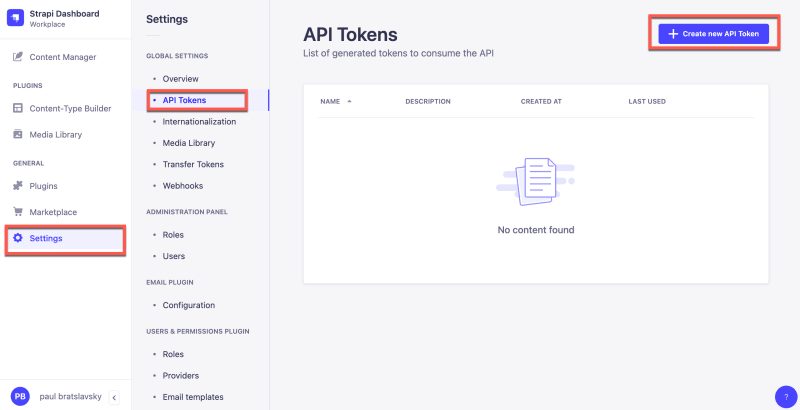
Now create a new token. I will call mine Next JS; the token duration should be set to unlimited, and the type will be set to custom. Then scroll down to the Strapi-chat and select all the checkboxes.


Once you have your token, paste it inside your .env file.

Let's test things out. Ensure your Strapi project is running, and inside our Next JS project directory, run yarn dev to start.

Notes On The Next 13 App Frontend
Before finishing this tutorial, I just wanted to share why I used route.ts files in my Next.js app to make request calls to Strapi.
This is a new feature in Next.js that allows you to create Route Handlers; you can learn more about it here.
Private Variable vs Public Variables
When using client components, I realized you can only inject public env variables using the NEXT_PUBLIC` env variable prefix.
This makes our environment variables accessible in the browser, meaning anyone can see them. But in my case, I wanted to keep the variable private, but Non-NEXT_PUBLIC_ environment variables are only available in the Node.js environment.
Next.js Routes Handlers
The route.ts files allow us access to private env variables from our Route Handler since they run on the server. Let's take a look at an example.
Router Handler Example
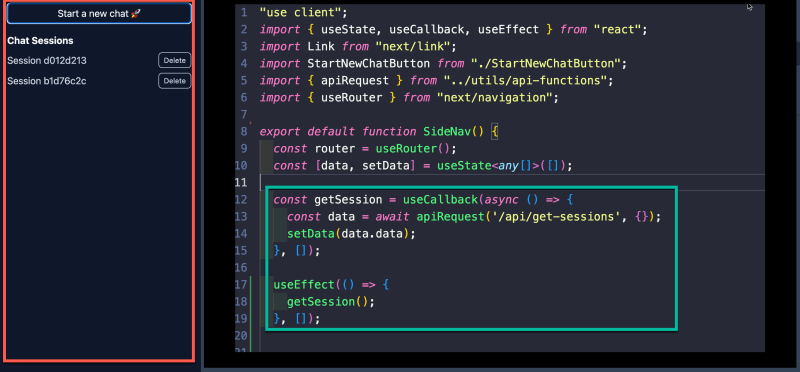
In the example above, we are looking at the client component code from our side navigation.
const getSession = useCallback(async () => {
  const data = await apiRequest("/api/get-sessions", {});
  setData(data.data);
}, []);
We are making a request via the getSession callback using our apiRequest helper method, which uses fetch.
export async function apiRequest(url: string, options: any) {
  if (!url) throw new Error("Request URL is required");

  const mergeOptions = {
    headers: {
      "Content-Type": "application/json",
    },
    ...options,
  };

  try {
    const response = await fetch(url, { ...mergeOptions });

    if (!response.ok) {
      throw new Error("Failed to fetch data from API");
    }

    const json = await response.json();
    return json;
  } catch (error) {
    console.error(error);
  }
}
Since we are calling getSession from our useEffect from our client component, we don't have access to our private variables.
useEffect(() => {
  getSession();
}, []);
That is why instead of making a call directly to our Strapi API, we are making a call to our Route Handler within Next.js first, which will give us access to our private variables using proeccess.env and then we can make a call to Strapi API with our private variable credentials as we can see in the example below.
import { NextResponse } from "next/server";

export async function GET(request: Request) {
  const url = `${process.env.PRIVATE_API_URL}/api/strapi-chat/get-all-sessions`;
  const token = process.env.PRIVATE_API_TOKEN;

  try {
    const response = await fetch(url, {
      method: "GET",
      headers: {
        Authorization: `Bearer ${token}`,
        "Content-Type": "application/json",
      },
      cache: "no-cache",
    });

    if (!response.ok) {
      throw new Error("Failed to fetch data from API");
    }

    const json = await response.json();
    console.log(json);
    return NextResponse.json(json);
  } catch (error) {
    console.error(error);
  }
}
Which allows us to keep our env variable private and on the server.
Conclusion
In this tutorial, we looked at how to build custom routes, controllers, and services combined with third-party libraries like LangChain and Open AI to create our own implementation of ChatGPT. Then we looked at combining our Strapi backend with a Next.js project.
I hope you found this tutorial helpful, and I can't wait to see what you will build based on what you have learned here.
What's Next?
I want to explore how to move the functionality we built today into a Strapi Plugin. The benefit of that is that it will make it easier to share this functionality with others.
For instance, we can have an Open AI api plugin that can expose different functionality from chat to image generation and is controlled from within our Strapi admin but allows us access via API endpoints.
That way, we will have access to all of our Open AI wrapped services that can be consumed by multiple applications and not just Strapi. Let me know if that is a tutorial you would be interested in.
All the best,
Paul
Strapi Backend Final GitHub Repo
Next.js Frontend Final GitHub Repo

Top comments (0)