
Communication is key to building great brands, in this digital age we have got lots of opportunities and ways to carry out great communications. From social media to emails, to text and calls, the limit of communications has been tested. One major innovation in communication has got to be ChatBots.
Simply put a chatbot is a software application used to conduct an online chat conversation via text or text-to-speech. It can be used to substitute a real chat with a live human agent. It has been used in various scenarios ranging but not limited to personal assistants, customer support, booking of tickets, e-shopping, also e-banking to mention a few.
This tutorial will show you how to build a Rule-Based Chatbot Assistant using Next.js and Tailwind CSS as frontend and Strapi headless CMS as backend. .
You can find the link to the finished frontend code here, as well as the backend code here.
Advantages of using Chatbot
It is necessary that before we proceed further into this article, we have a picture of what chatbot brings to the table when used adequately. Some of the advantages of using a chatbot include:
- Availability: Since a chatbot is a software application that can be hosted, it means it doesn't sleep, hence it is always available at any time of the day. This gives a company or person a great brand image that at any time of the day clients can get support on their varying requests.
- Cost reduction: As an application that can be deployed in multiple places, it reduces the cost of running a large number of customer care representatives.
- Efficiency: A single chatbot can be deployed in various places and also simultaneously attend to multiple requests at once.
- Improved online presence: Some chatbots allow for the integration to other messaging platforms, this allows a consistent response sent across multiple platforms and which leads to improved brand identity.
Prerequisite
Before starting this tutorial, you need to have
- Node.js installed on your local machine (v12 or v14) - Check this tutorial for instructions on how to install Node.js
- Basic understanding of Strapi - Get started with this quick guide
- Basic knowledge of Next.js
- Basic knowledge of Tailwind CSS
What is Next Js
Next.js is an awesome React framework for building highly dynamic applications. It comes with pre-rendering, automatic code-splitting amongst many other great features out of the box.
What is Tailwind CSS
Tailwind CSS is a utility-first CSS framework for rapidly building custom user interfaces. With Tailwind CSS, we write our CSS directly in our HTML classes. This is quite useful as we don't need to import an external stylesheet or use a separate library for UI designs.
What is Strapi
Strapi is a Node.js open-source headless CMS that allows us to develop APIs and manage content easily without the hassle of building out a project from scratch. It allows for customization and self-hosting as opposed to the rigid traditional CMS we are used to.
We can easily build out APIs faster and consume the contents via APIs using any REST API client or GraphQL.
Scaffolding a Strapi Project
To setup a new Strapi Project is quite straightforward, just run this command:
npx create-strapi-app chatbot-assistant --quickstart
Change chatbot-assistant to the preferred name of your project
Nb: During the setup, we would not be using any Strapi template
This would install and create a Strapi application and set up the project locally.
After installation, the browser would open a page on localhost:1337 which would prompt to set up a super admin account to proceed with Strapi.
Building the Interchange collection
Next, we will create a new collection type that will store the details of each question and their respective answers.
Hence, create a collection type called ‘interchange’ that has these fields: question, answer
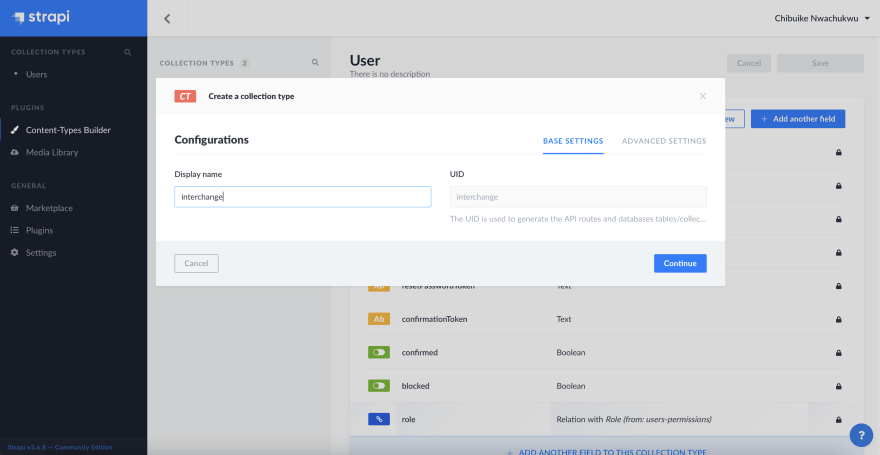
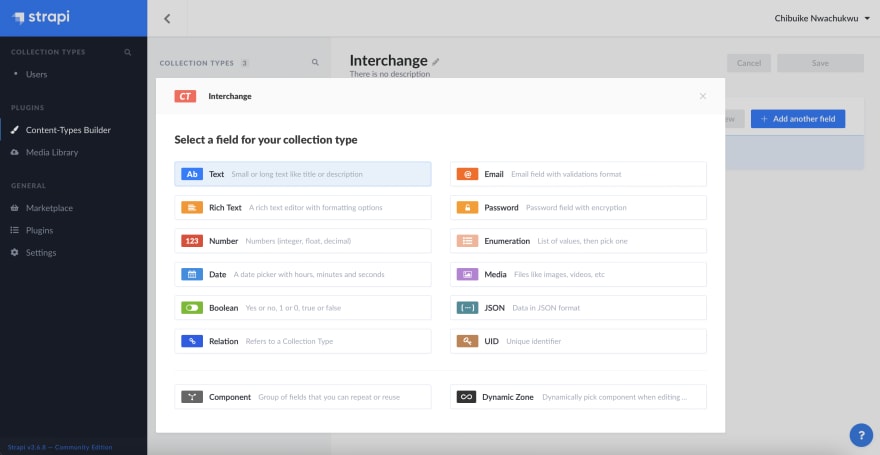
Clicking “Continue” would bring up another screen to select the fields for this collection. Choose the “Text” field from the list and provide question as its name.
Next, we select the Long Text type in the Base Settings, this would allow us to enter longer and more descriptive questions when creating an interchange.

Next, we proceed to the “Advanced settings” tab and check the “Required field” box to ensure this field is required when creating a new interchange. Also, we check the “Unique field” box to prevent having the same question our interchange.
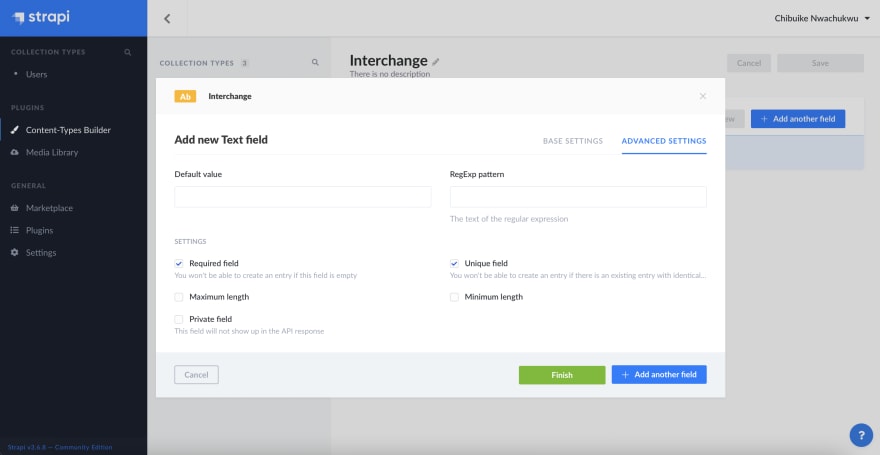
We click on the Add another field to add the answer field. Below is a table showing the properties for both fields in this collection:
| Field Name | Field Type | Required | Unique |
|---|---|---|---|
| question | long text | true | true |
| answer | rich text | true | false |
Seeding Strapi
We would proceed next to define the questions and respective answers given by our bot.
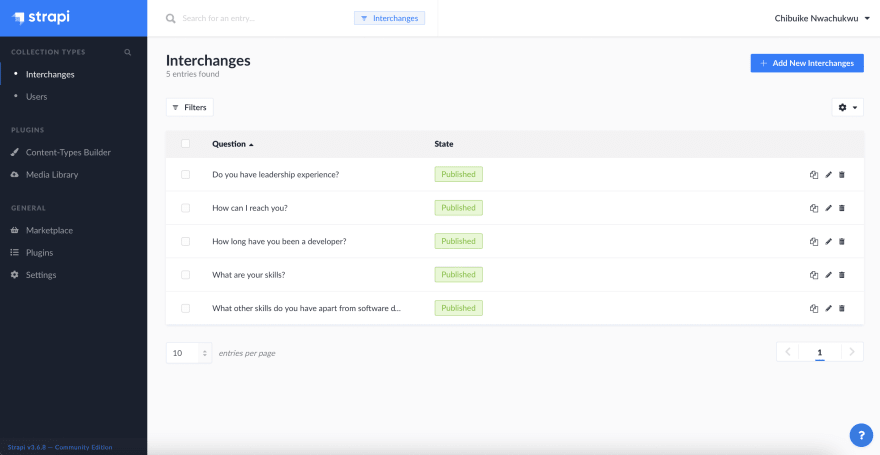
To add data to the collection, we select the Interchanges Collection on the left sidebar, click “Add New Interchanges” and fill in the details.

For this tutorial, I would be seeding the interchange with an about me interchange in mind, so our bot can act as an assistant that tells visitors more about us and our services. After seeding our collection looks thus:
Allowing Public access
By default, whenever you create an API, Strapi creates six endpoints from the name given to the API. The endpoints generated for Interchange should look like this:

By default, they’re all going to be restricted from public access. We need to tell Strapi that you’re okay with exposing these checked endpoints to the public. Go to Settings > Users & Permissions Plugin > Roles and click to edit the Public Role. Next, scroll down to permissions and check find for Interchange.
This endpoint: http://localhost:1337/interchanges should now be available. And the sample response this :
    [{"id":2,"question":"What are your skills?","answer":"I am skilled at frontend development as well as backend development.","published_at":"2021-11-10T22:04:01.379Z","created_at":"2021-11-10T22:00:18.983Z","updated_at":"2021-11-10T22:04:01.445Z"},
    {"id":3,"question":"How can I reach you?","answer":"You can reach me via my phone line: 0900000000 or via my twitter handle: interchange_demo.","published_at":"2021-11-10T22:04:09.033Z","created_at":"2021-11-10T22:01:07.886Z","updated_at":"2021-11-10T22:04:09.039Z"},
    {"id":4,"question":"How long have you been a developer?","answer":"6 years.","published_at":"2021-11-10T22:04:15.757Z","created_at":"2021-11-10T22:01:50.037Z","updated_at":"2021-11-10T22:04:15.765Z"},
    {"id":5,"question":"Do you have leadership experience?","answer":"Yes, I do.","published_at":"2021-11-10T22:04:21.346Z","created_at":"2021-11-10T22:02:23.115Z","updated_at":"2021-11-10T22:04:21.354Z"},
    {"id":6,"question":"What other skills do you have apart from software development?\n","answer":"I am a technical writer and also a community builder.","published_at":"2021-11-10T22:04:26.091Z","created_at":"2021-11-10T22:03:21.103Z","updated_at":"2021-11-10T22:04:26.102Z"}]
Scaffolding a NextJs project
Create a Next.js app
To create a Next.js app, open your terminal, cd into the directory you’d like to create the app in, and run the following command:
npx create-next-app -e with-tailwindcss nextjs-chatbot
This would also configure Tailwind CSS with the project
Run the Next.js development server
Next we cd into the newly created directory, in our case that would be nextjs-chatbot
cd nextjs-chatbot
After which we start up the development server, by running this command:
npm run dev
If everything was set up fine, the next.js server should now be running on http://localhost:3000 we should get this shown on our browser:
Building NextJs Components
Next, we proceed to any text editor of our choice to develop the rest of the application. We use Visual Studio Code for this tutorial. Opening up the installed project, we should have a folder structure such as this:

To begin the design of the interface, we would remove all the content of the index.js file which is found inside the pages folder, this is the entry point of the NextJs project. We replace it with the content below:
    import Head from 'next/head'
    import { useState, useEffect } from 'react'
    import { createMarkup, tranformInterchanges, showBotTyping, getBotAnswer, fetchQuery } from '../utils/helper'
    export default function Home( { interchanges }) {
      const [userQuestion, setUserQuestion] = useState('')
      const [allow, setAllow] = useState(false)
      const [interchange, setInterchange] = useState([])

    useEffect(async () => {
     await showBotTyping(setInterchange, [], setAllow)
     setInterchange([{
      owner: false,
      text: tranformInterchanges(interchanges, true)
    }])
    }, [interchanges])

    const handleSubmit = async (e) => {
      e.preventDefault()
      if(!userQuestion || !allow) return
      const uQ = userQuestion
      const newInterchange = [...interchange, {
        owner: true,
        text: userQuestion
      }]
      setInterchange(newInterchange)
      setUserQuestion('')
      setAllow(false)
      getBotAnswer(interchanges, setInterchange,  uQ, newInterchange, setAllow)
    }
      return (
        <div className="flex flex-col font-mono items-center justify-center min-h-screen">
          <Head>
            <title>ChatBot Assistant</title>
            <link rel="icon" href="/favicon.ico" />
          </Head>
          <form className="flex flex-col w-full flex-1" onSubmit={handleSubmit}>

            <header className="flex w-full h-24 fixed bg-black border-b">

              <span className="flex items-center text-white font-bold text-lg p-2"> Bot Assistant</span>
           </header>
            <div className="flex flex-col mt-24 bg-gray-200  overflow-scroll p-2 w-full" style={{ height: "80vh"}}>
            {interchange.map((chat,i) => (
              chat.owner ?
              <div key={i} className = "user flex flex-row my-2 w-full p-2">
              <span className = "w-2/3"></span>
              <span className = "w-1/3 bg-gray-100 p-2 rounded">
               {chat.text}
              </span>
            </div>
             :
              <div key={i} className = "bot my-2 bg-gray-100 w-1/2 lg:w-1/3  p-2 rounded">
                <span dangerouslySetInnerHTML={createMarkup(chat.text)} />
              </div>
            ))}
            <div id="scrollTo"></div>
            </div>
            <footer className = "flex flex-row justify-between items-center p-1 h-5/6  w-full -bottom-5">
            <div className = "flex flex-row justify-between flex-1 bg-white w-full">
              <input className = " bg-gray-200 w-2/3 p-2 " placeholder="Type a message" value={userQuestion} onChange={ (e) => { setUserQuestion(e.target.value)}}/>
              <button className = " bg-black p-2 ml-2 w-1/3  text-white" type="submit"> Send</button>
            </div>
            </footer>
          </form>

        </div>
      )
    }

    export async function getStaticProps() {
      const interchanges = await fetchQuery('interchanges')
      return {
        props: {
          interchanges
        }
      }
    }
Explanation of above code
The above code is used to display the UI for the chat interface, that is both the messages, input area as well and the send button.
In the upper section we imported the helper function from a helper.js file, these functions would be used to make the app functional:
    import Head from 'next/head'
    import { useState, useEffect } from 'react'
    import { createMarkup, tranformInterchanges, showBotTyping, getBotAnswer, fetchQuery } from '../utils/helper'
Next, using the useState hooks, we create multiple variables we would use later in the app to achieve various purposes:
The userQuestion is used to keep track of the current question being typed by the user, that is the text in the input box.
The allow state is used to prevent a user from sending multiple messages when the bot is currently still replying to a previously sent message.
The interchange state is used to store internally the messages between both the bot and the user
      const [userQuestion, setUserQuestion] = useState('')
      const [allow, setAllow] = useState(false)
      const [interchange, setInterchange] = useState([])
The portion of code in the useEffect fires once the app is started and does the following:
Firstly, it shows an animation of the bot typing for a few seconds.
Next, it sets the first/default message sent by the bot to the user, this message contains the question gotten from the Strapi API when the app was started.
    useEffect(async () => {
     await showBotTyping(setInterchange, [], setAllow)
     setInterchange([{
      owner: false,
      text: tranformInterchanges(interchanges, true)
    }])
    }, [interchanges])
The handleSubmit function is the handler that gets called once the user sends their message to the bot.
We only allow a successful submit if the user indeed has entered value in the text box and also only if the bot doesn’t have a question it is currently processing.
Next, add the new question of the user into the interchange state, remove the typed text of the user from the input box and set the allow state to false, to prevent the user from sending another text till the bot returns with a result.
The getBotAnswer helper function is then used to get the answer from the bot and update the UI.
    const handleSubmit = async (e) => {
      e.preventDefault()
      if(!userQuestion || !allow) return
      const uQ = userQuestion
      const newInterchange = [...interchange, {
        owner: true,
        text: userQuestion
      }]
      setInterchange(newInterchange)
      setUserQuestion('')
      setAllow(false)
      getBotAnswer(interchanges, setInterchange,  uQ, newInterchange, setAllow)
    }
As can be seen in the index.js file, we imported a helper.js file. This means we need to create this file, to do this we create a folder at the root of our application called utils and then create a file in it called helper.js.
Next, copy the content of the file below into the newly created helper.js file:
    const baseUrl = process.env.BASE_URL || 'localhost:1337'
    export const createMarkup = (text) => {
      return {__html: text};
    }
    export const tranformInterchanges = (interchanges, initial = false) => {
      let initialText = initial ? `<b>Welcome to my page, glad to have you here 🥰</b> <br/>
     Tell me what you would like to know: <br/> <br/> `: ''

      interchanges.map((e, i) => {
          initialText += `${(i+1)}. ${e.question} <br /> <br />`
      })
      return initialText
    }
    export const searchInterchange = (interchanges, question) => {
      let result = interchanges.find(e => e.question.toLowerCase().includes(question.toLowerCase()))
      if(result) return result.answer
      return `Cant seem to understand your question, please try again 😔<br><br>
        Here are the options again: <br/> <br/>
        ${tranformInterchanges(interchanges)}
      `
    }

    export const showBotTyping = async (setInterchange, prevState, setAllow) => {
      scrollDown()
      await new Promise(resolve => setTimeout(resolve, 1000));
      setInterchange([...prevState, {
        owner: false,
        text: 'Bot Assistant is typing.'
      }])
      scrollDown()
      await new Promise(resolve => setTimeout(resolve, 1000));
      setInterchange([...prevState, {
        owner: false,
        text: 'Bot Assistant is typing..'
      }])
      scrollDown()
      await new Promise(resolve => setTimeout(resolve, 1000));
      setInterchange([...prevState, {
        owner: false,
        text: 'Bot Assistant is typing...'
      }])
      scrollDown()

      await new Promise(resolve => setTimeout(resolve, 1000));
      setAllow(true)
      scrollDown()
    }

    export const getBotAnswer = async (interchanges, setInterchange, question, prevState, setAllow) => {
      await showBotTyping(setInterchange, prevState, setAllow)
      setInterchange([...prevState, {
        owner: false,
        text: searchInterchange(interchanges,question)
      }])
      scrollDown()
    }

    const scrollDown = () => {
      document.getElementById('scrollTo').scrollIntoView({behavior: "smooth", block: "start"});
    }

    export const fetchQuery = async (path, params = null) => {
      let url
      if (params !== null) {
        url = `${baseUrl}/${path}/${params}`
      } else {
        url = `${baseUrl}/${path}`
      }
      const response = await fetch(`http://${url}`)
      const data = await response.json()
      return data
    }
Explanation of above code
The above code contains various helper functions that are used in the app.
First, we set the base URL for the API, which in our case is localhost:1337 but if we eventually host the Strapi API, we would then update the BASE_URL in the .env file to the remote Strapi API.
Next, we use createMarkup to show the messages from the bot with any HTML formatting it comes with.
    const baseUrl = process.env.BASE_URL || 'localhost:1337'
    export const createMarkup = (text) => {
      return {__html: text};
    }
The tranformInterchanges function is used to display the first message sent by the bot to the user, which contains all possible questions that can be asked in a finely formatted way:
    export const tranformInterchanges = (interchanges, initial = false) => {
      let initialText = initial ? `<b>Welcome to my page, glad to have you here 🥰</b> <br/>
     Tell me what you would like to know: <br/> <br/> `: ''

      interchanges.map((e, i) => {
          initialText += `${(i+1)}. ${e.question} <br /> <br />`
      })
      return initialText
    }
The searchInterchange is the heart of the app, it is where all user questions are scanned to see if there is an adequate response for it. If there is, it returns a response from the provided answers else it returns a response indicating that no results were found while and also displaying all questions the user can ask.
    export const searchInterchange = (interchanges, question) => {
      let result = interchanges.find(e => e.question.toLowerCase().includes(question.toLowerCase()))
      if(result) return result.answer
      return `Cant seem to understand your question, please try again 😔<br><br>
        Here are the options again: <br/> <br/>
        ${tranformInterchanges(interchanges)}
      `
    }

    export const showBotTyping = async (setInterchange, prevState, setAllow) => {
      scrollDown()
      await new Promise(resolve => setTimeout(resolve, 1000));
      setInterchange([...prevState, {
        owner: false,
        text: 'Bot Assistant is typing.'
      }])
      scrollDown()
      await new Promise(resolve => setTimeout(resolve, 1000));
      setInterchange([...prevState, {
        owner: false,
        text: 'Bot Assistant is typing..'
      }])
      scrollDown()
      await new Promise(resolve => setTimeout(resolve, 1000));
      setInterchange([...prevState, {
        owner: false,
        text: 'Bot Assistant is typing...'
      }])
      scrollDown()

      await new Promise(resolve => setTimeout(resolve, 1000));
      setAllow(true)
      scrollDown()
    }
The showBotTyping is used to mimic a human, it gives the bot a human feeling by delaying its response a bit and using that time to display a message that the bot is typing. This typing animation would be removed from the chat history once a response comes back from the bot.
    export const showBotTyping = async (setInterchange, prevState, setAllow) => {
      scrollDown()
      await new Promise(resolve => setTimeout(resolve, 1000));
      setInterchange([...prevState, {
        owner: false,
        text: 'Bot Assistant is typing.'
      }])
      scrollDown()
      await new Promise(resolve => setTimeout(resolve, 1000));
      setInterchange([...prevState, {
        owner: false,
        text: 'Bot Assistant is typing..'
      }])
      scrollDown()
      await new Promise(resolve => setTimeout(resolve, 1000));
      setInterchange([...prevState, {
        owner: false,
        text: 'Bot Assistant is typing...'
      }])
      scrollDown()

      await new Promise(resolve => setTimeout(resolve, 1000));
      setAllow(true)
      scrollDown()
    }
The getBotAnswer function sends the user question to the bot and then updates the chat with the bot response.
    export const getBotAnswer = async (interchanges, setInterchange, question, prevState, setAllow) => {
      await showBotTyping(setInterchange, prevState, setAllow)
      setInterchange([...prevState, {
        owner: false,
        text: searchInterchange(interchanges,question)
      }])
      scrollDown()
    }

    const scrollDown = () => {
      document.getElementById('scrollTo').scrollIntoView({behavior: "smooth", block: "start"});
    }
We use the scrollDown function to smoothly bring the current message sent by either the bot or the user into view. This makes it more like a chat app, with users not having to manually scroll down to see recent messages.
    const scrollDown = () => {
      document.getElementById('scrollTo').scrollIntoView({behavior: "smooth", block: "start"});
    }
And that's it for the code section of the frontend part of this tutorial. In the next section, we would be seeing a demo of the finished app.
Finished App
The finished app looks like this:
Conclusion
There’s no doubt that the benefit a chatbot assistant brings outweigh any negative effect it could have. This method allows us to free up our time by allowing this bot to answer repetitive questions about us, our business, our organization, or event. The possibilities of this are endless and can only be left to one’s imagination.
This tutorial demonstrated how easily you can build a bot using technologies already very much common. If this interests you, check out Strapi's website to learn more about the headless CMS.

Top comments (0)