
Using a backend only content management system has now become a trend in the modern web. With Strapi being one of the most popular to use in developing our web apps, we'll learn how to connect a Nuxt app with Strapi using GraphQL
Outline
- The need for headless CMS
- Why use strapi?
- How it all works
- setting up the Nuxt frontend
- Configuring Nuxt to work with Apollo Client
- Creating a Strapi Collection Type
- Install the Strapi GraphQL Plugin
- Using the GraphQL Playground
- Adding a query to our Nuxt client
- Rendering Strapi data in the Nuxt client
- Implementing Top Navigation
- Displaying our events
- Filtering our Events
- Wrap Up
Goals
In this tutorial, we will look at how we can connect the Strapi backend to our Nuxt frontend and fetch some data using Graphql. We’ll also look at how to set up and configure this Jamstack project.
Prerequisites
In order to follow this tutorial, you need:
The Need for Headless CMS
Traditional CMS, having been the king of content management, gave us the comfort of having all our content, templates, and custom code in a single environment. However, this way of serving the content is no longer enough as how data can be shared has evolved. Today, content can be displayed on any device and in any data format. With the introduction of Headless CMS, content can now be provided to you as data over an API. This makes it very easy to serve your data across a wide variety of devices, including the internet of things.
Why use Strapi?
Strapi makes it easy for Javascript developers to create REST APIs, that can be consumed in any frontend application with its numerous integrations. Strapi allows you to create custom content types and relationships between the content types so that things can stay organized. You also have a media library where you can host your image or audio assets. Another great reason to use Strapi is the ability to create multilingual websites or apps. You can check out the other amazing features Strapi offers here.
Overview
In this section, we will look at getting started with Strapi, and setting it up. Since we are building an event app, we will make all events data available in our Strapi API, and hook Nuxt.js to the frontend. We will create an event custom type, then update the events in the Strapi admin panel. We can then make a simple request to get all our events to populate our frontend.
Setting up the Project
On the terminal, we first create a directory for our app:
    mkdir nuxt-strapi-eventapp
    cd nuxt-strapi-eventapp
In this directory, we will create our Strapi backend and this can be done with a single one-liner command.
npx create-strapi-app events-server --quickstart
After this is done running, we can see in our terminal, our project information and a url that we can use to access our strapi admin panel at http://localhost:1337/admin. We also notice our server started automatically.

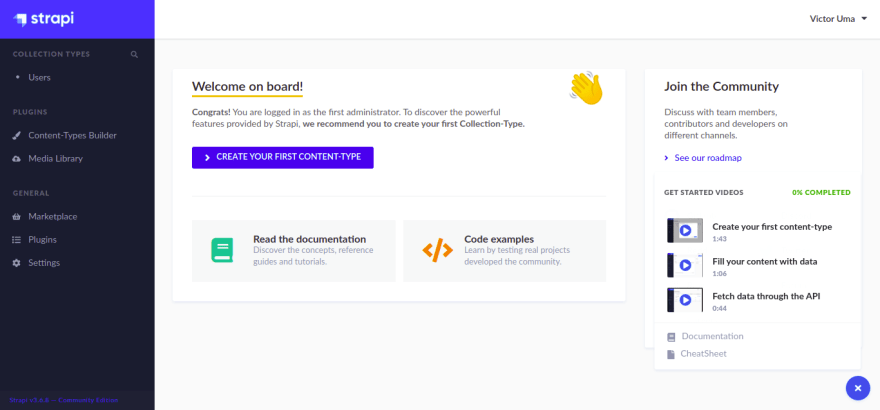
In our admin panel, let's fill in our information and create a root admin user. After clicking the let's start button, we will be directed to our dashboard.
So the way we want to structure the data we fetch is by events. Each event needs to be categorized, that is belonging to one or two categories.
Creating our Content-Types
In our admin dashboard, by the left, under Plugins, click on the Content-Types Builder option to easily create content types. In our case, we want to create an Events and Category content type. The Category content type will have a many-to-many relationship with the Events content type. Let’s build this out!
First, under Collection Types, click on Create new collection type button.

When we click create new collection type, a modal opens up where we can create our event content type and name it Event. We click on continue and now we can add fields to the event.
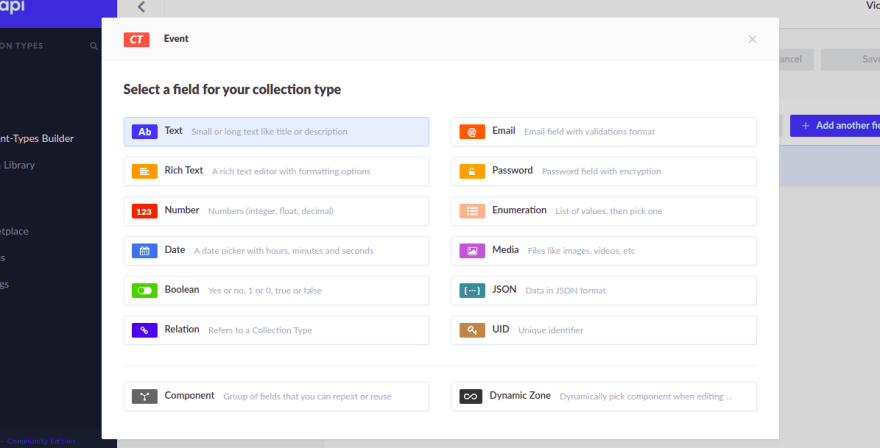
The fields we will need are:
- Text
- Date
- Number
- Media
We will be creating two text fields: the title of the event and the description of the event. The date field will be the date of the event. The two number fields are the duration of the event and the price to attend events respectively.
From the image above, click on the text field and name it title, then select the short text option, since it’s a title and we would like to easily search events by their title.

We then click on add another field and select the text field again, but this time we name it description . Select the long text option, and click on add another field .
We want to be able to set the date and time of our events, so we create a date field by clicking on the date option. We then name the field date and select datetime as our type of date. Next, we create a number field to specify the duration of the event. We name the field duration and choose decimal as our number format.
We create another number field named price and select decimal as its number format. Lastly, we create a media field and name it image . Select single media as its type because it is the cover image for the events.
Then click on finish, and save the fields and the event type.

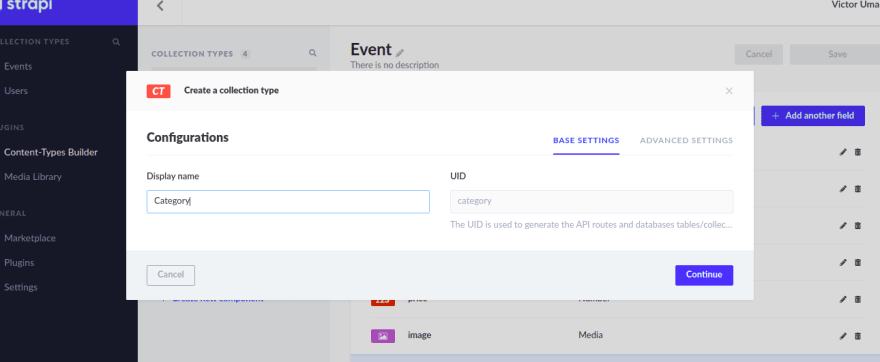
Creating our category content type
We want our events to be categorized according to meetups or coding events. So we need to create another content type using the Content-Types Builder. Click the create new collection type button. Name the collection type category
We want to create two fields this time around:
- Text
- Relations
We create a text field called name for the name of the categories. Then we create a relations field and make it have a many-to-many relationship with the Event content type. We will select this from the input field by the right.
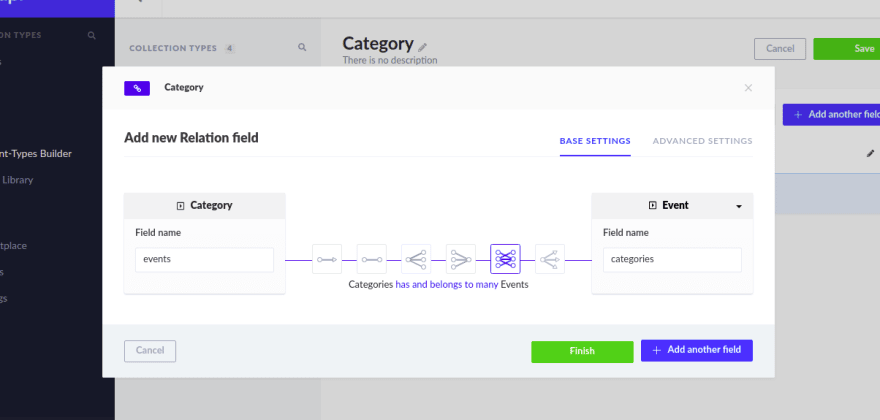
Now events and categories are now linked. So a category can have many events under it and an event can belong to many categories. We will finish and save the category content type.
Adding categories
We would like to add two categories which are meetup and coding. So we click on the categories content type.

Then we click on add new category and input coding as the name of this first category. Save it.

Then create another category called meetup and save it. Now we have two categories we can select from.
Adding our Events
Select the Event collection type and click the Add New Event button. Now we are prompted with a modal to create an entry for the first event
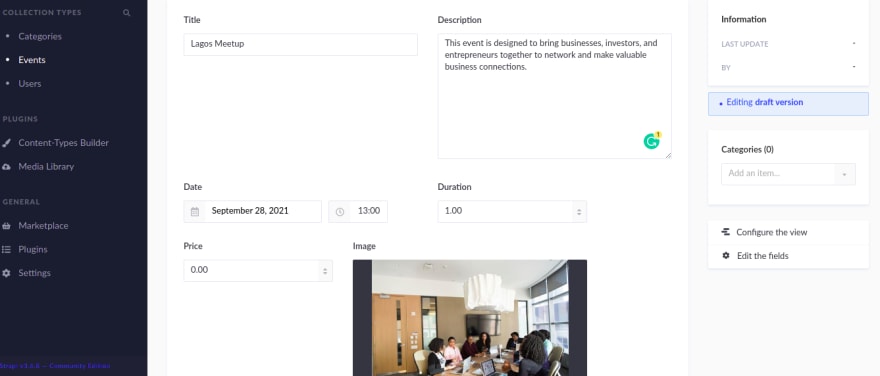
We can see the first event created in the image above with the fields we created earlier. We fill in the input fields with the desired information.
- The title field for the title of the event
- The description field for the event description
- Date field for the time of the event
- Duration field for the duration of the event
- Price field for the price of the event
- Image field for the cover image of our event
To add an image for an event, we first navigate to our Media Library which we can see from the left navbar. Then we can upload all assets we need for the events, by clicking upload assets .

To the left of the screen on the event creation page, we can see the category dropdown menu. Here we can select which category our events belong to, either coding or meetup. Now we save and publish the event. Our first event is now available to us.
We will repeat what we did above with different information, by creating unique events for our application. So you can go ahead and add 7 more events, but make sure we have 4 events with a category of meetup and another 4 with a category of coding.
Setting up Roles and Permissions
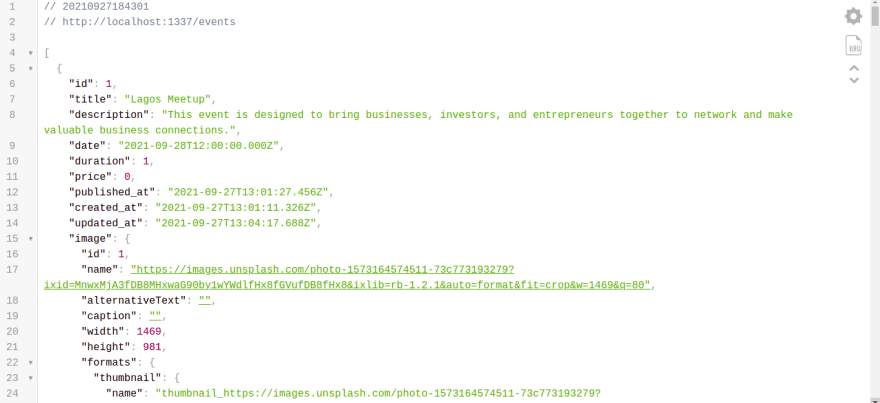
If we try accessing our events data through the API endpoint at http://localhost:1337/events we will get a forbidden error. To fix this, we have to grant access to our API by navigating to our Settings under User and Permission Plugin and click on Roles.
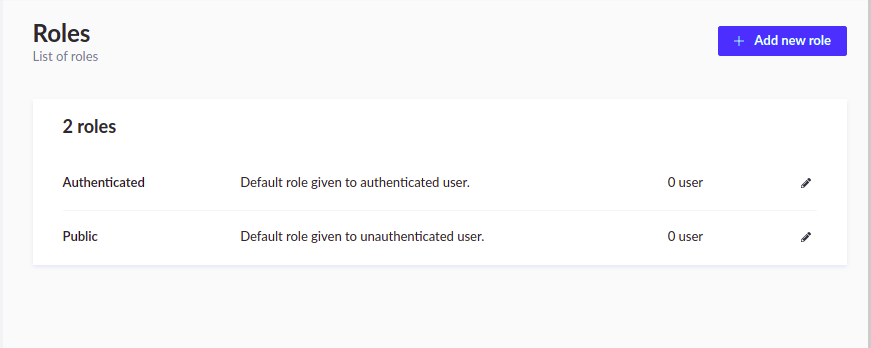
Select the Public role and set up all CRUD operations we might carry out with the API to be public.

Save the changes and now try accessing http://localhost:1337/events and we can see all our events returned in the browser.
Our Nuxt Frontend
In this section, we will setup Nuxt and build the event app UI. So let’s get started by installing Nuxt. On your terminal, run the following command in the nuxt-strapi-eventapp folder.
yarn create nuxt-app event-app
After running the command above, we will be prompted to make some choices based on how we want our project to run. Here are the choices to select as you setup Nuxt:
- Yarn package manager
- Tailwind CSS as our UI framework
- ESLint for linting
- Universal (SSR / Static) as our rendering mode
- Static/JAMStack hosting as our deployment target
Set up dependencies
We want to easily fetch our Strapi data from the Strapi GraphQL API. So we install some important GraphQL dependencies for this to work.
yarn add @nuxtjs/apollo graphql graphql-tag
We have @nuxtjs/apollo package installed that allows for the easy integration of Apollo/GraphQL with VueJS. We have GraphQL for our queries, and GraphQL-tag, a template literal tag for parsing our GraphQL queries.
Now that we have installed the GraphQL dependencies, let’s setup some Nuxt configurations.
In our nuxt.config.js file we need to make some changes that allows us use the Nuxt Apollo module.
    // nuxt.config.js
      modules: [
        '@nuxtjs/apollo'
      ],
      apollo: {
        clientConfigs: {
          default: {
            httpEndpoint: 'http://localhost:1337/graphql',
          }
        }
      },
From the above we just simply loaded the @nuxtjs/apollo module and set Apollo configuration. We want to be able to access our GraphQL playground when we go to the default endpoint http://localhost:1337/graphql we have set above. If we go to that link, we get a Not Found page returned. This is because we haven’t installed the Strapi GraphQL plugin.
Install the Strapi GraphQL plugin
We can install the Strapi GraphQL plugin two ways, either from our Strapi dashboard through the marketplace or using the CLI. In our case, we will be using the CLI.
npm run strapi install graphql
Now we have installed it, all we have to do is restart our server. If we go to the GraphQL endpoint again, we will be able to access the GraphQL playground now.

In the playground, we can test our API and build out the queries we will be making in the Nuxt application.
Using the Graphql Plugin
In the GraphQL playground, we can build out query requests before we put them in the frontend of our app and make our request to Strapi. Let’s see how a query works.

We can give our query a name, for example, we are querying for all the events we have added to Strapi. We can name the query for all the events AllEvents the we target for the events collection type which we named events. We can choose what to query for in our events data, so let’s say we want only the id, title and date. We can query them and when we hit play in our GraphQL playground, the data is returned from Strapi.
Adding a query to our Nuxt client
At the root of our application, we will create a folder named graphql and in the folder we add our query.js file.
    mkdir graphql
    cd graphql
    touch query.js
It is in this file we will write and export our query.
We need to determine what we want to query from our event data in Strapi, which are the event ID, title, date, image and categories.
    query Events {
        events {
          id
          title
          date
          image {
            name
          }
          categories {
            name
          }
        }
      }
Now we import gql from graphql-tag. We will then use gql for formatting the query and then export it.
    // graphql/query.js

    import gql from 'graphql-tag';
    export const allEventQuery = gql`
    query Events {
        events {
          id
          title
          date
          image {
            name
          }
          categories {
            name
          }
        }
      }
    `
We named the query allEventQuery. So this is the name we will be using as our query name when making a request for the Strapi event data.
Building out the application UI/Layout
As I stated earlier, we will be using TailwindCSS for styling in this application.
We are using the Nuxt default layout, and in the layout/default.vue . It has:
    // layouts/default.vue
    <template>
      <div>
        <NavBar />
         <TabNav />
        <Nuxt />
      </div>
    </template>
Implementing Top Navigation
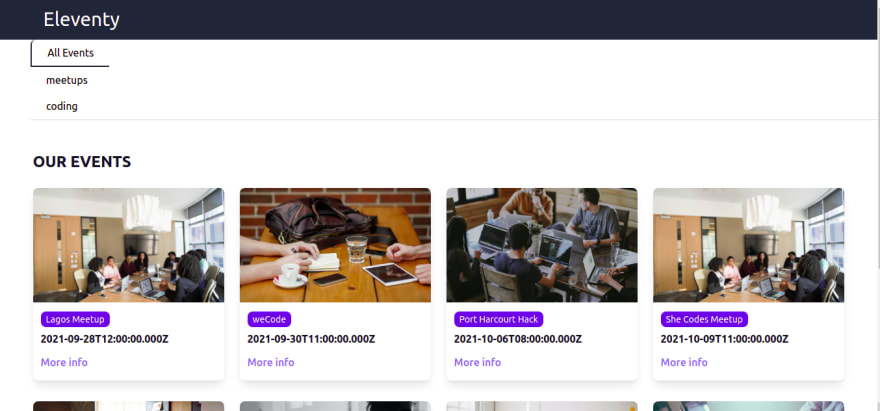
In the NavBar component, we just have the event app name and in the TabNav component we have the navigation for the app.
    // components/NavBar.vue
    <template>
    <nav class="bg-gray-800">
      <div class="max-w-7xl mx-auto px-2 sm:px-6 lg:px-8">
        <div class="relative flex items-center justify-between h-16">
            <div><h1 class="text-white text-3xl">Eleventy</h1></div>
        </div>
      </div>
    </nav>
    </template>


    // components/TabNav.vue
    <template>
        <div>
        <div style='border-bottom: 2px solid #eaeaea' class="ml-12">
      <ul v-for="(tab, id) in tabs" :key="id" class='flex cursor-pointer'>
         <NuxtLink :to="`/${tab}`"><li :class="currentTab === id ? 'active' : ''" @click="currentTab = id" class='py-2 px-6 bg-white rounded-t-lg'>{{tab}}</li></NuxtLink>
      </ul>
    </div>
    </div>
    </template>
    <script>
    export default {
        data() {
            return {
          tabs: ['All Events', 'meetups', 'coding'],
          isActive: false,
          currentTab: 0
            }
        },
          methods: {
           selectTab() {
          this.isActive = !this.isActive
        },
      },
    }
    </script>
    <style scoped>
     .active {
       border-bottom: 2px solid #1f2937;
       border-left: 2px solid #1f2937;
     }
    </style>
Our TabNav.vue is where all navigation for the app takes place.
Our pages
We will have four pages in this application. The most important page is the home page, which is also the index.vue file in our pages folder. Two of the pages contain events for the two event categories: meetups and coding. The last page is a page that displays more information about any event the user clicks, so we call it the event page.
Displaying our Events
In this section, we will make a GraphQL request to Strapi. Once we get back our desired data, we will populate the home page with the different events we get from Strapi. But before doing this, we need to create a card component that we can reuse to display our event data.
In the components folder, we create the EventCard component in our editor under our component folder and we add:
    // components/EventCard.vue
     <template>
      <div class="mt-6 grid md:grid-cols-2 lg:grid-cols-4 gap-x-6 gap-y-8">
        <NuxtLink
          :to="{ name: 'event-id', params: { id: event.id } }"
          v-for="event in events"
          :key="event.id"
        >
          <article
            class="
              bg-white
              group
              relative
              rounded-lg
              overflow-hidden
              shadow-lg
              hover:shadow-2xl
              transform
              duration-200
            "
          >
            <div class="relative w-full h-80 md:h-64 lg:h-44">
              <img
                :src="event.image.name"
                alt="cover image"
                class="w-full h-full object-center object-cover"
              />
            </div>
            <div class="px-3 py-4">
              <h3 class="text-sm text-gray-500 pb-2">
                <a class="bg-indigo-600 py-1 px-2 text-white rounded-lg" href="#">
                  <span class="absolute inset-0"></span>
                  {{ event.title }}
                </a>
              </h3>
              <p class="text-base font-semibold text-gray-900">
                {{ event.date.toLocaleString("en-US", { timeZone: "UTC" }) }}
              </p>
              <p class="text-indigo-400 mt-3 font-medium">More info</p>
            </div>
          </article>
        </NuxtLink>
      </div>
    </template>

    <script>
    export default {
      props: ["events"],
    };
    </script>
We can see that we passed an events prop into this component. The prop is an array of our events passed down from the home page index.vue. In the component template, we style our event card and add the necessary information we want to be displayed on the card thanks to the prop.
We also notice some kind of dynamic routing for when we click on an event:
    // components/EventCard.vue
       <NuxtLink
          :to="{ name: 'event-id', params: { id: event.id } }"
          v-for="event in events"
          :key="event.id"
        >
          <!-- Card -->
        </NuxtLink>
We passed on a variable, which represents the ID for each event we have, into ApolloGraphQL and we use the ID to fetch a particular event in our event page.
In the index.vue page where we passed the events props from, we have this:
    // pages/index.vue
    <template>
    <div>
    <!-- Events are displayed here -->
      <section class="max-w-7xl mx-auto px-4 sm:px-6 lg:px-4 mt-12 mb-12">
            <article>
                <h2 class="text-2xl font-extrabold text-gray-900">OUR EVENTS</h2>
                <section>
                   <EventCard :events="events" />
                </section>
            </article>
        </section>
    </div>
    </template>
    <script>
    import { allEventQuery } from "../graphql/query";
    export default {
      data() {
        return {
          events: [],
        }
      },
      apollo: {
        events: {
          prefetch: true,
          query: allEventQuery,
          variables () {
            return { id: parseInt(this.$route.params.id) }
          }
        }
      },
    }
    </script>
In the script of the index.vue page we import our allEventQuery query from the GraphQL folder and we get to finally use it in making a request to Strapi. In our data, we create an events array where we will store our array of data.
We make our request in Apollo and also notice as the query property is the allEventQuery, to make sure we make the right query to Strapi.
The events array is now populated and we have passed the array data down to the EventCard component.
This is what our homepage looks like now.

Filtering our Events
We have two categories of events: meetups and coding. We want each category to be displayed on its own page. Then we can reuse our allEventQuery GraphQL query, filter events based on each category, and display it on their respective pages.
    // pages/meetups.vue
    <template>
        <div>
             <section class="max-w-7xl mx-auto px-4 sm:px-6 lg:px-4 mt-12 mb-12">
            <article>
                <h2 class="text-2xl font-extrabold text-gray-900">MEETUP EVENTS</h2>
                <section>
                   <EventCard :events="meetupEvent" />
                </section>
            </article>
        </section>
        </div>
    </template>
    <script>
    import { allEventQuery } from "../../graphql/query";
    export default {
      data() {
        return {
          events: [],
          meetupEvent: []
        }
      },
      mounted() {
         this.getMeetUps()
      },
      methods:{
          getMeetUps() {
              this.meetupEvent = this.events.filter(event => {
                  return event.categories[0].name === "meetup"
              })
          }
      },
      apollo: {
        events: {
          prefetch: true,
          query: allEventQuery,
                variables () {
            return { id: parseInt(this.$route.params.id) }
          }
        }
      },
    }
    </script>
Notice that the code here looks similar to the one we have in our index.vue file. The difference is that the meetupEvent data that stores the array of our filtered events data. When the meetups page is mounted, we run a *getMeetUps* function that filters the event we fetch from Strapi usingGraphQL. The events are then displayed in our template.
We can do the same for our coding event page and everything should work fine.

Displaying a particular Event
We want to be able to click on a particular event whether it's in the coding or meetup page and have it display that particular event with all its information. To do this, we go to our event/_id page we have created in our editor and add the following code:
    // pages/event/_id.vue
    <template>
        <div class="mb-20">
            <div class="container w-full max-w-6xl mx-auto bg-white bg-cover mt-8 rounded"></div>
            <img :src="event.image.name"
                                alt="cover image"
                                class="w-full max-w-6xl mx-auto bg-white bg-cover mt-8 rounded object-center object-cover">
            <div class="container w-full max-w-6xl mx-auto mt-8">
                {{event.description}}
          </div>
        </div>
    </template>
    <script>
    import {eventQuery} from '../../graphql/query'
    export default {
      data() {
        return {
          event: {},
        }
      },
      mounted () {
          console.log(this.event);;
      },
       apollo: {
        event: {
          prefetch: true,
          query: eventQuery,
           variables () {
            return { id: parseInt(this.$route.params.id) }
          }
        }
      },
    }
    </script>
This time, the query we are making is called eventQuery. We need to add the query in our graphql/query.js file.
    // graphql/query.js
    export const eventQuery = gql`
    query event($id: ID!) {
      event(id: $id) {
        id
        title
        date
        description
        image {
          name
        }
      }
    }
    `
The ID we pass to the GraphQL query will be the ID of any event we click on.
So now when we click on an event, we are taken to that particular event page where we get more information about the page.
Running and Testing our App
To run our Nuxt app, navigate to our Nuxt project directory and run:
yarn dev
This command will reload and start our app at *localhost:3000* where we can view our app live.
Note:
Make sure your Strapi server is running by running this command:
npm run develop
Conclusion
We have finally come to the end of this tutorial. In this tutorial, we looked at how we can connect the Strapi backend to our Nuxt frontend and fetch some data using GraphQL. In the process, we created an event and category content type to build the application. We also changed the permissions that allow us to perform CRUD operations like read and update on the server. We created four pages, the home page containing all our events, the meetups and coding page containing events for the particular category and the event page that displays information about each individual event.
To take it a bit further, you can add search functionality to the app so when a user starts typing the name of an event, a list of possible events that match will be filtered and displayed. If you’re interested in finding out more about what Strapi can do, you can check out the features it offers on its website.

Top comments (0)