
Greetings to everyone,
I am Shashank Today I want to tell you how you can deploy Springboot and Reactjs application in Azure. So without worrying about this how to do it. Follow these following steps.
I will deploy springboot and recatjs application in azure appservice. So before going to azure appservice let's have a look what is azure appservice.
Azure AppService
Azure App Service is an HTTP-based service for hosting web applications, REST APIs, and mobile back ends. You can develop in your favorite language, be it .NET, .NET Core, Java, Ruby, Node.js, PHP, or Python. Applications run and scale with ease on both Windows and Linux-based environments.
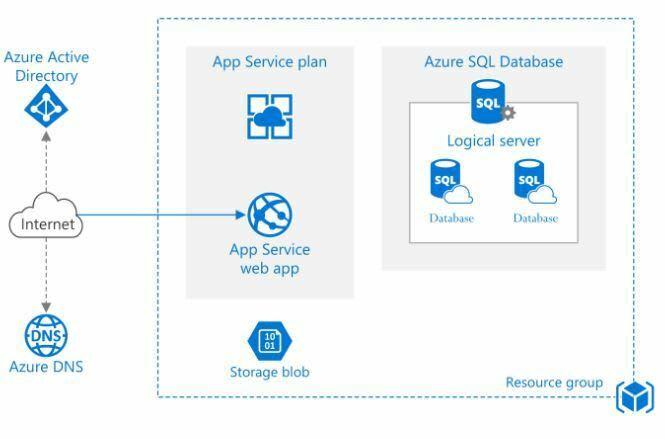
App Service not only adds the power of Microsoft Azure to your application, such as security, load balancing, autoscaling, and automated management. You can also take advantage of its DevOps capabilities, such as continuous deployment from Azure DevOps, GitHub, Docker Hub, and other sources, package management, staging environments, custom domain, and TLS/SSL certificates.
Follow the Following Steps to deploy the Application in Azure
1.) Start the SpringBoot Application in localhost
Before deploying the Application in azure check the Application is perfectly running on localhost or not. If the application running on localhost perfectly then deploying the application on azure.

2.) Download the Filezila File Transfer Application
The next step of the deploying the application on azure is download the latest version of the FileZila software. After download the application open this application and configure all the access.

3.) Add the below dependancy in pom.xml file
<dependency>

<groupId>org.springframework.boot</groupId>

<artifactId>spring-boot-starter-tomcat</artifactId>

<scope>provided</scope>

</dependency>
above dependancy code add on the
<dependencies></dependencies>
section.

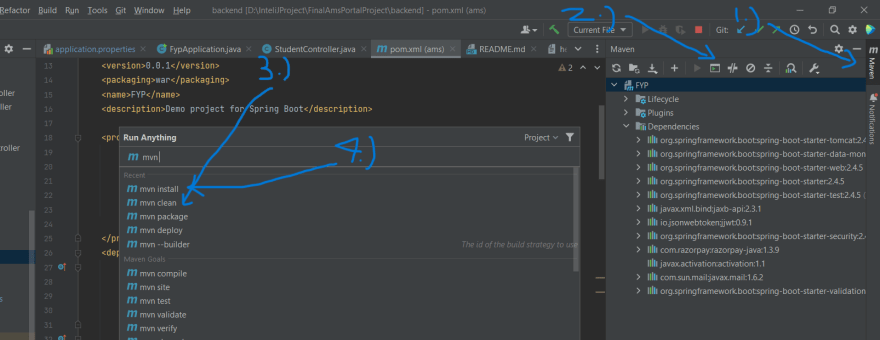
4.) Run the following Maven Command
First command is
mvn clean
Second command is
mvn install
You can run this command go to the maven section in InteliJ IDEA.
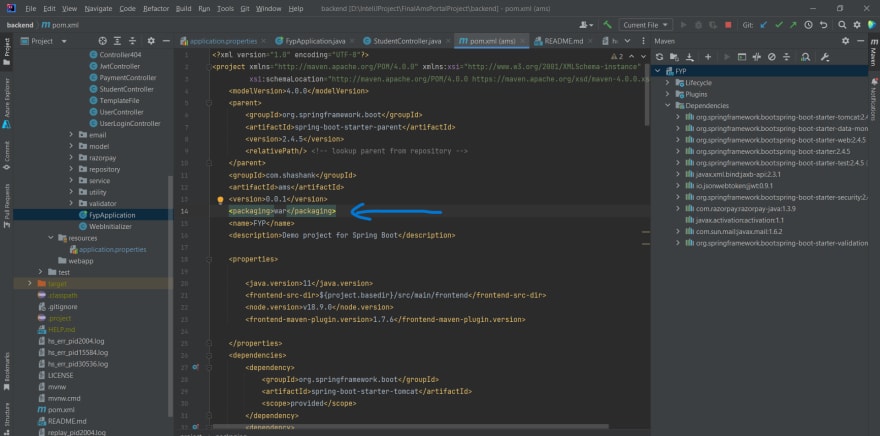
5.) Genrate war file
after mvn install command a war file is generated.
if war file is not generated then add this code in pom.xml after the artifact id and version of the project. and again run maven install command
<packaging>war</packaging>
6.) Create App Service in Azure
For Creating app service in Azure follow following steps.
a.) Go to Azure and select the Create a Resourse option

b.) Choose the Create Web App option

c.) Write the name of the project and select the Java & Tomcat version which is used in the project

d.) Click the Create option

e.) Click the Go to Resourse option

f.) Stop the web App

7.) Copy the Username, Password & FTPS endpoints in App Service

8.) Paste these details in FileZila
Ftps end point address paste in the host section then paste the username and password then click on quick connect option. after seccuessflly connected show the details in right section.

9.) Create the webapps folder in wwwroot folder using right click create directory option and delete the hostingstart.html

10.) Deploy the war file in webapps folder using right click upload option.

11.) Start the Azure Web App

12.) Final Result
finally Springboot + RecatJs application running on the azure server.


Top comments (0)