
Integrating your application with Firebase can allow you to tap into it's vast services like authentication, Storage, Hosting, Database, Cloud Functions, Analytics and many other interesting services which makes your application market ready.

In this post we will see how we can integrate some of these features to build a basic application using Vanilla Javascript.
Note: Basic knowledge of JS, HTML and CSS makes it easier to understand the following context, but it's not a requirement.
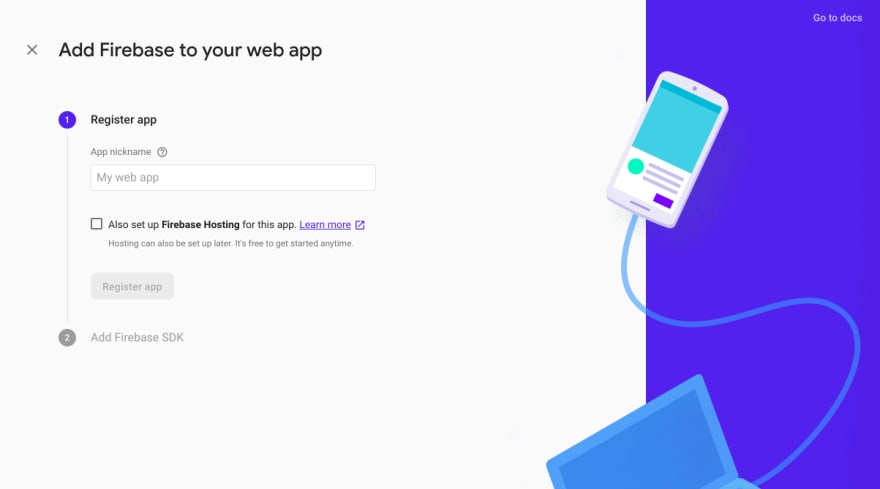
So let's get started. First create an account in Firebase. For this application, free tire is more than enough as it meets most of the requirements for development. Then create a new project inside with giving it a proper name. After following the steps on the screen, you will be taken to your project Dashboard. Since we are building a web application click on web icon in the below screen.

Then you will be asked to give a name to your project. After that you will be able to copy your SDK's and configs.
Voila! Now you are all set to start integrating firebase to your application. Just create a basic html file called Index.html to add your firebase config.
<!DOCTYPE html>
<html lang="en">
<head>
  <title> firebase </title>
</head>
<body>
   <!-- TODO: Add SDKs for Firebase products that you want to use
     https://firebase.google.com/docs/web/setup#available-libraries -->
    <script src="https://www.gstatic.com/firebasejs/7.6.1/firebase-
     app.js"></script>
    <script>
     // Paste your firebaseConfig here
     const firebaseConfig = {
        apiKey: "FIREBASE_API_KEY",
        projectId: "FIREBASE_PROJECT_ID",
        appId: "FIREBASE_APP_ID",
        measurementId: "FIREBASE_MEASUREMENT_ID"
     };
     // Initialize Firebase
    firebase.initializeApp(firebaseConfig);
    </script>
</body>
</html>
The initializeApp() function will create a new instance of the firebase with your configuration. This will allow you to link your website to your firebase project. Now create a simple form for signup and login according to your likes. I'm not going to focus on the html and css here as that is not the scope of this article. Take some time now and create those forms, till then I'll wait here.

Now that is out of the way, we'll now continue with our firebase integration. In your Index.html, we'll make small changes where we will import the "auth" service from firebase. We will also create a reference to auth so that we can use it afterwards without creating a reference everytime.
<!DOCTYPE html>
<html lang="en">
<head>
  <title> firebase </title>
</head>
<body>
   <!-- TODO: Add SDKs for Firebase products that you want to use
     https://firebase.google.com/docs/web/setup#available-libraries -->
    <script src="https://www.gstatic.com/firebasejs/7.6.1/firebase-
     app.js"></script>
    <script src="https://www.gstatic.com/firebasejs/7.6.1/firebase-
     auth.js"></script>
    <script>
     // Paste your firebaseConfig here
     // Initialize Firebase
    firebase.initializeApp(firebaseConfig);
    const auth = firebase.auth();
    </script>
</body>
</html>
After making those changes, create a new file. I named it as Auth.js so that there won't be any confusion later on. And don't forget to import this script into your "Index.html". In this file we will write the logic for login as well as signup. First we will allow users to sign up with our website. For that add an event listener to your signup form and add the following code into your file after making necessary changes in id's of forms and fields.
const signupForm = document.querySelector("#signup-form");
// Signup
if (signupForm) {
   signupForm.addEventListener('submit', e => {
    e.preventDefault();
    //Get the field values from the signup form
    const email = signupForm['signup-email'].value;
    const password = signupForm['signup-password'].value;

    auth.createUserWithEmailAndPassword(email, password)
      .then(Credential => {
          console.log("Successfully signed up", Credential.user);
      }).catch(error => {
          console.log("error",error);
      });
   });
}
If you notice above, we have used the reference which we have already created in our html file, that is auth. And "createUserWithEmailAndPassword()" is a function given by firebase to create an user with Email and Password. There are lot's of other ways to sign the users including the social account signups but that is for another day. This function takes two parameters, email and password and returns a promise if the user is successfully created in the firebase. Then we will be able to access the User Id, User Email and other information in the "Credential" which I have used in the .then()
Firebase take's care of some of the checks required for signing up with Email and Password. Such as the email format, already used email, and a password of atleast 6 characters. But you can always keep your custom checks on them in your Javascript file, which is recommended.
Since we have users singed up, let's also give them an option to Login. This is quite similar with what we did with signup except for the function. In the same file add the following changes after replacing the Id's of your fields and forms.
const loginForm = document.querySelector("#login-form");
    //Login
    if (loginForm) {
        loginForm.addEventListener("submit", e => {
            const email = loginForm['login-email'].value;
            const password = loginForm['login-password'].value;

            auth.signInWithEmailAndPassword(email,password)
             .then(Credential => {
               console.log("Logged In successfully", Credential);
             }).catch(error=>{
               console.log("error",error);
             });
        });
    }
We are again using the auth reference to call the "signInWithEmailAndPassword()" function provided by the firebase. This function also takes two parameters, email and password, and returns a promise which we can handle it as above. If there is any error while this action is being performed, that can be catched too.
Now our users can login and signup but don't you think we are missing something in this. How do we know if the user is logged in if we refresh or re-open the page? How can we keep an eye on the changes in user's auth status? Well Firebase got your back there too. By using the function "onAuthStateChanged()" provided by the firebase, we can now find out the Auth status of the user.
    auth.onAuthStateChanged(user=>{
       console.log("user info", user);
    });
This function gives the info of the user which,later on, can be used according to our usecase . Also Firebase Authentication sessions are long-lived by means of ID tokens and Refresh tokens. Means, it can have the session info of which user logged in. So even if you refresh or re-open the page, the user will be logged in. Pretty neat right?
There are lot of other functionalities in Firebase Auth like "Email Verification", "Re-setting the password", "Email Change" and other services too which we'll touch upon in later articles. With this we can now add login and signup functionalities to our application with the help of Firebase. See you with the next post. Till then, Adios!


Top comments (0)