
Introduction
Would you be able to build a web project? Want to collect data from a form and store it in a MySQL database? You’re in the right place! In this guide, I’ll walk you through creating a clean, responsive registration form using HTML and CSS, and connect it to MySQL using PHP (a backend language that bridges the gap). Let’s dive in!
Setup Environment
Before we code, ensure you have:
- XAMPP/WAMP installed (local server)
- MySQL database setup
- VS Code / Sublime Text or any preferred code editor
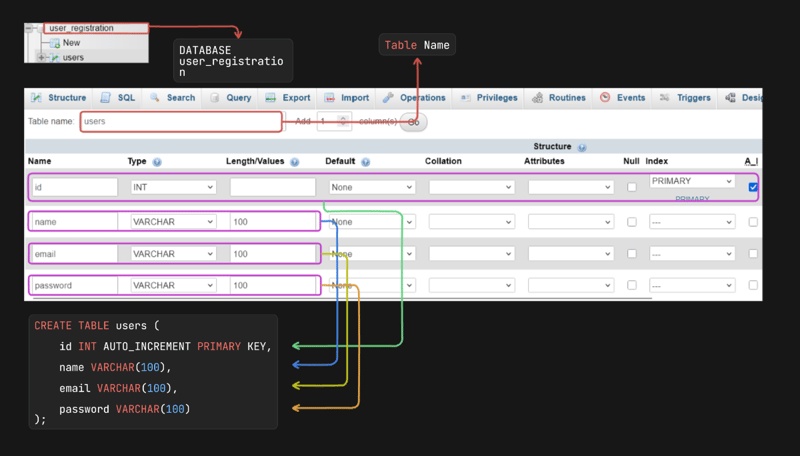
Create the MySQL Database
- Open phpMyAdmin from XAMPP/WAMP.
- Create a new database:
CREATE DATABASE user_registration;
Create a users table:
 CREATE TABLE users (
    id INT AUTO_INCREMENT PRIMARY KEY,
    name VARCHAR(100),
    email VARCHAR(100),
    password VARCHAR(100)
);
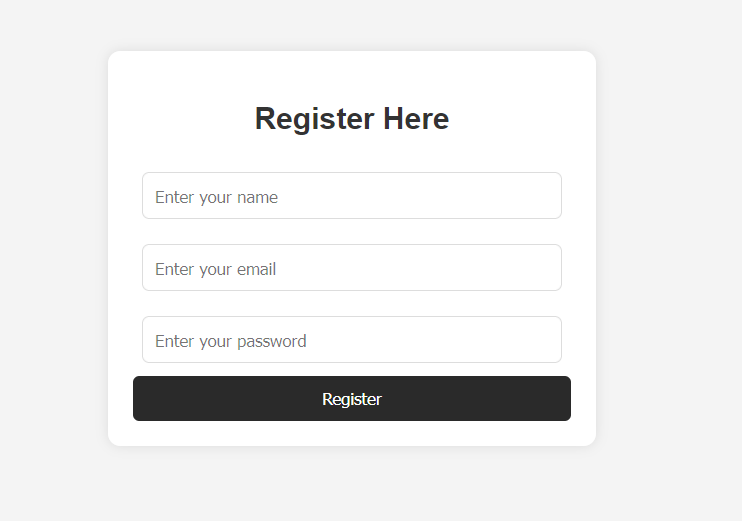
Build the Registration Form (HTML + CSS)
index.html
<!DOCTYPE html>
<html>
<head>
    <title>Registration Form</title>
    <link rel="stylesheet" type="text/css" href="style.css">
</head>
<body>
    <div class="container">
        <h2>Register Here</h2>
        <form action="process.php" method="POST">
            <input type="text" name="name" placeholder="Enter your name" required>
            <input type="email" name="email" placeholder="Enter your email" required>
            <input type="password" name="password" placeholder="Enter your password" required>
            <button type="submit">Register</button>
        </form>
    </div>
</body>
</html>
style.css
body {
    font-family: 'Arial', sans-serif;
    background: #f4f4f4;
    display: flex;
    justify-content: center;
    align-items: center;
    height: 100vh;
}

.container {
    background: #fff;
    padding: 20px;
    border-radius: 10px;
    box-shadow: 0 0 10px rgba(0, 0, 0, 0.1);
    width: 300px;
    text-align: center;
}

h2 {
    color: #333;
}

input {
    width: 100%;
    padding: 10px;
    margin: 10px 0;
    border: 1px solid #ddd;
    border-radius: 5px;
}

button {
    width: 100%;
    padding: 10px;
    background: #4caf50;
    color: #fff;
    border: none;
    border-radius: 5px;
    cursor: pointer;
}

button:hover {
    background: #45a049;
}
Create the Backend Connection (PHP):
- Go to your XAMPP installation directory
(C:\xampp on Windows). - Open the
htdocsfolder:C:\xampp\htdocsand includeprocess.phpfile.
process.php
 <?php
$servername = "";
$username = "";
$password = "";
$dbname = "";

// Create connection
$conn = new mysqli($servername, $username, $password, $dbname);

// Check connection
if ($conn->connect_error) {
    die("Connection failed: " . $conn->connect_error);
}

// Get data from the form
$name = $_POST['name'];
$email = $_POST['email'];
$password = $_POST['password'];

// Insert into the database
$sql = "INSERT INTO users (name, email, password) VALUES ('$name', '$email', '$password')";

if ($conn->query($sql) === TRUE) {
    echo "<h2>Registration successful!</h2>";
} else {
    echo "Error: " . $sql . "<br>" . $conn->error;
}

$conn->close();
?>
Test It!
- Start your
XAMPP/WAMPserver. - Save all files in the htdocs folder
(xampp/htdocs/your_project). - Open the browser and go to
http://localhost/your_project/index.html. - Fill the form and hit Register.
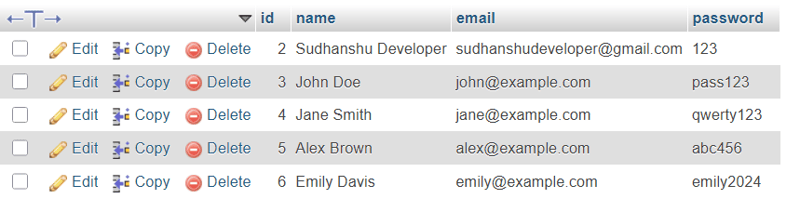
Check phpMyAdmin
you’ll see the data saved!

Top comments (0)