In every non-trivial application you’ll have to do something that is just slow. You need to export a large data set to a CSV file. An analyst needs a complicated Excel report. Or maybe you have to connect to an external API and process a whole bunch of data.
So how do you know when it’s time to use background jobs?
If you try building these kinds of reports in a normal Rails controller action, you will see these symptoms:
- Request timeouts : once response times start creeping past 10+ seconds, you run the risk of timeouts. You might have a report that is slow but just barely finishes, but you know that it scale linearly with the amount of data and will break soon. Platforms like Heroku will kill requests after 30 seconds and, in the mean time, your whole app slows down as workers/dynos are tied up with long running actions.
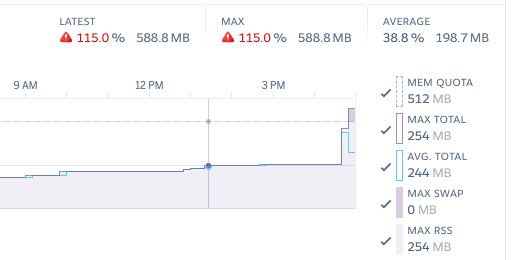
- Memory spikes : the most straightforward implementations for file exporting generate a file in memory before serving it to the user. For small files, this is fine; but if you create 100+ MB files in memory, your RAM usage will spike up and down wildly. If even a few users are doing exports at the same time, you will hit your resource cap and see failed requests and Heroku “R14 - Memory Quota Exceeded” errors.
- Bad UX : even if your server weathers the extra load of slow actions, users may not be so patient. A never-ending loading indicator in the browser tab, or worse, nothing happening for 20 seconds is not a good experience. You can throw up a “Loading…” spinner, but can we do better?
The first step is to buy some breathing room by optimizing the queries or fixing any obvious performance issues. Spend an hour looking through the Speedshop Rails performance blog to see if there is low-hanging fruit.
But once you start seeing these kind of problems, it’s time to set up infrastructure for background jobs.
Pick Your Tools
Adding the first background job is always the hardest. You’ve got frustrated users or an irate customer (that’s called an acute need in business speak!), but you don’t know your long-term needs past this first use case.
There are two initial decisions to make when setting up background jobs in Rails.
Active Job or Not?
Way back in Rails 4.2, Active Job was released as a common abstraction over background job processing. Following in the footsteps of other Rails ActiveX gems, Active Job is an API that allows you add background jobs into queue and then use tools like Sidekiq, Delayed Job, or Resque to “work” or process those jobs.
Active Job defines a core set of functionality that should serve most applications really well: you can (obviously) create jobs, but also put jobs into separate queues (priorities), schedule jobs to run in the future, and handle exceptions. These are the basic primitives that you want for background jobs.
As with all Rails abstractions, there are trade-offs: a standard interface allows for deeper framework integration but has to work with the lowest common denominator.
Using Active Job affords you a simpler development environment. In development, you can set the queue adapter to :async to run jobs with an in-process thread pool. Run bin/rails server locally and jobs will get worked without running a separate worker command or using a tool like foreman.
The downsides are that if you need more powerful features or want to utilize an adapter specific pattern, you are fighting against the current.
You can certainly set up your app to use Sidekiq directly and forgo Active Job completely. And if you need to use advanced features (special retry strategies, batching, pushing huge numbers of jobs, rate limiting, etc), there are benefits to being “closer to the metal” with the background processor (and some features may not work with Active Job at all).
Skipping Active Job can also give you a non-trival performance boost, per the Sidekiq wiki.
I recommend starting off with Active Job; you can always port later down the line when you have a clear vision of your long-term needs. If you hit limits or cannot make it work, you can justify spending more time tuning and going off the standard Rails path.
Delayed Job or Sidekiq?
The second consideration is which queueing adapter to use in production. There are only two options unless you have some extremely exotic needs: Sidekiq or Delayed Job. These are both established libraries and have the best tutorials, articles, and extensions.
Sidekiq is the current “default” option for many developers. It scales up well and the Sidekiq Pro/Enterprise option is very reassuring for the continued stability and improvement of the project. Mike Perham (and the rest of the contributors) do a really nice job on the Sidekiq documentation and wikis.
If you plan on having thousands and thousands of jobs running per day, Sidekiq is a no-brainer.
The one minor drawback to Sidekiq is that you take on a hard dependency on Redis to store the queue of jobs and metadata. If you already have Redis in your infrastructure (most likely for caching), this is a moot point. The majority of Rails developers are comfortable with having Redis in their tech stack and you can spin up hosted instances in about 5 minutes on all the major cloud platforms.
Delayed Job is the older, less shiny option. While it has fallen out of community favor in recent years, it is still a very solid gem. Delayed Job was originally extracted from Shopify’s internal codebase so it has been battle tested at high scale.
Delayed Job works with ActiveRecord and uses your PostgresQL database for storing the jobs. No additional infrastructure or Heroku add-ons needed. It’s really easy to set up and there is one less moving part.
Sharing your application’s database is also handy if you want to peek into the underlying table to debug or see how the tool works; it’s just another table.
Because Delayed Job is single-threaded (compared to Sidekiq’s multi-threaded model) it is not advised for processing 100,000s of jobs per day. That said, many applications will never reach that scale! Delayed Job can take you pretty far with no extra infrastructure.
By the time you feel the scaling pain, you may be ready for a much bigger engineering investment – or have a whole team of people to tune and manage background processing.
If you have an (actually) large web service (Shopify/GitHub/Basecamp-esque loads), there is a whole range of “state of the art” patterns and tooling to consider (see Kir Shatrov’s great writeup from the trenches at Shopify), but the rest of us will be best served with a boring choice.
Ultimately, the decision comes down to if you already have Redis as part of your infrastructure. Both libraries work well and have similar set up time.
Sidekiq will allow you to scale up more, but with a bit of infrastructure tax; Delayed Job will fall over if you are trying to crank though 5000 jobs/sec, but that should not be a primary concern for small/medium-sized applications. You can’t really go wrong with either option.
In a recent project with a tiny team and a small amount of jobs (10s-100s per day), we went with Delayed Job for the simplicity and less moving pieces. It’s fine.
The Basics of Background Jobs
At the highest level, using background jobs means taking your slow code and moving it in a Job class. Instead of running the slow code in your controller, you enqueue the Job and pass it any input data it needs.
The Active Job guide does a good job explaining the general concept but there are a few best-practices that will give you an outsized benefit if you follow them.
The top three things you can do to avoid headaches with jobs are: use Global ID, check pre-conditions, and split up large jobs.
Global ID
You may see advice for other tools that are the exact opposite of this tip, but in Rails, you can pass ActiveRecord models as arguments to your jobs and they will Just Work. Under the hood, Rails uses a concept called “Global ID” to serialize a reference to a model object. If you have a Company model with id=5, Rails will generate an app wide unique id for the model (in this case: gid://YourApp/Company/5).
Don’t: Manually query models by ID
class CloseListingJob < ApplicationJob
  def perform(user_id, listing_id)
    listing = Listing.find(listing_id)
    listing.archive!
    listing.notify_followers

    user = User.find(user_id)
    listing.notify(user)
  end
end
In other contexts, passing objects to background jobs is considered an anti-pattern as you may serialize an object that is “stale” when you go to run the job later. Rails will get a fresh copy of the object before your job runs so you don’t have to worry about it.
If you’ve dealt with weird behavior from serialized/marshaled objects (shudders), you probably have battle scars, but you don’t need to pass around IDs and manually re-fetch data anymore.
Do: Use Global ID to automatically handle common serializing
class CloseListingJob < ApplicationJob
  def perform(user, listing)
    listing.archive!
    listing.notify_followers
    listing.notify(user)
  end
end
Check Pre-Conditions
Two reasons to check pre-conditions for jobs (especially destructive actions): the world may have changed and the double-queuing problem.
Since you’ve offloaded a task to the background, confirm that nothing major changed from the time we enqueued the job and when the code actually runs.
Imagine a case where you get ready to send a late invoice email to a customer, it takes a few minutes for the job to get processed, and during that time the customer just so happens to submit their overdue payment. The job is already in the queue and without guarding against the invoice being paid, you’d send a confusing email out.
The other issue is when multiple copies of the same job are enqueued. Maybe two users triggered the same job, maybe there is a bug in your code, or maybe a job got run twice when your dyno restarted. There is a fancy computer-science word for this: idempotence. Ensure the same job could run multiple times without negative side-effects.
Don’t: Fire away destructive actions blindly
class NotifyLateInvoiceJob < ApplicationJob
  def perform(user, invoice)
    # Fire off a scary email
    InvoiceMailer.with(user: user, invoice: invoice).late_reminder_email
  end
end
There are plugins and tools that can try to enforce idempotence (see gems like sidekiq-unique-jobs), but in general, take precautions in your own application code.
Do: Ensure the conditions that cause you to enqueue a job are true when it runs
class NotifyLateInvoiceJob < ApplicationJob
  def perform(user, invoice)
    # Confirm that nothing has changed since the job was scheduled
    if invoice.late? && !invoice.notified?
      InvoiceMailer.with(user: user, invoice: invoice).late_reminder_email

      # Track state for things that should only happen once
      invoice.update(notified: true)
    end
  end
end
Split Up Large Jobs
In addition to moving work off of the “main thread”, background queues allow you to split up and parallelize work. But just putting something in a background job does not make it run faster.
Prefer many small jobs to one big job – this helps with performance (letting multiple workers crank through the task) and also helps in the event that the job is interrupted (dyno restart, unexpected errors, random bit flips due to solar flares).
Don’t: Run excessively slow loops in a single job
class ComputeCompanyMetricsJob < ApplicationJob
  def perform(company)
    company.employees.each do |employee|
      # A bunch of slow work
      employee.compute_hours
      employee.compute_productivity
      employee.compute_usage
    end
  end
end
You may hear this concept called “fanning out”: you take one job that might have 100 loop iterations and instead spin off 100 smaller jobs.
If you have 10 workers available, you can finish the job ~10x faster (ignoring overhead) and if the 62nd loop iteration fails, you can retry that one small piece of work (instead of starting the whole thing over).
Do: Enqueue smaller jobs from another job
class ComputeCompanyMetricsJob < ApplicationJob
  def perform(company)
    company.employees.each do |employee|
      # Fan-out with parallel jobs for each employee
      ComputeEmployeeMetricsJob.perform_later(employee)
    end
  end
end
class ComputeEmployeeMetricsJob < ApplicationJob
  def perform(employee)
    employee.compute_hours
    employee.compute_productivity
    employee.compute_usage
  end
end
Don’t go overboard: it’s not advisable to break every job with a loop into sub-jobs. Sometimes it’s not worth the extra complexity or you want the work all wrapped in the same transaction.
But if you find yourself creating a job where you are looping and doing more than a query or two, think about splitting up the job.
Getting Data Back to the User
Most guides on background jobs make the faulty assumption that everything is “fire-and-forget”. Sure, for sending password reset emails, it’s fine to enqueue the job and finish the request. It’s unlikely to fail, takes only a few seconds, and you don’t need the result of the job to inform the user to kindly check their inbox.
But what about generating a 20,000 row Excel file or a background process that takes 5 minutes to complete? We often need a way to report back progress and send back information once the job is completed.
The fundamental issue is that when you move work to a background job, code execution does not stop and you need a way to “connect” back to the user that caused the job to be created. It’s outside of a single request-response life cycle so you cannot rely on normal Rails controllers.
There are two approaches that are well suited for the vast majority of jobs: email later and polling + progress.
Email Later
One way to relay that a job has been completed is to send an email. The benefit is that it’s simple. You run a job and then off an ActionMailer email with any relevant status (“Your contacts have now been imported!” or “Failed to sync calendar events. Contact support”) or links back into your app (“View your annual tax documents now”).
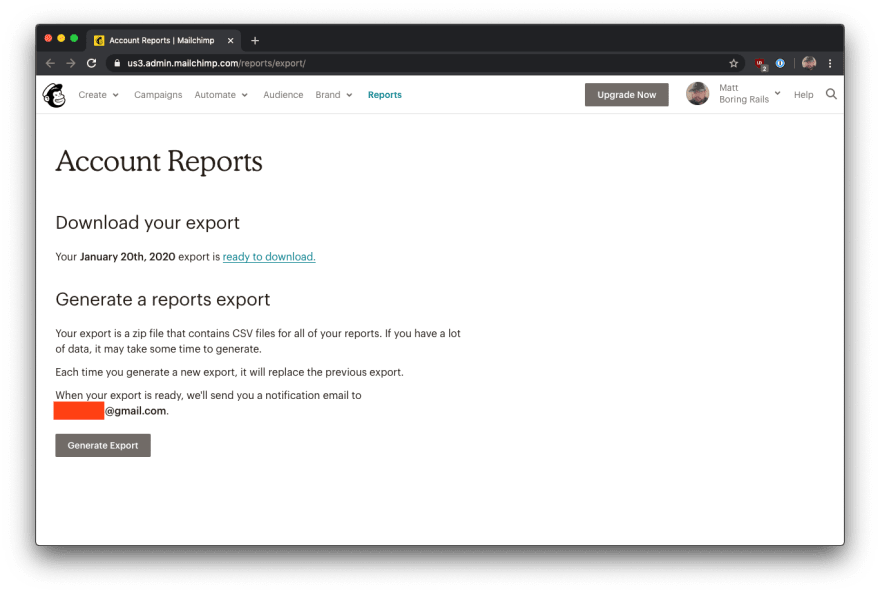
You can see an example of this pattern in Mailchimp.
For reports that may take a long time (e.g. exporting the campaign statistics for every email you’ve ever sent), you start by clicking “Generate Report”
Mailchimp informs you that for large accounts, it may take a few minutes and to expect an email when the data is done exporting.
After some time, you get an email from Mailchimp with a link to download the report.
You are taken back to the Mailchimp app and can download a zip of your report.
Mailchimp opts to store the most recent file export in your account, in case you want to download the same report again later. If you generate another large report, it will overwrite the file.
For your own application, you can decide if that approach to saving reports makes sense. You may opt to store a complete history of all files, keep the most recent three, or something else entirely.
Here is some sample code to implement this workflow (specific details will need to adapted to your own app).
class ReportsController < ApplicationController
  def generate_campaign_export
    # Enqueue the job
    CampaignExportJob.perform_later(Current.user)

    # Display a message telling user to await an email
    render :check_inbox
  end
end
class CampaignExportJob < ApplicationJob
  def perform(user)
    # Build the big, slow report into a zip file
    zip = ZipFile.new
    user.campaigns.each do |campaign|
      zip.add_file(CsvReport.generate(campaign))
    end

    # Store the report on a file system for downloading
    file_key = AwsService.upload_s3(zip, user)

    # Record the location of the file
    user.update(most_recent_report: file_key)

    # Notify the user that the download is ready
    ReportMailer.campaign_export(user).deliver_later
  end
end
<!-- application/views/report_mailer/campaign_export.html.erb -->

Hi <%= @user.name %>,

The export of your campaign report is complete. You can download it now.

<%= link_to "Download Report", download_campaign_export_path %>
class ReportsController < ApplicationController
  ...

  def download_campaign_export
    # Create a 'safe link' to download (e.g. signed, expiring, etc)
    download_url = AwsService.download_link(User.current.most_recent_report)

    # Trigger a download in the browser
    redirect_to(download_url)
  end
end
Polling + Progress
For basic reports, emailing will suffice, but sometimes users need more frequent status updates on what’s happening in the background process.
An alternative pattern is to combine polling (periodically checking on the job via AJAX calls) with progress reporting. One benefit of this approach is that it is super extendable. You can implement the progress reporting in a variety of ways: a numeric progress bar, a single “status” message, or even a detailed log of progress.
This pattern is well suited for big user-generated reports, as well as long-running “system tasks” that the user may want to monitor.
You can see an example of this pattern in the Netlify build dashboard.
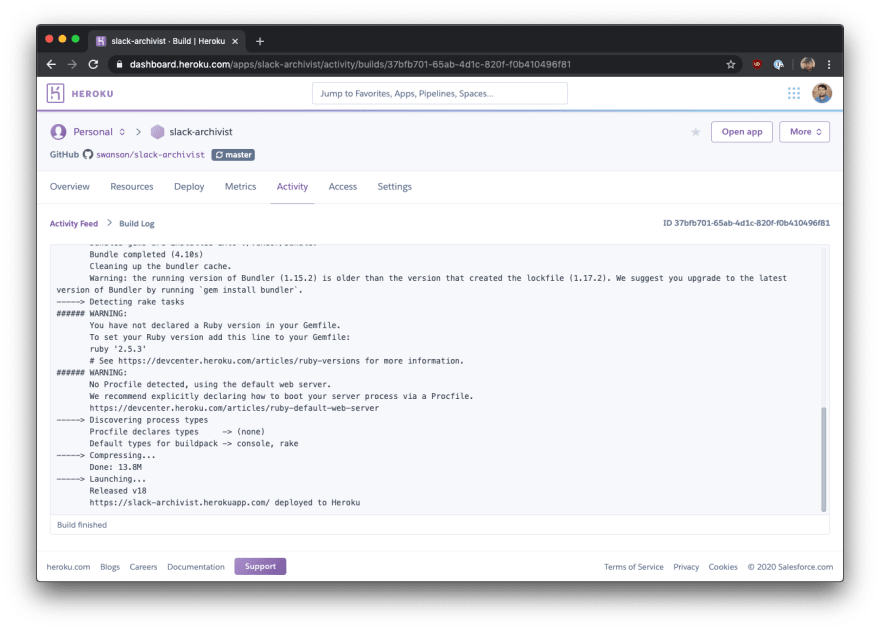
Heroku uses the same pattern for displaying progress for the minutes-long process of deploying a new version of your software.
These UIs may look complicated, but at their core, it is a repeating AJAX call to check the job status and a block of text. You can reuse this pattern for multiple different reports in your application and make the output as detailed as you need.
You can think of this pattern as building a CLI interface inside of a web page. And since the main UI element is text, it’s really easy to build and change as needed.
Here is some rough sample code to implement this workflow. This sample uses a separate database model for storing “job status” that is passed to the job and a Stimulus controller to handle client-side polling/updating.
Specific details will need to be adapted to your own app.
class MetricsController < ApplicationController
  def export_company_stats
    company = Company.find(params[:company_id])

    status = JobStatus.create!(name: "Company Stats - #{company.name}")

    CompanyStatsJob.perform_later(company, status)

    redirect_to status, notice: "Generating statistics..."
  end
end
# == Schema Information
#
# Table name: job_statuses
#
# id :bigint not null, primary key
# completed :boolean default(FALSE), not null
# download_key :string
# error :boolean default(FALSE), not null
# error_message :text
# log :text default("")
# name :string not null
# created_at :datetime not null
# updated_at :datetime not null
#
class JobStatus < ApplicationRecord
  def add_progress!(message)
    update!(
      log: log << "\n==> " << message
    )
  end

  def mark_completed!(key)
    update!(
      completed: true,
      download_key: key,
      log: log << "\n\n---\n\n" << "Report complete!"
    )
  end

  def mark_failed!(error_message)
    update!(error: true, error_message: error_message)
  end

  def log_error!(error)
    update!(
      log: log << "\n\n---\n\nERROR: " << error.to_s
    )
  end
end
class CompanyStatsJob < ApplicationJob
  def perform(company, status)
    status.add_progress!("Generating stats for #{company.name}...")
    report = CompanyStatsReport.new(company)

    # Do some complicated calculations
    status.add_progress!("Computing financial data...")
    report.compute_financial_data!

    status.add_progress!("Computing employee data...")
    report.compute_employee_data!

    status.add_progress!("Computing product data...")
    report.compute_product_data!

    # Store the report on a file system for downloading
    file_key = AwsService.upload_s3(report.as_xlsx)

    status.add_progress!("Report completed.")
    status.mark_completed!(file_key)
  rescue StandardError => e
    status.mark_failed!(e.to_s)
    status.log_error!(e)
  end
end
class JobStatusController < ApplicationController
  def show
    @status = JobStatus.find(params[:id])

    # Return a basic HTML page and a JSON version for polling
    respond_to do |format|
      format.html
      format.json { render json: @status }
    end
  end
end
<!-- application/views/job_status/show.html.erb -->

<h1>
  <%= @status.name %>
</h1>

<div
  data-controller="job-status"
  data-job-status-url="<%= job_status_path(@status, format: :json) %>"
>
  <div data-target="job-status.log">
    <%= @status.log %>
  </div>

  <%= link_to "Download", "#", class: "btn hidden", data: { target: "job-status.download" } %>
</div>
// src/controllers/job_status_controller.js
import { Controller } from "stimulus";

export default class extends Controller {
  static targets = ["log", "download"];

  connect() {
    // Start polling at 1 second interval
    this.timer = setInterval(() => {
      this.refresh();
    }, 1000);
  }

  refresh() {
    fetch(this.data.get("url"))
      .then(blob => blob.json())
      .then(status => {
        // Update log and auto-scroll to the bottom
        this.logTarget.innerText = status.log;
        this.logTarget.scrollTop = this.logTarget.scrollHeight;

        if (status.error) {
          this.stopRefresh();
          // Add additional error handling as needed
        } else if (status.completed) {
          this.stopRefresh();

          // Show a download button, or take some other action
          this.downloadTarget.href = `/download/${status.download_key}`;
          this.downloadTarget.classList.remove("hidden");
        }
      });
  }

  stopRefresh() {
    if (this.timer) {
      clearInterval(this.timer);
    }
  }

  disconnect() {
    // Stop the timer when we teardown the component
    this.stopRefresh();
  }
}
Aside: there are tools like sidekiq-status that you can use to track progress instead if you want more features or a different API. One thing you should not do is to try adding extra status information directly to the underlying jobs table as most processors will clear out the records once the job has been processed (leaving you unable to query the status).
Mix, Match, and Modify
These two approaches should serve as solid ways to tackle the problem, but feel free to combine or modify them to suit your own needs.
Maybe you want to add a flag that the file was downloaded and send an email later if the user closed the tab while waiting for it to finish. Maybe you want to redirect the user to a new page in the app instead of downloading a file. Maybe you just need a loading spinner or basic progress bar.
Tip: Background processing is a language-agnostic concept, so don’t be shy about learning from other development ecosystems
Think of these patterns as good building blocks and then layer on additional complexity as needed. You might want to clean up the job_statuses table after a few days or add more robust authentication or use the job status as a way to cache results. It’s up to you.
This code should serve as a conceptual guideline and should be easy to extend and grow as your needs change.
Advanced Techniques: Proceed with Caution
It is outside the scope of this article to cover more advanced techniques, but if you find yourself needing something even more powerful the next step would be to implement some kind of ActionCable or web-socket approach, maybe combined with in-app or push notifications. Most applications will never need to go this far.
If you have reports that are easy to pre-compute and store – for instance, a monthly account statement – you could switch from “on-demand” report generation to cron/scheduled generation. If the report contents are unlikely to change after a certain date, it is a good candidate for pre-computing.
Wrap It Up
You will reach a point where you cannot solve every performance problem by optimizing queries. Long-running reports or large file exports should be moved into a background job for processing outside the life cycle of a single HTTP request.
The Active Job framework in Rails provides a solid, standardized interface for enqueueing work. There are battle-tested, community-supported tools – Sidekiq and Delayed Job – that can crank through thousands of jobs a day without any hiccups.
Follow these basic (but robust!) patterns for displaying progress and sending data back to the user once it’s been processed. There is a modest up-front investment to get your first background job up and running, but it will payoff immediately as your app grows.
Was this article valuable? Subscribe to the Boring Rails low-volume, high-signal newsletter. No spam. All killer, no filler.


Top comments (0)