
In part 1 and part 2 of this series, we learned how to create a GraphQL mutation and we created a GraphQL client with the help of the Strawberry Shake tool, which allowed us to consume server endpoints.
Continuing with this application, this article will cover how to add the edit and delete capabilities to the movie data. We will configure the home page of our app to display the list of movies and will provide sort and filter movie options to the user.
Update the IMovie interface
Update the IMovie.cs file by adding the following method declaration:
 public interface IMovie
 {
     // other methods
     Task<List<Movie>> GetAllMovies();
     Task UpdateMovie(Movie movie);
     Task<string> DeleteMovie(int movieId);
 }
Update the MovieDataAccessLayer class
Update the MovieDataAccessLayer class by implementing the GetAllMovies method as shown below.
 public async Task<List<Movie>> GetAllMovies()
 {
     return await _dbContext.Movies.AsNoTracking().ToListAsync();
 }
The GetAllMovies method will return the list of all the movies from the database.
Add the definition for the UpdateMovie method as shown below:
 public async Task UpdateMovie(Movie movie)
 {
     try
     {
         var result = await _dbContext.Movies.FirstOrDefaultAsync(e => e.MovieId == movie.MovieId);

         if (result is not null)
         {
            result.Title = movie.Title;
            result.Genre = movie.Genre;
            result.Duration = movie.Duration;
            result.PosterPath = movie.PosterPath;
            result.Rating = movie.Rating;
            result.Overview = movie.Overview;
            result.Language = movie.Language;
         }

        await _dbContext.SaveChangesAsync();
     }
    catch
    {
        throw;
    }
 }
The UpdateMovie method accepts an object of the type Movie.
To see the method in action,query the database to find the existing movie record based on the movieId. If the movie exists in the database, this method updates it based on the parameter passed to the method.
Finally, add the definition for the DeleteMovie method as shown below:
 public async Task<string> DeleteMovie(int movieId)
 {
     try
     {
        Movie? movie = await _dbContext.Movies.FindAsync(movieId);

        if (movie is not null)
        {
            _dbContext.Movies.Remove(movie);
            await _dbContext.SaveChangesAsync();
            return movie.PosterPath;
        }

        return string.Empty;
     }
    catch
    {
        throw;
    }
 }
The DeleteMovie method accepts the movieId as the parameter and deletes the movie from the database based on the movieId passed to it.The DeleteMovie method returns the poster path of the movie so that we can delete its poster in the server.
Add the GraphQL server query to fetch all movie data
Add the following query definition in the MovieQueryResolver class:
 [GraphQLDescription("Gets the list of movies.")]
 [UseSorting]
 [UseFiltering]
 public async Task<IQueryable<Movie>> GetMovieList()
  {
    List<Movie> availableMovies = await _movieService.GetAllMovies();
     return availableMovies.AsQueryable();
  }
The GetMovieList method invokes the GetAllMovies method of the movie service to fetch the list of all the available movies.
We have annotated the GetAllMovies method with the following two attributes:
- UseSorting : Sorts the movie data either in ascending or descending order based on the object properties.
- UseFiltering : Filters the movie data based on the object properties such as movieId, title, rating, etc.
Add GraphQL server mutation to edit and delete movie data
Add the mutation for editing the movie data in the MovieQueryResolver class as shown below.
 [GraphQLDescription("Edit an existing movie data.")]
 public async Task<AddMoviePayload> EditMovie(Movie movie)
 {
    bool IsBase64String = CheckBase64String(movie.PosterPath);

    if (IsBase64String)
    {
        string fileName = Guid.NewGuid() + ".jpg";
        string fullPath = System.IO.Path.Combine(posterFolderPath, fileName);

        byte[] imageBytes = Convert.FromBase64String(movie.PosterPath);
        File.WriteAllBytes(fullPath, imageBytes);

        movie.PosterPath = fileName;
     }

    await _movieService.UpdateMovie(movie);

    return new AddMoviePayload(movie);
}

static bool CheckBase64String(string base64)
{
    Span<byte> buffer = new(new byte[base64.Length]);
    return Convert.TryFromBase64String(base64, buffer, out int bytesParsed);
}
The EditMovie method accepts an object of the type Movie as a parameter, and it helps us to update the existing movie data. While updating the movie data, we also need to handle the following two cases:
- Case 1: If the user has updated the poster of the movie.
- Case 2: If the poster image is not updated.
In case 1, we receive a base64 string in the PosterPath property of the movie object.
In case 2, we receive the name of the image which was saved to the database while adding the movie.
For this reason, we created the method CheckBase64String , which helps us to check if the PosterPath property contains a base64 string. This method will return a Boolean value if the PosterPath property contains a base64 string.
If the user has updated the poster image, then convert the base64 string to a byte array and save it as a file to the Poster folder on the server. This process is the same as what we did in the AddMovie method.
Then, invoke the UpdateMovie method of the movie service.
Similarly, add the mutation for deleting the movie data as shown below:
 [GraphQLDescription("Delete a movie data.")]
 public async Task<int> DeleteMovie(int movieId)
 {
    string coverFileName = await _movieService.DeleteMovie(movieId);

    if (!string.IsNullOrEmpty(coverFileName) coverFileName != _config["DefaultPoster"])
    {
        string fullPath = System.IO.Path.Combine(posterFolderPath, coverFileName);
        if (File.Exists(fullPath))
        {
            File.Delete(fullPath);
        }
    }
    return movieId;
 }
The DeleteMovie method accepts movieId as the parameter. If the poster of the deleted movie is not the default poster, then the method deletes it from the server as well.
Add the configuration for sorting and filtering
To add the sorting and filtering options, register the extension methods in the Program.cs file as shown below:
 builder.Services.AddGraphQLServer()
    .AddQueryType<MovieQueryResolver>()
    .AddMutationType<MovieMutationResolver>()
    .AddFiltering()
    .AddSorting();
Let us now focus on the client-side of the application.
Add GraphQL client queries
Since we have added new methods on the server, regenerate the GraphQL client using the process discussed in part 2 of this series.
Add a file named FetchMovieList.graphql inside the MovieApp.Client\GraphQLAPIClient folder. Add the GraphQL query to fetch the list of movies as shown below:
 query FetchMovieList{
  movieList{
    movieId,
    title,
    posterPath,
    genre,
    rating,
    language,
    duration
  }
 }
To filter the movie data based on the movieId, use the Schema Definition Language (SDL) query as shown below. This query will return the movie with the movieId 20.
 query{ movieList(
  where:{
    movieId:{eq:20}
  }){
    movieId,
    title,
    rating,
    genre,
    duration,
    overview,
    posterPath
  }
 }
Write the generic query to filter the movie data. Add a new file named FilterMovieData.graphql and add the following GraphQL query:
 query FilterMovieByID($filterInput:MovieFilterInput){
  movieList(where:$filterInput){
    movieId,
    title,
    posterPath,
    genre,
    rating,
    language,
    duration,
    overview
  }
 }
Allow sorting of movie data based on the movie title, rating, and duration using the following SDL query. This query will return the list of movies in the ascending order of rating.
 query{ movieList(
  order:{rating:ASC}
  ){
    movieId,
    title,
    rating,
    genre,
    duration,
    overview,
    posterPath
  }
 }
Write the generic query to sort the movie data. Add a new file named SortMovieData.graphql and add the following GraphQL query to sort the movies:
 query SortMovieList($sortInput:MovieSortInput!){
  movieList(order:[$sortInput]){
    movieId,
    title,
    posterPath,
    genre,
    rating,
    language,
    duration
  }
 }
Add a new file named EditMovieData.graphql and add the following GraphQL mutation for editing the movie:
 mutation EditMovieData($movieData:MovieInput!){
  editMovie(movie:$movieData){
  movie{
      title
    }
  }
 }
Finally, add a file named DeleteMovieData.graphql and add the following GraphQL mutation for deleting the movie:
 mutation DeleteMovieData($movieId:Int!){
    deleteMovie(movieId:$movieId)
 }
We can also write the mutation for deleting using the following SDL. This will delete the movie with movieId 20.
 mutation{
    deleteMovie(movieId:20)
 }
Configure Bootstrap and Font Awesome
We use Font Awesome icons and Bootstrap modal dialogs in this application. Therefore, we need to configure our app to use them.
Navigate to the MovieApp.Client\wwwroot\index.html file and add the CDN link for Font Awesome in the section as shown below:
<link rel="stylesheet" type="text/css" href="https://cdnjs.cloudflare.com/ajax/libs/font-awesome/5.15.4/css/all.min.css" />
Add the CDN link for Bootstrap at the end of the section.
 <script src="https://cdn.jsdelivr.net/npm/@popperjs/core@2.10.2/dist/umd/popper.min.js" integrity="sha384-7+zCNj/IqJ95wo16oMtfsKbZ9ccEh31eOz1HGyDuCQ6wgnyJNSYdrPa03rtR1zdB" crossorigin="anonymous"></script>
 <script src="https://cdn.jsdelivr.net/npm/bootstrap@5.1.3/dist/js/bootstrap.min.js" integrity="sha384-QJHtvGhmr9XOIpI6YVutG+2QOK9T+ZnN4kzFN1RtK3zEFEIsxhlmWl5/YESvpZ13" crossorigin="anonymous"></script>
You can also refer to Bootstrap’s official page to get the CDN links.
We will display the movie in a card layout on the home page. Each card will display the movie title, poster, and the rating of the movie. Upon clicking the card, the user will be navigated to a movie details page, where they can see the complete movie data. The home page contains a list of genres which will allow us to filter the movie data based on genre. A dropdown list will also be provided to sort the movie data.
Let us proceed to create all the required components.
Create the rating component
We display the movie rating on both the home page and the movie details page with a custom style as shown below.

Therefore, we will create a sharable component for it.
Create a new component and name it MovieRating.razor under the Pages folder. Add a base class for the component and name it MovieRating.razor.cs.
Add the following code to the base class.
 using Microsoft.AspNetCore.Components;

 namespace MovieApp.Client.Pages
 {
    public class MovieRatingBase : ComponentBase
    {
        [Parameter]
        public decimal? Rating { get; set; }
    }
 }
This component will accept a parameter of type decimal to display the rating.
Add the following code in the MovieRating.razor file:
 @inherits MovieRatingBase

 <span class="movie-rating">@Rating</span>
To add the custom style to the component, add a stylesheet named MovieRating.razor.css. Put the following code inside it:
 .movie-rating {
    background: #e0b600;
    border: 3px solid #e0b600;
    padding: 5px;
    color: #fff;
    text-align: center;
    display: block;
    z-index: 100;
    min-width: 35px;
    font-size: 14px;
    border-radius: 50%;
 }
Create the movie details component
The movie details component helps us to display the complete information of a movie to the user.
Add a component named MovieDetails.razor. Add the base class and stylesheet for this component.
Add the following code to the base class:
 public class MovieDetailsBase : ComponentBase
 {
    [Inject]
    MovieClient MovieClient { get; set; } = default!;

    [Parameter]
    public int MovieID { get; set; }

    public Movie movie = new();
    protected string imagePreview = string.Empty;
    protected string movieDuration = string.Empty;

    protected override async Task OnParametersSetAsync()
    {
        MovieFilterInput movieFilterInput = new()
        {
            MovieId = new()
            {
                Eq = MovieID
            }
        };

        var response = await MovieClient.FilterMovieByID.ExecuteAsync(movieFilterInput);

        if (response.Data is not null)
        {
            var movieData = response.Data.MovieList[0];

            movie.MovieId = movieData.MovieId;
            movie.Title = movieData.Title;
            movie.Genre = movieData.Genre;
            movie.Duration = movieData.Duration;
            movie.PosterPath = movieData.PosterPath;
            movie.Rating = movieData.Rating;
            movie.Overview = movieData.Overview;
            movie.Language = movieData.Language;

            imagePreview = "/Poster/" + movie.PosterPath;
            ConvertMinToHour();
        }
    }

    void ConvertMinToHour()
    {
        TimeSpan movieLength = TimeSpan.FromMinutes(movie.Duration);
        movieDuration = string.Format("{0:0}h {1:00}min", (int)movieLength.TotalHours, movieLength.Minutes);
    }
 }
This component will accept the parameter MovieID of type integer. In the OnParametersSetAsync lifecycle method, we will create an object of the type MovieFilterInput to filter the movie data based on the component parameter. Then, invoke the FilterMovieByID method of the MovieClient to get the filtered movie data. Since the movieId is a primary key for our object, the method will return a single value.
Now, fetch the movie poster directly from the server using the posterPath property.
The movie length is defined as minutes. Use the ConvertMinToHour method to convert the length of movies to the hour and minute format.
Add the following code to the MovieDetails.razor file:
 @page "/movies/details/{movieID:int}"
 @inherits MovieDetailsBase

 @if (movie.MovieId > 0)
 {
    <div class="row justify-content-center">
        <div class="col-md-10">
            <h1 class="display-4">Movie Details</h1>
            <hr />
            <div class="card mt-3 mb-3 p-3">
                <div class="row">
                    <div class="col-md-3">
                        <img class="card-img-top rounded" src="@imagePreview" alt="@movie.Title" />
                    </div>
                    <div class="d-flex col">
                        <div class="d-flex flex-column justify-content-between w-100">
                            <div>
                                <div class="d-flex justify-content-between">
                                    <h1>@movie.Title</h1>
                                    <span>
                                        <MovieRating Rating="@movie.Rating"></MovieRating>
                                    </span>
                                </div>

                                <p>@movie.Overview</p>
                            </div>
                            <div class="d-flex justify-content-between">
                                <span><strong>Language</strong> : @movie.Language</span>
                                <span><strong>Genre</strong> : @movie.Genre</span>
                                <span><strong>Duration</strong> : @movieDuration</span>
                            </div>
                        </div>
                    </div>
                </div>
            </div>
        </div>
    </div>
 }
 else
 {
     <p><em>Loading...</em></p>
 }
Display all the movie data on a Bootstrap card. Use the component to display the rating.
Update the stylesheet by adding the following code:
 img {
    overflow: hidden;
    transition: transform .5s;
 }

 img:hover {
    transform: scale(1.5);
 }
This will add a magnifying effect to the poster image on hover.
Create the card component
Add a component named MovieCard.razor and add the base class and stylesheet for it.
Add the following code to the base class:
 using Microsoft.AspNetCore.Components;
 using MovieApp.Server.Models;

 namespace MovieApp.Client.Pages
 {
    public class MovieCardBase : ComponentBase
    {
        [Parameter]
        public Movie Movie { get; set; } = new();

        protected string imagePreview = string.Empty;

        protected override void OnParametersSet()
        {
            imagePreview = "/Poster/" + Movie.PosterPath;
        }
    }
 }
This component will accept a parameter of type Movie. Inside the OnParametersSet lifecycle method, set the movie poster directly from the server using the posterPath property.
Add the following code in the MovieCard.razor file:
 @inherits MovieCardBase

 <div class="card movie-card">
    <a href='/movies/details/@Movie.MovieId'>
        <img class="card-img-top" src="@imagePreview" data-toggle="tooltip" title="@Movie.Title" alt="@Movie.Title" />
    </a>
    <div class="card-body">
        <span class="card-rating">
            <MovieRating Rating="@Movie.Rating"></MovieRating>
        </span>
        <a href='/movies/details/@Movie.MovieId'>
            <h5 class="card-title">@Movie.Title</h5>
        </a>
        <p class="card-text">
            @Movie.Genre
        </p>
    </div>
 </div>
We will display the movie title, poster image, and genre in this component. Clicking on the movie title or the poster image will redirect the user to the MovieDetails component.
Update the stylesheet by adding the following code:
 .movie-card {
    min-width: 200px;
    max-width: 200px;
    max-height: 400px;
    margin: 3px;
 }

 a {
    text-decoration: none;
 }

 .card-rating {
    position: absolute;
    right: 7px;
    top: 7px;
 }

 .card-title {
    text-overflow: ellipsis;
    white-space: nowrap;
    overflow: hidden;
 }

 .card {
    transition: .3s;
 }

 .card:hover {
    box-shadow: 0 5px 5px -3px #777, 0 8px 10px 1px #777, 0 3px 14px 2px #777;
 }
Create the genre component
The genre component will display the list of genres and allow us to filter the movies based on the selected genre.
Add a component named MovieGenre.razor and add the base class and stylesheet for this component.
Add the following code to the base class:
 public class MovieGenreBase : ComponentBase
 {
    [Inject]
    NavigationManager NavigationManager { get; set; } = default!;

    [Inject]
    MovieClient MovieClient { get; set; } = default!;

    [Parameter]
    public string SelectedGenre { get; set; } = string.Empty;

    protected List<Genre> lstGenre = new();

    protected override async Task OnInitializedAsync()
    {
        var results = await MovieClient.FetchGenreList.ExecuteAsync();

        if (results.Data is not null)
        {
            lstGenre = results.Data.GenreList.Select(x => new Genre
            {
                GenreId = x.GenreId,
                GenreName = x.GenreName,
            }).ToList();
        }
    }

    protected void SelectGenre(string genreName)
    {
        if (string.IsNullOrEmpty(genreName))
        {
            NavigationManager.NavigateTo("/");
        }
        else
        {
            NavigationManager.NavigateTo("/category/" + genreName);
        }
    }
 }
We have injected the NavigationManager and MovieClient into the component. The component will accept the parameter SelectedGenre of type string.
Inside the OnInitializedAsync method, fetch the list of genres by invoking the FetchGenreList method of the MovieClient.
SelectGenre will accept a genreName as a parameter. If the genreName is not null, then redirect the user to the route to filter the movie based on the selected genre.
Note: We will define the route to filter the movies based on the genre in the next section when configuring the home component.
Add the following code in the MovieGenre.razor file:
 @inherits MovieGenreBase

 <div class="list-group mb-3 col-md-2">
    <a @onclick="(() => SelectGenre(string.Empty))"
        class="list-group-item list-group-item-action
        @(string.IsNullOrEmpty(SelectedGenre) ? "active-genre" : "")">
        All Genre
    </a>
    @foreach (var genre in lstGenre)
    {
        <a @onclick="(() => SelectGenre(genre.GenreName))"
            class="list-group-item list-group-item-action
            @(SelectedGenre==genre.GenreName ? "active-genre" : "" )">
            @genre.GenreName
        </a>
    }
 </div>
We will display the list of genres as a list group. Clicking on the genre name will invoke the SelectGenre method.
Update the stylesheet by adding the following code:
 .active-genre {
    background-color: #fb641b;
 }

 a {
    cursor: pointer;
 }

 @media only screen and (max-width: 768px) {
    .list-group {
        position: relative;
        width: 100%;
    }
 }
Create the home component
The home component displays the movie data in a card layout. This will be the landing page for our application.
Add a component named Home.razor. Add the base class and stylesheet for this component.
Add the class definition inside the Home.razor.cs file as shown below.
 public class HomeBase : ComponentBase
 {
    [Parameter]
    public string GenreName { get; set; } = default!;

    [Inject]
    MovieClient MovieClient { get; set; } = default!;

    protected List<Movie> lstMovie = new();
    protected List<Movie> filteredMovie = new();

 }
This component will accept the parameter GenreName of the type string. The parameter will be sent via the URL. The lstMovie property helps us to store the list of movies that will be displayed via the templates. The filteredMovie property helps us to store the list of movies to filter the movie data based on genre.
Add the method to fetch the movie list.
 protected override async Task OnInitializedAsync()
 {
    MovieSortInput initialSort = new() { Title = SortEnumType.Asc };

    await GetMovieList(initialSort);
 }

 async Task GetMovieList(MovieSortInput sortInput)
 {
    var results = await MovieClient.SortMovieList.ExecuteAsync(sortInput);

    if (results.Data is not null)
    {
        lstMovie = results.Data.MovieList.Select(x => new Movie
        {
            MovieId = x.MovieId,
            Title = x.Title,
            Duration = x.Duration,
            Genre = x.Genre,
            Language = x.Language,
            PosterPath = x.PosterPath,
            Rating = x.Rating,
        }).ToList();
    }

    filteredMovie = lstMovie;
 }
Inside the OnInitializedAsync lifecycle method, define the initial sort order for the movie data on the home page. By default, the movie data on the home page will be sorted by ascending order of movie title.
We will fetch the sorted movie list by calling the GetMovieList method.
The SortEnumType is defined in the generated GraphQL client file MovieApp.Client\GraphQLAPIClient\Generated\MovieClient.StrawberryShake.cs.
Filter the movie data based on the parameter GenreName. Add the following methods:
 protected override void OnParametersSet()
 {
    FilterMovie();
  }

 void FilterMovie()
  {
    if (!string.IsNullOrEmpty(GenreName))
    {
        lstMovie = filteredMovie.Where(m => m.Genre == GenreName).ToList();
    }
    else
    {
        lstMovie = filteredMovie;
    }
 }
The FilterMovie method will be called inside the OnParametersSet lifecycle method. If the component parameter and GenreName are not null, then filter the list of movies based on the genre.
Note: The component parameter GenreName is set by the SelectGenre method from the MovieGenre component as discussed in the previous section.
Finally, add the function to sort the movie data.
 protected async Task SortMovieData(ChangeEventArgs e)
 {
    switch (e.Value?.ToString())
    {
        case "title":
            MovieSortInput titleSort = new() { Title = SortEnumType.Asc };
            await GetMovieList(titleSort);
            break;

        case "rating":
            MovieSortInput ratingSort = new() { Rating = SortEnumType.Desc };
            await GetMovieList(ratingSort);
            break;

        case "duration":
            MovieSortInput durationSort = new() { Duration = SortEnumType.Desc };
            await GetMovieList(durationSort);
            break;
    }
 }
The SortMovieData method helps us to sort the list of movies. It can sort movies in ascending order of title, descending order of rating, descending order of duration, and so on.
Then, create an object of type MovieSortInput and invoke the GetMovieList to sort the movie data.
Add the following code in the Home.razor file:
 @page "/"
 @page "/category/{GenreName}"
 @inherits HomeBase

 <div class="row">
    <div class="col-md-3 col-sm-12">
        <div class="row g-0">
            <div class="filter-container">
                <MovieGenre SelectedGenre="@GenreName"></MovieGenre>
                <div class="col-md-2 my-2">
                    <h4>Sort Movies</h4>
                    <select @onchange="SortMovieData" class="form-select">
                        <option value="title" selected>Title</option>
                        <option value="rating">Rating</option>
                        <option value="duration">Duration</option>
                    </select>
                </div>
            </div>
        </div>
    </div>
    <div class="col mb-3">
        @if (lstMovie.Count == 0)
        {
            <p>No data to display</p>
        }
        else
        {
            <div class="d-flex flex-wrap">
                @foreach (var movie in lstMovie)
                {
                    <MovieCard Movie="movie"></MovieCard>
                }
            </div>
        }
    </div>
 </div>
There are two routes defined for this page:
- / : This is the default home page path of the app. This indicates that the component will be displayed as the app launches.
- /category/{GenreName}: This route helps us to display the filtered list of movies based on the URL parameter GenreName.
Now, provide a dropdown list for sorting the movies. The SortMovieData method will be invoked on the onchange event of the dropdown. We will iterate over the list of movies and display each movie using the component.
Update the stylesheet by adding the code as shown below.
 .filter-container {
    position: fixed;
 }

 @media screen and (max-width: 768px) {
    .filter-container {
        position: relative;
    }
 }
Note: We have created and configured the Home component, so we can now delete the \Pages\Index.razor file.
Execution demo
Launch the application and you can perform all the operations shown below: 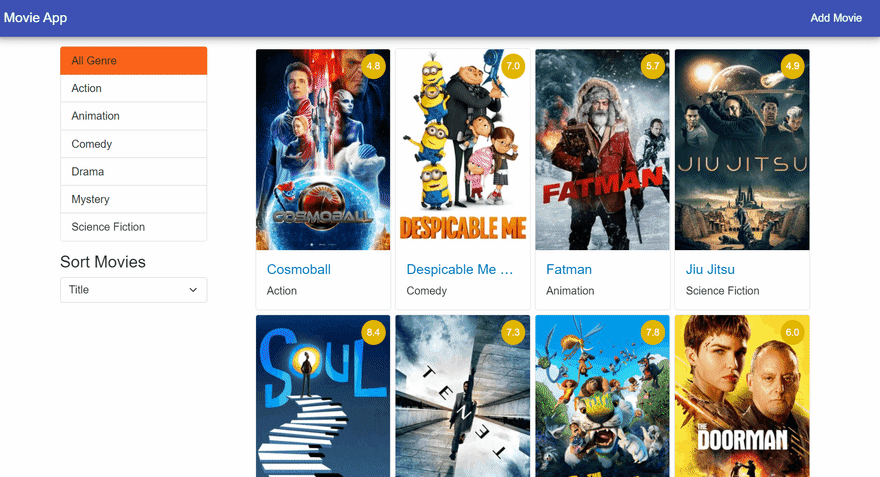
Install Syncfusion Toast package
The Syncfusion Blazor Toast component allows us to show toast messages to the user. Refer to this getting started document for adding the Toast component in a Blazor App.
Open the Package Manager Console and execute the following command in the MovieApp.Client project:
Install-Package Syncfusion.Blazor.Notifications -Version 20.1.0.XX
To register the Syncfusion Toast service, add the following line to the MovieApp.Client\Program.cs file:
builder.Services.AddSyncfusionBlazor();
Then, add the following imports to the MovieApp.Client_Imports.razor file to use the Toast component:
 @using Syncfusion.Blazor
 @using Syncfusion.Blazor.Notifications
Add the following lines of code in the MovieApp.Client\Shared\MainLayout.razor file. This will provide a global configuration to the Syncfusion Toast component.
 <SfToast ID="toast_default" @ref="ToastObj" Title="Adaptive Tiles Meeting" Content="@ToastContent" Timeout="5000" Icon="e-meeting">
        <ToastPosition X="@ToastPosition"></ToastPosition>
 </SfToast>
Add the reference to the stylesheet of the Syncfusion Toast component. Add the following line in the section of the MovieApp.Client\wwwroot\index.html file:
 <head>
    ....
    <link href="_content/Syncfusion.Blazor.Themes/bootstrap5.css" rel="stylesheet" />
    <script src="_content/Syncfusion.Blazor.Core/scripts/syncfusion-blazor.min.js" type="text/javascript"></script>
 </head>
Update the AddEditMovie component
Now, update the AddEditMovie component to include the edit functionality.
Add the OnParametersSetAsync lifecycle method to the AddEditMovie.razor.cs file as shown below:
 protected override async Task OnParametersSetAsync()
 {
    if (MovieID != 0)
    {
        Title = "Edit";

        MovieFilterInput movieFilterInput = new()
        {
            MovieId = new()
            {
                Eq = MovieID
            }
        };

        var response = await MovieClient.FilterMovieByID.ExecuteAsync(movieFilterInput);
        var movieData = response?.Data?.MovieList[0];

        if (movieData is not null)
        {
            movie.MovieId = movieData.MovieId;
            movie.Title = movieData.Title;
            movie.Genre = movieData.Genre;
            movie.Duration = movieData.Duration;
            movie.PosterPath = movieData.PosterPath;
            movie.Rating = movieData.Rating;
            movie.Overview = movieData.Overview;
            movie.Language = movieData.Language;

            imagePreview = "/Poster/" + movie.PosterPath;
        }
    }
 }
If the component parameter MovieID is set, then it means that the movie data already exists, and the component is invoked for editing the movie.
In the OnParametersSetAsync lifecycle method, we will create an object of the type MovieFilterInput to filter the movie data based on the component parameter. We will invoke the FilterMovieByID method of the MovieClient to get the movie data to be edited.
Update the SaveMovie method as shown below:
 protected async Task SaveMovie()
 {
    MovieInput movieData = new()
    {
        MovieId = movie.MovieId,
        Title = movie.Title,
        Overview = movie.Overview,
        Duration = movie.Duration,
        Rating = movie.Rating,
        Genre = movie.Genre,
        Language = movie.Language,
        PosterPath = movie.PosterPath,
    };

    if (movieData.MovieId != 0)
    {
        await MovieClient.EditMovieData.ExecuteAsync(movieData);
    }
    else
    {
        await MovieClient.AddMovieData.ExecuteAsync(movieData);
    }

    NavigateToAdminPanel();
 }
If the MovieId property of the MovieInput object is not set, then it means we are trying to add new movie data. In this case, invoke the AddMovieData method.
If the MovieId property of the MovieInput object is set, then it means we are trying to edit the existing movie data. In this case, invoke the EditMovieData method.
Update the NavigateToAdminPanel method as shown below:
 protected void NavigateToAdminPanel()
 {
    NavigationManager?.NavigateTo("/admin/movies");
 }
We will create the admin panel in the next section and configure the route for it.
Create the admin panel
In this section, we are going to implement role-based authorization in our app. The admin user has access to add, edit, and delete a movie. Therefore, we will create an admin panel to manage the admin rights.
Add a component called ManageMovies.razor and add the base class for the component.
Include the class definition inside the ManageMovies.razor.cs file as shown below:
 public class ManageMoviesBase : ComponentBase
 {
    [Inject]
    MovieClient MovieClient { get; set; } = default!;

    [Inject]
    public NavigationManager NavigationManager { get; set; } = default!;

    [Inject]
    IToastService ToastService { get; set; } = default!;

    protected List<Movie>? lstMovie = new();
    protected Movie? movie = new();
 }
Add the following method to fetch the list of movies:
 protected override async Task OnInitializedAsync()
 {
    await GetMovieList();
 }

 protected async Task GetMovieList()
 {
    var results = await MovieClient.FetchMovieList.ExecuteAsync();

    lstMovie = results?.Data?.MovieList.Select(x => new Movie
    {
        MovieId = x.MovieId,
        Title = x.Title,
        Duration = x.Duration,
        Genre = x.Genre,
        Language = x.Language,
        PosterPath = x.PosterPath,
        Rating = x.Rating,
    }).ToList();
 }
Use the GetMovieList method to fetch the list of movies. Then, fetch the data by invoking the FetchMovieList method of the MovieClient and then map it to the lstMovie variable.
Finally, add the method to handle the delete operation as shown below:
 protected void DeleteConfirm(int movieID)
 {
    movie = lstMovie?.FirstOrDefault(x => x.MovieId == movieID);
  }

   protected async Task DeleteMovie(int movieID)
  {
    var response = await MovieClient.DeleteMovieData.ExecuteAsync(movieID);

    if (response.Data is not null)
    {
        await GetMovieList();
        ToastService.ShowSuccess("Movie data is deleted successfully");
    }
 }
The DeleteConfirm method will accept the movieID as a parameter. It will then find the movie to delete from the lstMovie variable based on the movieID supplied to it.
The DeleteMovie method will invoke the DeleteMovieData method of MovieClient to delete the movie from the database. Then, invoke the GetMovieList method to fetch the updated list of movies and use the Toast to display the success message.
Add the following code in the ManageMovies.razor file:
 @page "/admin/movies"
 @inherits ManageMoviesBase

 <div class="row">
    <div class="col" align="right">
        <a href='/admin/movies/new'
           class="btn btn-primary" role="button">
            <i class="fas fa-film"></i> Add Movie
        </a>
    </div>
 </div>

 <br />

@if (lstMovie?.Count == 0)
 {
    <p><em>Loading...</em></p>
 }
 else
 {
    <table class="table shadow table-striped align-middle table-bordered">
        <thead class="table-success">
            <tr class="text-center">
                <th>Title</th>
                <th>Genre</th>
                <th>Language</th>
                <th>Duration</th>
                <th>Rating</th>
                <th>Actions</th>
            </tr>
        </thead>
        <tbody>
            @if (lstMovie is not null)
            {
                @foreach (var movie in lstMovie)
                {
                    <tr class="text-center">
                        <td>@movie.Title</td>
                        <td>@movie.Genre</td>
                        <td>@movie.Language</td>
                        <td>@movie.Duration min</td>
                        <td>@movie.Rating</td>
                        <td>
                            <a href='/admin/movies/edit/@movie.MovieId'
                               class="btn btn-outline-dark" role="button">
                                Edit
                            </a>
                            <button class="btn btn-danger"
                                 data-bs-toggle="modal"
                                 data-bs-target="#deleteMovieModal"
                                 @onclick="(() => DeleteConfirm(movie.MovieId))">
                                Delete
                            </button>
                        </td>
                    </tr>
                }
            }
        </tbody>
    </table>
 }
The route of the page is set as /admin/movies. We have provided the Add Movie button at the top and displayed the list of movies in a table. Every row of the table will have Edit and Delete buttons.
Clicking on the Edit button will navigate the user to the AddEditMovie component with the movieID parameter set.
Clicking on the Delete button will invoke the DeleteConfirm method. It opens a modal dialog to ask for a confirmation to delete the movie.
To add the modal dialog to handle the delete operation, add the following lines of code just after closing the


Top comments (0)