
TL;DR: Easily implement Google authentication in your Blazor WebAssembly app for enhanced security. Generate Google credentials, add them to your app, install the Google authentication library, and configure your app. We’ll also customize the login page to match your app’s design. Refer to the GitHub demo for detailed steps and code examples.
In the dynamic world of web development, security remains a paramount concern. Ensuring that users securely access the right resources and data is non-negotiable. Building upon our previous exploration of authentication with Azure Active Directory (AAD) in a Blazor WebAssembly app, we now delve into another crucial aspect: enabling authentication using external providers, explicitly focusing on Google authentication.
Google authentication offers a seamless and widely-used method for users to securely log in to apps using their Google accounts. Leveraging Google’s authentication services enhances your app’s security and provides users with a familiar and convenient authentication experience.
So, let’s get started!
Implementing Google authentication in the Blazor WebAssembly app
Follow these steps to implement Google authentication in Blazor WebAssembly apps:
Step 1: Generate Google client ID and client secret
Begin by generating your Google client ID and client secret. This involves navigating through Google’s developer console and creating credentials specific to your application.
Step 2: Integrate Google credentials
Open the appsettings.json file of your server app and modify it by adding the Google credentials.
"Authentication": {
   "Google": {
     "ClientId": "xxx-xxxx.apps.googleusercontent.com",
     "ClientSecret": "xxxx-xxxxxxxxnu"
   }
 },
Ensure the client ID and secret match those generated in the previous step.
Step 3: Install the Google authentication library
Next, incorporate the Google authentication library into your server app using the following command in the Package Manager Console of Visual Studio.
Install-Package Microsoft.AspNetCore.Authentication.Google -Version 8.0.1
This command installs the necessary dependencies to enable Google authentication within your app.
Step 4: Configure Google authentication
Once the package installation is finished, modify the Program.cs file to call the AddGoogle method with ClientId and ClientSecret options.
builder. Services
    .AddAuthentication()
    .AddIdentityServerJwt().AddGoogle(o =>
    {
      o.ClientId = builder.Configuration.GetValue<string>("Authentication:Google:ClientId");
      o.ClientSecret = builder.Configuration.GetValue<string>("Authentication:Google:ClientSecret");
    });
After everything is set up, run your application. The Google option is available on the Login or Register page. This Google button is rendered by default from the Google authentication library, as we have used the RemoteAuthenticatorView component of Microsoft.AspNetCore.Components.WebAssembly.Authentication package on our authentication page.
Refer to the following image.

Now, users can effortlessly authenticate using their Google accounts.
Customizing the login page in the Blazor WebAssembly app
By default, Blazor WebAssembly authentication provides pre-defined login views using the RemoteAuthenticatorView component, which is visible on the client app page, Client/Pages/Authentication.razor. However, there are situations where aligning the login page with your application’s unique design and branding becomes imperative.
Let’s see how to customize the login page to meet your specific requirements.
Step 1: Scaffold identity items
1.Navigate to the Areas folder in your server app and right-click on it to open the contextual menu.
2.Select Add < New Scaffolded Item…”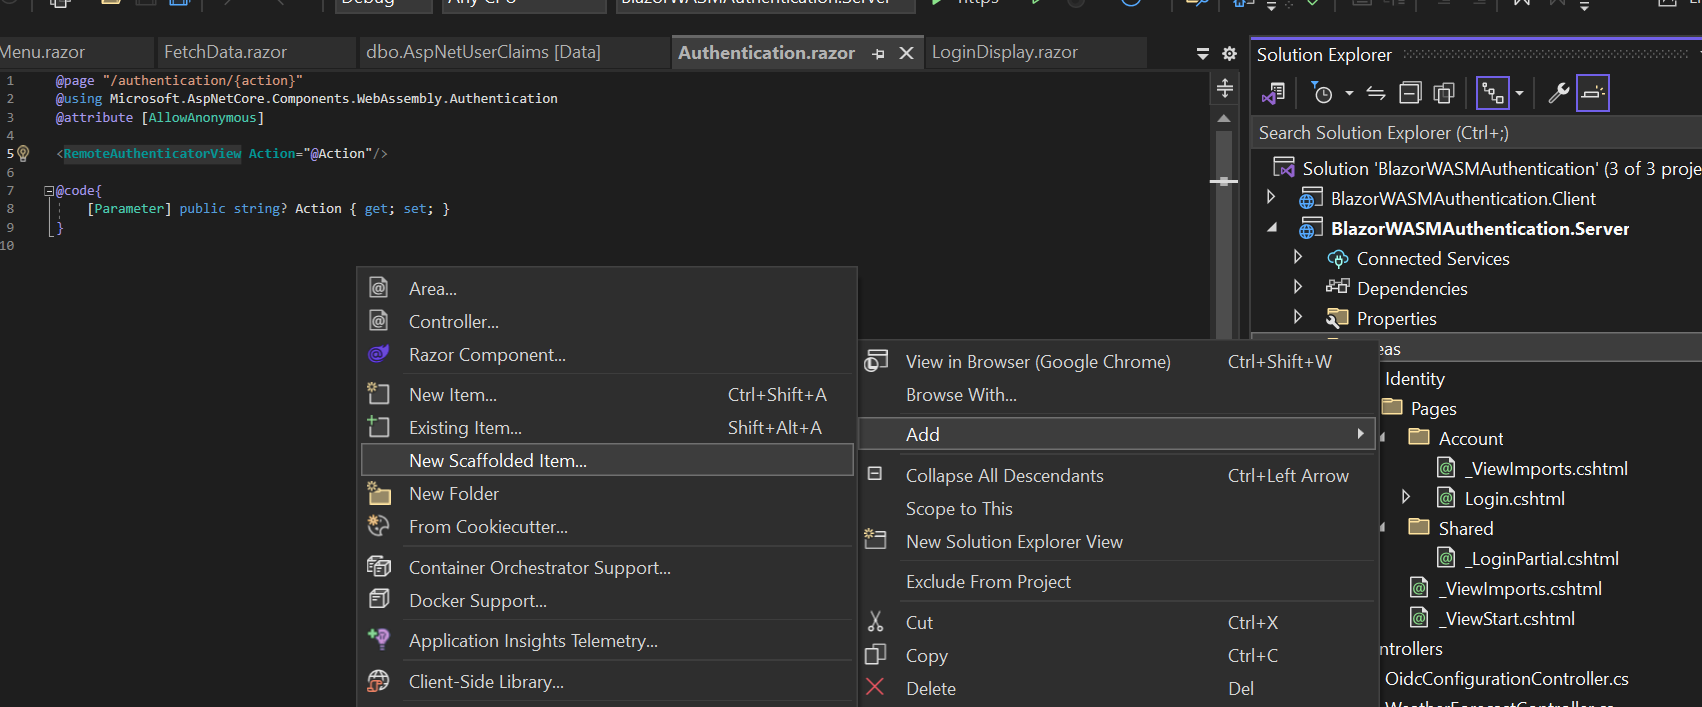
3.Choose Identity and proceed by clicking Add.
4.Select your identity data context class and specify the items you wish to scaffold. Then, choose the Account/Login option to customize the login page.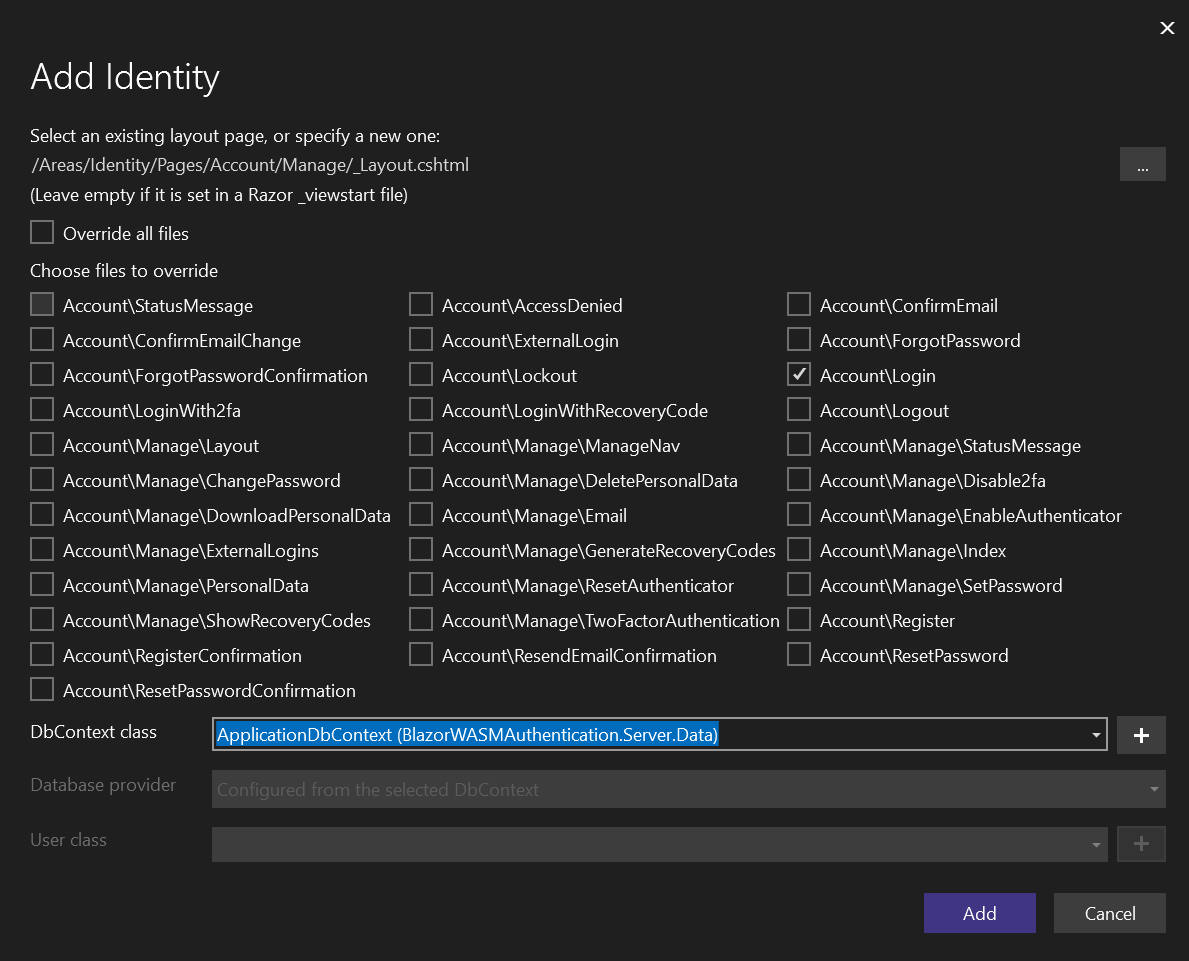
Step 2: Customize the login page
Once the Identity items are scaffolded, the login page will be imported into your application under Areas/Identity/Pages/Account/Login.cshtml. You now have complete control over customizing it according to your preferences.
Here, I have done a very simple customization. I have moved the position of the external login (Google) button to the bottom.
After implementing the necessary modifications, run your app to view the customized login page

GitHub reference
For more details, refer to the implementing Google authentication in Blazor WebAssembly app GitHub demo.
Conclusion
Thanks for reading! In this blog, we’ve outlined the process of integrating Google authentication into your Blazor WebAssembly app. Blazor WebAssembly simplifies authentication provider integration, ensuring your app’s security. For detailed guidance on authentication and authorization, consult the official Blazor WebAssembly documentation.
Syncfusion’s Blazor component library boasts over 85 responsive, lightweight components, perfect for modern web apps. The latest version of Essential Studio is available for existing customers on the License and Downloads. If you’re new to Syncfusion, test our controls’ features with a 30-day free trial.
If you have inquiries, contact us via our support forum, support portal, or feedback portal. We’re committed to assisting you!

Top comments (0)