
Hello, folks! In this article, we will discuss how to authenticate a Blazor WebAssembly (WASM) application with Azure Active Directory and its working principles. Blazor is an open-source framework for developing web apps using C# and HTML. Many modern web developers like to work with it because of its versatility.
Blazor WASM uses open web standards to run and execute the .NET code directly in the browser sandbox using .NET runtime, which provides maximum execution speed in the client side. Securing our application from unauthorized access is a priority while handling our apps since authorization checks can be bypassed by modifying all the client-side code at the end-user level.
In this scenario, the best approach for securing single-page applications (SPA) is to perform authorization checks on the server side using any API endpoint based on the OAuth 2.0 protocol, such as OpenID Connect (OIDC) or Azure Active Directory (AAD).
Let’s discuss the step-by-step procedures to secure our Blazor WASM applications with Azure Active Directory (AAD).
Prerequisites
In this blog, I have used Visual Studio 2019 to build an application. This software is required for you to follow along:
- .NET Core 3.1 SDK or later.
- Visual Studio with “ASP.NET and web development”
Creating a Blazor WebAssembly application
Follow these steps to create a Blazor WebAssembly hosted application:
- Open Visual Studio 2019 and choose Create a new project.

- Select Blazor App from the list and click Next.

- Enter your project name and click Create. In my example, I’ve used the name BlazorWASMAuthApp.

- Then, select Blazor WebAssembly App from the list and check the Configure for HTTPS and ASP.NET Core hosted check boxes. Then, select Create.

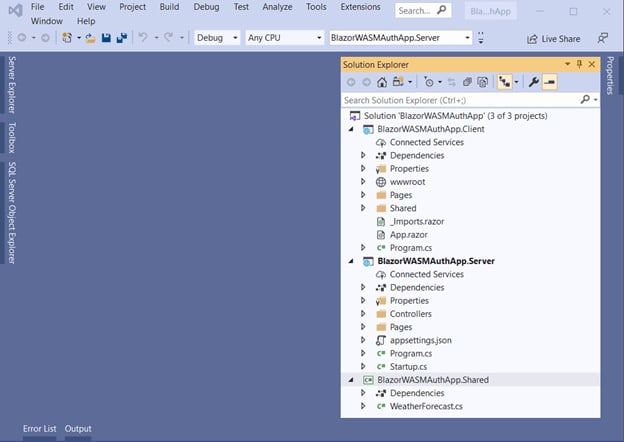
The Blazor WASM application will be created with three projects (client, server, and shared), as shown in the following screenshot.

Securing a Blazor WebAssembly-hosted application with Azure Active Directory (AAD)
We have created the Blazor WASM application. Now, let’s add the configuration to authenticate the Blazor WASM app with AAD for a single organization, like for a work or school account.
First, we need to register our server API and client app in the Microsoft identity platform in the Azure portal to get the Application ClientID and tenantID and set the required configuration like redirect URL and other details.
Check out the register server API link and client app link for how to do this.
Configuring server app
In this section, we are going to set up the authentication for calls to our APIs and its configurations.
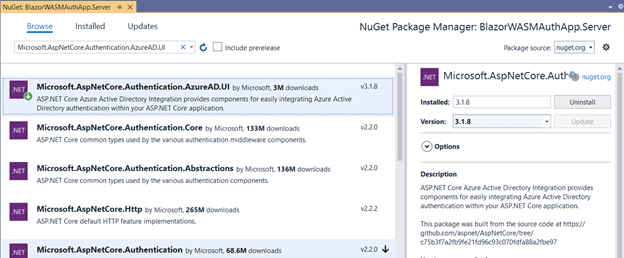
- First, install the NuGet package Microsoft.AspNetCore.Authentication.AzureAD.UI, which is used for authenticating API calls.Refer to the following screenshot.
- Use the following configuration to set up the authentication service and configure the JWT bearer handler in the Startup.cs file.
Startup.cs
using Microsoft.AspNetCore.Authentication.AzureAD.UI;
using Microsoft.AspNetCore.Authentication;

//…

public void ConfigureServices(IServiceCollection services)
{
    services.AddAuthentication(AzureADDefaults.BearerAuthenticationScheme)
    .AddAzureADBearer(options => Configuration.Bind("AzureAd", options));
    //...
}

//…

public void Configure(IApplicationBuilder app, IWebHostEnvironment env)
{
    //...
    app.UseRouting();

    app.UseAuthentication();
    app.UseAuthorization();

    app.UseEndpoints(endpoints =>
    {
        //...
    });
}
- Then, configure the options for the JWT bearer handler in the appsettings.json file as shown in the following code. You can replace the {DOMAIN}, {TENANT ID}, and {SERVER API APP CLIENT ID} with the values you obtained from the AAD.Refer to this link for more details.
appsettings.json
{
  "AzureAd": {
    "Instance": "https://login.microsoftonline.com/",
    "Domain": "{DOMAIN}",
    "TenantId": "{TENANT ID}",
    "ClientId": "{SERVER API APP CLIENT ID}",
   }
}
- The final step is to protect the API’s call from unauthorized users by defining the [Authorize] attribute in the controller.WeatherForecastController.cs
using Microsoft.AspNetCore.Authorization;

//…

[Authorize]
[ApiController]
[Route("[controller]")]
public class WeatherForecastController : ControllerBase
{
    //...
}
Configuring client app
In this section, we are going to set up the user authentication settings and UI configuration changes:
- Install the NuGet package Microsoft.Authentication.WebAssembly.Msal to authenticate your application using NuGet Manager.
 You can refer to this documentation for more details.
 - Add the following configuration to include the Msal authentication service with your application. Also, ensure that the Microsoft.Extensions.Http package is installed in your application. Program.cs
public static async Task Main(string[] args)
{
    var builder = WebAssemblyHostBuilder.CreateDefault(args);

    //...

   builder.Services.AddHttpClient("BlazorWASMAuthApp.ServerAPI", client => client.BaseAddress = new Uri(builder.HostEnvironment.BaseAddress))
      .AddHttpMessageHandler<BaseAddressAuthorizationMessageHandler>();

   builder.Services.AddScoped(sp => sp.GetRequiredService<IHttpClientFactory>()
        .CreateClient("BlazorWASMAuthApp.ServerAPI"));

   builder.Services.AddMsalAuthentication(options =>
   {
          builder.Configuration.Bind("AzureAd", options.ProviderOptions.Authentication);
          options.ProviderOptions.DefaultAccessTokenScopes.Add("{SCOPE URI}");
    });

    await builder.Build().RunAsync();
}
Replace {SCOPE URI} with your server client ID along with the scope name.
Check out this documentation for more details.
- Create and add the following configuration options for app authentication in the wwwroot/appsettings.json file. Replace the {TENANT ID} and {CLIENT APP CLIENT ID} with the values you obtained from the AAD configuration.
{
  "AzureAd": {
    "Authority": "https://login.microsoftonline.com/{TENANT ID}",
    "ClientId": "{CLIENT APP CLIENT ID}",
    "ValidateAuthority": true
  }
}
- Include the authentication-service-defined script reference to enable the app internal calls to perform the authentication process.
//...
<script src="_content/Microsoft.Authentication.WebAssembly.Msal/AuthenticationService.js"></script>

<script src="_framework/blazor.webassembly.js"></script>
- Then, import these two namespaces to make their references available throughout the application.
@using System.Net.Http
@using System.Net.Http.Json
@using Microsoft.AspNetCore.Authorization
@using Microsoft.AspNetCore.Components.Authorization
//...
Client app UI changes
Almost done! We have finished the configuration changes. Let’s do the UI changes to complete it.
- Configure the App component to provide an access page only for authorized users or to show the login message.
App.razor
<CascadingAuthenticationState>
    <Router AppAssembly="@typeof(Program).Assembly">
        <Found Context="routeData">
            <AuthorizeRouteView RouteData="@routeData" DefaultLayout="@typeof(MainLayout)">
                <NotAuthorized>
                    <h1>Sorry!!</h1>
                    <p>
                        You are not authorized to access this page. Please log in.
                    </p>
                </NotAuthorized>
            </AuthorizeRouteView>
        </Found>
        <NotFound>
            <LayoutView Layout="@typeof(MainLayout)">
                <p>Sorry, there's nothing at this address.</p>
            </LayoutView>
        </NotFound>
    </Router>
</CascadingAuthenticationState>
- Enable the authentication by injecting the [Authorize] attribute to the Razor pages (Counter.razor and FetchData.razor).
@page "/counter"
@attribute [Authorize]
//…
- Then, create the LoginDisplay component under the Shared folder and Authentication component under the Pages folder with these updated code snippets.
Shared/LoginDisplay.razor
@using Microsoft.AspNetCore.Components.Authorization
@using Microsoft.AspNetCore.Components.WebAssembly.Authentication
@inject NavigationManager Navigation
@inject SignOutSessionStateManager SignOutManager

<AuthorizeView>
    <Authorized>
        Hello, @context.User.Identity.Name!
        <button class="nav-link btn btn-link" @onclick="BeginLogout">
            Log out
        </button>
    </Authorized>
    <NotAuthorized>
        <a href="authentication/login">Log in</a>
    </NotAuthorized>
</AuthorizeView>

@code {
    private async Task BeginLogout(MouseEventArgs args)
    {
        await SignOutManager.SetSignOutState();
        Navigation.NavigateTo("authentication/logout");
    }
}
Pages/Authentication.razor
@page "/authentication/{action}"
@using Microsoft.AspNetCore.Components.WebAssembly.Authentication

<RemoteAuthenticatorView Action="@Action" />

@code {
    [Parameter]
    public string Action { get; set; }
}
- Finally, add the created LoginDisplay component to the MainLayout.razor page.
//…

<div class="top-row px-4">
    <LoginDisplay />
    <a href="http://blazor.net" target="_blank" class="ml-md-auto">About</a>
</div>

//…
Run the application
Let’s run the app from the server project. You can see the demo of the runnable application in the GIF image.

GitHub Sample
You can download the complete source code of this example from this GitHub location.
Conclusion
In this blog post, we have learned how to secure a Blazor-WASM-hosted application with Azure Active Directory authentication. In this way, you can secure your app with minimal lines of code.
Syncfusion provides more than 65 high-performance, lightweight, modular, and responsive Blazor UI controls such as DataGrid, Charts, and Scheduler to ease the work of developers. Check them out!
If you have any questions or feedback, please leave your valuable comments in the comments section below.
You can also contact us through our support forum, Direct-Trac, or feedback portal. We are always happy to assist you! Have a good day!

Top comments (0)