
A typical application needs a hierarchical navigation experience where the user can navigate through pages forward and backward as required.
The .NET MAUI platform provides two primary forms of page navigation to an app:
- Shell.
- Base navigation pages, such as FlyoutPage, TabbedPage, and NavigationPage.
In this blog, let’s see how we can integrate page navigation in your .NET MAUI application with code examples.
Page navigation through Shell
Shell page navigation is recommended to provide a page navigation experience in a .NET MAUI mobile app.
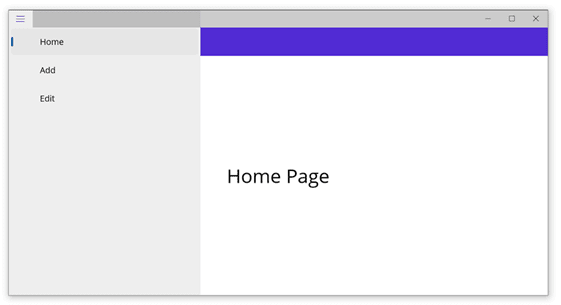
Shell is a UI control that hosts your pages and provides flyout and tab menus for navigation. Shell page navigation can also be done based on URLs. You can use content templates with it to make the code efficient.
A Shell template is available in any new .NET MAUI project as an AppShell.Xaml file with a single page that is added as the primary page. To use this template:
- Create a simple .NET MAUI app. By default, it will be generated with a shell template.
- Then, create the required pages. Here, I will create two additional pages, namely Add.Xaml and Edit.Xaml.
- Open the AppShell.** Xaml file where the MainPage** has already been added as Shell content. Add the required pages as content to it. Refer to the following code example.
<Shell
    x:Class="ShellPageNavigation.AppShell"
    xmlns="http://schemas.microsoft.com/dotnet/2021/maui"
    xmlns:x="http://schemas.microsoft.com/winfx/2009/xaml"
    xmlns:local="clr-namespace:ShellPageNavigation"
    Shell.FlyoutBehavior="Diabled">

  <ShellContent
      Title="Home"
      ContentTemplate="{DataTemplate local:MainPage}"
      Route="MainPage" />

  <ShellContent
      Title="Add"
      ContentTemplate="{DataTemplate local:AddPage}"
      Route="AddPage" />

  <ShellContent
      Title="Edit"
      ContentTemplate="{DataTemplate local:EditPage}"
      Route="EditPage" />

</Shell>
- By default, the FlyoutBehavior is disabled. You can enable it with the value Flyout. Refer to the following code.
<Shell
   x:Class="ShellPageNavigation.AppShell"
   xmlns="http://schemas.microsoft.com/dotnet/2021/maui"
   xmlns:x="http://schemas.microsoft.com/winfx/2009/xaml"
   xmlns:local="clr-namespace:ShellPageNavigation"
   Shell.FlyoutBehavior="Flyout">

  <ShellContent
     Title="Home"
     ContentTemplate="{DataTemplate local:MainPage}"
     Route="MainPage" />

  <ShellContent
     Title="Add"
     ContentTemplate="{DataTemplate local:AddPage}"
     Route="AddPage" />

  <ShellContent
     Title="Edit"
     ContentTemplate="{DataTemplate local:EditPage}"
     Route="EditPage" />

</Shell>
Note : Check out the .NET MAUI Shell flyout and Shell tabs documentation for more details.
Page navigation through base navigation pages
Base navigation pages are another way to achieve page navigation in your .NET MAUI app. They support pages such as FlyoutPage , TabbedPage , and NavigationPage. We can perform navigation through Push and Pop actions.
Let’s take a quick look at these pages!
TabbedPage
The .NET MAUI TabbedPage contains tabs, and each tab will load content in the detail area.
Refer to the following code example.
<TabbedPage xmlns="http://schemas.microsoft.com/dotnet/2021/maui"
            xmlns:x="http://schemas.microsoft.com/winfx/2009/xaml"
            xmlns:local="clr-namespace:ShellPageNavigation"
            x:Class="ShellPageNavigation.TabbedPageNavigation">
  <local:MainPage Title="Home"/>
  <local:AddPage Title="Add"/>
  <local:EditPage Title="Edit"/>
</TabbedPage>

FlyoutPage
The .NET MAUI FlyoutPage contains a detail page with an overlay page called a flyout to present items. The detail page will load the content of the page selected on the flyout.
Refer to the following code example.
<FlyoutPage xmlns="http://schemas.microsoft.com/dotnet/2021/maui"
            xmlns:x="http://schemas.microsoft.com/winfx/2009/xaml"
            xmlns:local="clr-namespace:ShellPageNavigation"
            x:Class="ShellPageNavigation.FlyoutPageNavigation">
 <FlyoutPage.Flyout>
  <local:FlyMenuPage x:Name="flyoutMenu"/>
 </FlyoutPage.Flyout>
 <FlyoutPage.Detail>
  <NavigationPage>
   <x:Arguments>
    <local:MainPage/>
   </x:Arguments>
  </NavigationPage>
 </FlyoutPage.Detail>
</FlyoutPage>
NavigationPage
The .NET MAUI NavigationPage is used to stack pages, and we can easily navigate to the required page with the push and pop actions.
Push pages
The PushAsync method of the NavigationPage will push a page in the navigation stack.
Refer to the following code.
await Navigation.PushAsync(new DetailsPage());
Pop pages
The PopAsync method of the NavigationPage will pop a page in the navigation stack. Also, we can pop the current page by pressing the Back button on our device.
To programmatically pop a page, refer to the following code.
await Navigation.PopAsync();
GitHub reference
Check out a complete example of page navigation in the .NET MAUI application on GitHub.
Conclusion
Thanks for reading. I hope you have a basic idea about page navigation in the .NET MAUI application. Syncfusion .NET MAUI controls are also compatible with these navigation pages. Please give them a try and leave your feedback in the comments section below!
Also, you can contact us through our support forum, support portal, or feedback portal. We are always happy to assist you!

Top comments (0)