Webhooks are a way to communicate between two web applications. With the TalkJS Chat API, there are several webhooks that you can take advantage of just by entering your server URL on our dashboard. But for testing it locally, this is not possible, as the TalkJS server cannot access the localhost server running on your machine. There is a very easy way to do this using ngrok. Today’s guide is all about how you can integrate ngrok with TalkJS to receive webhook events locally.
What is ngrok?
ngrok exposes your localhost to the Internet and allows for testing of absolutely anything that you build on your local machine, as long as it has an endpoint. You can sign up for a free account that will give you access to 40 connections a minute, one online ngrok process, and four tunnels per ngrok process. This is more than enough for the scope of this tutorial to show the capabilities of TalkJS webhooks.
They have their own traffic inspector that runs on port 4040 in your local machine, which can be used to analyze the events. Once we initiate the webhook events, we will take a look at this.
Setting up ngrok
There are three main parts to this how-to. The first part is to set up ngrok. You need to visit their website and click on the button ‘Get started for free’. This will ask you to create an account with some minimal details. Once that is done, you can log in. On Windows, you can easily download a binary that you can install directly. On other platforms, you can follow the instructions present on their documentation to set it up.
Creating a simple NodeJS server
The second part is to create a simple server that runs on your local machine. We are doing it with NodeJS and Express, but it can be done with the framework of your choice. All we need is a server running on the localhost with an endpoint that accepts a POST request. The code for it is shown below.
const express = require('express');
const app = express().use(express.json());
app.listen(3000, () => console.log('Server is up'));
app.get("/", (req, res) => {
    res.status(200).end('TalkJS Event Monitor');
  })
app.post("/talkjs", (req, res) => {
  console.log(req.body);
  res.status(200).end();
})
This assumes that you have NodeJS and Express in your system. If you do not, you can get it set up very quickly with the guide here. The first line mentions, we will be importing the express library and the second line starts up an HTTP server. We will use the listen method to listen for requests on port number 3000 and a callback is present here, which prints ‘Server is up’ to the console.
For the sake of this how-to, we have two endpoints present. One is a simple GET request that prints ‘TalkJS Event Monitor’ on the homepage and the next is a POST request that we will be using to monitor the events.
Exposing the server to the Internet
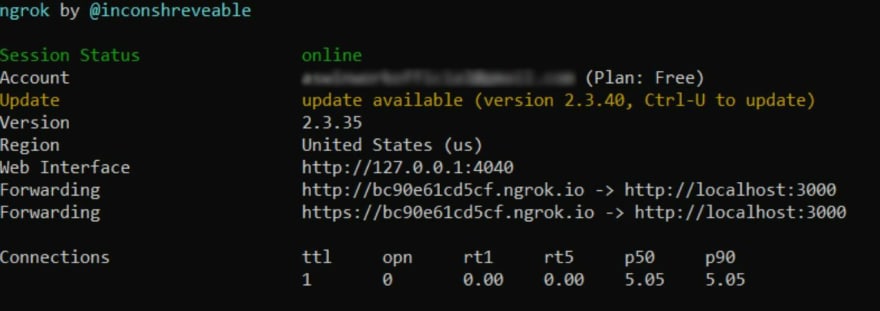
Now it is time to move on to the third part. We will now expose the service running on our localhost to the internet so that it is accessible from the TalkJS server. For this, use the following command:
ngrok HTTP 3000
Assuming you have the server running up on port 3000, you should see an output similar to this on your terminal.
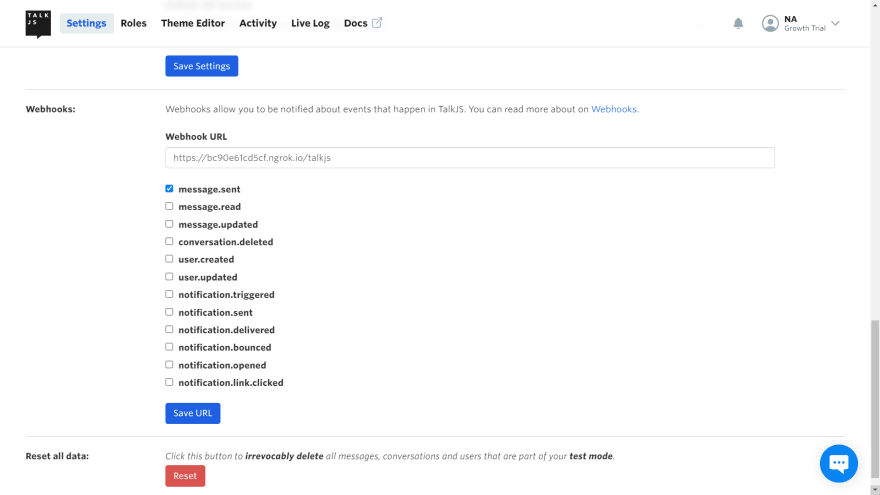
With that, we’re all set up to receive the webhook events from the TalkJS server. Log in to your TalkJS account and scroll down to the Webhooks section. Remember the URL shown in the terminal from ngrok? Copy that and paste it over here, but add the suffix ‘/talkjs’, because that is what we have set up in our server. Select all the events that you want to receive from the checkboxes below. For now, we will select only the message.sent event.
Now, all we need to do is set up a basic chat using the TalkJS Chat API. For this, you can refer to our Getting Started guide or any of the previous how-to posts to get an idea. We are using an inbox between two imaginary users, Sebastian and Alice. As soon as Alice sends a message to Sebastian, we get a response in the console of our server that is running in port 3000. The response is shown below. It has all the information about the event, including the timestamp, sender details, and message details.


Oldest comments (0)