Welcome back!
Today we are going to finish implementing authentication for the backend of our app "Gourmet".
In this post we will implement the login and logout endpoints.
Project steps
- Backend - Project Setup
- Backend - Authentication
- Backend - Place order
- Backend - View orders list and view a specific order
- Backend - Update order
- Frontend - Authentication
- Frontend - Place order, view orders list, and view order details
Login
Create a new branch
ft-authentication-loginoff ourmainbranchUpdate
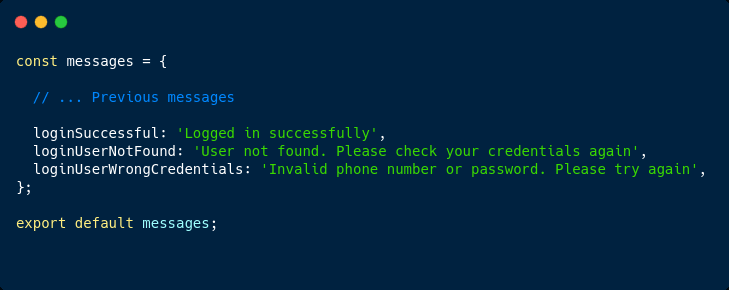
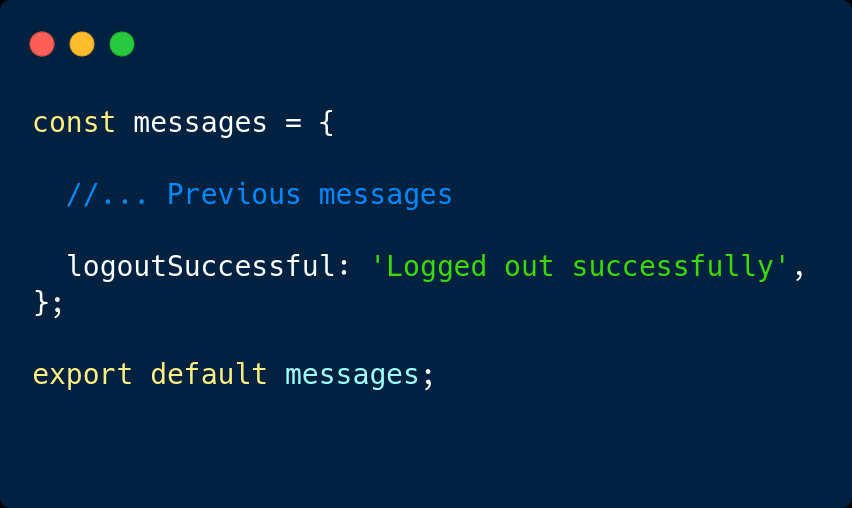
src/utils/messages.jsand add the following messages:
- Create
tests/authentication_login.test.jsfile and paste the following inside:
If you run the tests, all Login tests should fail because we haven't yet implemented this functionality. Let's do it.
- Update
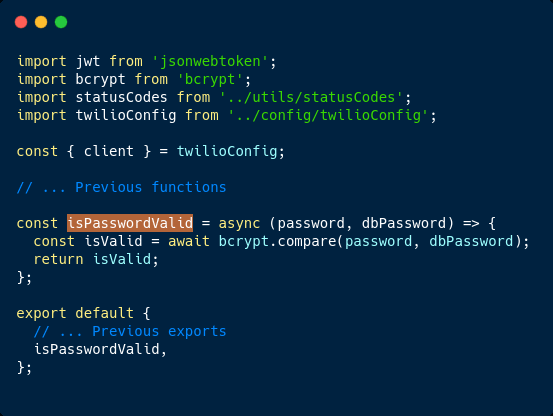
src/helpers/misc.jslike this:
The isPasswordValid function will help us in checking if the password submitted by the user equals to the user's password saved in the database by leveraging bcrypt's compare function.
- Update
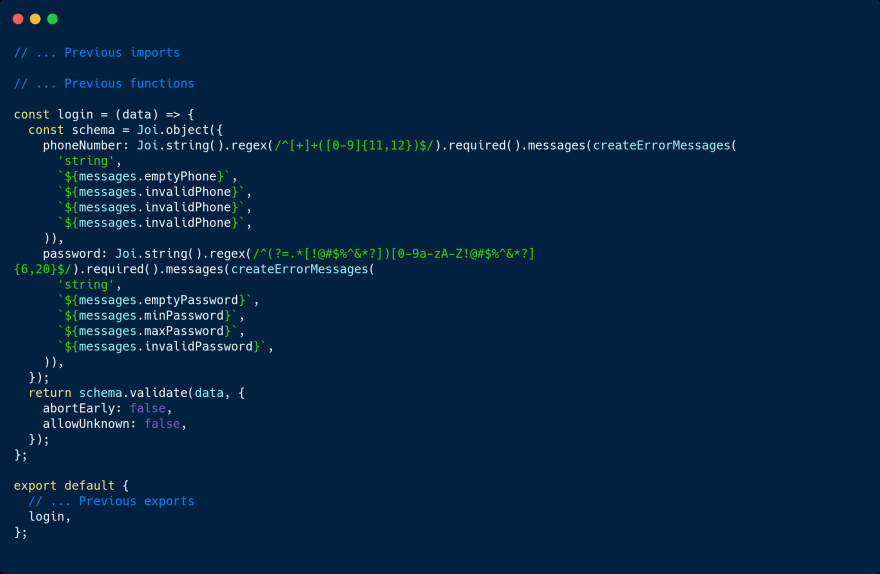
src/validations/authentication.jsand theloginfunction like this:
- Update
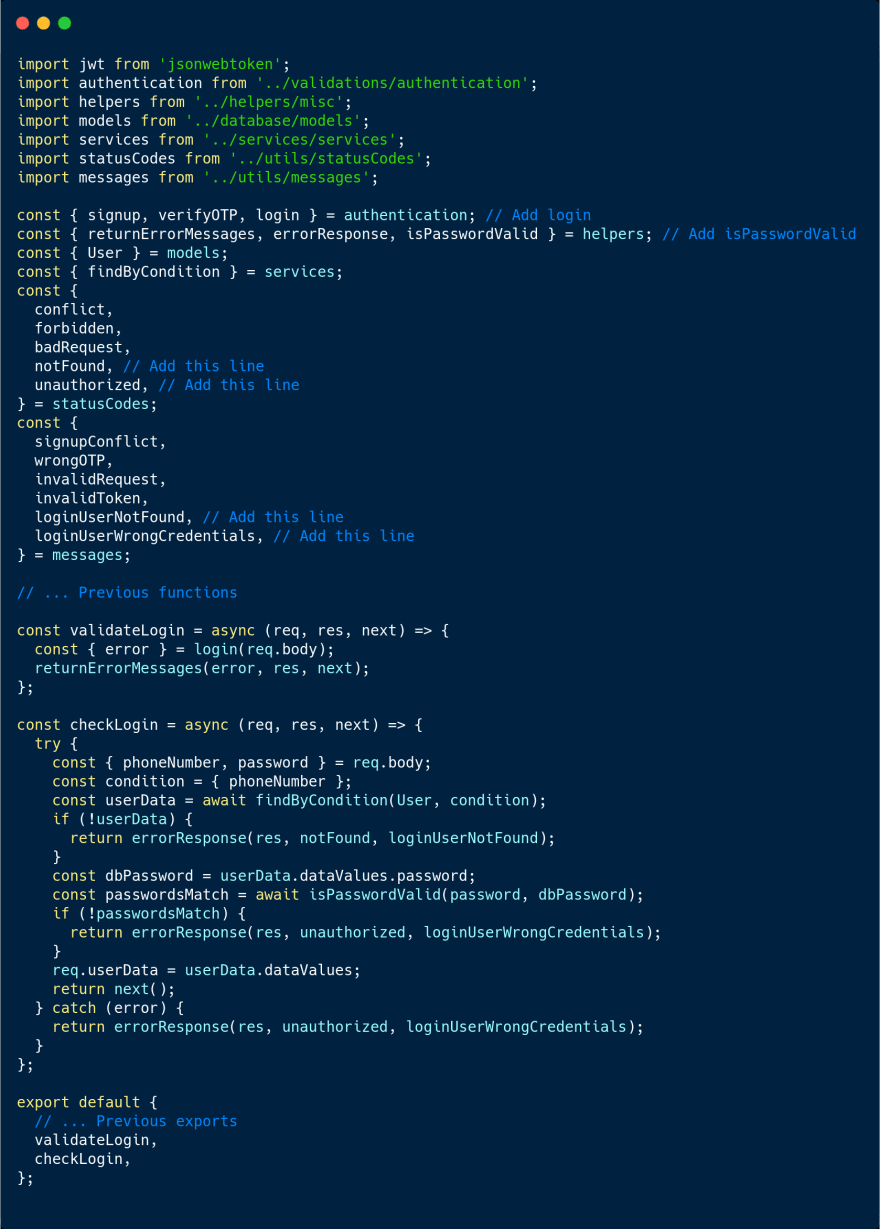
src/middlewares/authentication.jslike this:
The validateLogin middleware function will help us to validate the login credentials by using our login validation function.
The checkLogin middleware function will help us to check if the user trying to login exists in our database and if the password provided is valid.
- Update
src/controllers/authentication.jsand add theloginmethod like this:
- Finally, update
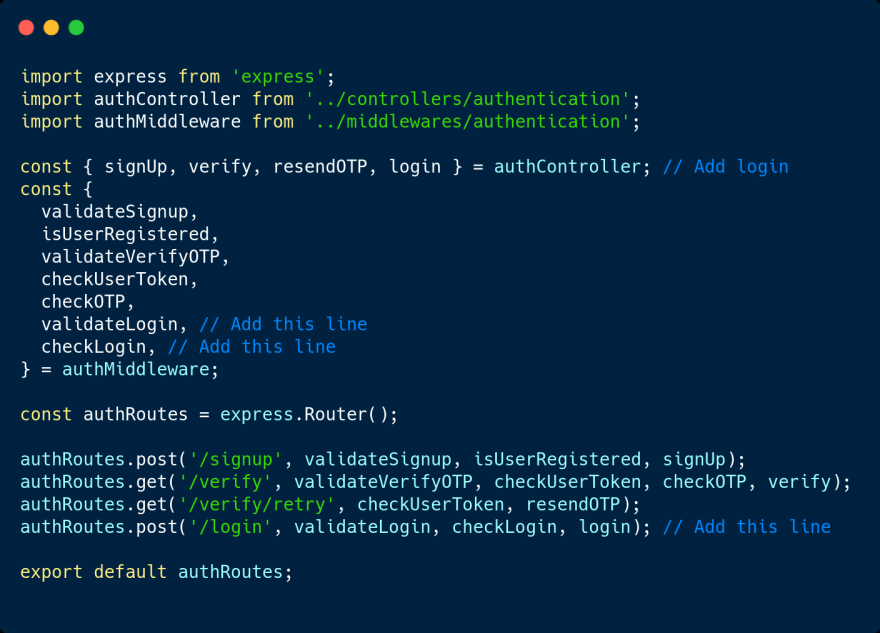
src/routes/authRoutes.jsto create the login route and connect our middlewares and controller
Now run the tests again and you should see that all our Login tests are passing. Nice!
Logout
What we want to achieve when a user logs out is to make sure that their JWT token becomes unusable. Since JWT doesn't have a functionality to force a token to expire, we will have to implement a custom solution.
If you have noticed, we provided a expiresIn: '30d', option in our generateToken function. This option controls the lifespan of our token, in our case it's 30 days. This is fine but imagine if a user logs in then logs out right away, this would mean that their token would still be valid for 30 days and if an attacker was to get hold of this token, they would be able to impersonate the original user. Now imagine if a user logs in then logs out again and they do this 5 consecutive times. We now have to deal with 5 unknown but valid tokens. Now imagine 1000 users doing this everyday - It could get out of hand very quickly.
Even though there's nothing we can do to force a token to expire before its expiresIn property, we can introduce a way to manage these tokens, especially for users who have logged out of our system.
Our solution is to store a user's token in a database when they logout. This database will be separate from our main database and ideally it should be very fast to make the writing and retrieving of data fast.
Redis is an ideal candidate for such a task because of its high performance and very low latency. Learn more about Redis here and here.
Let's now implement the logout functionality.
Download and install Redis and test that it works well with the
ping/pongcommandIn our project root, run
yarn add redisto install the Redis Node.js clientUpdate
src/utils/messagesand add the following messages:
- Create a
tests/authentication_logout.jsfile put the following code inside:
- Create a
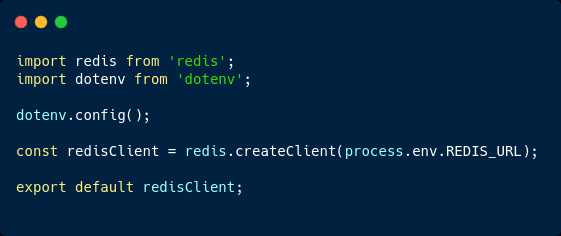
src/config/redisClient.jsconfiguration file like this:
- Update the
.envfile and aREDIS_URLvariable with a default port like this:REDIS_URL=redis://@127.0.0.1:6379.
If you are using credentials to connect to your Redis server then your URL would be like this: REDIS_URL=redis://USERNAME:PASSWORD@HOST_NAME:PORT_NUMBER
- Update
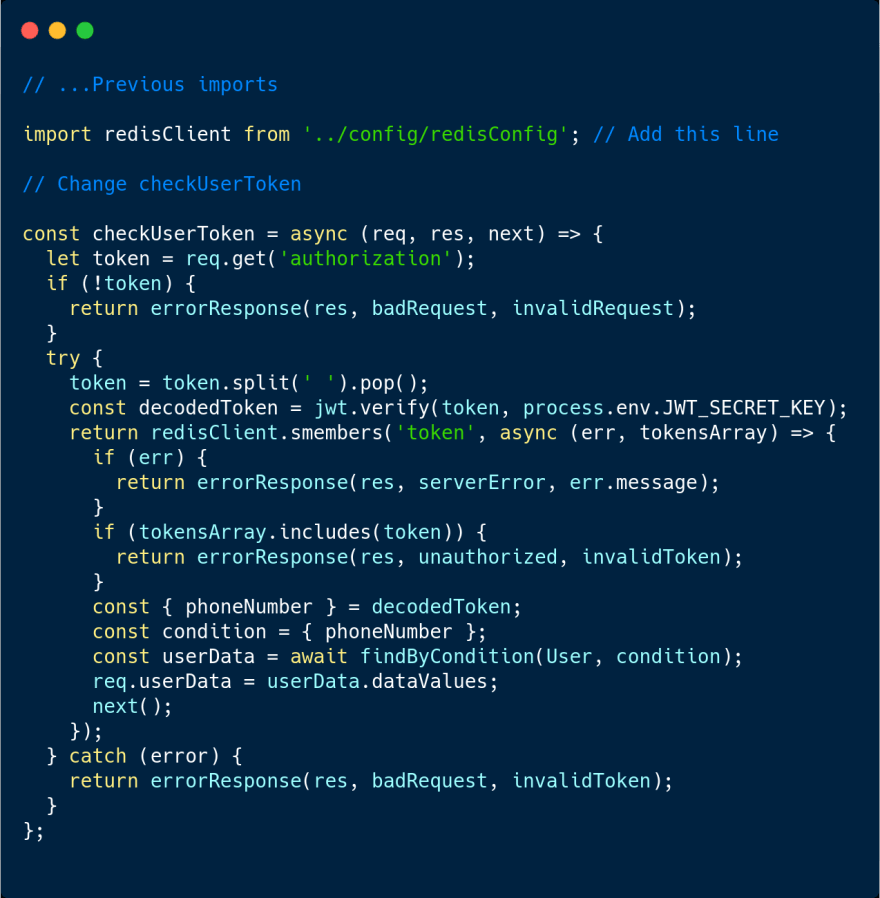
src/middlewares/authentication.jsand refactorcheckUserTokento this:
Here we are using the smembers method of Redis to retrieve all the members/values in a set. This method takes a string key (token) and a callback which returns an error or an array of values found. Check out this link for a list of all the commands/methods.
We then check if our token is in the tokensArray and return an appropriate error. tokensArray contains tokens of logged out users that have not yet expired. So to make a user logout, we just have to store their token in this set of key token.
Let's now implement the controller where we will store the user's token in that set.
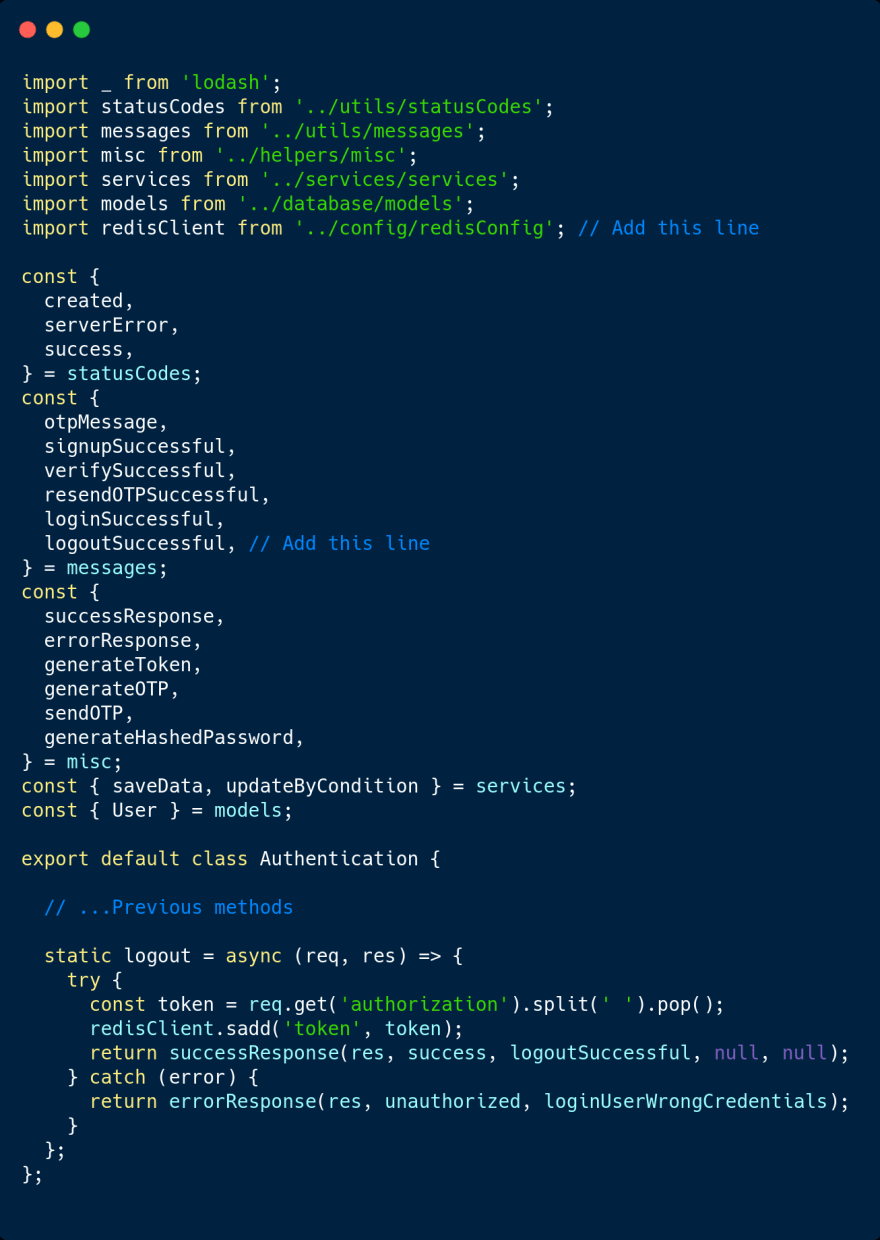
- Update
src/controllers/authentication.jsto add thelogoutmethod
Notice how we use the sadd method to add our token in a set of key token. When you use the sadd method, it appends your value to the set if the set exists. If the set doesn't exist it will first create it.
Cool!
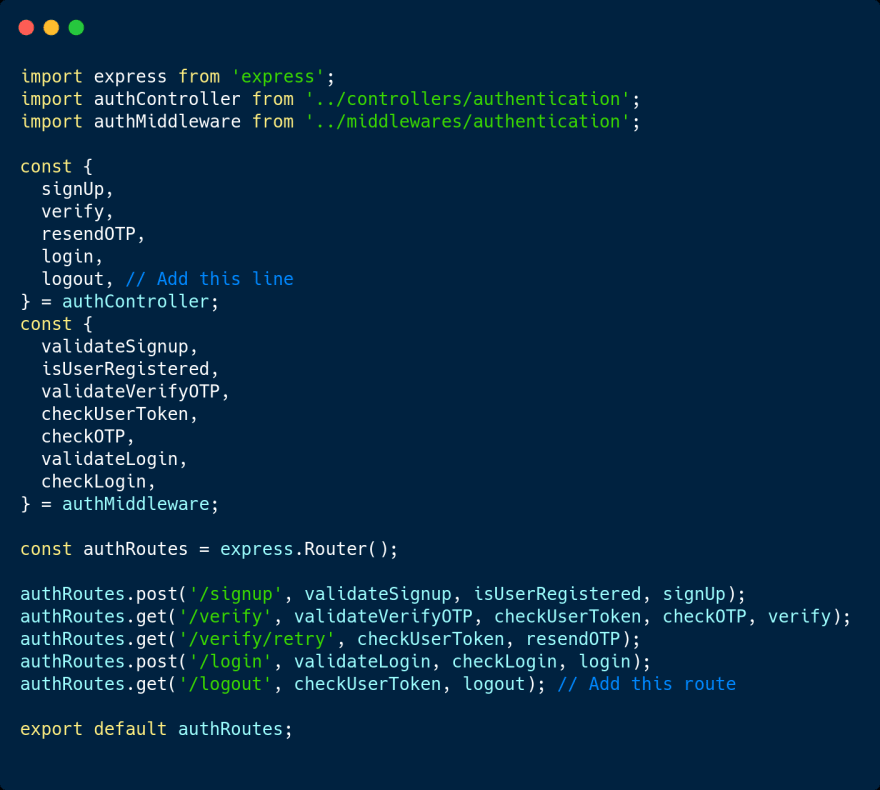
Let's now create our logout route.
- Update
src/routes/authRoutes.jslike this:
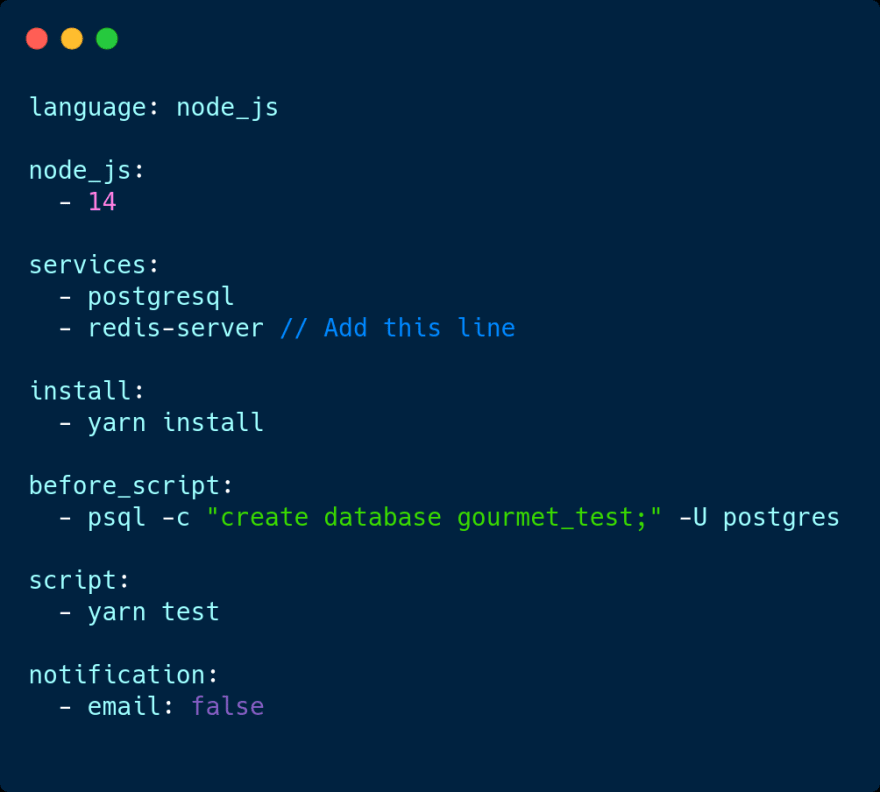
Lastly, let's update our Travis config file to tell Travis to install Redis-server before running our tests.
- Update
.travis.ymlandredis-serverin services like this:
And that's it!
If you run the tests again, you should see that all our authentication tests are passing.
Now we can commit our changes to GitHub and create a PR which will trigger a build on Travis.
The last step is to provision a Redis database for our production env on heroku. The process is similar to how we added the Postgres database.
- Open the
Resourcestab on heroku and typeHeroku Redisin the Add-ons search bar then select it. If "Heroku Redis" doesn't show up click here to find it in the market place then click on the install button and confirm.
Note: You might be asked to add a credit card but make sure sure to select the Hobby-dev plan so that they don't charge you for usage. You can always upgrade to a paid plan after you have tested that everything is working well.
If the provision of Heroku Redis is successful, it will automatically add a REDIS_URL env variable.
Now you can head back to GitHub and merge our PR.
After Heroku has finished building, you can open POSTMAN and test our new endpoints and everything should be working well.
That's all for today, our Authentication endpoints are finished.
Note: There are a few things we can do to improve our API. For instance, you might have noticed that the tokens of logged out users saved in our Redis database will stay there even after 30 days (after they expire). Since there's no reason to keep storing an expired token, we can set up a CRON job that will run maybe every day at midnight or every end of week or end of month to delete these expired tokens. But this is out of scope for this series now. I might write a post on how to implement such a functionality at the end of this series.
In the next post, we are going to look at user roles, how to create an admin account, how to create a menu of dishes, ...etc. At the end of the post a customer will be able to place an order.
I want to thank you who is reading this post right now. If you have a question, comment, suggestion or any other feedback, please feel free to drop it in the comment box below.
See you in the next post! Happy New Year! 🎉
The code in this post can be found here







Top comments (0)