
Introduction: Bridging AI with Live API Specifications
In modern software development, APIs have become the lingua franca for system communication, while AI-assisted programming is fundamentally transforming our development workflows.
By integrating Apidog MCP Server with AI-powered IDEs like Cursor and VSCode + Cline, we've established a groundbreaking workflow: Enabling AI to directly read, comprehend, and leverage up-to-date API specifications - effectively implementing the "API Documentation as Code" paradigm.
This article details how I connected Apidog MCP Server with Cursor, demonstrating how this integration significantly enhances development efficiency, accuracy, and consistency.
What is Apidog MCP Server?
MCP (Model Context Protocol) is a protocol that enables AI systems to interact with external data sources. Think of it as a standardized endpoint for AI applications to connect various data sources and tools.
Apidog MCP Server allows developers to expose API documentation from Apidog projects as a data source for AI-enabled IDEs like Cursor. This direct access empowers AI assistants to:
Generate or modify code based on API specs
Search API documentation content
Perform context-aware operations
The possibilities are limited only by your team's creativity.
Configuring Apidog MCP Server in Cursor
1. Prerequisites
2. Obtaining Credentials
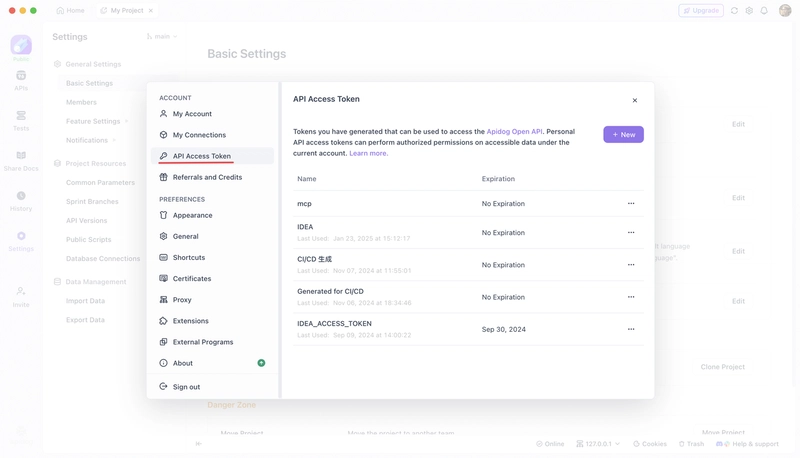
2.1 Get Apidog Access Token
Open Apidog application
Hover over profile avatar → "Account Settings → API Access Token"
Create and save new API access token
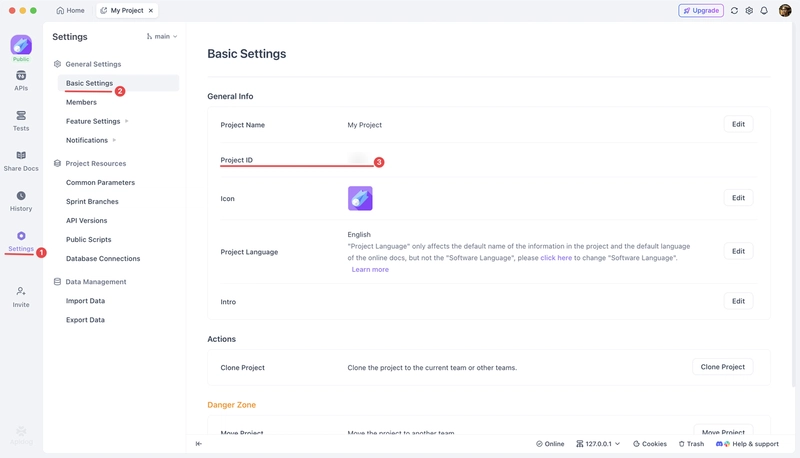
2.2 Get Apidog Project ID
Open target Apidog project
Click "Settings" in left sidebar
Copy Project ID from "Basic Settings"
3. Configuring MCP Settings
Two configuration approaches: Global (recommended) or Project-specific.
Method 1: Global Configuration
1. In Cursor: Click settings icon → MCP → "+ Add new global MCP server"
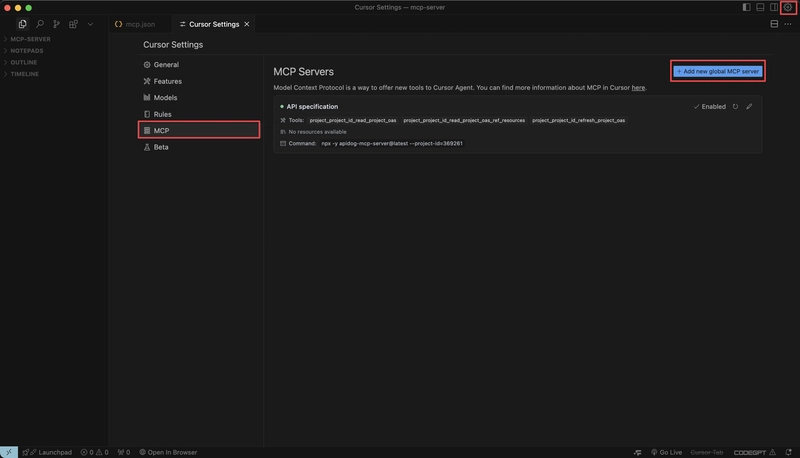
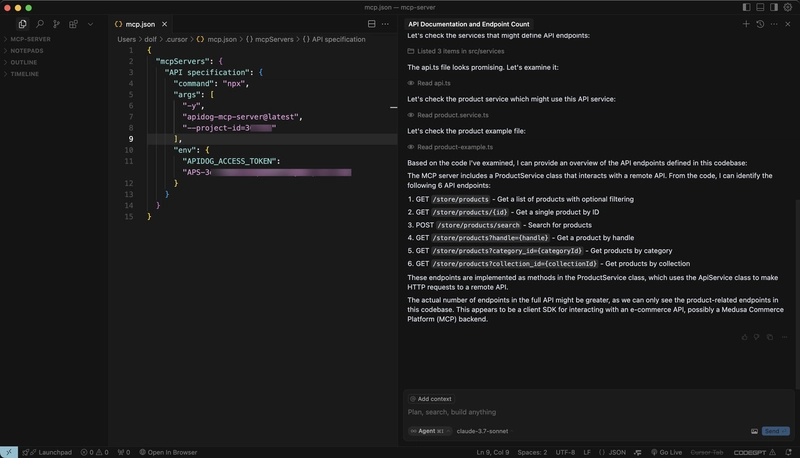
2. In the opened mcp.json file, add the following configuration, replacing <access-token> and <project-id> with your actual values.
{
  "mcpServers": {
    "API specification": {
      "command": "npx",
      "args": [
        "-y",
        "apidog-mcp-server@latest",
        "--project-id=<project-id>"
      ],
      "env": {
        "APIDOG_ACCESS_TOKEN": "<access-token>"
      }
    }
  }
}
Windows users may need:
{
  "mcpServers": {
    "API specification": {
      "command": "cmd",
      "args": [
        "/c",
        "npx",
        "-y",
        "apidog-mcp-server@latest",
        "--project-id=<project-id>"
      ],
      "env": {
        "APIDOG_ACCESS_TOKEN": "<access-token>"
      }
    }
  }
}
Method 2: Project-specific Configuration
Create
.cursorfolder in project rootAdd
mcp.jsonwith same configurationUse the same configuration as above
4. Verifying MCP Connection
Test with AI prompt in Agent mode:
"Fetch API documentation via MCP and list the number of endpoints"
Successful API information retrieval confirms proper setup.
Real-World Use Cases: Supercharging AI + API Development
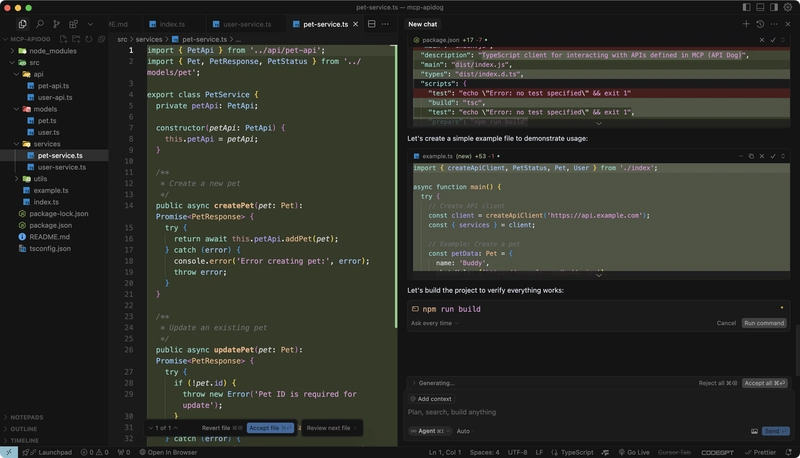
Case 1: Rapid Model Generation
For an e-commerce app with product APIs:
Create new Cursor project
Prompt:
"Fetch product APIs via MCP and generate complete TypeScript endpoints with service classes"
AI will:
Analyze API structure
Generate compliant code
Sample output:

Case 2: Documentation-Code Synchronization
After adding discountPrice field in Apidog:
Prompt:
"Refresh MCP cache and update Product endpoint with new fields"
AI updates:
discountPrice?: number; // New field
Case 3: CRUD Generation
Prompt:
"Generate complete Spring Boot MVC code for user management per API docs"
AI produces compliant controllers/services/repositories.
Case 4: API Documentation Q&A
Prompt:
"Explain payment-related endpoints and their workflow"
AI analyzes and explains payment flow.
Case 5: Automated Test Generation
Prompt:
"Generate Jest tests for product creation endpoint using MCP docs"
AI creates test cases covering edge conditions.
Pro Tips & Best Practices
Multi-Project Management
Configure multiple MCP servers:
{
  "mcpServers": {
    "Mall API Documentation": {
      "command": "npx",
      "args": [
        "-y",
        "apidog-mcp-server@latest",
        "--project=123456"
      ],
      "env": {
        "APIDOG_ACCESS_TOKEN": "<access-token>"
      }
    },
    "CRM API Documentation": {
      "command": "npx",
      "args": [
        "-y",
        "apidog-mcp-server@latest",
        "--project=123456"
      ],
      "env": {
        "APIDOG_ACCESS_TOKEN": "<access-token>"
      }
    }
  }
}
Specify context:
"Use CRM API Documentation to generate order management code"
Security Practices
To prevent exposing the Access Token in team collaboration:
Remove the
"APIDOG_ACCESS_TOKEN": "<access-token>"line from configuration files.Set the
APIDOG_ACCESS_TOKENenvironment variable on each developer's system.
Tips for Improving AI Response Quality
Specify the required documentation section: e.g., "Please refer to the API documentation for the user module."
Define coding style and conventions: e.g., "Generate code following our team's TypeScript naming conventions."
Request comments: e.g., "When generating code, add detailed JSDoc comments for each method."
Break tasks into steps: For complex tasks, first ask the AI to outline a plan, then execute step by step.
Conclusion
The Apidog MCP Server + Cursor integration delivers an unprecedented API development experience by enabling:
Dramatically reduced spec-to-code time
Fewer human errors
Faster iteration cycles
Enhanced code quality
As Apidog MCP Server evolves, developers can expect more powerful API workflow optimizations. This AI-API synergy represents a significant productivity leap for both frontend and backend developers.

Top comments (0)