
Storing images in github repo
by Kenneth Jahnsen Collins
25.07.2023
Web images are fairly simple to find and link to in your project. Resources abound on the internet, but occassionally this does not suffice to meet your needs. Projects delivered on specific platforms, for example the iCodeThis.com IDE, do not allow for attaching folders with additional files. In this article we will outline a workaround for these situations, and go through setting up and populating a github repository with images to easily link to them in your projects.
Github Account and Repository
Don’t have a Github account yet? No problem. Let’s walk through the easy setup process.
Step 1: Setting up your account.
- Go to github.com
- Click “Sign Up” icon in the top right corner

- Enter the email address you would like to use and create a password

- After you have verified that you are not a robot, you will receive an email from github with a 8-digit “launch code”. You will also be asked some background questions such as which version of github you would like to register for. For this example only the free account is needed.
- You have created your account! Way to go. You should see the dashboard page that looks similar to this.

Step 2: Creating a new repository
Creating a repository gives a space to store files or folders on the net. In this case, we are focusing on images, so we will call our repository web-images.
- Here we are to enter the name that we wish to call the repository.
- In this case, the files are not sensitive, so the repository should be designated “Public”. This will also allow us to link directly to the images.
- Then simply click to set up repository.

Step 3: Cloning repository to your machine with Github Desktop

- Following the setup, you will be navigated to this page explaining the steps needed to clone the repository that we set up to your machine. By doing this, you will be able to update your repo by “pushing” to your files to the github server for later access.
- The simplest solution is to download and use github Desktop to clone your repository to your machine.

- After installing github desktop, open the application, click file, then “Clone repository”.
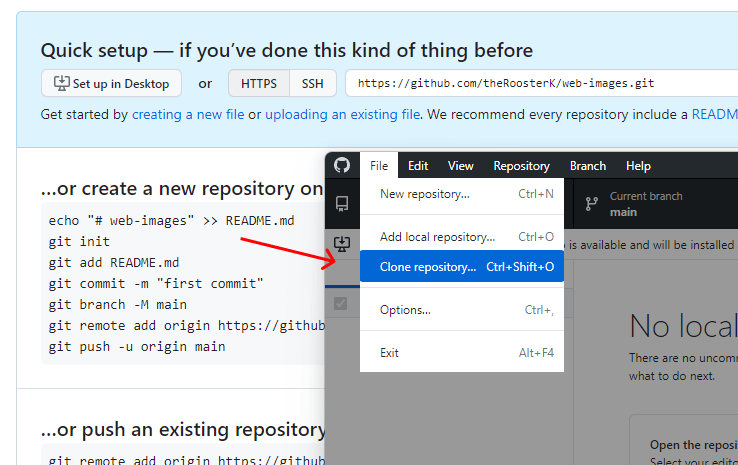
- To clone the repository, simply add the URL from the quick setup guide and select where on your machine you would like to have the cloned repository saved. In my case, I created a folder named “github-repos” on my desktop to have it easily accessible for this demonstration.

Step 4: Adding files to your repository
Now the fun part. Now we will place the files into your repository folder, commit them and push them to your repository.
After commiting and pushing the files. You can view the files in your github profile.

Now these images are linkable within your iCodeThis projects! Simply copy the image URL and add it to the image source and style it as you will.
Additional resources:
this is a copy of a blog post for icodethis https://spotless-cruiser-fdd.notion.site/Storing-images-in-github-repo-3be253eb762e475aa2f291d5a75afe31?pvs=4
For additional information please check out the github docs linked below
Creating a new repository - GitHub Docs
Acknowledgements:
Thanks to Florin Pop for the inspiration to write this post.
Thanks to github for resources and fantastic tools to use in development.
Infinite appreciation to the icodethis.com team and discord crew for creating an environment that instigates growth and perpetuates knowledge.
Cover image from Unsplash.com
uploaded by Behnam Norouzi

Top comments (0)