In my recent article, we built a Notes Writer Vue.js app that demonstrated how Mirage.js (an in-memory client-side server library) simulates REST API responses for your client-side app.
Now, we will take the Notes Writer app to another level by introducing the Cloud Firestore. Firestore is a serverless database service, offered by Google Firebase. We'll use the Cloud Firestore as a backend database for this app to persist and manage the notes.
As you go through the article, it will be clear that only the code for the Vuex Store is affected by introducing Cloud Firestore to the app. Some functions become void, and the entire code becomes simpler.
This article assumes a basic knowledge of using the Firebase Firestore library API. If you need some additional clarification, I’ve made sure to include some hyperlinks to help you locate what you want, and learn it quickly.
The source code of this article can be cloned from this GitHub repo: Notes Writer.
Google Firebase
The Cloud Firestore is a member of the Google Firebase family. Google Firebase is a Mobile and Web development platform offering cloud-based services to quicken the development process. Some of the products include:
Cloud Firestore
A serverless real-time NoSQL database engine.
Authentication
An authentication engine that is capable of authenticating your users via social networks like Google, Twitter, and Facebook, to mention a few. (https://firebase.google.com/docs/auth).
Cloud Functions
A platform and engine to build, deploy and run Cloud Functions with Google Firebase.
Hosting
A platform to host your application, whether the app is a static or dynamic app. This platform offers a rich toolbox to test your apps locally before deploying them live.
Cloud Storage
This service offers developers a bucket to store and serve user-generated content, such as photos, videos, or any other type of files.
ML Kit
A new member in the Google Firebase family. This service allows developers to introduce Machine Learning services to help solve real-life complex problems.
Documentation
The Google Firebase team has done a great job offering detailed, and quality documentation, covering all aspects of Firebase. Instead of repeating the same material here, I'll provide the relevant links that will bring you up to speed on Cloud Firestore and Firebase in general.
How to add and setup Firebase in your app
Cloud Firestore docs
Firebase API reference
Firebase Libraries
Firebase App samples
Moving on, we will be using the Cloud Firestore as both a database engine, and a real-time database to listen to new Notes that are being added to the app.
Demo
Let’s start by creating a new Git branch by running this command:
git checkout -b firebase-firestore-integration
The command creates and checks out a new Git branch.
Install Firebase
There are several approaches to incorporating Firebase in your app. I will install the Firebase NPM package. Let’s go ahead and install this package by running the command:
npm install --save firebase
This installs all that's required to start developing with Firebase.
Create a new Firebase project
Before you start using any Firebase service, you must create a new Firebase project. Visit the Firebase Website by pasting the following URL in your browser: Firebase Website.
If you are not signed in, you will be redirected to the Sign in/up page. Right after signing in, you are transferred to the Firebase home page.
Click the Go to console hyperlink to get started.
Click the Add project tile to start creating your first Firebase project.

Fill in a name for the new project and accept the Firebase terms and conditions. Once done, click Continue.

In the next step, I choose to disable the Google Analytics. You are free to enable it.
On the Google Analytics page, locate the Create project button to establish the project. The process usually takes a few seconds to finish setting up everything.
A new screen shows up with information about the creation process. Once the new project is ready, click the Continue button to go the project page.

Expand the Develop menu. You will be spending most of your time using the features under this menu, and specifically, the Database menu options in this article.
Create a new Firebase Web app
Now that the Firebase project is created, it’s time to create your first Firebase Web app. A Firebase project consists of multiple apps. For instance, an iOS Mobile backend app, Android Mobile backend app, Web backend app, and other types of apps.
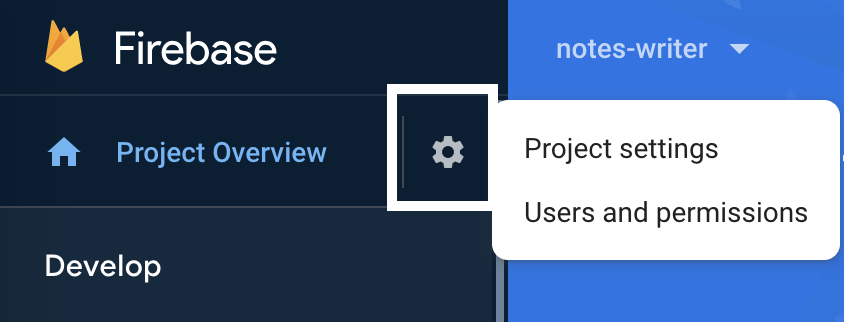
For this project, we will be creating a Web backend app. Locate and click the gear icon near the Project Overview menu item. Then, click the Project Setting hyperlink to go to the project settings.
On the Project Settings page, you can check the project settings, Web API key, Project ID, and other project-related information.
Under the General tab, scroll down to reach the Your apps section. Click the Web App icon as shown below.

A new screen pops up to collect some information about your new app before it gets registered under Firebase.
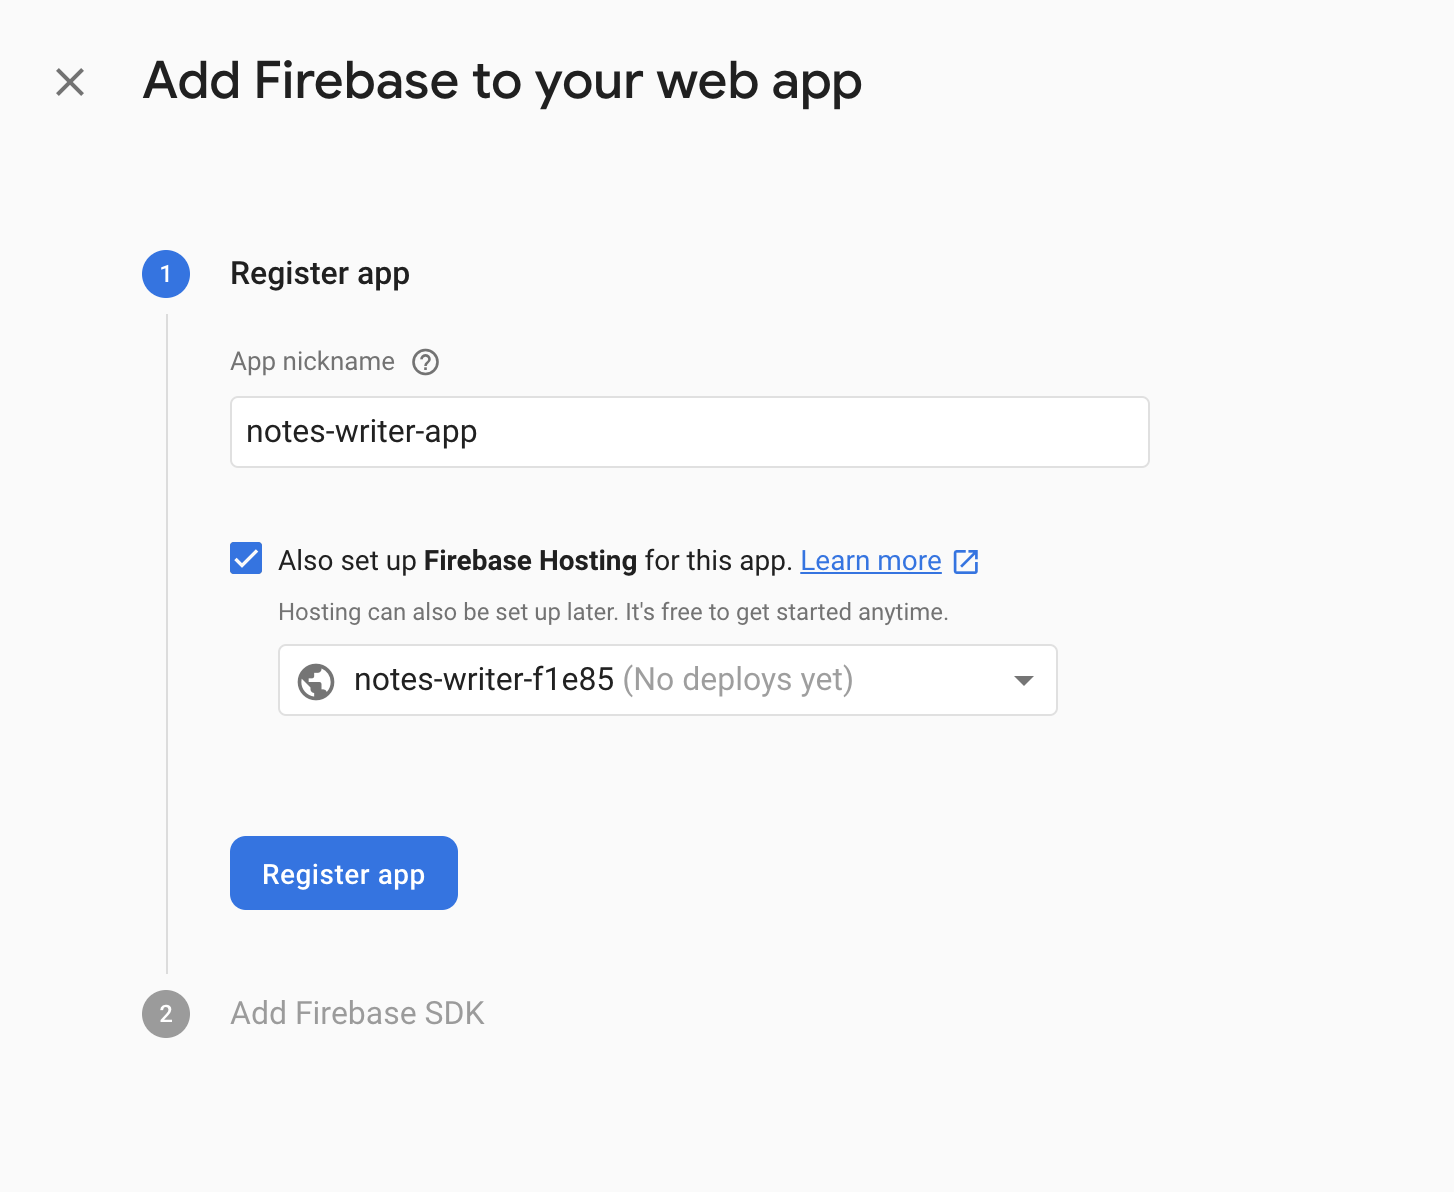
Provide a name for the new app. Also, select the option to set up Firebase Hosting for this app. We might be using this option later, but it’s better to select it now.
Locate and click the Register app button to get started registering the new app.
You may skip the scripts section, and click the Next button right away.
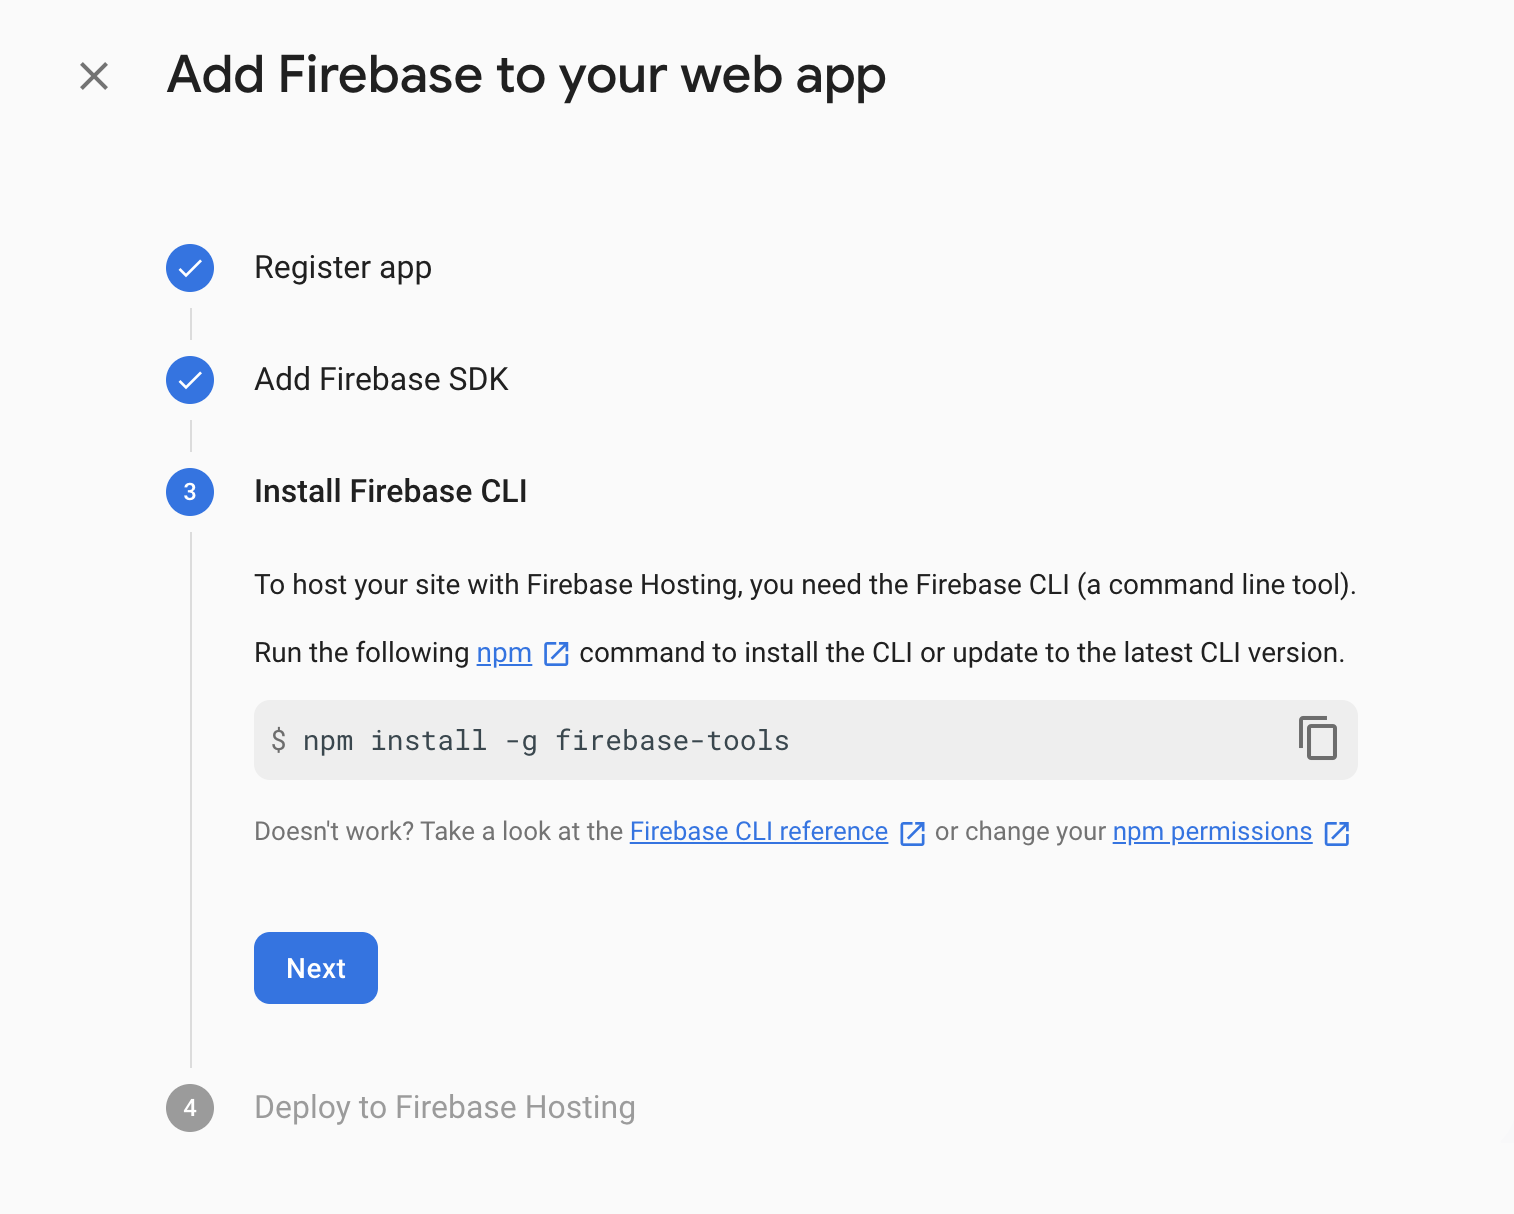
You are then asked to install the Firebase CLI that we might use later on to host the Notes Writer app on Firebase.
Copy the command and run it locally on your computer to install it globally.
Locate the Next button on the screen to move forward. You are given detailed information on how to deploy your app to Firebase. We will skip these steps for now, and come back to it later.

Click the Continue to console button to start managing your new app.
You are redirected back to the Project Settings page. Scroll down until you find your new Web app section. Locate the section Firebase SDK snippet, and make sure the config option is selected:
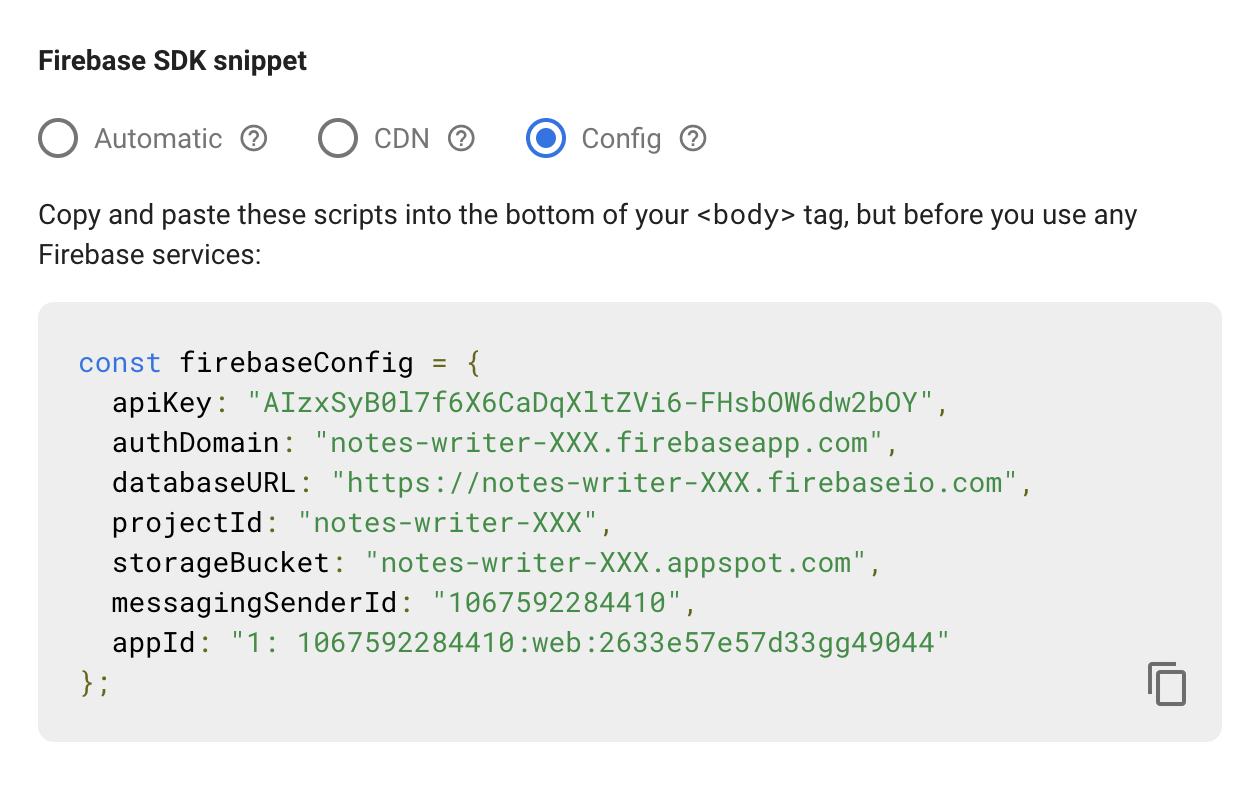
The firebaseConfig object has all the settings needed to allow your client-side app to connect to Firebase.
Copy this object, go back to the code editor, and create a new file named firebaseConfig.js at the root folder of your app. Then, paste this object inside the file. We will revisit this file shortly.
Create the database
Now that the app is ready, we are free to create an instance of the Cloud Firestore database.
Locate and click the Database menu item under the Develop menu.

Click the Create database button to create a new database.

On the Create database Modal window, make sure you select the Start in test mode option. This removes any restrictions on reading, adding, deleting, and editing data inside the database. Once you are ready for production, you may revisit the database settings, enable the production mode, and define rules for user access permissions.
Click the Next button to select a geographical location for this new database.

Make sure to select the nearest location to you. Finally, click the Done button. Firebase takes a few seconds to provision the new database. Then, you are redirected to the new Database page to start managing the data.
Historically, Firebase supported a realtime database engine. The Cloud Firestore is a successor to that engine, and is the recommended option for almost all scenarios. You can read more about the Firebase Realtime Database.

Just as a Relational Database engine structures and defines data in terms of Tables, Rows, and Columns, the Cloud Firestore is a NoSQL database engine structures that defines data in terms of Collections, Documents, and the relationships between Documents and Collections.
Let’s create the Notes collection by clicking the Start collection hyperlink.

Give your new collection the name of notes. Then click the Next button.
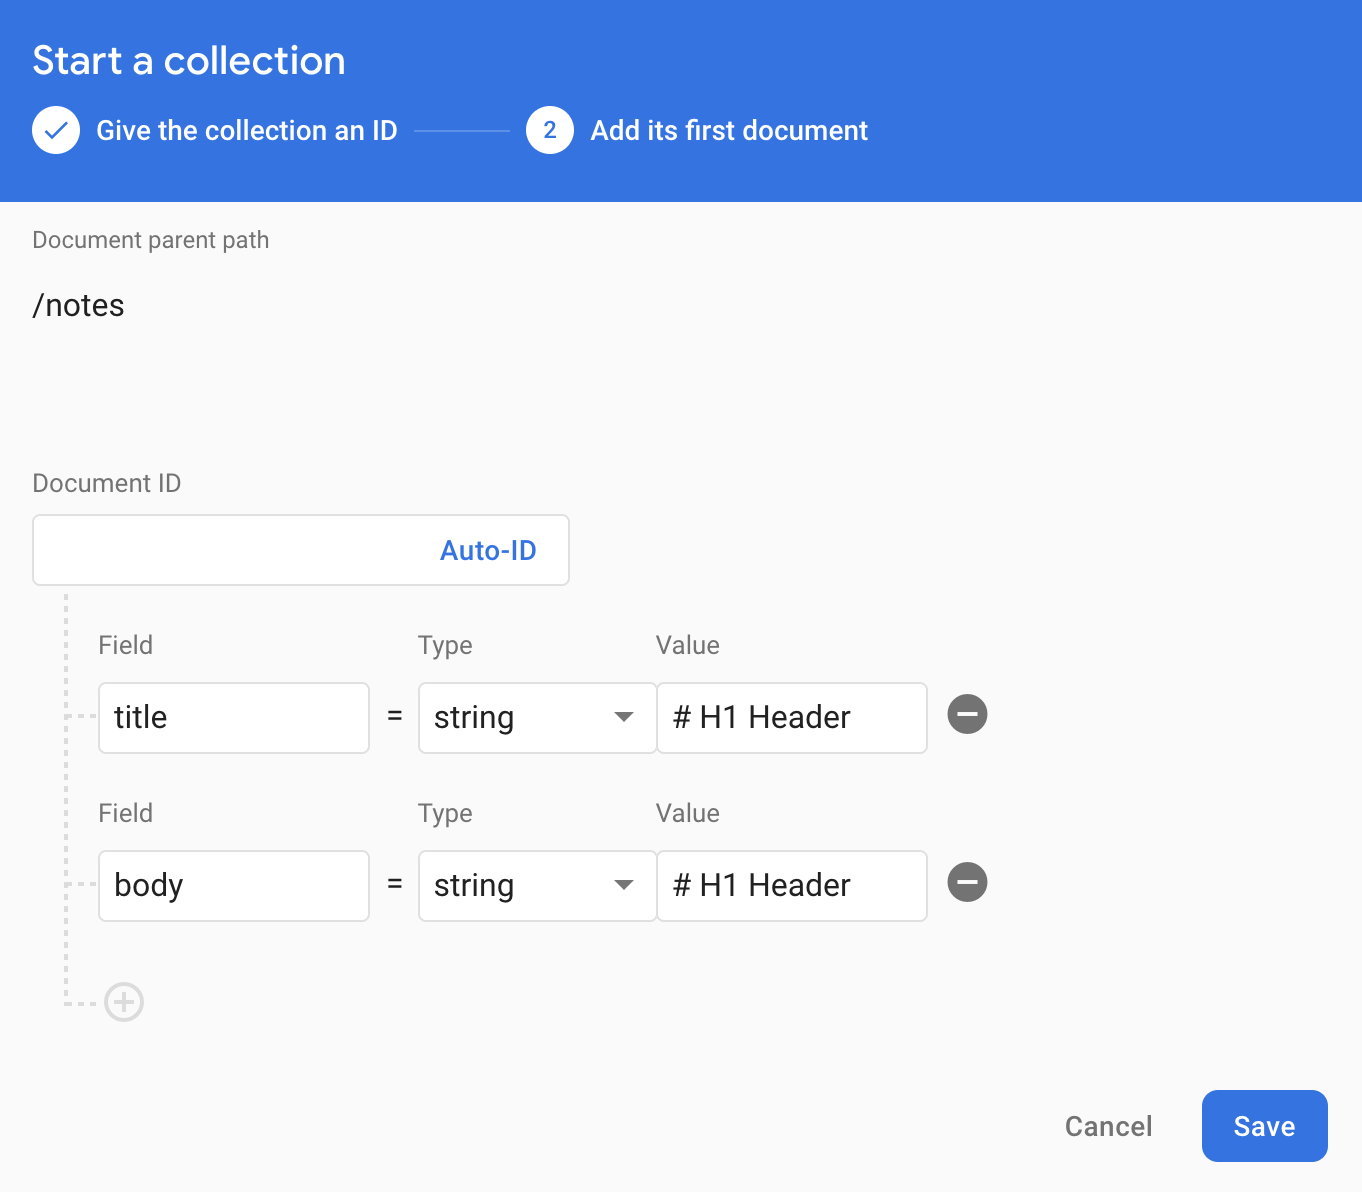
Create your first Document by adding the fields that you want to appear on a single Note record. Notice that the Document ID can be auto generated by Firestore, or you can give it a unique value yourself. I choose to keep it managed by Firestore.
Starting by adding the body and title fields. Give them both the string data type, and fill in a value.
You may add more fields. In this case, I will add the createdOn and updatedOn fields of type timestamp.

Once done filling the data, click the Save button.

You can now see our new notes collection together with the first document added, and the details of that document.
You may add more Notes documents by clicking the Add document hyperlink. You will follow the same process to add new Documents.
Now that the database is up and running, let's go back to the Notes Writer app, and start refactoring the code to make use of the Firestore database to load and manage Note in the app.
Connect app to Firebase
It’s time now to start interacting with the Firebase Firestore from within our Notes Writer app.
Revisit the firebaseConfig.js file at the root of the application folder, and paste the following:
import firebase from 'firebase/app'
import 'firebase/firestore'

// firebase init
const firebaseConfig = {
    ....
...
};

firebase.initializeApp(firebaseConfig)

// firebase utils
const db = firebase.firestore()

// firebase collectionsa
const notesCollection = db.collection('notes')

export {
    firebase,
    db,
    notesCollection
}
Make sure to copy your own firebaseConfig object from the Firebase app settings.
Start by importing the firebase object, and also the firebase/firestore library.
Given that you have copied and pasted a valid firebaseConfig object, initialize the communication with Firebase by calling the firebase.initializeApp() function, passing the firebaseConfig object as a parameter.
Store an instance of the Firestore client API inside a variable named db.
Also, retrieve a reference to the notes collection, and store it inside the variable named notesCollection.
Finally, export a few objects to be imported and used in other places in the app.
Open the /store/index.js file. Import the firebaseConfig file at the top of the store as follows:
const fb = require('./../firebaseConfig.js')
We are going to use the realtime database feature to get notified when new Notes documents are created so that we load them inside the store. Add the following section outside the store object:
fb.notesCollection.orderBy('createdOn', 'desc').onSnapshot(querySnapshot => {
  let notesArray = []

  querySnapshot.forEach(doc => {
    let note = doc.data()
    note.id = doc.id
    notesArray.push(note)
  })

  store.commit('loadNotes', notesArray)
})
The key here is to use the onSnapshot() function that is accessible on the notesCollection object.
Whenever a new document is added, updated or deleted, the onSnapshot() callback is called with all the information encapsulated inside the querySnapshot variable.
The code loops over all the Notes documents returned, populates an array of all notes, and then commits the array to the store by calling the mutation loadNotes.
Any time me or someone else creates, updates, or deletes a Note document, the onSnapshot() callback is executed, and therefore, our store is always up to date.
The loadNotes mutation is defined as follows:
   loadNotes (state, notes) {
      state.notesList = notes
    },
I’ve amended the states object to include the following:
 state: {
    notesList: [],
    note: {},
    performingDelete: false,
    performingAdd: false,
    performingUpdate: false
  },
The store now tracks a boolean flag to know whether there is an active request to either delete a Note, add a Note, or update a Note. These flags can be used to show/hide UI in the app, and give a visual feedback to the user of the app.
The deleteNote action is defined as follows:
async deleteNote ({ commit, state }) {
      let id = (state.note && state.note.id)

      if (id) {
        try {
          commit('setPerformingDelete', true)
          await fb.notesCollection.doc(id).delete()
          commit('setPerformingDelete', !state.performingDelete)
        } catch (error) {
          console.error(error)
        }
      }

      commit('setNote', {})
    },
The action starts by retrieving the note’s details to delete. If there is a valid Note Id, it continues.
It starts by setting the setPerformingDelete state flag to true.
It issues a call on the Firebase client API to delete a document specifying the Note document ID.
It then toggles the value of the setPerformingDelete’ state flag back tofalse`, signaling the end of deleting a Note document request.
Finally, the action resets the current active Note to clear the display.
The entire code is wrapped inside atry/catch block.
Notice though we are not manually removing the Note document from the Store state. Instead, we just issue a request to delete the Note document. The new list of Notes Documents will be retrieved via the onSnapshot() realtime database feature. Less code for you to write now!
Let’s implement the saveNote action:
`javascript
async saveNote ({ commit, state }) {
const { id, body, title } = state.note
  if (id) { // update
    commit('setPerformingUpdate', true)
    await fb.notesCollection.doc(id).update({
      body,
      title,
      updatedOn: fb.firebase.firestore.Timestamp.now()
    })
    commit('setPerformingUpdate', !state.performingUpdate)
  } else { // add
    commit('setPerformingAdd', true)
    await fb.notesCollection.add({
      body,
      title,
      createdOn: fb.firebase.firestore.Timestamp.now(),
      updatedOn: fb.firebase.firestore.Timestamp.now()
    })
    commit('setPerformingAdd', !state.performingAdd)
  }

  commit('setNote', {})
}
`
The code distinguishes between updating an existing Note document or adding a new one. In both cases, we set the flag to whether the app is updating a record inside Firebase Firestore or adding a new one.
In case we are updating an existing Note document, the code calls the update() function on the Note document reference. The updatedOn field is set to a value of fb.firebase.firestore.Timestamp.now().
From the Firebase documentation:
A Timestamp represents a point in time independent of any time zone or calendar, represented as seconds, and fractions of seconds at nanosecond resolution in UTC Epoch time.
You can read more information on firebase.firestore.Timestamp
In case we are adding a new Note document, the code calls the add() function on the noteColletion object passing as input a Note object including values for createdOn and updatedOn.
Finally, the action resets the current active Note to clear the display.
You can review the entire store file on Github:
https://github.com/bhaidar/notes-writer/blob/firebase-firestore-integration/src/store/index.js
One minor change I introduced to the store is removing the getters, and directly accessing state data. If a getter is not doing any logic, there is no need to keep this getter. Simply access the state data directly. Thank you, Simone, for bringing this to my attention!
Conclusion
This article demonstrates how to integrate Firebase Firestore into your front-end app by giving a step-by-step guide of what's required to create a Firebase app, add a Firestore database, and connect the app to Firebase.
Very soon, I will be using the Firebase Authentication to allow users to login to the Notes Writer app, and manage their own set of Notes, independent of other users using the same app.
Stay tuned!

Top comments (0)