Serverless is a cloud architecture that provides enormous benefits for operations engineers and Serverless Framework makes it easy to get started. It’s useful for operations and devops engineers who have been writing scripts to automate parts of their environment regularly and for those just beginning to write their automation. For those who have been writing automation regularly, periodic tasks that ran on a random AWS EC2 instance can now be turned into a standalone system with automation logic and accompanying infrastructure code that is tracked via AWS CloudFormation. For those new to writing automation, serverless architecture can lower the barrier to entry for infrastructure automation.
To demonstrate this, let’s build a simple service for our AWS environment. You may have a desire to track AWS console logins for reasons like compliance, auditing needs, or a desire to just have better visibility into your environment. We’ll build a Python 3 service that records console login CloudTrail events to an S3 bucket. We’ll extend this service with more features in future blog posts.
The project for this blog post, aws-console-auditor, is located on GitHub. Additionally, because aws-console-auditor will evolve, a fork of the repo specifically for this blog post is also available.
Getting started
To get started, install the Serverless Framework. It’s written in JavaScript and you’ll need to have NodeJS and NPM installed in order to do so.
npm install -g serverless
With Serverless Framework installed, we’ll go ahead and create a project. The serverless script can create projects of different types using templates. We’ll create a project using the AWS Python 3 template and also install a plugin for handling python dependencies.
serverless create -t aws-python3 -n serverless-aws-python3-intro -p serverless-aws-python3-intro
cd serverless-aws-python3-intro
serverless plugin install -n serverless-python-requirements
What will be created is a serverless.yml template file, a basic handler script (which we’ll discard), and a .gitignore.
Diagram the service
Rather than jumping right into building our service, let’s take a moment to draw a system diagram. This may seem unconventional to some, especially for simple services, but this forces us to be sure of what we’re about to build before we ever start any time consuming coding.
There are several options you can use:
I personally use Draw.io because it gives me access to the entire AWS icon set. This let’s me diagram a system with icons that are generally recognizable to people familiar with the AWS ecosystem.
This is the system about to be built. Contained in the rectangle on the right is the service to be built. On the left is the workflow that will trigger the service.
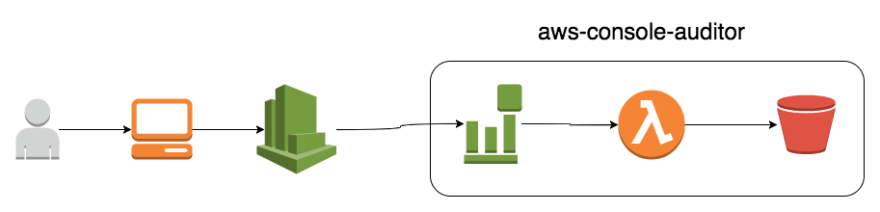
The flow of the system is as follows, a user logs into the console which generates a CloudTrail event and that event will trigger a Lambda that writes the event data to an S3 bucket.
Creating serverless.yml
Now that we know what system we’re about to build, we can start building it. Serverless Framework provides the ability to represent the system as code (well, YAML), deploy, and manage the system. The serverless.yml will need to define three things:
- AWS Lambda function (and define the event to trigger it)
- S3 bucket
- IAM policy (not pictured above) to allow the Lambda to write to the bucket.
Let’s go through the different sections of the serverless.yml now.
Initial Configuration
We’ll start with some initial configuration in the serverless.yml file. We’ll replace the existing serverless.yml created by the template with the following below. There’s nothing wrong with the template serverless.yml but this is just a little clearer to follow and explain.
service: serverless-aws-python3-intro

plugins:
  - serverless-python-requirements

provider:
  name: aws
  region: us-east-1
  stage: dev

  environment:
    LOG_LEVEL: INFO

  iamRoleStatements:

resources:

functions:
First we start by providing the name of the service. In this case, it’s called serverless-aws-python3-intro. We’ll see the service name used in many of the resources created for this service.
The plugins section lists a single plugin, serverless-python-requirements. This plugin will handle building and installing python dependencies specified in a standard requirements.txt file. We don’t actually need this currently, but it’s useful to be introduced to the plugin now. We’ll probably use it later on as we evolve this service down the road. Also, if you go off after this to write a service of your own, knowing about this plugin is useful.
The provider section defines the serverless platform provider and its configuration along with other configuration for the service’s component resources. The section will create an AWS serverless system in us-east-1 using your locally configured default AWS credentials.
The stage attribute is how Serverless Framework namespaces deployments of the same service within the same environment. That can be used if development and production share a single AWS account or if you want multiple developers to be able to deploy their own system simultaneously.
The region, stage, and AWS profile name can be overridden on the command line using the --region, --stage, and_ --aws-profile_ arguments respectively. You can make region, stage, and profile more flexible using environmental variables but we’ll cover that in another blog post.
The LOG_LEVEL environment variable is a personal preference. This makes it easy to increase the logging level on functions for debugging purposes and decrease it when done. Below is how it’s used in our handler code.
We'll leave iamRoleStatements empty for now. We'll return to it after we've created our AWS resources and need to allow the Lambda function to write to the S3 bucket.
handlers/write-event-to-s3.py:
log_level = os.environ.get('LOG_LEVEL', 'INFO')
logging.root.setLevel(logging.getLevelName(log_level))
_logger = logging.getLogger( __name__ )
S3 Bucket
Instead of moving directly onto the functions section, we’ll move down to the resources section. This section is for adding AWS resources. If you’re familiar with CloudFormation then good news, it uses the same syntax as CloudFormation YAML.
Adding our service's S3 bucket is trivial: just add a resource and set the Type attribute. Here’s what the configuration looks like for this service’s S3 bucket.
resources:
  Resources:
    LoginEventS3Bucket:
      Type: AWS::S3::Bucket
      Properties:
        AccessControl: Private
By default, the AccessControl policy will be Private. That should probably be set in order to be explicit, so we’ve added that property. Serverless Framework will name the bucket based on the service and resource name. S3 buckets are globally unique across AWS accounts, and Serverless Frameworks will append a random string to help assure that you won’t collide with a bucket in a different account that has deployed the same service.
How will your Lambda function know to write to this S3 bucket if the name is generated with a random string? We’ll show that later.
IAM Role Statements
All functions have an IAM role, and in this example, the role will include a policy that allows our function to write to the S3 bucket. IAM roles can be defined two different ways: in the provider section under iamRoleStatements or in the resources as an AWS::IAM::Role section.
Defining IAM roles in the provider section is the commonly accepted way to define IAM roles and assign permissions with Serverless Framework. However, a single IAM role will be created for and used by all Lambda functions in the service. In this example, that is not an issue. However in larger services that have chosen a monorepo approach to code organization, you may want to exercise tighter control and create a role per function. The decision is up to you.
Our iamRoleStatements in the provider section is as follow:
iamRoleStatements:
    - Effect: Allow
      Action:
        - s3:PutObject
      Resource:
        - Fn::Join:
          - '/'
          - - Fn::GetAtt:
            - LoginEventS3Bucket
            - Arn
          - '*'
The single IAM role statement gives the ability to write to the S3 bucket. Rather than giving the name of the S3 bucket, which will be auto generated on deployment, we use the CloudFormation built-in function to Fn::GetAtt to get the ARN of the bucket by resource ID.
Functions
With supporting resources in place, we start adding to the functions section to serverless.yml. Below defines.
functions:
  WriteEventToS3:
    handler: handlers/write-event-to-s3.handler
    description: "Write login event to S3"
    runtime: python3.6
    memorySize: 128
    timeout: 15
    role: WriteEventToS3
    events:
      # http://docs.aws.amazon.com/AmazonCloudWatch/latest/events/EventTypes.html#console_event_type
      - cloudwatchEvent:
        event:
        source:
          - "aws.signin"
    environment:
      S3_BUCKET_NAME:
        Ref: LoginEventS3Bucket
The value for handler represents the handler() function in the file handler/write-event-to-s3.py in this repo. The runtime is python3.6 and has 128M of memory allocated with a 15 second execution timeout. The role value is the IAM role resource name (not the IAM role name to be created) in the resources section.
In the environment section, we set a shell variable called S3_BUCKET_NAME with a value of the S3 bucket’s name. Since the name is autogenerated, the CloudFormation built-in function Ref is used to get the bucket’s name. This environment value will be checked by the handler’s code to know what S3 bucket to use.
Lastly, there’s the event. This is where you define what will trigger the function. In this case, a single event type, a CloudWatch event from the event source aws.login, will trigger this function.
Putting it all together
With serverless.yml all put together, the system may not be functional, there’s no handler code, but it is deployable.
sls deploy -v
Handler
Now let’s dive into the handler. When a console login event is generated by CloudWatch, it will call the handler() function in the file handlers/write-event-to-s3.py.
Before we do the handler() function code, let’s add some code that will be executed on first invocation of the function. When a Lambda function is executed, the AWS infrastructure keeps the function instance warm for subsequent requests. For python objects and variables that don’t need to be initialized on each invocation, eg. logging and boto3 objects or setting variables from the shell environment, these can be initialized outside of handler() to speed up subsequent invocations of the function.
The handler should have some logging. It’ll get the LOG_LEVEL environment variable value, set in the provider section of serverelss.yml, and create a logging object of that level.
handlers/write-event-to-s3.py:
log_level = os.environ.get('LOG_LEVEL', 'INFO')logging.root.setLevel(logging.getLevelName(log_level))_logger = logging.getLogger( __name__ )
Next initialize the code’s boto3 S3 client object and get the name of the S3 bucket to use from the shell environment.
handlers/write-event-to-s3.py:
s3_client = boto3.client('s3')s3_bucket = os.environ.get('S3_BUCKET_NAME')
The handler function is executed on every function invocation. It’s passed two variables by AWS, the event that triggered the Lambda and the context of the invocation. The context variable stores some useful information, but isn’t needed in this example so we’ll just ignore it.
The handler function is pretty straight forward. If LOG_LEVEL were set to ‘DEBUG’, then the function would log the event received. It then gets the CloudWatch event detail, calls a function that returns an S3 object key path from the event detail. Next, it writes the event detail to the S3 bucket. A log message at our standard logging level, INFO, will log information about the event that will automatically be picked up by CloudWatch. Finally, the function returns
def handler(event, context):
    '''Lambda entry point.'''
    _logger.debug('Event received: {}'.format(json.dumps(event)))

    # We're going to ignorethe CloudWatch event data and work with just the
    # CloudTrail data.
    event_detail = event.get('detail')

    # Get our S3 object name from the CloudTrail data
    s3_object_key = _get_s3_object_key_by_event_detail(event_detail)

    # Write the event to S3.
    s3_resp = s3_client.put_object(
        ACL='private',
        Body=json.dumps(event_detail).encode(),
        Bucket=s3_bucket,
        Key=s3_object_key
    )

    _logger.info(
        'Console login event {event_id} at {event_time} logged to: {s3_bucket}/{s3_object_key}'.format(
            event_id=event_detail.get('eventID'),
            event_time=event_detail.get('eventTime'),
            s3_bucket=s3_bucket,
            s3_object_key=s3_object_key
        )
    )

    return s3_resp
Once the code is in place, then the service can be deployed again.
sls deploy -v
Now, every time someone logs into the AWS Console, the login information will be recorded. You can check the cloudWatch logs for brief information and then S3 for the login details.
Conclusion
We’re now collecting AWS console login events from our environment, and storing them in S3 to give us an audit trail of who is accessing the console. But you probably want more. You may want to send a Slack notification to a channel so people are aware. You may want to send a PagerDuty notification if the login does not match certain criteria. How about searching through the event data to find trends in your logins? We can extend this service to add new features and we’ll do that in future blog posts.
If you want to see the code used in this blog, check it out on github here:
Or take a look at AWS Console Auditor here:
This originally appeared on the ServerlessOps blog. Visit to read more of our work!


Top comments (4)
Tom, nice article. Pretty detailed and well explained. Looking forward to future posts.
I have more on their way. I did my writing calendar yesterday and I have one next week coming.
Great article, thanks for writing and clearly explaining each part
Awesome! I have another one I'm preparing for next week and I'm glad to know my style is clear and understandable.