
This is a technical writeup of how I built npmbomb, which technologies I chose and why. The problems encountered along the way and how I solved them.
npmbomb is a purely client side app where you can guess the number of dependencies for popular NPM packages 😈
I took the packages from the first 3 pages here and calculated the dependency tree for each of them.
How
For the past few months, after work, I've been working on and off on a NodeJS package analyzer. I wanted to know what is the oldest dependency in my dependency tree, what are the licenses, are there new versions for my dependencies etc. You just point it to a package.json or hand it a package name and it will resolve the dependencies and calculate all sorts of data. Once the analyzer is more polished I'll write more in-depth about it. At one point parts of it used C# as the NodeJS stream API was unstable but that's for another time.
Ever since the addition of React Hooks, I always wanted to create a little web app that exclusively uses them just to see how it feels and Emotion CSS for the styling. I just needed a worthwhile idea, ...this was it.
Tech Stack
In a nutshell it's a purely client side app, leveraging React, React Router, Emotion.
Normally I opt for MobX and CSS Modules. While I like MobX, I wanted to see if React Context in conjunction with React Hooks would be a suitable replacement in this case.
As for CSS Modules I never really quite liked them because I can't easily access CSS properties in my code and vice versa like animation delays etc. Also it's just too much magic, while it works, "importing" CSS files in JavaScript just feels wrong, it's a clever hack. Also using them with TypeScript requires some extra effort. By using Emotion I hoped to improve on all of these pain points.
In its infancy I used NextJS because I wanted to try it out as they added TypeScript support but dropped it because adding Emotion was giving me some trouble and overall I could just move faster by rolling my own setup instead. While people hate configuring webpack I don't find it that bad as everything I need can be found in their documentation. For NextJS I had to look at stackoverflow etc. Never-mind I will revisit NextJS in the future, it just wasn't a great fit at the time.
TypeScript
All the code is written in TypeScript with the strict option, for me the most invaluable tool for writing maintainable JavaScript. You could replace any part of the tech stack and I'm cool with it except TypeScript.
I still remember one time at work where I had to replace instances of TextNode with HTMLNode. It took me several commits to catch and fix everything. Later I converted the whole code base to TypeScript(just after they announced support for JS files) and even though the compiler complained A LOT and thus I had to touch much more code than when I did the TextNode to HTMLNode conversion, the dev experience was just so much better.
When the compiler said 0 errors, he really meant it. Ever since then TypeScript became invaluable, if TypeScript complains you listen.
React
As I said I wanted to build the app solely with Function Components and Hooks/Context.
Overall I found it quite pleasing, however defining Contexts is a little awkward in conjunction with TypeScript. I didn't want to make the actual Context members optional so I had to initialise them with temporary values...
interface IAppContext {
    appState: IAppState;
    setAppState: (state: IAppState) => void;
}

export const AppContext = React.createContext<IAppContext>({
    appState: {
        inGameMode: false,
        guesses: [],
        remaining: [],
        packages: []
    },
    setAppState: () => {}
});
Here all the values are just placeholders to satisfy the TypeScript compiler, setAppState will essentially do nothing, if I later down the road forget to provide the actual data, it will use my placeholder data with no real warning.
export const App: React.FC = () => {
    const [appState, setAppState] = useState<IAppState>({
        inGameMode: false,
        guesses: [],
        remaining: [],
        packages: []
    });

    const context: IAppContext = {
        appState,
        setAppState
    };

    return (
        <AppContext.Provider value={context}>
        //have to make sure I use AppContext.Provider to provide
        //the actual data for child components
        </AppContext.Provider>
    );
};
I could have simply defined AppContext like this:
export const AppContext = React.createContext<IAppContext | undefined>(undefined);
Which would allow me to initialise AppContext with undefined and be done with it, but then every-time I would like to consume it I would have to do a check for undefined which leads to very repetitive code.
    const appContext = useContext(AppContext);

    if(appContext) {
        //do something with appContext.appState
    }
By not having it undefined I can consume it much more elegantly, but I have to initialise it with temp data first like shown above.
const { setAppState } = useContext(AppContext);
Other than that I like the flexibility that Contexts provide, no more passing on props to child components, definitely an improvement.
For this use case it could replace external state management completely.
React Router
Just like React I used Hooks for React Router. In conjunction with TypeScript this also simplified typing. Previously you had to setup much more boilerplate code to access router related props in your components like:
interface IProps extends RouteComponentProps<{}> {
  package: string
}
With hooks it just boils down to using the appropriate useHistory or useParams hooks:
import { useParams, useHistory } from "react-router-dom";

    //in your function component...
    const history = useHistory();
    const { pkgName } = useParams<{ pkgName: string; }>();
Emotion
In short it basically solved all the pain points that I had with CSS Modules and it will be my preferred CSS solution going forward.
I like that with the spread operator it makes for very concise code.
The only downside was that since I was using it directly with TypeScript
and not with Babel, I had to place a pragma comment at the top of each file where I wanted to use Emotion:
/** @jsx jsx */
import { jsx, css } from "@emotion/core";
This also meant that I couldn't use the shorthand notation <></> anywhere in the code and had to fall back to <React.Fragment></React.Fragment>. While a bummer it wasn't that much of a bummer that I would introduce Babel into the mix.
Another surprise was that it auto prefixed the CSS out of the box, without me doing anything:
const titleStyle = css({
    "@media (min-width: 320px)": {
        flex: 1
    }
});
turned into
@media (min-width: 320px)
.css-bof962-Header {
    -webkit-flex: 1;
    -ms-flex: 1;
    flex: 1;
}
Quite nice!
Sentry
Sentry monitors your application for runtime errors. If there's an error, Sentry collects it and sends it to their servers where you can inspect them and take further actions:
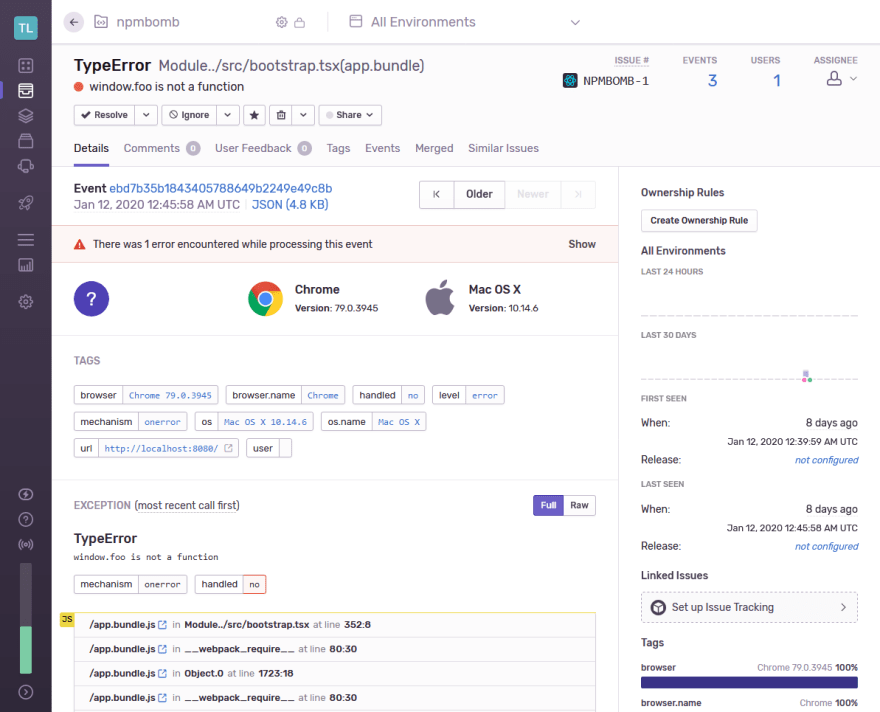
Here some error happened in my app, and I get to see details about the browser environment and also a stacktrace etc.
I also use it to propose me new packages. As said I only analyzed the most popular NPM packages and I'm using Sentrys functionality to gather feedback too, not just runtime errors.
I've used datadog in the past, which offers similar functionality but the onboarding was much smoother with Sentry, going forward this will be my preferred choice for collecting runtime errors.
Testing
No application is complete without testing, here are the tools that I used:
Unit Tests
For unit tests I used React Testing Library. Not much needs to be said, I like the API that they are offering to test various parts of your app.
E2E Tests
For E2E tests I used cypress.
Visual Regression Testing
For a per pixel check of the app I use Percy. It's a cloud service that compares screenshots on a per pixel basis. I instrument cypress to take screenshots at certain points in the app and with different breakpoints and Percy then shows me the differences, if there are any.
    //take a screenshot of the homepage with
    //3 different breakpoints
    cy.visit("http://localhost:8080");
    cy.percySnapshot("home page", { widths: [320, 768, 1200] });
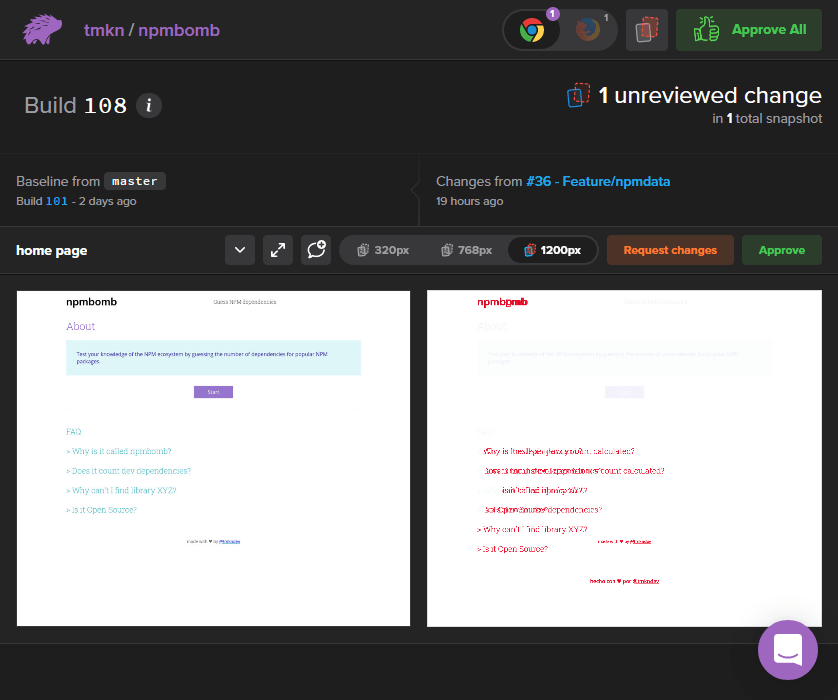
I can then approve it or go back into the code and fix it.
What is also nice is that it's integrated into GitHub, it checks every pull request for changes automatically

Code Coverage
Code Coverage is visualized via Codecov, I like their UI better than coveralls, it's less cluttered.
It's also integrated into GitHub and run on every pull request:

Continuous Integration
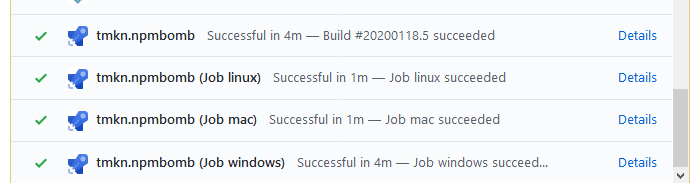
To make sure the tests are working and to upload the code coverage and percy results I'm using Azure Pipelines.
I specified to run the tests on Linux, Mac and Windows even though there is no explicit platform specific code since it's a web app I do it because I use all of these 3 operating systems to develop.
It's also integrated into GitHub, every push to master/pull request triggers the pipelines:
Setting it up was fairly straight forward, the biggest problem I had was to tell it to only upload the code coverage report on the Linux run. It took me several tries to get it correct.
Deployment
The whole app is hosted on Netlify. It's the first time using the platform and it was very easy to integrate. Each push to master deploys it automatically.
You just have to specify the build command and which folder contains the compiled output, it couldn't be easier!
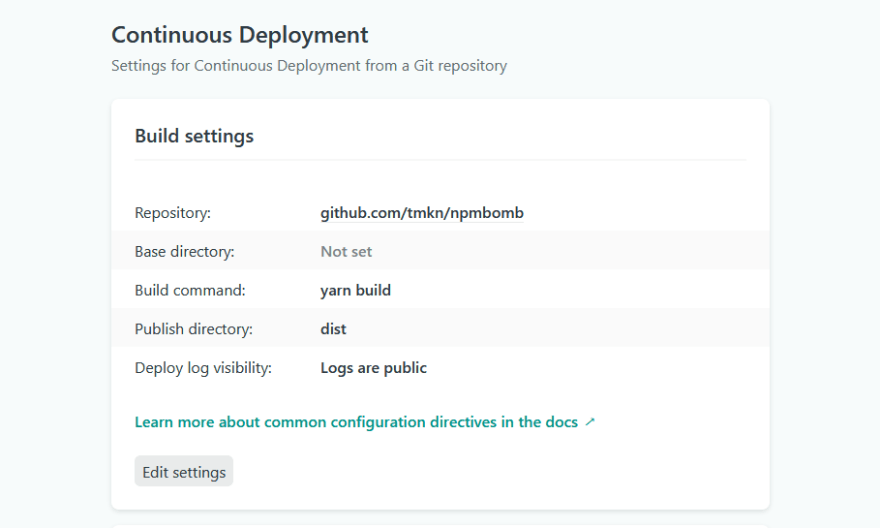
I only had to add a netlify.toml to specify redirect rules so urls like https://npmbomb.tmkn.dev/package/jest@24.8.0 resolve correctly since I'm using client side routing.
[[redirects]]
  from = "/*"
  to = "/index.html"
  status = 200
  headers = {X-From = "Netlify"}
I also enabled Netlify to run on pull requests:

I just need to click the link and get a live version of the pull request, super nice!
That's basically it about the tech stack and how I wrote npmbomb.
All the tools that I introduced can be used for free, I run all of them on the free tier and they are more than enough for my use case and make my life as a developer much easier.
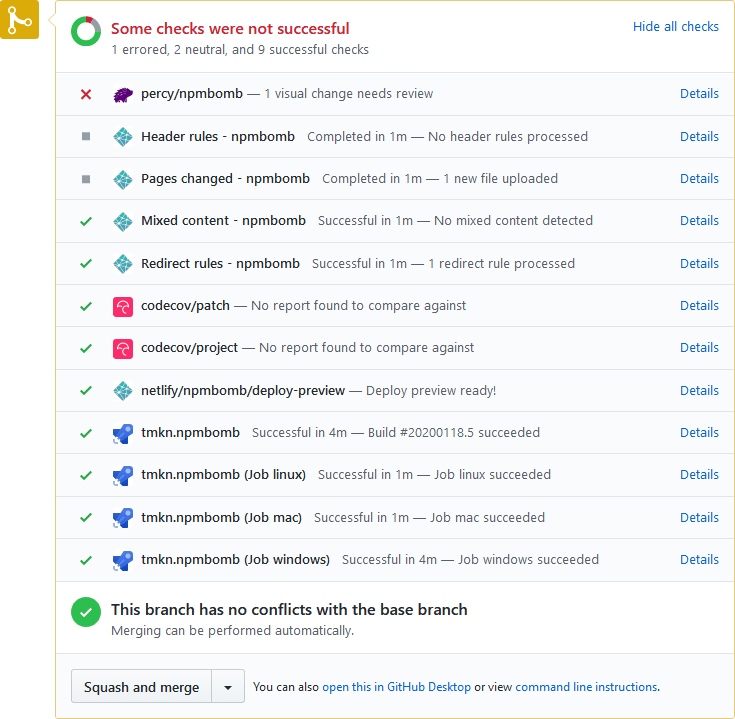
Here I instantly see that the visual design changed thanks to Percy, but everything else like tests ran through and Netlify was able to successfully deploy the pr. So once I fix the issue reported by Percy I can confidently merge this back into master (never-mind the fact that codecov couldn't find a report here).
Whats next
Greater test coverage, just kidding, we all know it won't happen. 😐 I actually did it: ![]()
By using the app (at least for me) I found it quite addictive, currently you can guess only 4 packages before it starts over again. I think an endless mode would be cool.
I also would like to show the dependency tree visually, so that you see which dependencies it pulls in from where etc.
Thanks for making it to the end and have fun guessing NPM dependencies!
All the code can be found on GitHub.

Top comments (0)