
In our previous article, we introduced you to the basic usage of the Twitter API in conjunction with Convoworks. We guided you through the process of setting up a Twitter app, importing a service, testing it, and understanding its core functionalities. Building on that foundation, today we're exploring the development of a Twitter bot that tweets regularly about our articles.
What Does This Bot Do?
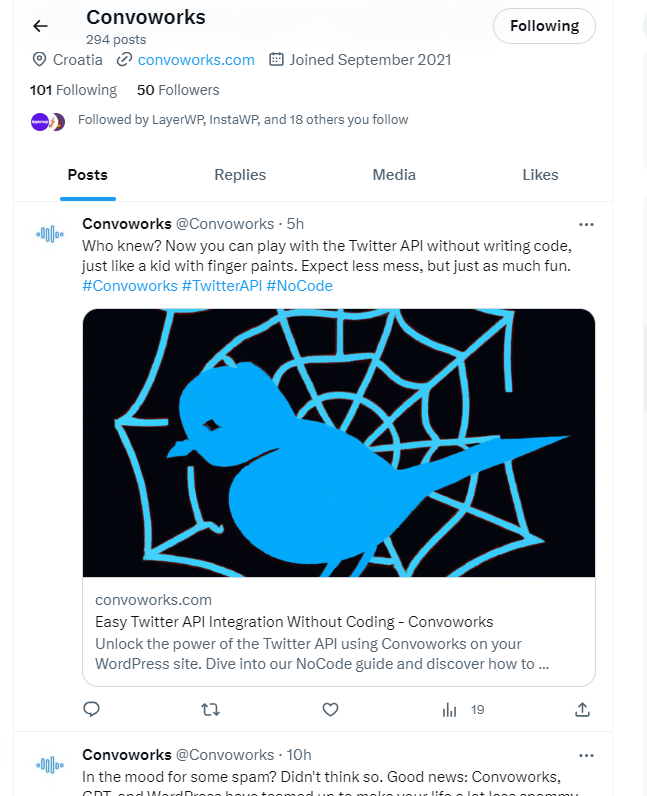
This bot automates the process of generating and posting tweets about content from your WordPress site. Operating on scheduled intervals, it selects a post, crafts a human-like tweet using GPT, and then sends it out to the Twitter. In fact, we're using this very bot over at Convoworks. To see it in action, check out our Twitter account @Convoworks.
 Here's a more detailed breakdown:
- WordPress Integration: Your site's posts serve as the primary content source, with the bot functioning as a WordPress scheduled task.
- Advanced Language Processing with GPT: Tweets aren't just automated; they're crafted using GPT to sound natural and engaging.
- Testing Utility: Ensure everything works perfectly. Use the built-in testing feature to check tweet generation or manually trigger the bot.
Experience the seamless fusion of WordPress content with the power of automated Twitter engagement.
Quick Steps to Get Started
Here's a brief overview of the prerequisites and the initial setup. For a more comprehensive guide, please refer to our previous article which delves deeper into these steps.
- API Keys: Ensure you have the necessary API keys from both Twitter and OpenAI.
- Add GPT package: Our example leverages the Convoworks GPT package. This package is available as a separate plugin on GitHub, which you'll need to install and activate.
- Download and Import: Download the Twitter Bot service definition (link provided below) and import it into Convoworks as a new service.
- Variables: Once imported, go to the variables view in your service and input the required API keys and secrets (4 for Twitter, 1 for GPT).
After completing these steps, navigate to the Test view. From here, you can check its functionality. Input "info" to verify that the Twitter API is functioning correctly, or type "generate 123" to test the GPT functionality (replace 123 with an actual post id). If any issues arise, consult the debug panel. Alternatively, you can enable logging and review the log file.
Deep Dive into the Full Process
After setting everything up, you can initiate a trial run with the "test" command. By default, this won't post real tweets, a feature controlled by the AUTO_TWEET_ENABLED global variable. This ensures worry-free testing. Invoking this command activates the Task Executor - Daily Random Tweet fragment, the same piece of logic used by our scheduled event hook handler, letting you observe its operations in action. Fragments function as reusable workflow definitions, which can be invoked from various points. In our context, this includes the chat utility test command and the hook handler. To delve deeper, open your service editor and click on the Fragments tab on the right. From there, select Task Executor - Daily Random Tweet. The main section will display the constituent elements of this workflow, guiding you through each step of the process.
Fetching Posts
To begin, we retrieve the post that will act as the foundation for our tweet using the get_posts() WordPress function. The parameters we've defined specify that a random post, published after the date set by the POSTS_AFTER variable, will be selected. You can modify these parameters based on your requirements. Since a random post is chosen, there's a risk of repeated selections. To mitigate this, we've configured the system to exclude the IDs of the last EXCLUDE_LAST_POSTS_COUNT tweeted posts. Details of these tweets are retained in an option labeled convo_twitter_bot_worklog. We'll discuss this feature in more depth later in the article. 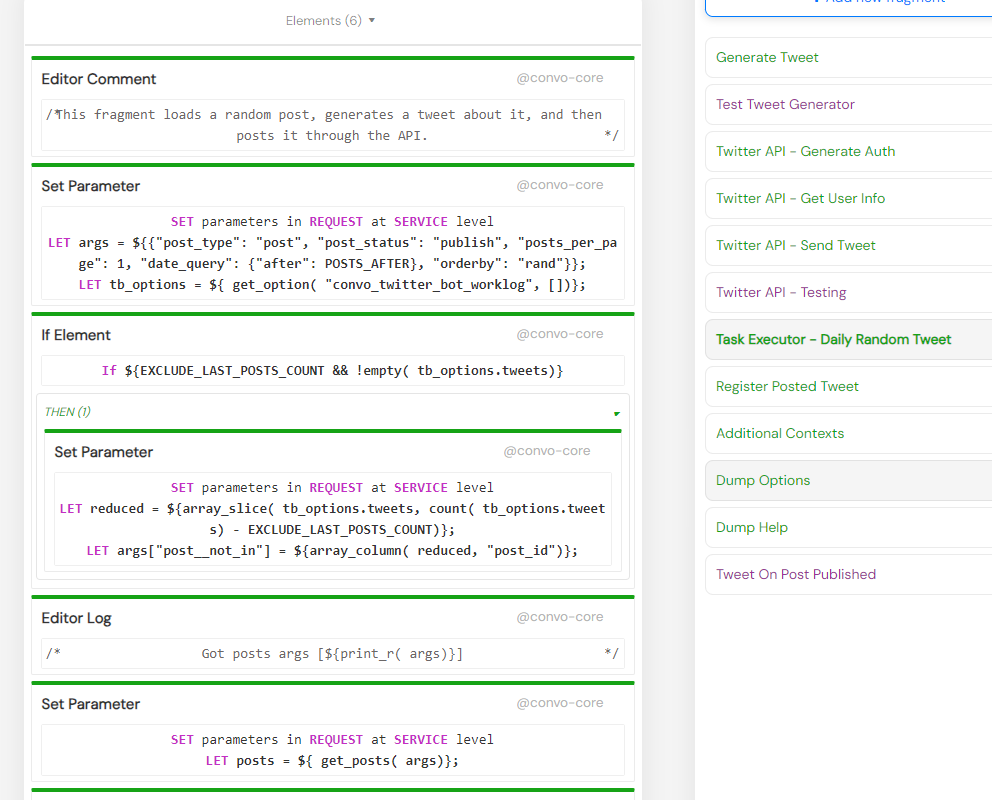
Generating Tweet with GPT
Once we've selected the post for the tweet, the next step is content generation. This logic is contained within the Generate Tweet fragment. Here, GPT is instructed to craft a tweet, using the post's content as input, and subsequently save the generated content. To navigate to the desired fragment, click the link in the INCLUDE element. Alternatively, explore fragments using the tabs on the right side. When working with GPT, we send one or more messages packed with the requisite instructions and data for generating meaningful content. By leveraging the Convoworks GPT package, we've dispersed these instructions over multiple system messages, enhancing adaptability and simplifying maintenance. Inspect the Messages flow within the GPT Chat Completion API v2 component.
- Main system prompt: This defines the agent's role and its objectives. For instance, it's depicted as a social media manager assigned the task of tweeting about our posts.
- Additional contexts: These auxiliary system messages supply the current date and time (always useful) and relay foundational information about the website and its associated product.
- Previous tweets: By furnishing insights from previous tweets, we ensure the generated content isn't redundant.
- Post content: At this juncture, we incorporate the post's content. It's worth noting the conversion from HTML to markdown, which conserves space in our API calls.
It's worth emphasizing the ease with which you can tailor the context prepped for GPT completion, incorporating control structures, employing functions, or accessing WordPress data. 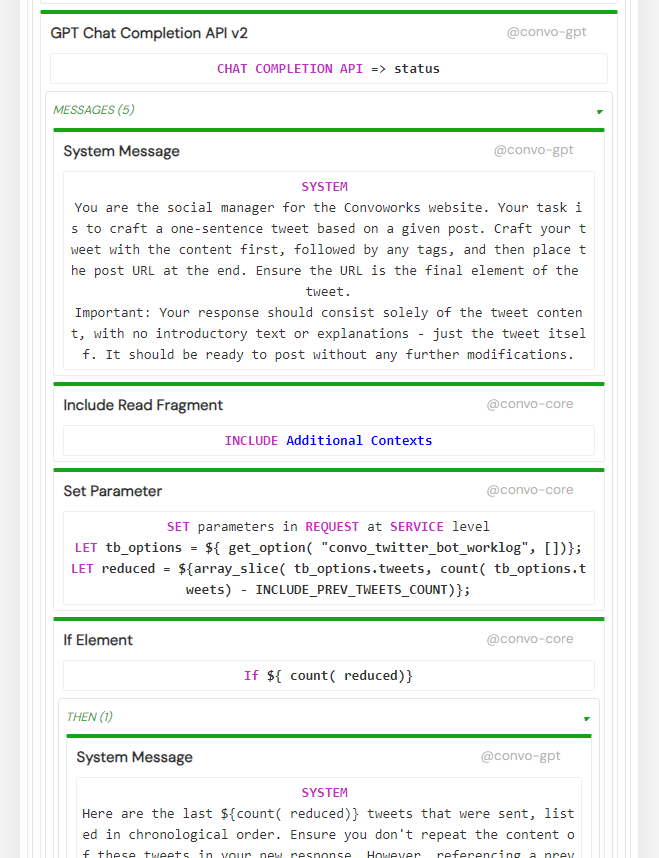 Upon completing the GPT request, the OK flow elements are executed. Here, the output is stored in the
 tweet_content variable. We also eliminate double quotes that GPT might include around the generated tweet. For those new to the GPT chat completion API, we recommend the official documentation or revisiting our previous articles on the GPT package.
Sending Out the Tweet
Having crafted our tweet, it's time to send it out through the Twitter API. It's worth noting that we utilize the AUTO_TWEET_ENABLED variable to easily toggle the dispatching of actual tweets. For the tweeting process itself, we rely on the same HTTP client-based approach that we showcased in our previous article.
Registering the Generated Tweet
You may have observed our retrieval of options for posts to be excluded and the logging of prior tweets. The logic for preserving this data resides within the Register Posted Tweet fragment. Besides cataloging the tweet content and recording the most recent post ID, it's important to note the TWEET_HISTORY_SIZE parameter. This parameter limits the array of saved tweets. To access this data, you can use the test chat utility by executing the "dump" command.
Generating the Perfect Tweet
In the previous section, we outlined the entire bot workflow. A critical stage within this is generating the tweet to be sent. This is an area where you might want to invest some time, refining prompts and testing the kind of results produced. You can test the tweet generation using the "generate" and "generate all" commands. The Test Tweet Generator fragment encompasses these commands. Adjust the predefined post id or search arguments as per your preferences. As a quick reminder, you can specify a particular post id following the "generate" command. As previously discussed, tweet generation is encapsulated in the Generate Tweet fragment. Navigate to this fragment within the Convoworks editor and modify the system message to suit your requirements. Also, take a moment to review and tweak the Additional Contexts fragment. One of the most effective ways to refine a language model's writing style is to provide it with several examples. If you wish to adopt this approach, add a new System Message element (by dragging and dropping from the toolbox on the left) and input something like, "Here are a few example tweets: ..." Besides context we provide to AI, there are two model options that you can adjust and experiment with.
-
GPT_DEFAULT_MODELallows you to change GPT model it will use. By defaultgpt-3.5-turbo-16kand if you have access you might want to usegpt-4. We tested it with both models and both models are producing good results. -
GPT_DEFAULT_TEMPERATUREallows you to tune up model's creativity. It can be value between 0 and 2, the higher value is, more creative responses will be (but also more likely to hallucinate).
Experimenting and fine-tuning the GPT output can be a delightful process, and we hope you'll relish the experience.
Final Testing
Before allowing the bot to run autonomously, utilize the "test" command to trial the complete workflow. This command simulates the process that would typically be initiated by WP Cron. At this juncture, you may wish to review, and if necessary, adjust the post search arguments within the Task Executor - Daily Random Tweet fragment. Tailor the POSTS_AFTER and EXCLUDE_LAST_POSTS_COUNT variables to your preferences. In addition to the "test" command, at this stage, consider using the "dump" command to view the current tweet log. There's also the "reset" command to purge this log. It's vital to note that the actual posting of tweets is controlled by the AUTO_TWEET_ENABLED variable.
Activating Your Automated Twitter Bot
Once you've adjusted and tested your bot to your satisfaction, you're ready to activate its automated functions. WordPress event scheduling utilizes the wp_loaded action, so we've allocated scheduling responsibilities to a separate, lightweight service for efficiency.
Install the Twitter Bot Scheduler service definition after downloading. Within this definition, you'll find a variable SCHEDULED_TIMES indicating when the bot will run each day. This variable consists of an array of string values, which you can tailor to fit your schedule. Next, activate the WordPress Hooks platform for both services, which you can find under the Configuration view. Finally, ensure the AUTO_TWEET_ENABLED variable in the Twitter Bot service is set to true. 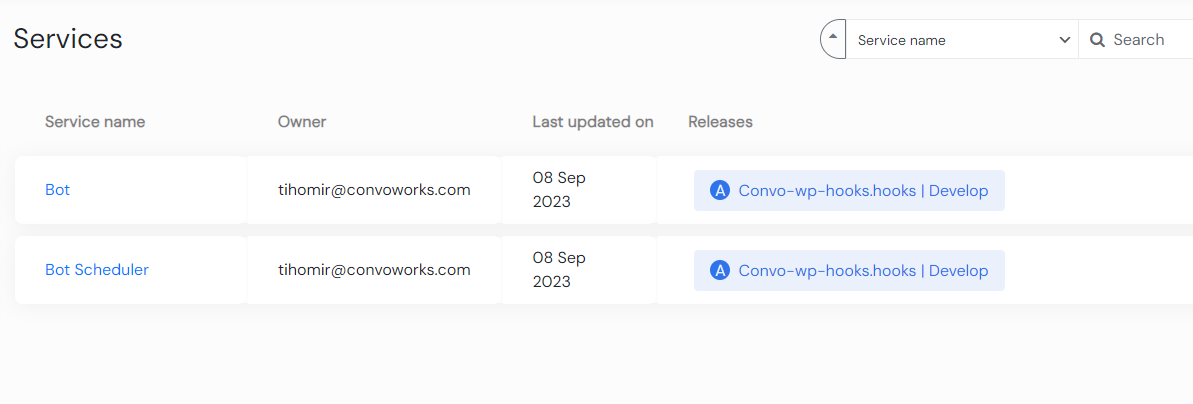 If you have the WP Crontrol plugin or a similar one that displays scheduled events, you should see one or more instances of the
 convo_twitter_bot_daily_event listed.
Conclusion
With our visual editor, you have a wealth of customization options at your fingertips. Adjust the search query, set unique agent definitions for various post types, create a predefined list of hashtags for the bot to select from, or save generated tweets as custom post types. Should you have any questions or face any challenges, please reach out to us.

Top comments (0)