Hasura provides an easy way to build an API and testing it is as easy as testing any other API. We will focus on the GraphQL API but everything presented here can be applied to the REST API as well.
Use Case
We will model a todo list for different users. Each user should only see her own todo items and none of a different user.
Tools
We will use
- Docker: to setup Hasura and PostgreSQL
- Jest: as our test runner
- graphql-codegen: to generate an SDK including Typescript support to have good autocompletion in the editor
- JWT: to set the authenticated user
... to test that the business logic in Hasura works as intended. Business logic can live in Hasura itself (e.g. permissions) or within the database (e.g. views, constraints, et al.). Note that it does not make sense to test that Hasura does its job correctly as it is by itself well tested. If you just create a resource without any logic you probably do not want to test it.
If you want to follow along you can clone the sample repository at trigo/hasura-api-testing.
Hasura and PostgreSQL Setup with Docker Compose
We use a slightly modified version of Hasura's docker compose file.
Changes include:
-
HASURA_GRAPHQL_JWT_SECRETfor user authentication -
cli-migrationsimage so that migrations are automatically applied -
graphql-engine/volumesto be able to store migrations and metadata in the repository - exposed
portfor PostgreSQL to be able to connect directly to PostgreSQL
// docker-compose.yml
version: "3.6"
services:
  postgres:
    image: postgres:12
    restart: always
    ports:
      - "5432:5432"
    volumes:
      - db_data:/var/lib/postgresql/data
    environment:
      POSTGRES_PASSWORD: password
  graphql-engine:
    image: hasura/graphql-engine:v2.0.3.cli-migrations-v3
    ports:
      - "8080:8080"
    depends_on:
      - "postgres"
    restart: always
    volumes:
      - ${PWD}/migrations:/hasura-migrations
      - ${PWD}/metadata:/hasura-metadata
    environment:
      HASURA_GRAPHQL_METADATA_DATABASE_URL: postgres://postgres:password@postgres:5432/postgres
      PG_DATABASE_URL: postgres://postgres:password@postgres:5432/postgres
      HASURA_GRAPHQL_ENABLE_CONSOLE: "true"
      HASURA_GRAPHQL_DEV_MODE: "true"
      HASURA_GRAPHQL_ENABLED_LOG_TYPES: startup, http-log, webhook-log, websocket-log, query-log
      HASURA_GRAPHQL_ADMIN_SECRET: admin-secret
      HASURA_GRAPHQL_JWT_SECRET: '{"type":"HS256", "key": "3EK6FD+o0+c7tzBNVfjpMkNDi2yARAAKzQlk8O2IKoxQu4nF7EdAh8s3TwpHwrdWT6R", "claims_map": { "x-hasura-allowed-roles": { "path": "$$.roles" }, "x-hasura-default-role": { "path": "$$.roles[0]" }, "x-hasura-client-id": { "path": "$$.clientId", "default": "" }, "x-hasura-user-id": { "path": "$$.userId", "default": "" }, "x-hasura-username": { "path": "$$.username", "default": "" } }}'
volumes:
  db_data:
Start Hasura and PostgreSQL with docker-compose up -d and wait until Hasura is up and running. You can either check via curl localhost:8080/healthz or hasura migrate status --admin-secret admin-secret to see whether all migrations have been applied.
Setup Database and Permissions
When you spin up the compose file within the provided repository you can skip the next steps because migrations and metadata are included and applied automatically when Hasura starts.
Next we create a todo table with properties id, description, is_done, and user:
CREATE TABLE "public"."todo" (
  "id" serial NOT NULL,
  "description" text NOT NULL,
  "is_done" boolean NOT NULL DEFAULT false,
  "user" text NOT NULL, PRIMARY KEY ("id")
);
Permissions
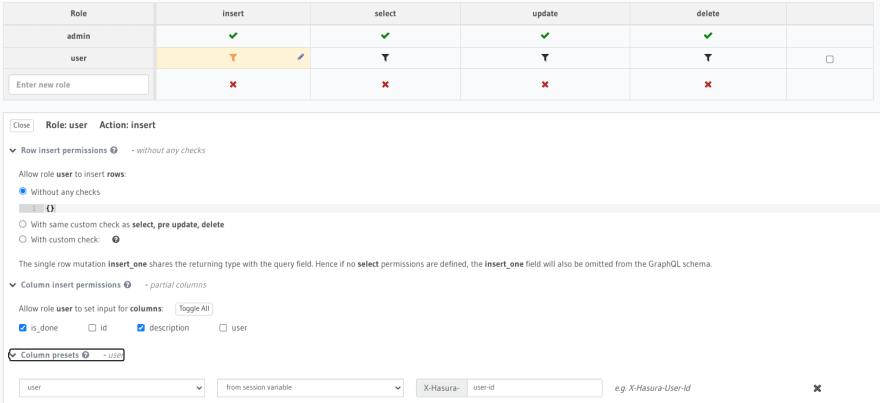
Insert permissions:
When inserting new todos, we do not allow the user to set the user property by herself, instead we use the user-id session variable for the user and only allow the properties description and is_done to be set. id is an autoincrement field and should not be touched by the user either.
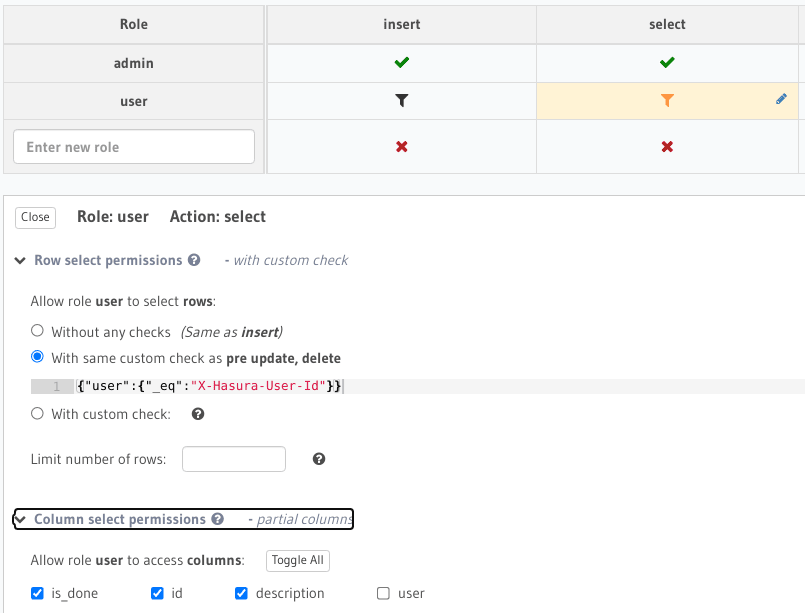
Select permissions:
When a user retrieves her todos, we set the custom check user equals x-hasura-user-id to ensure that a user only gets her own todos.
We have now completed our PostgreSQL and Hasura setup and are ready to look into the test setup.
Tests
Code Generation
We leverage @graphql-codegen to generate an SDK for the GraphQL API. It will take all .graphql files under tests, connect to the Hasura GraphQL API and output the SDK in tests/client/graphql.request.ts. This takes over most of the communication between our tests and the GraphQL API and gives us typing information to help us in the editor and in our tests.
You can find detailed information at GraphQL Code Generator on the possibilities to generate code from your GraphQL schema.
First we need a .graphql file that describes how to insert and select todos. It has a query GetTodos that retrieves
all todos and a mutation AddTodo which inserts a new todo item.
// tests/graphql/todo.graphql
query GetTodos {
  todo {
    id
    description
    is_done
  }
}

mutation AddTodo($description: String = "", $is_done: Boolean = false) {
  insert_todo(objects: { description: $description, is_done: $is_done }) {
    returning {
      id
    }
  }
}
graphql-codegen/cli needs a configuration file so it knows where our GraphQL API lives, where to look for source files and where to put the generated SDK. You can also specify plugins which modify the output of SDK. More information can be found in the graphql-codegen plugin index.
We will use
- typescript: Generate types for TypeScript - those are usually relevant for both client side and server side code
- typescript-operations: Generate client specific TypeScript types (query, mutation, subscription, fragment)
- typescript-graphql-request: Generates fully-typed ready-to-use SDK for graphql-request
// codegen.js
module.exports = {
    schema: [
        {
            'http://localhost:8080/v1/graphql': {
                headers: {
                    'x-hasura-admin-secret': 'admin-secret',
                },
            },
        },
    ],
    documents: ['./tests/**/*.graphql'],
    overwrite: true,
    generates: {
        './tests/utils/graphql.request.ts': {
            plugins: [
                'typescript',
                'typescript-operations',
                'typescript-graphql-request',
            ],
        },
    },
};
Now install all necessary npm modules
npm install -D @graphql-codegen/cli @graphql-codegen/typescript @graphql-codegen/typescript-graphql-request @graphql-codegen/typescript-operations
and generate the SDK with npx graphql-codegen --config codegen.js. This should generate an SDK under tests/utils/graphql.request.ts.
Authenticated Requests
The SDK itself does not have an easy way to create authenticated requests with JWT, you need to generate and specify the headers for each request. But we can simply wrap it for our purposes so that authentication headers are automatically sent with each request. The configuration will be sourced from the .env file which should include Hasura and PostgreSQL configuration variables, see .env example
// tests/utils/client.ts

import {GraphQLClient} from 'graphql-request';
import {getSdk} from './graphql.request';
import jwt from 'jsonwebtoken';
import dotenv from 'dotenv';

// source environment variables
dotenv.config();
We have set up the imports and read in the configuration variables. We can now extract the key from the Hasura configuration parameter (see docker-compose.yml above).
let secret = '';
try {
    secret = JSON.parse(process.env.HASURA_GRAPHQL_JWT_SECRET!).key;
} catch (e) {
    console.error(
        'HASURA_GRAPHQL_JWT_SECRET must be parsable json and have property key'
    );
    process.exit(1);
}
The client takes options for either a user or an admin:
- User:
- allowedRoles: all roles that a user can have, this will be sent within the JWT
- defaultRole: the role that is currently active, is sent in the
x-hasura-roleheader, but must also be present in the JWT - userId: the user id
- username: the username
- Admin:
- admin: boolean used to make requests with the
admin-secret. No other option needs to be present
- admin: boolean used to make requests with the
type UserOptions = {
    allowedRoles?: string[];
    defaultRole: string;
    userId: string;
    username: string;
};

type AdminOptions = {
    admin: boolean;
};

// define the configuration options for the client
type Options = UserOptions | AdminOptions;
If we have a user we map the default role to the x-hasura-role header which corresponds to the role in the Hasura Console permissions tab.
const mapOptionsToHeaders = (options: Options) => ({
    'x-hasura-role': options.defaultRole || '',
});
All other user options are packed into the JWT which will be read by Hasura and provided as variables for permissions.
const generateJwt = (options: Options): string =>
    jwt.sign(
        JSON.stringify({
            roles: options.allowedRoles || [],
            userId: options.userId,
            username: options.username,
        }),
        secret
    );
We can now create the main entry point which takes the options and returns an SDK with a user specific GraphQL client embedded.
export default (options: Options): ReturnType<typeof getSdk> => {
  if (!process.env.GRAPHQL_ENDPOINT) {
    throw new Error("GRAPHQL_ENDPOINT is not defined");
  }
  if (!process.env.HASURA_GRAPHQL_ADMIN_SECRET) {
    throw new Error("HASURA_GRAPHQL_ADMIN_SECRET is not defined");
  }

  // if we do not provide allowedRoles for the client we assume that the defaultRole is an allowed role
  if ('defaultRole' in options && !options.allowedRoles) {
    options.allowedRoles = [options.defaultRole];
  }
We configure a GraphQL client with either an admin user (with an admin secret) or a normal user (with JWT) and pass it to the SDK factory function. This will ensure that all request have the correct headers.
  const client = new GraphQLClient(process.env.GRAPHQL_ENDPOINT, {
    headers: 'admin' in options
      ? { "x-hasura-admin-secret": process.env.HASURA_GRAPHQL_ADMIN_SECRET }
      : {
          Authorization: `Bearer ${generateJwt(options)}`,
          ...mapOptionsToHeaders(options),
        },
  });

  return getSdk(client);
};
Testing Todo Permissions
Recap: We want to ensure that users see only their respective to todos.
Steps:
- clear the database before each test
- create 2 todos for user Franz
- create 1 todo for user Herbert
- get todos for user Franz
- get todos for user Herbert
- test that each user sees only his todos
Import dependencies
import clearDb, {closeConnection} from './utils/clear-db';
import client from './utils/client';
Setup the test and hooks
describe("Todo", () => {
  // reset the database before each run
  beforeEach(clearDb);

  // close PG connection after all tests
  afterAll(closeConnection);
Create an SDK client for each user. We provide the defaultRole (user), a username and a userId all client requests are scoped to the passed in options.
  describe("user: Franz + Herbert", () => {
    it("should only see his todos", async () => {
      const franzClient = client({defaultRole:'user', username:'franz', userId:'1'});
      const herbertClient = client({defaultRole:'user', username:'herbert', userId:'2'});
Insert two todos into the database for user Franz
const franzTodo1 = await franzClient.AddTodo({
    description: "Franz's first todo item",
    is_done: false,
});
const franzTodo2 = await franzClient.AddTodo({
    description: "Franz's second todo item",
    is_done: false,
});
Insert one todo for user Herbert
const herbertTodo1 = await herbertClient.AddTodo({
    description: "Herbert's first todo item",
    is_done: false,
});
Now we have three todos in the database two for Franz and one for Herbert. We retrieve the todos for each user and assert that the user only sees his own todo items.
      // get Franz's todos
      const franzsTodos = await franzClient.GetTodos();

      // Franz should only see his todos
      expect(franzsTodos.todo.map(todo => todo.id).sort())
        .toEqual([
          franzTodo1.insert_todo?.returning[0].id,
          franzTodo2.insert_todo?.returning[0].id]);

      // get Herbert's todos
      const herbertsTodos = await herbertClient.GetTodos();

      // Herbert should only see his todos
      expect(herbertsTodos.todo.map(todo => todo.id).sort())
        .toEqual([herbertTodo1.insert_todo?.returning[0].id]);
    });
  });
});
Conclusion
It is really easy to setup a Hasura API but with this ease we often forget that business logic should be well tested. As soon as the test setup is done it is rather easy to write tests against the API. TypeScript and the tests help to see any breaking API changes that would let your application fail in production.
Notes
Due to the current setup it is not possible to run tests in parallel. The API tests provide no means to isolate a test in a transaction. Keep this in mind as it will increase the time of your test runs.
This is all just a starting point.

Top comments (2)
Sorry that was totally my fault. Forgot to make the repository public.
Thanks. Repository access is fixed. Link is working now.