In the world of serial communication, there are times when physical hardware is not required, but we still need to test or simulate communication between devices. Virtual serial ports provide a perfect solution, and on Linux-based systems like Ubuntu, we can use tools like PuTTY and socat to easily set up and test these virtual connections.
In this article, we'll guide you through the steps to create virtual serial ports on Ubuntu, simulate serial communication, and use PuTTY as your terminal emulator for testing.
What Are Virtual Serial Ports?
Virtual serial ports are software-based communication channels that behave like physical serial ports. You can use them to simulate serial communication between two programs or systems without needing actual hardware. These virtual ports can be useful for testing applications that rely on serial communication, debugging, or for creating virtual connections between two software applications.
Tools You'll Need
- socat – A versatile tool that can create and manage virtual serial ports, redirect data between ports, and even simulate network communication.
-
PuTTY – A popular terminal emulator that can connect to serial ports. We’ll use PuTTY to interact with the virtual COM ports created by
socat.
Step 1: Install socat and PuTTY
First, ensure that both socat and PuTTY are installed on your system.
Install socat:
sudo apt update
sudo apt install socat
Install PuTTY:
sudo apt install putty
Step 2: Create Virtual Serial Ports Using socat
Once socat is installed, you can use it to create virtual serial ports. These virtual ports will allow data to be transferred between them as if they were real, physical serial connections.
- Create Two Virtual COM Ports:
In the terminal, run the following command to create two virtual serial ports:
sudo socat PTY,link=/dev/ttyV0,raw,echo=0 PTY,link=/dev/ttyV1,raw,echo=0
- PTY creates a pseudo-terminal (virtual serial port).
- link=/dev/ttyV0 and link=/dev/ttyV1 specify the paths to the virtual ports.
- raw disables any line discipline (for clean data transfer).
- echo=0 disables local echoing.
After running this command, you'll have two new virtual serial ports: /dev/ttyV0 and /dev/ttyV1.
- Verify Virtual Ports:
You can confirm that the virtual ports have been created by listing the devices in the /dev directory:
ls /dev/ttyV*
You should see /dev/ttyV0 and /dev/ttyV1 in the output.
Step 3: Test Virtual Serial Ports Using PuTTY
Now that we have created the virtual serial ports, let’s use PuTTY to simulate serial communication between them.
- Run PuTTY:
Open PuTTY by typing the following command in the terminal:
putty
- Configure PuTTY for Serial Communication:
In the PuTTY configuration window, follow these steps:
- Select the Serial connection type.
- In the Serial line field, enter
/dev/ttyV0(or whichever virtual port you want to connect to). - Set the Speed (baud rate) and other serial communication settings (data bits, stop bits, parity, flow control, etc.) as required by your setup.
- Open the Serial Connection:
After configuring the settings, click Open to begin the serial connection.
- Repeat for the Other Virtual Port:
Open another instance of PuTTY, but this time configure it to connect to /dev/ttyV1 (the second virtual port). Configure the same serial settings.
Now, you have two PuTTY windows connected to the two virtual serial ports. Anything you type in one window will appear in the other, simulating serial communication between two devices.
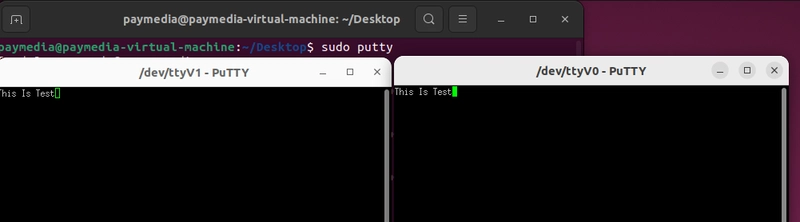
Step 4: Test Communication
- In one PuTTY window (connected to
/dev/ttyV0), type some text and press Enter. For example:
Hello, Virtual COM Port!
- In the second PuTTY window (connected to
/dev/ttyV1), you will see the exact same text appear.
This demonstrates that data is being transferred between the two virtual serial ports. In real-world use, this would simulate data being sent between two physical devices connected to serial ports.
Step 5: Automate the Process (Optional)
If you want to create virtual serial ports every time you boot your system, you can automate the process by adding the socat command to your startup scripts. You can do this by adding it to ~/.bashrc or a system startup script, depending on your needs.
For example, to add it to ~/.bashrc, open the file in a text editor:
nano ~/.bashrc
Add the following line to the end of the file:
sudo socat PTY,link=/dev/ttyV0,raw,echo=0 PTY,link=/dev/ttyV1,raw,echo=0 &
Save and exit. This will create the virtual serial ports every time you log in to your system.
Conclusion
By using PuTTY and socat, you can easily create and manage virtual serial ports on Ubuntu, enabling you to simulate serial communication for testing or debugging purposes. With socat, you have the flexibility to create multiple virtual ports and route data between them. PuTTY allows you to interact with these virtual ports as if they were physical serial devices, providing an efficient way to test your applications without needing actual hardware.
This setup is an excellent solution for anyone who needs to simulate or test serial communication in a Linux environment.

Top comments (2)
Small correction -- by adding that line to your bashrc you're having that run every time a shell is opened up rather then every time you log in; adding to
~/.bash_profiledoes what you're looking to do.Personally I'd caution against doing either, as running
sudoin your bashrc or bash_profile is bad form (you'd be prompting for password auth at every new shell or after login, which may cause your WM to break). Instead, given you already have root, I'd suggest doing this as a systemd service -- that way, you can easily start/stop/restart the virtual ports and not have any adverse effects on the user side.Thank Youu ❤️