This article was co-authored by @notsol
Introduction
Did you ever wonder how those weather apps work behind the scenes? Well, in this tutorial, you’ll learn how to build a clean and simple Weather Dashboard called Lil’ Forecast using nothing but HTML, Vanilla JavaScript (yupp, no complex JS frameworks here), and the OpenWeatherMap API.
You’ll be able to search for any city in the world and instantly see its current weather — temperature, humidity, conditions, and even a neat little icon to match the vibe.
At the end you will not only have a working Weather App, but you’ll also learn how to:
- Connect to external APIs using
fetch() - Parse and display real-time data
- Handle errors gracefully
- Build something lightweight and useful from scratch
Let’s get started—and turn your browser into your personal weather station.
Prerequisites
To follow along, you’ll need:
- Basic knowledge of JavaScript and HTML
- A free API key from OpenWeatherMap
- A code editor (like VS Code) and a browse
Project Setup
Start by creating the project directory and setting up your base files.
Run these commands one by one in the Command Prompt
mkdir lil-forecast
cd lil-forecast
type nul > index.html
type nul > script.js
Here’s what each command does:
-
mkdir lil-forecast– creates a new folder named lil-forecast -
cd lil-forecast– moves into that folder -
type nul > file_name– creates new empty file
Now, you have the essential files to start your weather app project.
Getting Your OpenWeatherMap API Key
Here’s the breakdown process before you integrate the API:
- Get your API key by signing up at OpenWeatherMap.
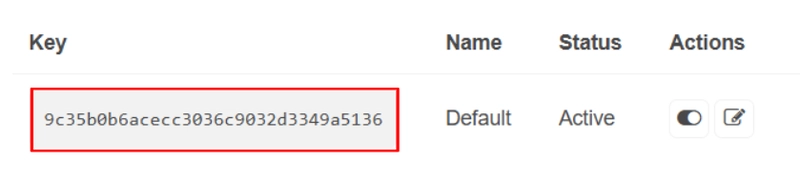
- After logging in, click your username on the upper right corner and select My API keys. The API key should look like this:
- It may take some time for the API key to activate. Take note that you should never expose your API keys
- You can use API testing softwares like Postman to check if your API key is working. You may refer to this youtube link for a tutorial on how to check if the API key is working properly https://www.youtube.com/watch?v=MdIfZJ08g2I&ab_channel=Andy%27sTechTutorials
- Copy the API key and paste it in your JavaScript code.
Building HTML Structure
Create a simple and intuitive layout that will include the following:
- A text input to enter a city name
- A search button
- A section to display the weather information
You can create your own HTML Structure or use the example below.
<!DOCTYPE html>
<html lang="en">
    <head>
        <meta charset="UTF-8">
        <meta name="viewport" content="width=device-width, initial-scale=1.0">
        <title>Lil' Forecast</title>
    </head>
    <body>
        <form class="form">
            <label for="city-input">Enter city name</label>
            <input type="text" id="city-input" placeholder="Enter city name" required>
            <button type="submit" id="search-button">Search</button>
        </form>

        <div>
            <h1 class="name"></h1>
            <h4 class="temp"></h4>
            <h4 class="humidity"></h4>
            <h4 class="description"></h4>
            <img class="icon">
        </div>

        <script src="script.js"></script>
    </body>
</html>
Styling with CSS
To make your weather app look visually appealing, you can style it with your own custom CSS to match your personal design tastes. Just create another file (style.css) and start adding styles — you have full control over colors, fonts, spacing, layout, and more.
However, if you want a little head start, you can include a CSS framework like Bootstrap. This will help you make your weather app look clean and responsive without writing a lot of custom CSS from scratch.
Here’s a quick example of how you could link your stylesheet in the HTML file:
<link href="https://cdn.jsdelivr.net/npm/bootstrap@5.3.5/dist/css/bootstrap.min.css"
      rel="stylesheet"
      integrity="sha384-SgOJa3DmI69IUzQ2PVdRZhwQ+dy64/BUtbMJw1MZ8t5HZApcHrRKUc4W0kG879m7"
      crossorigin="anonymous"
>
Tip: Keep your styles simple and build up as you go — start with the basic and necessary style.
JavaScript: Connecting to OpenWeatherMap API
Now that your HTML layout is ready, it is time to bring the Weather Dashboard to life with JavaScript. You’ll walk through the process on how to fetch weather data from OpenWeatherMap and display it on the page.
Step 1: Selecting HTML Elements
Start by selecting the elements from the HTML document that you’ll interact with using JavaScript. These will let you capture user input and update the page with the results.
const form = document.querySelector('.form');
const input = document.getElementById('city-input');
const display = document.querySelector('.display');
const apiKey = '';
Step 2: Handle the Form Submission
Now, set up a listener for when the user submits the form (either by clicking the button or pressing Enter)
form.addEventListener('submit', async e => { // search button function
    e.preventDefault(); // preventing from refreshing the page

    input.classList.remove('is-invalid');
    form.classList.add('was-validated');

    if (!form.checkValidity()) {
        return; // return if input is empty don't execute
    }

    const cityName = input.value;

    try {
        const data = await getData(cityName);
        displayWeather(data);
        display.classList.remove('d-none');
    } catch (error) {
        console.error(error);
    }
});
What You’re Doing Here:
- Prevent the default form behavior (which would normally refresh the page)
- Validates the input field
- Fetches weather data for the city the user entered by calling the custom function
- Displays the weather information if the request succeeds
- Handles errors gracefully
Step 3: Fetch Weather Data from the API
Next, write a function to connect to the OpenWeatherMap API and get the weather for the city the user entered.
async function getData(cityName) { // sends a http request to the API
    const apiUrl = `https://api.openweathermap.org/data/2.5/weather?q=${cityName}&appid=${apiKey}`

    const apiResponse = await fetch(apiUrl);

    if (!apiResponse.ok) { // check if api response ok is false
        form.classList.remove('was-validated');
        input.classList.add('is-invalid');
        throw new Error('Could not fetch weather data');
    }

    return await apiResponse.json();
}
Here’s What’s Happening:
- You build the API URL using the city name and the API key
- Then, by the use of
fetch()to request weather data from the server - If the response indicates a problem/error (like “city not found”), you manually throw an error.
- If the request is successful, the function will return the weather data in JSON format.
Step 4: Display the Weather on the Page
Once the weather data is obtained, it is time to show it to the user by updating the content of the display section.
function displayWeather(data) { // displays the weather data
    const nameDisplay = document.querySelector('.name');
    const tempDisplay = document.querySelector('.temp');
    const humidityDisplay = document.querySelector('.humidity');
    const descriptionDisplay = document.querySelector('.description');
    const iconDisplay = document.querySelector('.icon');

    const {name: cityName, main: {temp, humidity}, weather: [{description, icon}]} = data; // destructuring the data from the json file

    nameDisplay.innerHTML = cityName;
    tempDisplay.innerHTML = `Temperature: ${Math.round((temp - 273.15) * 100) / 100}°C`;
    humidityDisplay.innerHTML = `Humidity: ${humidity}%`;
    descriptionDisplay.innerHTML = `Description: ${description}`;
    iconDisplay.src = `https://openweathermap.org/img/wn/${icon}@2x.png`;
}
Full Flow
Here’s what your weather app now does:
Homepage – when the Lil’ Forecast app loads, users are greeted with a simple interface: a title, an input, and a search button. No distractions—just type and go!

Searching a city – the user types the name of any city in the world. In this example, “Davao” was typed to check the weather there.

Weather Data Displayed – The app pulls real-time weather data from OpenWeatherMap and displays it beautifully: complete with temperature, humidity, description, and a matching weather icon.

Final Thought
And just like that, you’ve built a fully functional weather dashboard from scratch using nothing but HTML, Vanilla JavaScript, and the OpenWeatherMap API.
With Lil’ Forecast, you’ve learned how to:
- Capture user input and validate it
- Fetch real-time weather data from a public API
- Dynamically update your UI with real-time information
- Handle errors in a clean and user-friendly way
More significantly, you’ve now seen what it’s like to create a real-time API-driven application — no complex frameworks, no bloat — just you and the underlying web technologies.
This is just the beginning, you can still take your weather app (or any app) even further, with the knowledge of bringing live data into your app, the browser is yours to explore.
So yeah… keep building, keep learning!
Reference
- https://openweathermap.org/current
- https://youtu.be/VaDUGPMjzOM?si=t2GG5zm51joGQHCh
- https://www.youtube.com/watch?v=MdIfZJ08g2I&ab_channel=Andy%27sTechTutorials
GitHub Repository:
https://github.com/not-sol/open-weather-map/tree/main

Top comments (0)