In this tutorial we will create a brand new Node.js application on HostPresto!
Let’s start by setting up our HostPresto! Environment.
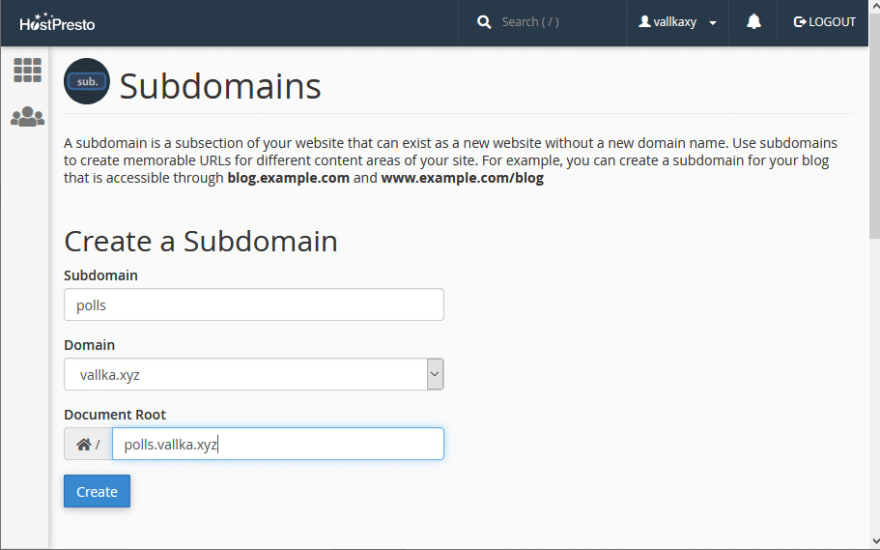
Creating a subdomain:
Suppose you have a domain registered with HostPresto! — yourname.xyz. For this tutorial, we will create a subdomain: node.youname.xyz
We think this is the most natural and straightforward method. Setting up the tutorial project in the root domain may pollute your hosting space. You may also have an existing website sitting there already. Adding a subdirectory like www.youname.xyz/node is also less convenient, in our opinion.
Log in into your cPanel and click on Subdomains in the DOMAINS section.
Enter ‘ node ‘ into the Subdomain field.
Select your main domain (youname.xyz) from the Domain dropdown.
The Document Root will be auto-populated with ‘node.yourname.xyz’.
Let’s accept the default value. Click Create.
The Subdomain has now been created. If you point your browser to http://'node.yourname.xyz, you should now see a directory listing — something like this:

This is how an empty site / site folder normally appears on HostPresto! cPanel hosting.
Setting up a Node.js application:
In cPanel go to the SOFTWARE section and select Setup Node.js App.
Click on CREATE APPLICATION.
Node.js version — let’s select the most recent version of Node.js from the list. It’s 12.9.0 at the moment of writing.
Application mode — leave development selected
Application root — type in node.yourname.xyz (This is the name of the subdomain we have created in the previous step)
Application URL — select our subdomain, node.yourname.xyz
Application startup file — leave it blank for the time being, we will return to this field in a minute.
Passenger log file — this is where our application logs will go. Let’s eneter: /home/yourname/logs/node.log (replacing “yourname” with your cPanel username)
Click on the CREATE button
Writing the simplest web server:
In cPanel, go to File Manager , then go to our subdomain directory: node.yourname.xyz.
You’ll see there’s not much there currently — Let’s create a file called: main.js in the root folder for node.yourname.xyz, so that the file will be located at: node.yourname.xyz/main.js
Open this new empty file in the cPanel File Editor. OK, what will we put here?
Let’s take the example from the official Node.js site:
https://nodejs.org/en/docs/guides/getting-started-guide/
Copy and paste the following lines into your main.js file:
const http = require('http');

const hostname = '127.0.0.1'; const port = 3000;

const server = http.createServer((req, res) => { res.statusCode = 200; res.setHeader('Content-Type', 'text/plain'); res.end('Hello World'); });

server.listen(port, hostname, () => { console.log('Server running at http://${hostname}:${port}/'); });
Now we can return to the Node.js application in cPanel and fill in missing the Application startup file box. Put main.js in this field.
Click SAVE
Click START APP
Point your browser to http://node.yourname.xyz (or refresh the page if you still have it open in one of your web browser tabs). Now it should show:
Hello World
It worked!
Stop, wait a minute! In the main.js file we explicitly set the hostname to 127.0.0.1 and port to 3000. And still we can access the application using our domain name and port 80? The answer is — our application is running by Phusion Passenger (https://www.phusionpassenger.com/), and Phusion Passenger just ignores these values and uses it’s own, which we cannot access from cPanel. Luckily, they are just what we need here.
Let’s start doing something more interesting:
Writing the web server from scratch is not very productive. There are a number of popular frameworks to use with Node.js.
In this tutorial lets use Express
It’s a popular framework, originally built by one of the members of core Node.js team. “Express is a minimal and flexible Node.js web application framework that provides a robust set of features for web and mobile applications.”
We will need to use command line to run express-generator, so let’s make an SSH connection.
If you are on Windows, I recommend using a program called PuTTY. Use your cPanel username and password (not client area password!) and change port 22 to 88 — HostPresto uses port 88 for ssh connections for cPanel hosting.
Once logged in, activate your project virtual environment and cd into the project directory. How to do this? Actually cPanel contains a useful hint: at the top of the page the command is displayed:
Enter to the virtual environment. To enter to virtual environment, run the command (replacing “yourname” with your cPanel username & domain name as appropriate):
source /home/yournamexy/nodevenv/node.yourname.xyz/12/bin/activate && cd /home/yournamexy/node.yourname.xyz
Alternatively, you can also click on command shown on the cPanel Node.js page, and it will be copied to the clipboard. You can then paste the command to PuTTY terminal window and run it.
Now you are in your project directory and the virtual environment is activated.
Generating an application skeleton:
As most frameworks do, Express has a special tool to generate an application skeleton. In your project directory, run the following command:
npx express-generator -v twig
What is ‘twig’? This is the choice for the “view engine” parameter — what template engine to use. I prefer to use twig, because it’s more familiar to PHP and Python programmers than the jade engine which is used by Express by default. We will use twig for this example.
The following directory structure should appear after running express-generator:
. │ app.js │ package.json ├───bin │ www ├───public │ ├───images │ ├───javascripts │ └───stylesheets │ style.css ├───routes │ index.js │ users.js └───views error.twig index.twig layout.twig
Installing Node packages:
Express generator created the package.json file, but didn’t install any packages. So we need to do it ourselves. Run the following command:
npm install
This operation can also be done from cPanel. There is a button called Run NPM Install in the Node.js application manager. It detects the package.json file automatically and uses it.
Updating application settings:
Anyway, we need to return to the cPanel Node.js application manager to alter our application settings. Go to our node.yourname.xyz application and alter the Application startup file.
But don’t put app.js there as I did on the first attempt! The Express application has a specific startup file, namely bin/www. Just type in “bin/www” in the field.
Click SAVE
Click RESTART
This is what we will see in a browser now:

The only other page in the generated application is the “users” page: http://node.yourname.xyz/users
respond with a resource
This is what express generator has generated for us. Not very impressive.
Let’s add an About page
Adding an About page:
Let’s do some copy-and-paste work. Open the app.js file within the cPanel File Editor and add two lines, copying the existing lines (marked below with // NEW):
var createError = require('http-errors'); var express = require('express'); var path = require('path'); var cookieParser = require('cookie-parser'); var logger = require('morgan');

var indexRouter = require('./routes/index'); var usersRouter = require('./routes/users'); var aboutRouter = require('./routes/about'); // NEW

var app = express();

// view engine setup app.set('views', path.join(__dirname, 'views')); app.set('view engine', 'twig');

app.use(logger('dev')); app.use(express.json()); app.use(express.urlencoded({ extended: false })); app.use(cookieParser()); app.use(express.static(path.join(__dirname, 'public')));

app.use('/', indexRouter); app.use('/users', usersRouter); app.use('/about', aboutRouter); // NEW

// catch 404 and forward to error handler app.use(function(req, res, next) { next(createError(404)); });

// error handler app.use(function(err, req, res, next) { // set locals, only providing error in development res.locals.message = err.message; res.locals.error = req.app.get('env') === 'development' ? err : {};

// render the error page res.status(err.status || 500); res.render('error'); });

module.exports = app;
Then in the File Manager go to the ‘views’ directory and copy the index.twig file into about.twig
Do the same with the index.js file in the ‘routes’ directory — copy it into about.js
Open the new about.js file in the editor and change it like this:
var express = require('express'); var router = express.Router();

/* GET about page. */ router.get('/', function(req, res, next) { res.render('about', { title: 'About' }); });

module.exports = router;
Go to the Node.js application manager in cPanel and restart the application, then try the new About page: http://node.yourname.xyz/about

To make it look finished, let’s add a menu. Open the views/layout.twig file and change it like this:
<!DOCTYPE html> <html> <head> <title>{{ title }}</title> <link rel='stylesheet' href='/stylesheets/style.css' /> </head> <body> <nav id="nav"> <ul id="navigation"> <li><a href="/">Home</a> <li><a href="/about">About</a> <li><a href="/users">Users</a> </ul> </nav> <div id="content"> { % block body % }{ % endblock % } </div> </body> </html>
We added the “nav” section and then put “div” around { % block body % }
(I did not previously work with twig templates before but the syntax looks very similar to Django templates or Jinja templates in Python)
Finally, add some styling — open public/stylesheets/style.css file and add the following:
#navigation { margin:0; padding: 0; position:relative; float:left; border-right:1px solid #c4dbe7; }

#navigation li { font-size:12px; font-weight:bold; margin:0; padding:0; float:left; position:relative; border-top:1px solid #c4dbe7; border-bottom:2px solid #c4dbe7; }

#navigation li a { padding:10px 25px; color:#616161; text-shadow:1px 1px 0px #fff; text-decoration:none; display:inline-block; border-right:1px solid #fff; border-left:1px solid #C2C2C2; border-top:1px solid #fff; background: #f5f5f5; }

#navigation li a:hover { background:#f8f8f8; color:#282828; }

#navigation li:hover > a { background:#fff; }

#content { clear: both; padding: 10px; }
Once done, Restart the application

We did it. A fully working application built with Node.js and Express.js.
The next step would be to add a MySQL database to our application. But this is fairly straightforward, we would recommend using the official guide:
https://expressjs.com/en/guide/database-integration.html#mysql
Need Hosting? Try ours, it’s fast, reliable and feature loaded with support you can depend on.
HostPresto! is reasonably priced and reliable hosting. What makes it outstanding — like many hosting providers they give you PHP and MySQL out of the box, but unlike most of other providers, they give you a very simple solution to host almost any kind of application, Node.js, Django, Flask, Ruby-on-Rails to mention a few. And all this zoo of applications can co-exist on the same server! What makes HostPresto! a great choice for any developer.
Originally published at https://hostpresto.com.

Top comments (0)