When we start working with a new technology, we tend to test several different boilerplates in order to identify which one of them suits best for the project that we need to build. It turns out that the more expert you become in this technology, the more capable you are of adding your own "touch" to its defaults.
In my story with VueJS it wasn't different. I've been working with this JS framework for more than 3 years and now I have my own configuration preset I use in every new VueJS project I start.
Keep in mind that this article is not telling you that my preset is the only or the best way to structure a VueJS project. But it's the way it has been working for me for a while and that's why I'm sharing it with you.
TL;DR
In this article I show how I currently configure and organise my VueJS 2.x (I haven't tried to structure a VueJS 3 project with this configurations, so if you wanna try, comment with the result) projects which usually include:
- VueJS v2
- Vue Router
- Vuex
- Bootstrap Vue
- Axios
- Lodash
- Jest
- Vue Testing Library
- ESLint
- Prettier
- Babel
- Font Awesome
I'm not going to dive too deep in each configuration but I'll provide a quick and simple overview of them. You can find a fully-working boilerplate in my GitHub. The link is at the end of this article.
Scaffolding main folder structure
Usually, we get very excited when building a project from scratch. This means that we are able to define each one of the main structure aspects required for that project to run.
But, creating each one of the folders and files is pretty much a pain in the ass (sorry for the language, but it's true).
To avoid the "suffering", I take advantage of the Vue CLI, which is a command-line tool that does the "heavy work" for me. I run the following command on the terminal (make sure to install it using NPM):
vue create vuejs2-boilerplate
To avoid a bunch of prints here, I'm going to tell you the exact options I choose in each step of the create command.
1. Check the features needed for your project
Start choosing the last option Manually select features then, check the following options:
⦿ Babel
⦿ Progressive Web App (PWA) Support
⦿ Router
⦿ Vuex
⦿ Css Pre-processors
⦿ Linter/Formatter
⦿ Unit Testing
2. Choose a version of Vue.JS
⦿ 2.x
3. Use history mode for router?
Y (Yes)
4. Pick a CSS Pre-processor
⦿ Sass/SCSS (with node-sass)
5. Pick a linter / formatter config
⦿ ESLint + Prettier
6. Pick additional lint features
⦿ Lint on save
7. Pick a unit test solution
⦿ Jest
8. Where do you prefer placing config for Babel, ESLint, etc.?
⦿ In dedicated config files
*9. Save this as a preset for future projects? *
y (Yes)
10. Type a name for your new preset (what about "Handsome Pablo"?! 😎)
Wait for the tools to be installed.
Installing a few more dependencies
After the default dependencies have been installed, I install a few more packages to make sure my boilerplate will contain everything I need to start coding. So I run these two commands on the terminal:
yarn add bootstrap-vue axios lodash vue-content-placeholders indexof component-inherit @fortawesome/fontawesome-free
yarn add -D eslint-plugin-vue-a11y eslint-plugin-jest
Adding config files
I prefer to have a separated file for each one of the configurations the project requires. These are the files I usually add to my boilerplate:
jsconfig.json
This file will help VSCode to identify the paths aliases properly and enhance the auto complete feature.
{
  "compilerOptions": {
    "allowSyntheticDefaultImports": true,
    "baseUrl": ".",
    "paths": {
      "@/*": ["./src/*"]
    }
  },
  "exclude": [
    "node_modules"
  ]
}
.eslintrc.js
This file is responsible for loading the Linter base settings and also provide space for me to customize certain rules. I'm not going to dive deeper into all of them but, the main standards and rules I've added here are:
- Vue A11y Accessibility Rules;
- Components names must be written in Pascal Case;
- Do not allow unused variables;
- Remove semi colons;
- Replace double quotes by single quotes;
- Remove trailing commas;
- Do not require attributes hyphenation;
- Indent code;
module.exports = {
  env: {
    node: true,
    jest: true,
  },
  globals: {
    expect: 'writable',
    assert: 'writable'
  },
  plugins: ['vue', 'prettier', 'jest', 'vue-a11y'],
  extends: [
    'plugin:vue/recommended',
    'eslint:recommended',
    'prettier/vue',
    'plugin:prettier/recommended',
    'plugin:vue-a11y/recommended',
    'plugin:vue/essential',
    '@vue/prettier',
  ],
  rules: {
    'vue/component-name-in-template-casing': ['error', 'PascalCase'],
    'vue/attribute-hyphenation': 'off',
    'no-console': 'warn',
    'no-debugger': process.env.NODE_ENV === 'production' ? 'error' : 'off',
    'no-unused-vars': [
      'error',
      { vars: 'all', args: 'after-used', ignoreRestSiblings: true },
    ],
    'prettier/prettier': [
      'error',
      {
        semi: false,
        singleQuote: true,
        trailingComma: 'none'
      },
    ],
    'no-var': 2,
  },
  parser: 'vue-eslint-parser',
  parserOptions: {
    parser: 'babel-eslint',
  },
}
code-workspace file (skip if you do not use VSCode)
I've been using Microsoft VSCode for a while.
It is fast, easy to use and it has several useful extensions that help me on a daily basis.
After installing all of the dependencies, I create a .code-workspace file with a few useful configurations in the root directory of my project.
{
  "folders": [{
    "path": "."
  }],
  "settings": {
    "editor.formatOnSave": false,
    "editor.tabSize": 2,
    "editor.codeActionsOnSave": {
      "source.fixAll.eslint": true
    },
    "typescript.format.enable": false,
    "javascript.format.insertSpaceAfterCommaDelimiter": false,
    "javascript.format.semicolons": "remove",
    "eslint.alwaysShowStatus": true,
    "eslint.options": {
      "extensions": [
        ".html",
        ".js",
        ".vue",
        ".jsx"
      ]
    },
    "eslint.validate": [
      "vue",
      "html",
      "hollowtree.vue-snippets",
      "javascript",
      "javascriptreact",
      "vue-html"
    ],
    "vetur.validation.script": false,
    "vetur.validation.template": false,
    "cSpell.enabled": true,
    "cSpell.enableFiletypes": [
      "vue"
    ]
  },
  "extensions": {
    "recommendations": [
      "jcbuisson.vue",
      "hollowtree.vue-snippets",
      "dariofuzinato.vue-peek",
      "octref.vetur",
      "dbaeumer.vscode-eslint",
      "streetsidesoftware.code-spell-checker"
    ]
  }
}
This file also contains some extensions recommendations to use along with VueJS projects.
After creating it, a button named Open Workspace will be displayed at the right-bottom corner of the editor. Click on it to open the project through the workspace file and remember to always use File > Open Workspace to open your project instead of opening directly through the folder. This makes sure that all of the configurations are loaded and applied properly to the development environment.
When the Recommended Extensions popup appears, choose to install all of them:
Obs.: if another popup like the following appears, choose the option "Allow" to allow the local-installed Prettier module to be used across the project properly.
Folder structure
After setting up the basic configuration files for all tools and plugins, I create some new folders to organise the files better.
Unlike some boilerplates, I choose not to organize my code per domain simply because there are usually several features shared across all domains and, besides that, I think it makes it a little bit simpler to deal with.
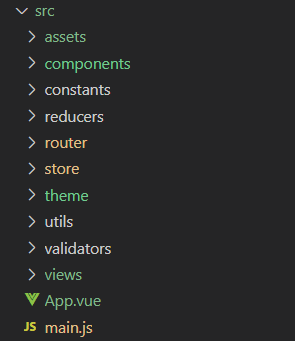
Basically, these are the folders my projects have within the src directory:
assets- contains all static resources such as images;components- contains all of the components used within the application. Notice in the print below that I create a folder for each component and put its unit test file inside it. It seems to me that, by doing this, it becomes easier to associate components files with their respective tests;constants- contains.jsfiles that hold constant values used across the entire application. Here I usually choose a "domain-driven" approach, grouping values in files according to the project scope;reducers- contains all.jsfiles that hold all functions used to compute data across the application. The name might not be really good, but it works well for me. When a look at it I know that it contains all functions I use to calculate derived states within the system. I also separate files here using a per-domain
approach;router- contains the routes configurations;theme- contains all custom.scssfiles used to overwrite styles;store- contains all of the Vuex files for managing the application global state;utils- mixed.jsfiles that contain global functions that might manipulate the DOM, check values integrity, format data and so on.validators- I usually build my own validation mechanism and, when I do that, I put all of the validation files within this folder (I might write an article about this mechanism in a near future).
So, basically, this is how my src looks like after creating some new folders as mentioned above:
And this is how the root directory of my project looks like after all changes:
Conclusion
When building a project from scratch, we have the chance to structure it aiming high productivity and maintainability. Boilerplates are really powerful resources that help us with the heavy work.
In this article I shared with you my latest VueJS 2.x boilerplate containing several tools, plugins and settings that make development easier and faster.
I hope you liked it. Please, share and comment!
You can find a fully-working example that implements everything mentions above at this link.
Cover image by Jessica Lewis


Latest comments (5)
Are you open to adding drag and drop to this article?
I believe that a darg and drop feature does not fit into this article. But I can write a new one explaining how I manage to implement it in my projects.
What do you think?
If it’s in the context of a collapsible list, I’d be thrilled with that.
I'll work on it... you'll see it published soon enough! :)
I can barely type out how thrilled I am at the prospect of seeing your post!