Have you ever tried to create and embed a data dashboard into your React application? If so, you may know that finding the right data visualization tools that correspond to the requirements of a particular project can be challenging. Let me outline the main requirements:
- Performance is above all. The dashboard should run smoothly on any browser and device.
- Easy integration with the underlying infrastructure of the application.
- A multitude of supported data sources for data analysis (CSV, JSON, databases).
- The dashboard should provide essential reporting features such as:
- Aggregating raw numbers.
- Interactive filtering by dates and values
- Sorting in ascending & descending order as well as the ability to define custom sorting rules.
- Grouping data under separate dimensions.
- Drilling through the data.
- Crucial data visualization features include:
- A wide range of charts that can be used for comparing values, showing the composition or distribution of the data, analyzing trends over time or expressing relationships between variables.
- Interactivity. An end-user should be able to interact with the elements on charts.
- Customization options such as styles & themes.
- Exporting results to PDF & Excel.
- Event system. To define custom scenarios of interaction with the components, events should be supported.
Today I'd like to share with you my thoughts about using tools that meet the above-mentioned demands and work together like a charm.
As a second part of the article, I’ll walk you through the process of creating a dashboard in the React application. All you need to use are two JavaScript libraries and a little bit of your imagination :)
What Will You Get
The dashboard consists of two parts - analytical and visual. The first one is a pivot table which is responsible for performing aggregating and filtering the raw data that I pull from the MongoDB database, the second one - a charting library for displaying this data in the form of appealing charts.
To my mind, these two components are inevitable parts of any dashboard. While the pivot table takes upon itself all the necessary data transforming, the charts make this data easier to perceive for the audience.
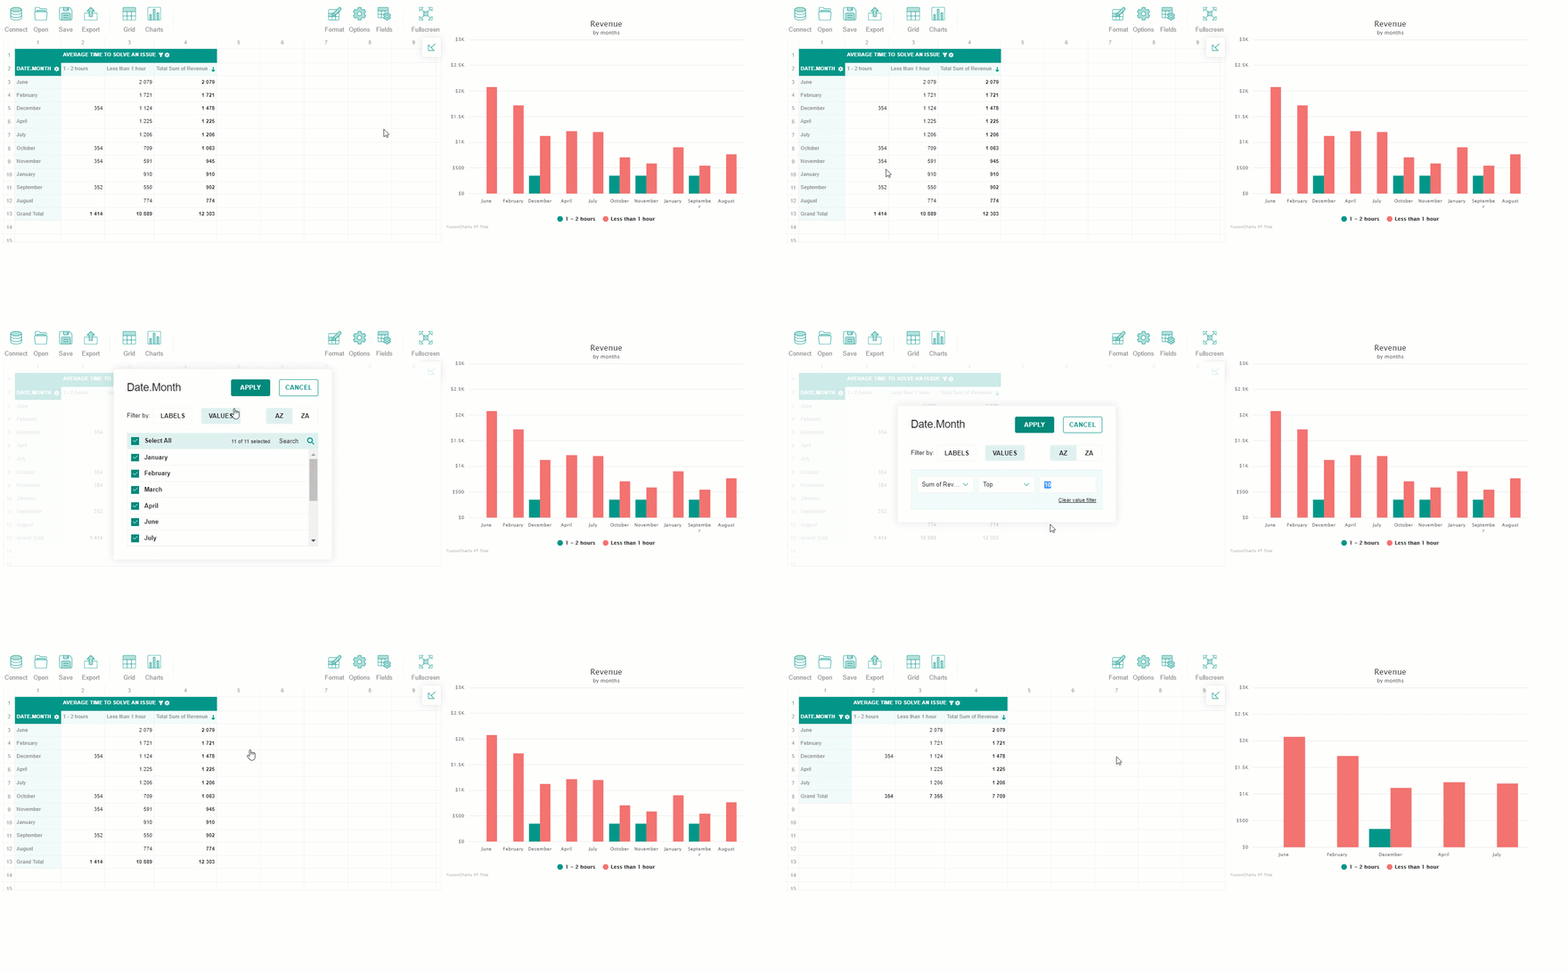
Here's a preview of the dashboard you will get as a result of accomplishing the tutorial:
It's worth mentioning that you can save your results afterward: the pivot table allows generating reports in PDF, Excel, CSV, HTML and PNG formats and charts can be exported to PDF or an image.
Have no time for reading the entire tutorial? Jump straight to the last paragraph and find a link to the CodePen demo to play with.
Let's start with introducing the libraries.
Pivot Table
Flexmonster Pivot Table & Charts is a client-side pivot table component I’d definitely recommend for using as a part of embedded BI solution. It integrates smoothly with React and other JavaScript frameworks. But, first of all, it strikes with an abundance of data sources: CSV, JSON, SQL, and NoSQL databases, and Elasticsearch. The second great thing is an interactive functionality that is accessible from its user interface. It's possible to aggregate, filter and sort data easily at runtime:
Besides, its extensive API allows defining interactive behavior and changing the appearance of the component. The thing that I especially like is the customizeCell API call - it helps to restyle the contents of particular cells. Another customization features are conditional and number formatting similar to the ones in Excel. Also, it’s possible to select one field with different aggregation functions or create custom calculated values. The latter functionality is useful when you need to track important sales and marketing metrics.
Charting Library
FusionCharts is a charting library that works with multiple JavaScript frameworks and React is one of them. It’s loved by numerous developers around the world and there are reasons for that. The thing that I liked the most is the convenience of usage. You can display any data in spectacular charts effortlessly - the demos are ready to help you start the journey to the data visualization world. Another remarkable feature is the ability to change themes, labels, tooltips, and legends of the chart through configuring attributes.
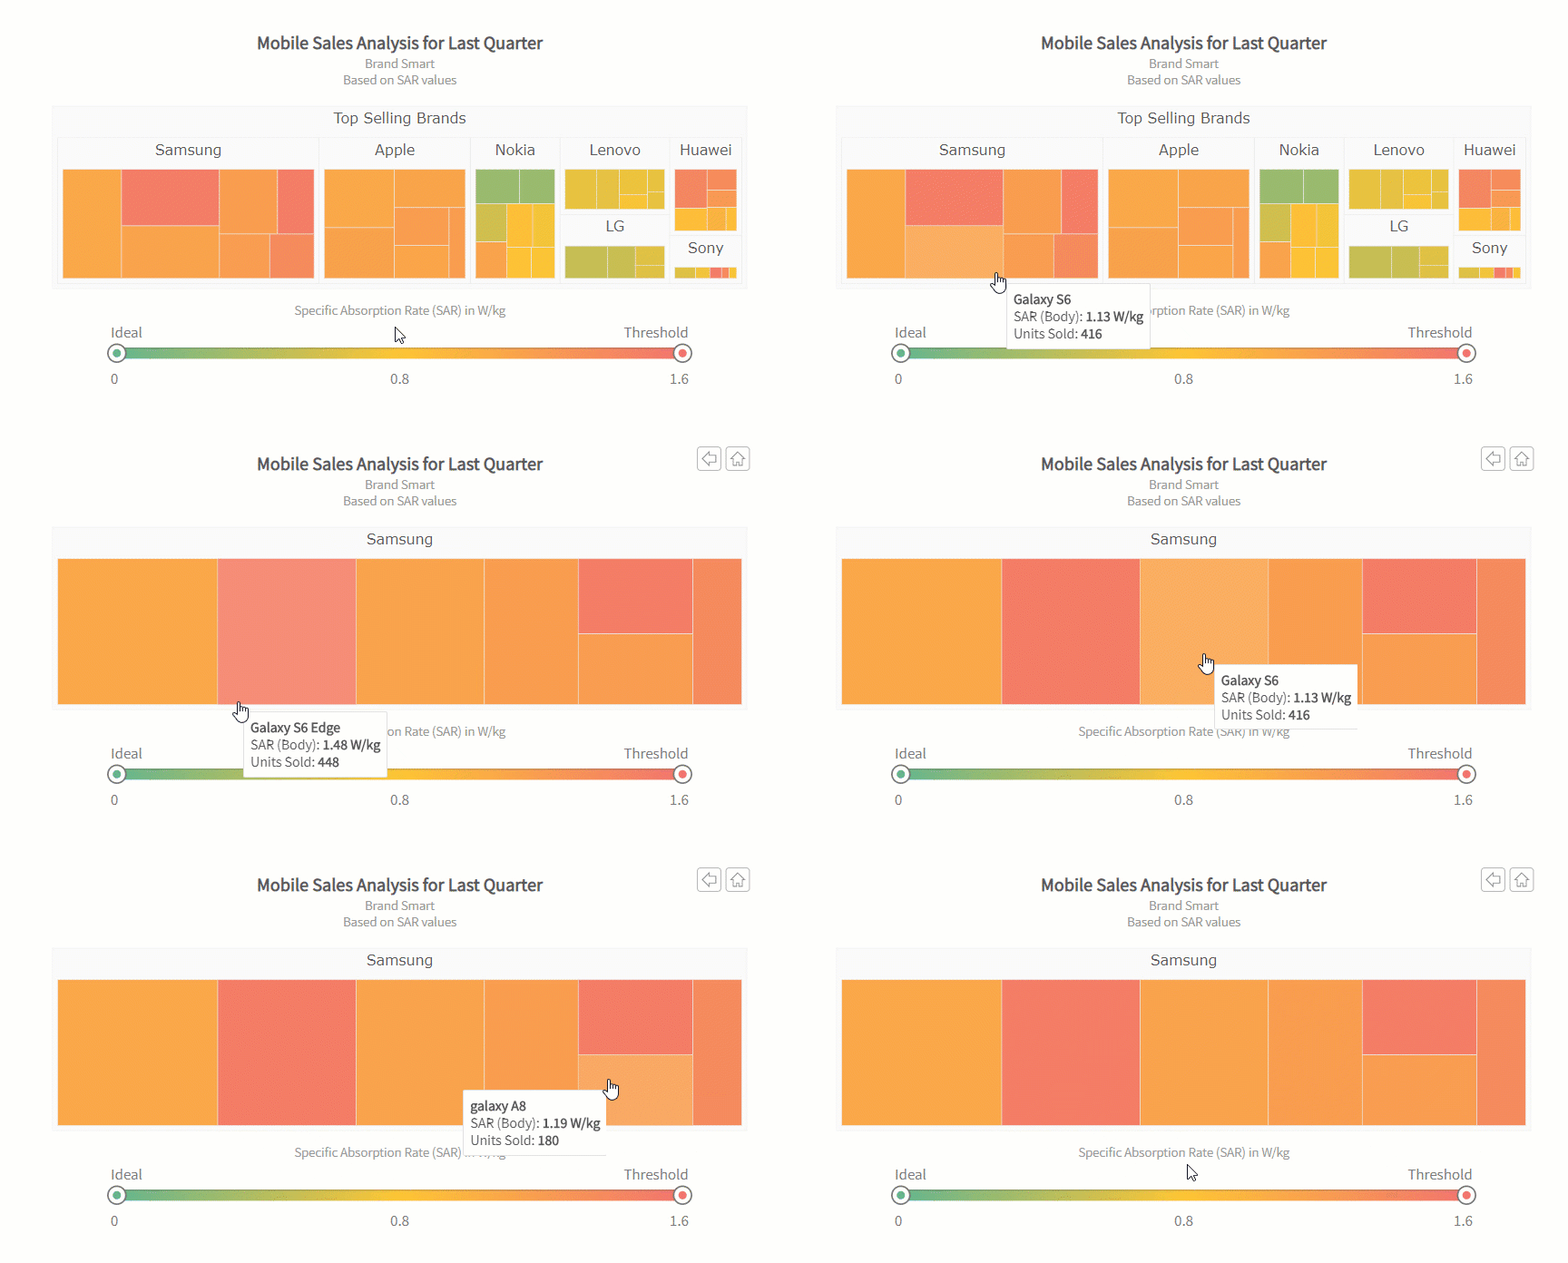
Check out how you can visualize the hierarchical data in a treemap:
Integrating Flexmonster with FusionCharts
To make two components work together, you need to initialize them and integrate after. The entire process is quite straightforward:
- Install Flexmonster dependencies.
- Install FusionCharts dependencies.
- Initialize the pivot table and feed the data into it.
- Create your report based on this data.
- Initialize charts once the pivot table is ready to provide data.
Later you’ll see that you can always return to step 4 so as to change the report, pass updated data to charts and get new insights.
Since each point requires more explanation, let’s get deeper into the details.
Installing a Pivot Table
After creating a single-page React application, you need to install Flexmonster as an npm package and render a pivot table into an HTML container:
<script src="https://cdn.flexmonster.com/flexmonster.js"></script>
<div id="fm-component"></div>
ReactDOM.render( <
    FlexmonsterReact.Pivot toolbar = {
        true
    }
    width = {
        "100%"
    }
    componentFolder = "https://cdn.flexmonster.com/"
    report = {
        {
            "dataSource": {
                dataSourceType: "ocsv",
                filename: "http://localhost:3000/data"
            }
        }
    }
    />,
    document.getElementById("fm-component"))
);
Connect Your Data Source
Now it's time to load your data into the component. Using the connector for MongoDB, I managed to establish a connection with the MongoDB database and pull the data from it. You can do the same by using this tutorial.
Create Report Based on the Data
Firstly, define which part of the data you need to show on the grid. This subset of the report is called a slice. Here you can put the hierarchies into rows, columns, measures and set all the filters and/or sorting.
I've tried filtering the data by months to show the revenue for two months.
This is an example of the slice that can be a part of the report:
"slice": {
    "rows": [{
        "uniqueName": "Date.Month"
    }],
    "columns": [{
        "uniqueName": "[Measures]"
    }],
    "measures": [{
        "uniqueName": "Revenue",
        "aggregation": "sum"
    }]
}
Now your pivot table is rendered and filled with the data you want to concentrate on.
Installing Charting Library
Setting up FusionCharts is not a problem as well - following the Integration with React guide leads to the successful embedding of the component in your project. After installing its npm package, create a <div> container where the chart should be rendered:
<script src="https://cdn.fusioncharts.com/code/latest/react-fusioncharts.js"></script>
<script type="text/javascript" src="https://unpkg.com/react-fusioncharts@2.0.1/dist/react-fusioncharts.min.js"></script>
<div id="chart-container"></div>
To be able to apply different themes, import the necessary scripts:
<script src="https://static.fusioncharts.com/code/latest/themes/fusioncharts.theme.gammel.js"></script>
<script src="https://static.fusioncharts.com/code/latest/themes/fusioncharts.theme.candy.js"></script>
Display the Data from the Table in Charts
Each chart of the FusionCharts library accepts JSON data in a different format. Therefore, you need to pre-process the data that you request from the pivot table and provide it to the chart. There is an easy way to do it - just add the connector of Flexmonster that handles processing the data for the appropriate type of chart.
Here is a script to import:
<script src="https://cdn.flexmonster.com/flexmonster.fusioncharts.js"></script>
Now the methods from this connector are available in your application.
Next, you need to implement the following logic:
- Wait till the pivot table is rendered and ready to provide data (you can listen to the
reportcompleteevent for this). - Request the data from the report by using the
flexmonster.fusioncharts.getData()API call. - Prepare this data and pass it to
callbackHandlerandupdateHandlerwhere the chart is created for the first time and updated correspondingly.
Here is an example of defining the createChart() function:
function createChart() {
    flexmonster.fusioncharts.getData({
        type: "doughnut2d",
        "slice": {
            "rows": [{
                "uniqueName": "Customer Satisfaction"
            }],
            "columns": [{
                "uniqueName": "[Measures]"
            }],
            "measures": [{
                "uniqueName": "Requests",
                "aggregation": "sum"
            }]
        }
    }, drawChart, updateChart);
}

function drawChart(data) {
    var chartConfigs = {
        type: 'doughnut2d',
        width: '500',
        height: '350',
        dataFormat: 'json'
    };
    data.chart.caption = "Customer Satisfaction";
    chartConfigs.dataSource = data;
    ReactDOM.render( <
        ReactFC {
            ...chartConfigs
        }
        />,
        document.getElementById('chart-container')
    );
}

function updateChart(data) {
    var chartConfigs = {
        type: 'doughnut2d',
        width: '500',
        height: '350',
        dataFormat: 'json'
    };
    data.chart.caption = "Customer Satisfaction";
    chartConfigs.dataSource = data;
    ReactDOM.render( <
        ReactFC {
            ...chartConfigs
        }
        />,
        document.getElementById('chart-container')
    );
}
And attaching the createChart() function to reportcomplete as an event handler:
reportcomplete = {
    createChart
}
These snippets show how to create a single chart on the page but you can define as many charts as you need in a similar way.
Adding Extra Visual Features
Need to personalize the appearance of your dashboard? You can either change colors of particular elements of the charts/pivot table or apply pre-made themes to them. Or even both :)
Personally, I find the teal theme of Flexmonster one of the most eye-catching. And to make the charts fit the palette of the pivot table, I specified the color palette for data plot. You can configure charts through attributes.
Results
Save your results and check out how the chart interacts to the changes you apply to the report:
Bringing it All Together
Today you’ve learned how to enhance your React application with an analytical business dashboard.
To my mind, these two data visualization tools - the pivot table and charting library - totally complement each other. With their help, you are able to create an awesome dashboard in minutes. I encourage you to experiment with your data and try multiple ways of presenting the data.
Please share your results - I’ll be glad to see them!
Thank you for reading!
Demo
Play with the live demo on CodePen 👩💻👨💻
Recommended reading
Let me share with you all the useful links that helped me to understand how to use Flexmonster and FusionCharts in my React project:


Latest comments (5)
How can we do it with free tools?
I'm in the same boat. I'm about to try Cube JS: react-dashboard.cube.dev/
looks good! let us know how is it
This article is right on time) I was looking for something like this for my side project. Thanks
Thank you for the feedback, Yaovi!
I'm happy to know you find it useful.
Have a nice day!