
Table of Contents
-
Table of Contents
- Hardening the Ubuntu Dokku Droplet Part 1: Creating a new user in the sudo group
- Hardening the Ubuntu Dokku Droplet Part 2: Harden OpenSSH on Ubuntu and disable root
- Changing your Host to a Static IP and Implementing an IP address Allowlist Part 1
- Changing your Host to a Static IP and Implementing an IP address Allowlist Part 2
- Connecting the dots...getting a blog pushed onto Cloudflare pages, querying our MySQL database on the DO Dokku droplet via a GraphQL playground in Strapi (hosted also on our DO Dokku droplet).
Hardening the Ubuntu Dokku Droplet Part 1: Creating a new user in the sudo group
!!! tip
As a preface, to anybody who's interested in hardening your Linux server, I highly recommend "Unix and Linux Administration Handbook 5th edition" which contains the following advice and more.
!!! note
Recall, instructions prefaced with REMOTE are run on my remote Dokku droplet in an SSH terminal.
For further instructions, see here and here.
- REMOTE: Set the RAM swap. Although we will be temporarily increasing memory when installing Strapi, using a RAM swap decreases the chances of failure due to low memory when installing NPM packages. For more information, see here.
cd /var
touch swap.img
chmod 600 swap.img
dd if=/dev/zero of=/var/swap.img bs=1024k count=1000
mkswap /var/swap.img
swapon /var/swap.img
free
echo "/var/swap.img    none    swap    sw    0    0" >> /etc/fstab
Here's my output:

-
REMOTE: Let's adjust swappiness values and vfs_cache_pressure. swappiness values close to 100 (the default) attempt to load the SWAP with data to free up RAM. For a server, this is better closer to 0:
sudo sysctl vm.swappiness=10
vfs_cache_pressure is related to inode/filesystem access and should be set conservatively, so inode information is removed from cache less often:
sudo sysctl vm.vfs_cache_pressure=50
Output:

To make these settings persist, sudo nano /etc/sysctl.conf and add the following to the bottom of the file:
vm.swappiness = 10
vm.vfs_cache_pressure = 50
Output:

- Being root user is a huge security problem, as you could wipe your system in a single command if you're not careful. Let's remedy this by creating our own user account and later we'll be turning off root account.
REMOTE: Create a new user as root with adduser <username>

REMOTE: Grant that user administrative privileges with usermod -aG sudo <username>
-
REMOTE: Next, we copy Public SSH keys from the
rootuser to our own user. The set of commands is as follows, replacevicwith the user you created:
mkdir -p /home/vic/.ssh # Create ssh directory
chmod 700 /home/vic/.ssh # Apply directory permissions
cp /root/.ssh/authorized_keys /home/vic/.ssh/authorized_keys # Copy the ssh authorized key
chown -R vic:vic /home/vic/.ssh # Apply user and group permissions
chmod 600 /home/vic/.ssh/authorized_keys # Apply file permissions
-
LOCAL: Reconnect to the droplet as your new user.
exitthe root remote connection, then, on a local Git Bash window, runssh <user>@<subdomain>.vicstech.xyz

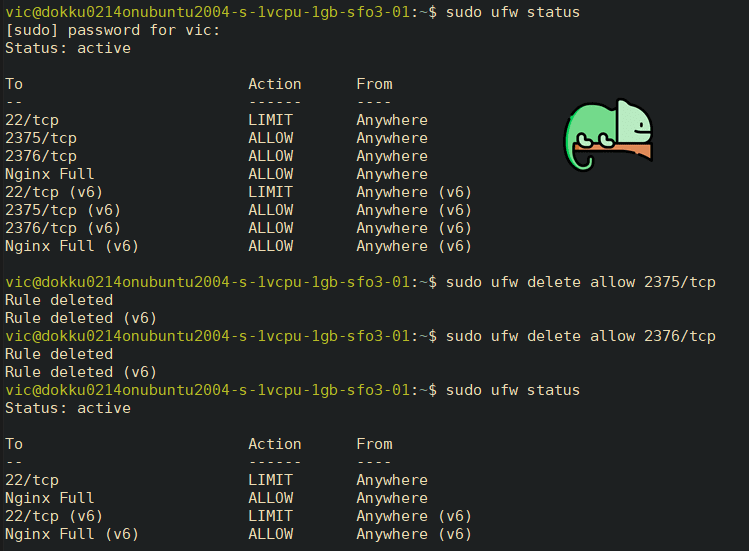
- REMOTE: Delete the Docker ports which are opened by default to mitigate security risks.
sudo ufw status

# Delete Docker UFW rules
sudo ufw delete allow 2375/tcp
sudo ufw delete allow 2376/tcp

sudo ufw status
My output:
Nice, we're getting there. 🌷
We've set up a new user account with sudo privileges and added a swap file.
Hardening the Ubuntu Dokku Droplet Part 2: Harden OpenSSH on Ubuntu and disable root
We're almost finished setting up our server. The last things we need to do are harden our security settings for OpenSSH, and install Fail2Ban to prevent unwanted logins.
Information is taken from this guide.
Now that we're logged in as a new user, let's go ahead and harden OpenSSH then install Fail2Ban.
REMOTE: Backup configuration file:
sudo cp /etc/ssh/sshd_config /etc/ssh/sshd_config.bakREMOTE: Edit the SSHD configuration with
sudo nano /etc/ssh/sshd_config
Change the following settings to more secure ones as follows:
PermitRootLogin no
MaxAuthTries 3
LoginGraceTime 20
X11Forwarding no
AllowAgentForwarding no
AllowTcpForwarding no
Output:


REMOTE: Validate the syntax with
sudo sshd -t, which should have no output if everything is correct:

REMOTE: Reload the new settings with
sudo service sshd reloadLOCAL: Now, if we attempt to SSH at root, we get the following output:

Alright, good. Now root can no longer login, which was a big security risk. We'll continue by implementing an IP Address Allowlist.
The basic idea behind this is Deny By Default security, in which all inbound and outbound traffic not expressly permitted by SSHD service is blocked. 🛑
Changing your Host to a Static IP and Implementing an IP address Allowlist Part 1
!!! note
The following commands are all local.
Even if by some odd chance your private keys or password gets leaked, if you have implemented an IP address allow list, you can ensure only users on those IP addresses can login. Let's do that now.
!!! tip
For the purposes of this guide, I'll be setting up my Ethernet IP as static, though the instructions are similar for a Wi-Fi adapter.
I'll be taking steps from this guide.
Type
ip addressinto the Windows 10 search bar, then click "Ethernet Settings"

Click "Change Adapter options"

Right click on Ethernet to set up a static IP over Ethernet, or right click on WiFi if your computer is connected via WiFi --> Then click "Status"

Click "Details"

Take note of the following info: IPv4 address, IPv4 subnet mask, IPv4 default gateway, and IPv4 DNS server.
!!! note
As my IP is currently Static, it says DHCP is not enabled.

This information can also be found via ip config /all on the Windows CMD prompt:

Note: the adapter's name is "Ethernet"
- IPv4 Address: 10.0.0.220 (Preferred)
- IPv4 Subnet Mask: 255.255.255.0
- IPv4 Default Gateway: 10.0.0.1
- IPv4 DNS Servers:
- 75.75.75.75
- 75.75.76.76
- We can set our static IP address graphically or through the CMD. To set it graphically, follow the rest of this guide.
To set it manually via CMD using netsh command, keep following:
- To set a static IP address to 10.0.0.220 for an adapter named "Ethernet", with subnet mask 255.255.255.0, and Gateway 10.0.0.1:
   IPv4 Address. . . . . . . . . . . : 10.0.0.180(Preferred)
   Subnet Mask . . . . . . . . . . . : 255.255.255.0
   Lease Obtained. . . . . . . . . . : Thursday, February 24, 2022 9:07:06 AM
   Lease Expires . . . . . . . . . . : Saturday, February 26, 2022 9:07:06 AM
   Default Gateway . . . . . . . . . : fe80::10:18ff:fe46:236a%12
   10.0.0.1
   DHCP Server . . . . . . . . . . . : 10.0.0.1

C:\WINDOWS\system32>netsh interface ip set address name="Ethernet" static 10.0.0.220 255.255.255.0 10.0.0.1
Output of ipconfig /all:

Note: If you're using a Wifi Adapter, check the name in ipconfig /all:

Your adapter name would be "Wi-Fi" (case-sensitive).
- To set the DNS servers:
Set DNS servers:
C:\WINDOWS\system32>netsh interface ip set dns name="Ethernet" static 75.75.75.75
C:\WINDOWS\system32>netsh interface ip add dns name="Ethernet" 75.75.76.76 index=2
Output of ipconfig /all

Great, that's it. We're static. ⚡
There's a lot of other benefits to setting your static IP such as ease of SSH use and port forwarding, but I won't get into that here.
For our next steps, let's finish configuring OpenSSH on our remote server, then configure Fail2Ban.
Changing your Host to a Static IP and Implementing an IP address Allowlist Part 2
!!! note
These instructions are taken from the latter half of this guide.
Now we're going to implement an IP Address Allowlist in both OpenSSH and Fail2Ban.
-
LOCAL: If you're not already, log on to the remote server again with
ssh vic@apps.vicstech.xyz -
REMOTE: press
wand enter to see your connecting IP:

!!! note
My remote Dokku server's connecting IP is 71.59.236.28.
-
REMOTE: Edit our OpenSSH server configuration:
sudo nano /etc/ssh/sshd_configand add some configuration directives:
AllowUsers *@71.59.236.28 *@71.59.236.0/27
Here we restrict all users to a specific IP address and a range.
To be a bit more secure, you can remove the range if you want.
-
REMOTE: Run
sudo service sshd reload
Congratulations, your SSHD server is hardened. Next, let's install Fail2Ban to prevent any unwanted users from accessing our server.
-
REMOTE: Let's update with
sudo apt update
Output:

-
REMOTE: Install Fail2Ban on our Dokku server with
sudo apt install fail2ban
Output:

REMOTE: Create a .local Fail2Ban configuration file from the default jail.conf:
sudo cp /etc/fail2ban/jail.{conf,local}REMOTE: Open the jail.conf file with
sudo nano /etc/fail2ban/jail.localand uncomment the line starting with ignoreip, add our local IP address followed by all machines to whitelist (insert your IP from earlier here):
ignoreip = 127.0.0.1/8 ::1 71.59.236.28 71.59.236.0/27
Output from /etc/fail2ban/jail.local

Modify the following additional settings in /etc/fail2ban/jail.local:
For more information on these options and more, see this guide.
!!! note
Set 1d to a negative like -99d if you want to permaban them.
bantime  = 1d
maxretry = 4
-
REMOTE: Finally, restart Fail2Ban to apply the configurations --
sudo systemctl restart fail2ban
So we've set up a static IP on our host PC, installed Fail2Ban on our remote Dokku server, and whitelisted our host PC's IP on the remote server in both SSHD and Fail2Ban configurations. We've also disabled root login and hardened both configurations against attackers.
It's a lot... but it's necessary in this dog eat dog world. 🤷🏼♂️
Check out your Fail2Ban logs sometime, you might see some surprising brute force and automated attack attempts...
Soon, finally, we will get to the cooler stuff 🥁
Setting up an Eleventy blog with MySQL-hosted posts and a Strapi CMS on our shiny new and secure server. 💻 🕷
Connecting the dots...getting a blog pushed onto Cloudflare pages, querying our MySQL database on the DO Dokku droplet via a GraphQL playground in Strapi (hosted also on our DO Dokku droplet).
I'll save the nitty-gritty, inner-workings of my blog and how I emulate Eleventy's high performance blog example for later. For now, we just want to connect the dots...let's see what we have and what we still need to do:
- Install MySQL plugin for Dokku
- Install Strapi CMS onto Dokku
- Allow Strapi CMS to talk to our MySQL instance.
- Query from our MySQL instance using GraphQL query playground (built-in to Strapi).
- Pull queries into Blog markdown files and present them with Nunjucks templating language (and some JS) in Eleventy.

Top comments (0)