
The goal of this tutorial is to give an introduction to vue.js ❤.
This content was initially written for a workshop for DAM Digital London.
Vue.js is a progressive framework for building user interfaces (UI).
This tutorial assumes that you already have some intermediate knowledge about HTML, CSS and Javascript. If you don't have any knowledge of these fields, check out freeCodeCamp, they have great resources to learn these topics 😉.
Here are the subjects this tutorial will cover:
- v-bind directive
- Class and Style Bindings
- Event Handling
- Data binding in attributes
- List Rendering
- Interpolations - Mustache
- Form Input Bindings - Checkbox
- v-model
- Methods
- Conditional Rendering
- v-if
- v-else
- Introduction to PWA
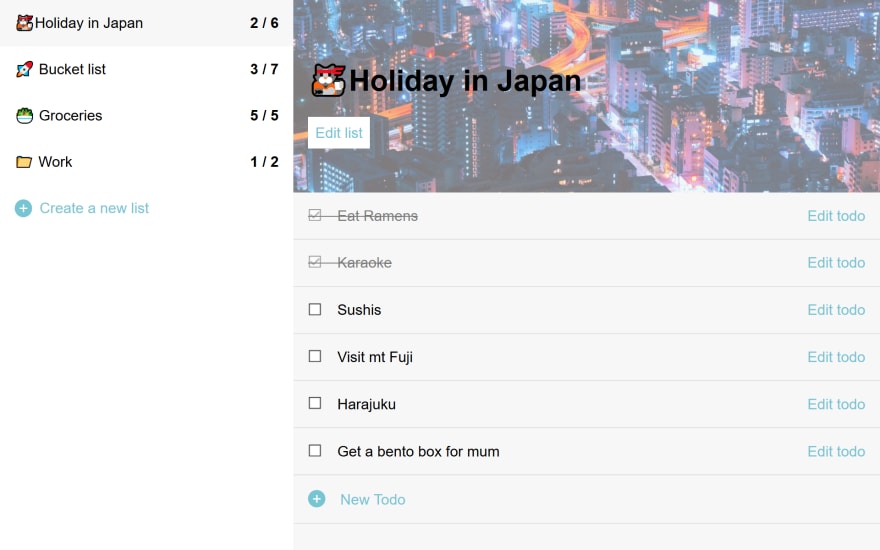
We are going to create a todo application with the ability to have multiple lists of todos.
Getting started
Clone the starter materials from github. It includes the base HTML, CSS and JS.
You can find the final code of this tutorial on github, and the demo if you follow this link.
Vue CDN is already included in our index.html, as well as our CSS and content/js/app.js 😃.
Toggle navigation on mobile
First thing first, the side navigation on mobile (📱 < 850px) should show and hide.
When we click on Menu we want <nav> to toggle the class .is-open.
In vue.js, v-bind allow us to bind data inside an html attribute. E.g. v-bind:id="", v-bind:style="", v-bind:data-target="", etc. The shorthand for v-bind is :.
In index.html, we will dynamically pass .is-open using v-bind:class. If isNavOpen is true, then we will add our class.
<nav v-bind:class="{'is-open': isNavOpen}">
<!-- ... -->
</nav>
In content/js/app.js, we need isNavOpen in our data. If you change the value of this last one to true, the nav will show up.
The data property in vue.js is where we store the data of our application but as well the state of our UI. For example, isNavOpen is by default set to false, but by changing its value to true, we can bind the class is-open to the DOM.
In our app.js, we need to add isNavOpen: false.
var app = new Vue({
  el: "#app",
  data: {
    isNavOpen: false
  }
});
Now we want to change the value of isNavOpen when we click on the Menu button.
We are going to use the event handler 'on click'. In vue.js, we can use v-on: or @ (Shorthands), to listen to DOM events. In our case, we want to listen to a click event. We are then going to use v-on:click/@click.
<button v-on:click="isNavOpen = !isNavOpen" class="menu">Menu</button>
As you can see, we can pass an inline javascript statement, we can as well use a method (function), we will see later in this tutorial how to use this last one.
Documentation references
Bind our todo lists to the side navigation
In content/js/app.js, let's add some dummy lists so we can start to integrate our side navigation.
var app = new Vue({
  el: "#app",
  data: {
    isNavOpen: false,
    todoLists: [
      {
        title: "✈️ Trip to japan",
        keyword: "japan",
        items: [
          { name: "Eat ramen", isCompleted: true },
          { name: "Visit mt Fuji", isCompleted: false },
          { name: "Learn japanese", isCompleted: false }
        ]
      },
      {
        title: "🏂 Ski trip to the Alps",
        keyword: "Alps",
        items: [
          { name: "Find a chalet", isCompleted: true },
          { name: "Learn how to ski", isCompleted: false }
        ]
      },
      {
        title: "🍉 Groceries",
        keyword: "Food",
        items: [
          { name: "Apples", isCompleted: false },
          { name: "Banana", isCompleted: true },
          { name: "Tomatoes", isCompleted: false },
          { name: "Bread", isCompleted: true }
        ]
      }
    ]
  }
});
To render our lists in the side navigation, we need to use the v-for directive.
<nav v-bind:class="{'is-open': isNavOpen}">
  <ul>
    <li v-for="todoList in todoLists">
      <button>
        {{todoList.title}}
        <span>
          {{todoList.items.length}}
        </span>
      </button>
    </li>
    <li>
      <button class="is-add">Create a new list</button>
    </li>
  </ul>
</nav>
todoLists is the source data and todoList is the alias used to iterate in our array.
We are using the 'moustache' syntax {{}} to bind our text to the view. The moustache tag gets replace by the targeted value in todoLists.
Documentation references
Main section
Header
We want to be able to see our todos in the main section. For now, we will only render the first todoLists list (index 0).
In content/js/app.js => data add currentListIndex: 0.
var app = new Vue({
  el: "#app",
  data: {
    isNavOpen: false,
    currentListIndex: 0,
    todoLists: [
      //...
    ]
  }
});
Bind the title of the list using the moustache syntax in the header.
<h1>{{todoLists[currentListIndex].title}}</h1>
The header has a background image. We are using Unsplash Source to get a random image. We can specify a keyword to get a relevant image for our header.
https://source.unsplash.com/featured/?{KEYWORD},{KEYWORD}
As we bind our keyword inside an attribute, we are using v-bind
<header v-bind:style="'background-image: url(https://source.unsplash.com/featured/?' + todoLists[currentListIndex].keyword + ')'">
  <!-- ... -->
</header>
Todos
To render our todos in the main section, we will need to use v-for. As we want an individual ID and names for each input we are passing the index in our for loop v-for="(value, index) in object".
We use v-bind to check/tick our todos inputs if these ones are already checked.
We are using v-model to update the value of isCompleted from our todos when we click on the checkbox. When our checkbox is checked, isCompleted will get the value of true and the parent li will automatically get the class .is-completed as isCompleted is true.
The v-model directive creates a two-way data bindings, meaning when the value gets updated the UI will be updated as well.
<ul>
  <li v-for="(todo, index) in todoLists[currentListIndex].items" v-bind:class="{'is-completed': todo.isCompleted}">
    <label v-bind:for="'todo' + index">
      <input
      type="checkbox"
      v-bind:name="'todo' + index"
      v-bind:id="'todo' + index"
      v-bind:checked="todo.isCompleted"
      v-model="todo.isCompleted">
      {{todo.name}}
    </label>
    <button class="is-danger">Edit todo</button>
  </li>
  <li>
    <button class="is-add">New Todo</button>
  </li>
</ul>
Documentation references
Change current list
We want to be able to change the current list being displayed. This one is set by currentListIndex in our app's data. When we click on one of the list items we want to change currentListIndex to the index of this one and close the side navigation if open.
We need as well, to show the user the current list being displayed, to do so, we are adding the class .is-active if currentListIndex === index.
<li v-for="(todoList, index) in todoLists"  v-bind:class="{'is-active' : currentListIndex === index}">
    <button v-on:click="currentListIndex = index; isNavOpen = false">
        {{todoList.title}}
        <span>
            {{todoList.items.length}}
        </span>
    </button>
</li>
Create a new list
Toggle the sidebar
When clicking on Create a new list, we show the .sidebar. To do so we want to add the class .is-open to this one, then close the nav bar if this one is open on mobile. The way to do this is quite similar to what we have done with the navigation on mobile.
In our data, we will first, add a new entry of isSidebarOpen: false:
var app = new Vue({
  el: "#app",
  data: {
    isNavOpen: false,
    isSidebarOpen: false,
    currentListIndex: 0
    //...
  }
});
Now let's bind our class .is-open to our .sidebar:
<div class="sidebar" v-bind:class="{'is-open' : isSidebarOpen}">
 <!-- ... -->
</div>
We need to add an event handler on click on Create a new list, that will open the sidebar and close the navigation on mobile:
<button class="is-add" v-on:click="isSidebarOpen = true; isNavOpen = false;">Create a new list</button>
Nice, now we can open our sidebar 🎉.
Now let's close the sidebar when we click on cancel:
<button type="button" class="is-danger" v-on:click="isSidebarOpen = false">Cancel</button>
Add the new list
To create a new list, we need the values of the title and keyword inputs. When the user clicks on Create List, we will push our new values to todoLists in our data. If one of our input is empty we will show up a default value.
In our app.js, add a tempNewList array, it will store the values of our inputs.
var app = new Vue({
  el: "#app",
  data: {
    isNavOpen: false,
    isSidebarOpen: false,
    currentListIndex: 0,
    tempNewList: [
      {
        title: null,
        keyword: null
      }
    ]
    //...
  }
});
Now we will bind our inputs using v-model.
<form>
  <h3>Create a new list</h3>
  <label for="listTitle">Title:</label>
  <input id="listTitle" name="listTitle" type="text" placeholder="My amazing next trip to south america" v-model="tempNewList.title">
  <label for="listKeyword">Keyword:</label>
  <input id="listKeyword" name="listKeyword" type="text" placeholder="Colombia" v-model="tempNewList.keyword">
  <div class="buttons">
      <button type="button" class="is-danger" v-on:click="isSidebarOpen = false">Cancel</button>
      <button type="button" class="is-confirm">Create List</button>
  </div>
</form>
Alright, now let's push our new tempNewList values to todoLists.
Create a method called addNewList. A method is a function stored as an object property. Here the object is the vue instance. In vue, our method will be stored in a methods object.
addNewList method will follow this scenario:
- If title is empty, use a default string of
"🕵️ List with no name" - If keyword is empty, use a default string of
"earth" - Push our values to
todoLists - Change our current list to our new list
- Close the sidebar
- Reset the values of our inputs
var app = new Vue({
el: "#app",
data: {
//...
},
methods: {
addNewList: function() {
var listTitle = this.tempNewList.title;
var listKeyword = this.tempNewList.keyword;
if (listTitle == null) {
listTitle = "🕵️ List with no name";
}
if (listKeyword == null) {
listKeyword = "earth";
}
this.todoLists.push({
title: listTitle,
keyword: listKeyword,
items: []
});
this.currentListIndex = this.todoLists.length - 1;
this.isSidebarOpen = false;
this.tempNewList.title = null;
this.tempNewList.keyword = null;
}
}
});
Finally, we are going to bind our method to our Create list button.
<button type="button" class="is-confirm" v-on:click="addNewList">Create List</button>
Documentation references
Edit a list
Good, now that we can create a new list, we want the ability to edit existing ones. We will be able to edit the title, the keyword and delete a list.
Toggle the sidebar content
Create a new method openSidebar. This one will:
- Open the sidebar
- Show the form that we want to use
- Close the navigation if this one is open
In data, let's add sidebarContentToShow: null, This will allow us to know what form should be shown.
var app = new Vue({
  el: "#app",
  data: {
    isNavOpen: false,
    isSidebarOpen: false,
    sidebarContentToShow: null,
    currentListIndex: 0
    //...
  },
  methods: {
    //...
  }
});
We have 4 forms in our sidebar that we will toggle:
-
"createNewList" -
"editList" -
"createNewTodo" -
"editTodo"
In our HTML, we will conditionally render our forms depending on the value of sidebarContentToShow. To do so we are using the v-if directive. It will allow us to render our block if a condition is true. We need to uncomment our forms and add a v-if directive.
<div class="sidebar" v-bind:class="{'is-open' : isSidebarOpen}">
  <div class="sidebar-content">
      <form v-if="sidebarContentToShow === 'createNewList'">
          <h3>Create a new list</h3>
          <!-- ... -->
      </form>
      <form v-if="sidebarContentToShow === 'editList'">
        <h3>Edit list</h3>
          <!-- ... -->
      </form>
      <form v-if="sidebarContentToShow === 'createNewTodo'">
        <h3>Create a new todo</h3>
          <!-- ... -->
      </form>
      <form v-if="sidebarContentToShow === 'editTodo'">
        <h3>Edit todo</h3>
          <!-- ... -->
      </form>
  </div>
</div>
Now when we click on the Create a new list, the sidebar appears and we see... Nothing 😱. That normal remember, sidebarContentToShow is set to null 😉.
To change the value of sidebarContentToShow we are going to create an openSidebar method that will open the sidebar and change the form that we want to show.
var app = new Vue({
  el: "#app",
  data: {
    //...
  },
  methods: {
    openSidebar: function(contentToShow) {
      this.isSidebarOpen = true;
      this.isNavOpen = false;
      this.sidebarContentToShow = contentToShow;
    }
    //...
  }
});
Now we can change Create a new list so we can use openSidebar
<button class="is-add" v-on:click="openSidebar('createNewList')">Create a new list</button>
And ta-dah we are now rendering the create a new list form. As you may have already guessed we will reuse our method with the Edit list button.
<button class="is-primary" v-on:click="openSidebar('editList')">Edit list</button>
Edit list form
Delete a list
We are going to start with the delete list button. Create a new method called deleteList. It will remove the currently shown list and show the first one.
//...
deleteList: function() {
  this.todoLists.splice(this.currentListIndex, 1);
  this.currentListIndex = 0;
  this.isSidebarOpen = false;
}
//...
<button type="button" class="is-danger" v-on:click="deleteList">Delete list</button>
Now we can remove lists, but if we try to remove all lists we get an error and our app stop to work.
[Vue warn]: Error in render: "TypeError: todoLists[currentListIndex] is undefined"
As you might have guessed, we have this error because our todoLists is empty and we still try to render some part of our application that relies on the values of todoLists. We will use conditional rendering v-if and v-else, to fix this issue we will render our main content only if todoLists.length > 0. Moreover, we want the user to able to create a new list, we will use v-else to show an alternative main content that will help the user create a new list.
<main v-if="todoLists.length > 0">
  <!-- ... -->
</main>
<main v-else>
  <header style="background-image: url(https://source.unsplash.com/featured/?cat">
      <div class="header-content">
          <h1>Please create a new list</h1>
          <button class="is-add" v-on:click="openSidebar('createNewList')">Create a new list</button>
      </div>
  </header>
</main>
Change the title and keyword value
Let's get back to our editList form. We want to:
- Bind our inputs with the right
todoListselement usingv-model. - When we click on done, we want to close our slider.
- Only want to render this form if
todoLists.length > 0
<form v-if="sidebarContentToShow === 'editList' && todoLists.length > 0">
    <h3>Edit list</h3>
    <label for="listTitle">Title:</label>
    <input id="listTitle" name="listTitle" type="text" placeholder="My amazing next trip to south america" v-model="todoLists[currentListIndex].title">
    <label for="listKeyword">Keyword:</label>
    <input id="listKeyword" name="listKeyword" type="text" placeholder="Colombia" v-model="todoLists[currentListIndex].keyword">
    <div class="buttons">
        <button type="button" class="is-danger" v-on:click="deleteList">Delete list</button>
        <button type="button" class="is-confirm" v-on:click="isSidebarOpen = false">Done</button>
    </div>
</form>
Documentation references
Create and edit a todo
The UI of our app is almost finished, we still need to:
- Create a new todo in a list
- Edit and delete an existing todo
Sound similar to what we have done with the lists right? It is going to be almost the same steps.
Create a todo
In our data create a new element of tempNewList:
tempNewTodo: [
  {
    name: null,
    isCompleted: false
  }
],
We need a new method, so we can add our new todo to a list in todoLists
addNewTodo: function() {
var todoName= this.tempNewTodo.name;
var todoCompleted = this.tempNewTodo.isCompleted;
if (todoName == null) {
todoName = "🕵️ unnamed todo";
}
this.todoLists[this.currentListIndex].items.push({
name: todoName,
isCompleted: todoCompleted
});
this.isSidebarOpen = false;
this.tempNewTodo.name = null;
this.tempNewTodo.isCompleted = false;
}
Now let's dive in our HTML.
We need to open the sidebar with the createNewTodo form.
<button class="is-add" v-on:click="openSidebar('createNewTodo')">New Todo</button>
As we did before, we will bind our inputs using v-model and use the addNewTodo method to push our new values.
<form v-if="sidebarContentToShow === 'createNewTodo'">
    <h3>Create a new todo</h3>
    <label for="todoName">Name:</label>
    <input id="todoName" name="todoName" type="text" placeholder="Do things..." v-model="tempNewTodo.name">
    <label for="todoCompleted"><input name="todoCompleted" id="todoCompleted" type="checkbox" v-bind:checked="tempNewTodo.isCompleted" v-model="tempNewTodo.isCompleted"> Is completed</label>
    <div class="buttons">
        <button type="button" class="is-danger" v-on:click="isSidebarOpen = false">Cancel</button>
        <button type="button" class="is-confirm" v-on:click="addNewTodo">Create todo</button>
    </div>
</form>
As we are now binding the data for isCompleted in our todos, we will show, in our navigation the number of completed todos.
In our app.js, create a totalTodosCompleted method passing the index of the current todoList.
totalTodosCompleted: function(i){
  var total = 0;
  for (var j = 0; j < this.todoLists[i].items.length; j++) {
    if(this.todoLists[i].items[j].isCompleted){
      total++;
    }
  }
  return total;
}
And now in our navigation, we are going to use our new method to return the total of completed todos.
<li v-for="(todoList, index) in todoLists" v-bind:class="{'is-active' : currentListIndex === index}">
    <button v-on:click="currentListIndex = index; isNavOpen = false">
        {{todoList.title}}
        <span>
            {{totalTodosCompleted(index)}} / {{todoList.items.length}}
        </span>
    </button>
</li>
Edit a todo
To edit a todo, first, we need to know the index of the todo that will be editing, in our data, create currentTodoIndex.
currentTodoIndex: 0,
We will need a deleteTodo method that will remove the current todo.
deleteTodo: function() {
  this.todoLists[this.currentListIndex].items.splice(this.currentTodoIndex, 1);
  this.isSidebarOpen = false;
  this.currentTodoIndex = 0;
}
Now let's have look at our HTML.
First, we want to open our slider and change the value of currentTodoIndex.
<button class="is-primary" v-on:click="openSidebar('editTodo'); currentTodoIndex = index">Edit todo</button>
In our editTodo form we will:
- Show our form only if
todoLists[currentListIndex].items.length > 0 - Bind the todo name and if completed using
v-model - When we click on Delete todo, trigger the method
deleteTodo - When we click on Done, close our sidebar
<form v-if="sidebarContentToShow === 'editTodo' && todoLists[currentListIndex].items.length > 0">
  <h3>Edit todo</h3>
  <label for="todoName">Todo:</label>
  <input id="todoName" name="todoName" type="text" placeholder="Do things..." v-model="todoLists[currentListIndex].items[currentTodoIndex].name">
  <label for="todoCompleted"><input name="todoCompleted" id="todoCompleted" type="checkbox" v-bind:checked="todoLists[currentListIndex].items[currentTodoIndex].isCompleted" v-model="todoLists[currentListIndex].items[currentTodoIndex].isCompleted"> Is completed</label>
  <div class="buttons">
      <button type="button" class="is-danger" v-on:click="deleteTodo">Delete todo</button>
      <button type="button" class="is-confirm" v-on:click="isSidebarOpen = false">Done</button>
  </div>
</form>
🎉🎉🎉🎉🎉 The UI of our todo is now done!
LocalStorage
When we reload the page, it goes back to our dummy values. How great would it be if we could store our lists and todos locally?
We are going to use window.localStorage. It is part of the Web Storage API.
localStorage allow us to store data with no expiration date.
In our app.js, create a new method updateTodoLocalStorage
//...
updateTodoLocalStorage: function () {
  localStorage.setItem('todoLocalStorage', JSON.stringify(this.todoLists));
}
//...
We are using setItem() method from the Web Storage API. We pass the following parameters:
-
setItem(keyName, keyValue);-
keyName: name of the key we want to create/update ('todoLocalStorage'). -
keyValue: value we want to give the key you are creating/updating (JSON.stringify(this.todoLists)).
-
We want now to use this method every time we update the values of our todos or lists. Vue allows us to react to data changes with the watch option. Every time we have a change in our todoLists, we will call our updateTodoLocalStorage method. As our object has nested values, we want to detect changes inside this values. We can pass deep: true to do so.
var app = new Vue({
  el: "#app",
  data: {
    //...
  },
  watch: {
    todoLists: {
      handler() {
        this.updateTodoLocalStorage();
      },
      deep: true
    }
  },
  methods: {
    //...
    updateTodoLocalStorage: function() {
      localStorage.setItem("todoLocalStorage", JSON.stringify(this.todoLists));
    }
  }
});
Now let's inspect our app and look into Local Storage. If we create/update a list or a todo, we can see our todoLocalStorage storage being updated.
Now, when we load our page, we need to set our todoLists as our todoLocalStorage. Vue comes with Lifecycle Hooks. We will use the created: function() one to set our values. We are going, as well, to remove our dummy values.
var app = new Vue({
  el: "#app",
  data: {
    //...
    todoLists: []
  },
  created: function() {
    this.todoLists = JSON.parse(
      localStorage.getItem("todoLocalStorage") || "[]"
    );
  },
  watch: {
    //...
  },
  methods: {
    //...
  }
});
Now if we reload, close and reopen our app all our todos and list have been saved 🤟.
Documentation references
Bonus - Offline Progressive Web App (PWA)
In this bonus part of this tutorial, we will set up a Progressive Web App (PWA) and services workers, so we can use this web application offline on a smartphone.
Set up a PWA
A PWA is:
Progressive Web Apps are web applications that are regular web pages or websites, but can appear to the user like traditional applications or native mobile applications. The application type attempts to combine features offered by most modern browsers with the benefits of a mobile experience. wikipedia
It is basically a web app that takes advantages of the latest technologies to act and feels like a native app.
To set up our PWA we will need to create a manifest.json file and set up our service workers.
PWA must be served from a secure origin (HTTPS).
Generate icon assets
First, include all the icon assets in our project. The icons have already been generated using https://realfavicongenerator.net/. They are included in content/img/.
In the head of our HTML we want to include:
<link rel="apple-touch-icon" sizes="180x180" href="content/img/apple-touch-icon.png">
<link rel="icon" type="image/png" sizes="32x32" href="content/img/favicon-32x32.png">
<link rel="icon" type="image/png" sizes="16x16" href="content/img/favicon-16x16.png">
<link rel="mask-icon" href="content/img/safari-pinned-tab.svg" color="#5bbad5">
<link rel="shortcut icon" href="content/img/favicon.ico">
<meta name="msapplication-TileColor" content="#ffffff">
<meta name="msapplication-config" content="content/img/browserconfig.xml">
<meta name="theme-color" content="#77c4d3">
Web App Manifest
Web App Manifest (manifest.json) is a file that provides information about our web app such as icons, the name of our application, etc. It is part of the technologies used for PWAs. You can get more information about the Web App Manifest on MDN web docs.
Create this file at the root of our project.
{
  "name": "todo",
  "short_name": "todo",
  "author": "Vincent Humeau",
  "lang": "en-GB",
  "icons": [
    {
      "src": "content/img/android-chrome-192x192.png",
      "sizes": "192x192",
      "type": "image/png"
    },
    {
      "src": "content/img/android-chrome-512x512.png",
      "sizes": "512x512",
      "type": "image/png"
    }
  ],
  "theme_color": "#77c4d3",
  "background_color": "#77c4d3",
  "display": "standalone",
  "orientation": "portrait",
  "scope": "/todo/",
  "start_url": "/todo/"
}
In our HTML file, we want to include it.
<link rel="manifest" href="manifest.json">
Service workers
What are service workers?
Service workers are a new browser feature that provide event-driven scripts that run independently of web pages. Unlike other workers, service workers can be shut down at the end of events, note the lack of retained references from documents, and they have access to domain-wide events such as network fetches. Service workers also have scriptable caches. Along with the ability to respond to network requests from certain web pages via script, this provides a way for applications to “go offline”. w3c/ServiceWorker - Github
This tutorial does not aim to go in depth about service workers, you can find some great tutorial and resources online:
- How to Setup a Basic Service Worker (with Caching) - bitsofcode (Video)
- Service Workers: an Introduction
- pwabuilder - service workers
- pwabuilder - service workers
- Lighthouse
- Making a Simple Site Work Offline with ServiceWorker
- Getting Started with Service Workers
For our services workers we are using this gist from Omranic
Create a sw.js file at the root of our project.
In our index.html:
<script>
    if ('serviceWorker' in navigator) {
        window.addEventListener('load', () => {
            navigator.serviceWorker.register('sw.js');
        });
    }
</script>
Then, in our sw.js we will cache all our assets that will allow our app to be usable offline:
var shellCacheName = "pwa-todo-v1";
var filesToCache = [
  "./",
  "./index.html",
  "./content/css/screen.min.css",
  "./content/js/app.js",
  "https://cdn.jsdelivr.net/npm/vue",
  "https://cdnjs.cloudflare.com/ajax/libs/normalize/8.0.0/normalize.min.css"
];
Now, we only have to follow this gist and add the parts Listen to installation event, Update Assets Cache and Serve App Shell Offline From Cache.
This tutorial is now finally done. Our todo vue.js PWA can now be accessed here https://vinceumo.github.io/todo

Oldest comments (0)