
Do you have a website? Do you want to accept online payments from your customers? If you answered yes to these questions, Fincra is the best option. Fincra also offers a variety of other services, such as cross-currency payouts and the creation of Virtual Accounts
You can create any payment flow for your specific use case by integrating Fincra APIs into your application. Please see Fincra's documentation for instructions on how to integrate its various products and services.
One of the ways Fincra allows you to collect payments from customers worldwide is through the checkout API.
The checkout API is available in both standard and redirect format; in this tutorial, we will be working with the standard method. The standard format involves you including a Javascript file in your application which will generate a modal that can be used to receive payments from your customers without redirecting them to another page.
This tutorial will teach you how to integrate Fincra's checkout API into your NodeJS application.
Prerequisites
To follow along with this tutorial, we will need:
- Some knowledge of JavaScript and node js but not neccesary
- We also need a Fincra account to receive or accept payments from our application.
- Your full attention
Step 1 - Create a directory and Install dependencies
To begin, we'll need to create our project. You can use whichever IDE you choose.
Create a folder and initialize npm by typing the following command
mkdir fincra-app

cd fincra-app

npm init -y
Step 2 - Create Files
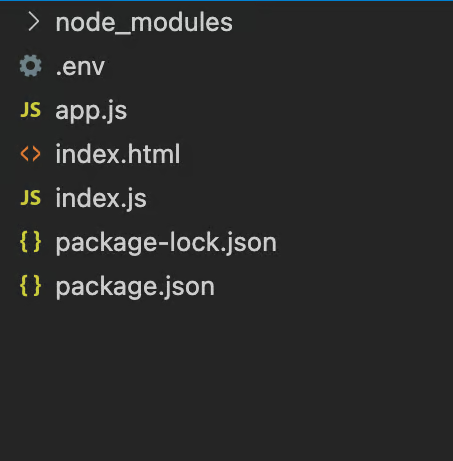
At the root of our folder, we will make three files: index.js, index.html, and app.js.
touch app.js index.js index.html
Your folder structure should look like this now.
Step 3 - Install dependencies
We will install several dependencies, such as express, dotenv, and axios, and a development dependency, such as nodemon, so that the server will automatically restart whenever we make changes.
npm install dotenv express


npm install nodemon -D
Step 4 - Create a Node.js server
We can now create our Node.js server by adding the following snippets to our app.js, index.js in this order.
In our app.js
fincra-app/app.js
require("dotenv").config();
const express = require("express");


const app = express();

app.use(express.json());

// your Logic here

module.exports = app;
In our index.js
const http = require("http");

const app = require("./app");

const server = http.createServer(app);


const { API_PORT } = process.env;
const port = process.env.PORT || API_PORT


server.listen(port, () => {
    console.log(`Server running on port ${port}`);
});
Our file needs environment variables. We'll create a .env file and add our variables before running our app.
In our .env
API_PORT=3000
We will make changes to the scripts object in our package.json to look like this.
"scripts": {
    "start": "node index.js",
    "dev": "nodemon index.js",
    "test": "echo \"Error: no test specified\" && exit 1"
  }
The code above has been added to our app.js and index.js files. We created an index.js file for our Node.js server and imported the app.js file with the routes we intended to use.
Using the npm run command, we will execute npm dev in our terminal.
npm run dev
Everything should be working correctly now that the server is up and running.
step 5 - Create the Front end client
Let's get the front-end client set up to receive customer payments.
Update the index.html that we created earlier with the snippet below:
<!DOCTYPE html>
<html lang="en">

<head>
    <meta charset="UTF-8" />
    <meta name="viewport" content="width=device-width, initial-scale=1.0" />
    <title>Receive Payment With Fincra</title>

    <style>
        input {
            display: block;
            margin: 10px 0;
            width: 300px;
            height: 30px;
            padding: 2px 15px;
            border: 1px solid #ddd;
            border-radius: 3px;
        }

        button {
            display: block;
            margin: 10px 0;
            color: white;
            width: 330px;
            height: 50px;
            padding: 2px 15px;
            border: 1px solid #ddd;
            border-radius: 3px;
            background-color: #844ef1;
            font-weight: bold;
        }

        form {
            left: 50%;
            top: 30%;
            position: absolute;
            transform: translate(-50%, -50%);
        }
    </style>
</head>

<body>
    <form class="form" id="payment-form">
        <div class="form-group">
            <label for="name"> Name</label>
            <input type="text" id="name" />
        </div>
        <div class="form-group">
            <label for="amount">Amount</label>
            <input type="number" id="amount"/>
        </div>
        <div class="form-group">
            <label for="email">Email Address</label>
            <input type="email" id="email" />
        </div>

        <div class="form-submit">
            <button type="submit" onclick="payFincra()"> Pay with Fincra</button>
        </div>
    </form>
    <script src="https://unpkg.com/@fincra-engineering/checkout@1.10.0/dist/inline-test.min.js"></script></body>

</html>
Notice in this example:
- A
scripttag is used to add the Fincra JavaScript. This is how you import Fincra to your code - The payFincra onClick function is linked to the Pay button. This is what makes the Fincra payment modal show up.
Let's add the following javascript snippet to our HTML File
<script>
        const paymentForm = document.getElementById('payment-form');
        paymentForm.addEventListener("submit", payFincra, false);
        function payFincra(e) {
            e.preventDefault();
            Fincra.initialize({
                key: "your public key",
                amount: parseInt(document.getElementById("amount").value),
                reference: "your unique reference here"
                currency: "NGN",
                customer: {
                    name: document.getElementById("name").value,
                    email: document.getElementById("email").value,
                },

                onClose: function () {
                    alert("Transaction was not completed, window closed.");
                },
                onSuccess: function (data) {
                    const reference = data.reference;
                    alert("Payment complete! Reference: " + reference);
                },
            });
        }
    </script>
Take note of the following:
- The
keyfield here takes your Fincra public key; you can get it by following the instructions here - The
amountfield here is the amount to be collected. - To avoid duplicate attempts, it's best to generate a unique
referencefrom your system for each transaction. - The
onClosemethod is called if the user closes the modal without completing payment. - The
onSuccessmethod is called if the transaction is completed
This is how our index.html file will now look.
<!DOCTYPE html>
<html lang="en">

<head>
    <meta charset="UTF-8" />
    <meta name="viewport" content="width=device-width, initial-scale=1.0" />
    <title>Receive Payment With Fincra</title>

    <style>
        input {
            display: block;
            margin: 10px 0;
            width: 300px;
            height: 30px;
            padding: 2px 15px;
            border: 1px solid #ddd;
            border-radius: 3px;
        }

        button {
            display: block;
            margin: 10px 0;
            color: white;
            width: 330px;
            height: 50px;
            padding: 2px 15px;
            border: 1px solid #ddd;
            border-radius: 3px;
            background-color: #844ef1;
            font-weight: bold;
        }

        form {
            left: 50%;
            top: 30%;
            position: absolute;
            transform: translate(-50%, -50%);
        }
    </style>
</head>

<body>
    <form class="form" id="payment-form">
        <div class="form-group">
            <label for="name"> Name</label>
            <input type="text" id="name" />
        </div>
        <div class="form-group">
            <label for="amount">Amount</label>
            <input type="number" id="amount"/>
        </div>
        <div class="form-group">
            <label for="email">Email Address</label>
            <input type="email" id="email" />
        </div>

        <div class="form-submit">
            <button type="submit" onclick="payFincra()"> Pay with Fincra</button>
        </div>
    </form>
    <script src="https://unpkg.com/@fincra-engineering/checkout@1.10.0/dist/inline.min.js"></script>
<script>
        const paymentForm = document.getElementById('payment-form');
        paymentForm.addEventListener("submit", payFincra, false);
        function payFincra(e) {
            e.preventDefault();
            Fincra.initialize({
                key: "your public key",
                amount: parseInt(document.getElementById("amount").value),
                reference: "your unique reference here"
                currency: "NGN",
                customer: {
                    name: document.getElementById("name").value,
                    email: document.getElementById("email").value,
                },

                onClose: function () {
                    alert("Transaction was not completed, window closed.");
                },
                onSuccess: function (data) {
                    const reference = data.reference;
                    alert("Payment complete! Reference: " + reference);
                },
            });
        }
    </script>
</body>
</html>
Using the following snippet, we can update our app.js to render the index.html file from the server-side:
require("dotenv").config();
const express = require("express");
const axios = require('axios')

const path = require("path");

const app = express();

app.use(express.json());

// Add the route below
app.get("/pay", (req, res) => {
    res.sendFile(path.join(__dirname + "/index.html")); //__dirname : It will resolve to your project folder.
});


module.exports = app;
Let's see if it works by going to our browser and typing http://localhost:4001/pay. When we click the Pay With Fincra button, we should see something like what's below:
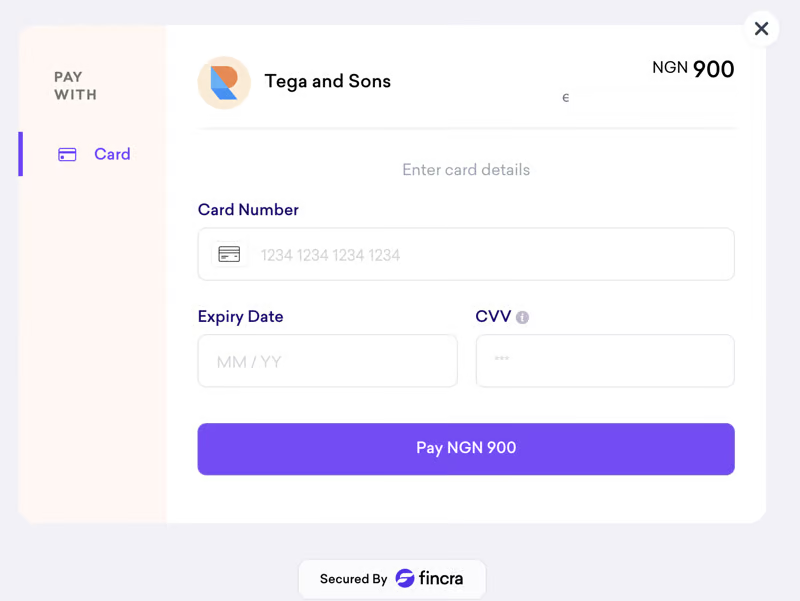
We will use the test card number: 4084 1278 8317 2787, expiry date: 09/22 and CVV: 123.

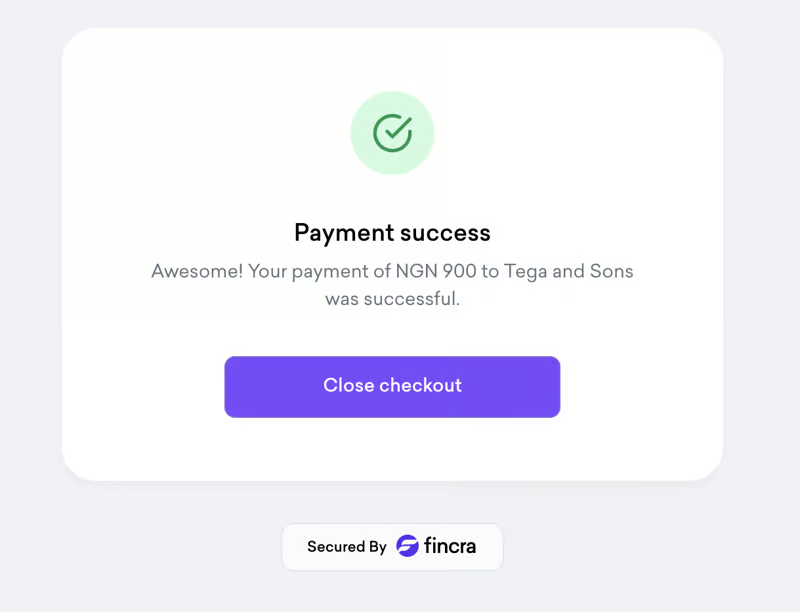
After the payment is successful we will see a response on the browser
Step 6 - Receive the webhook
We can update our app.js file to receive the webhook response using the following snippet. In the portal, you may specify the URLs for your webhooks. Learn more about Fincra API webhooks by checking out the API documentation.
app.post("/response", async (req, res) => {
    const response = req.body.data;

    console.log(response)


})
We should see something like the screenshot below in our log. Please go to the API documentation to learn more about the response below

Step 7 - Verify Payments
Depending on the type of transaction, you can validate a webhook by querying the transaction by its reference to confirm its existence. In this case, we can send a get request either the get collection by reference endpoint or get transaction by reference endpoint to confirm the status of the transaction.
Conclusion
This tutorial taught us how to implement Fincra payment integration into our nodeJs application.
References
Fincra
Docs of Fincra
I'd love to connect with you on Twitter | LinkedIn
See you in my next blog article. Take care!!!

Top comments (0)