
In this part of the tutorial we'll create a local node project with hardhat, write our smart contract in it, compile our smart contract and deployed our smart contract to a test network.
This project is hosted here.
Link to Github Repo of the project here. This will serve as a reference for you, if at some point you are not able to follow the tutorial.
For this project we'll using some tools and services such as
- Hardhat
- Alchemy
- Metamask
- Rinkeby Test Network
What is hardhat?
Hardhat is a development environment to compile, deploy, test, and debug your Ethereum software. It helps developers manage and automate the recurring tasks that are inherent to the process of building smart contracts and dApps, as well as easily introducing more functionality around this workflow.
What is alchemy?
Alchemy is a blockchain developer platform focused on making blockchain development easy. We've built a suite of developer tools, enhanced APIs, and superior node infrastructure to make building and running blockchain applications seamless.
What is Metamask?
Metamask is a software cryptocurrency wallet used to interact with the Ethereum blockchain. It allows users to access their Ethereum wallet through a browser extension or mobile app, which can then be used to interact with decentralized applications.
What is a Test Network(testnet)?
These are networks used by protocol developers or smart contract developers to test both protocol upgrades as well as potential smart contracts in a production-like environment before deployment to Mainnet.
There are multiple testnets available like Görli, Kovan, Rinkeby and Ropsten. For this project we'll be using Rinkeby.
Creating a Node Project.
mkdir SimpleBank
cd SimpleBank
npm init --yes
npm install --save-dev hardhat
This will create a directory called SimpleBank (name of the project) and initialize it as a node project and install hardhat.
npx hardhat
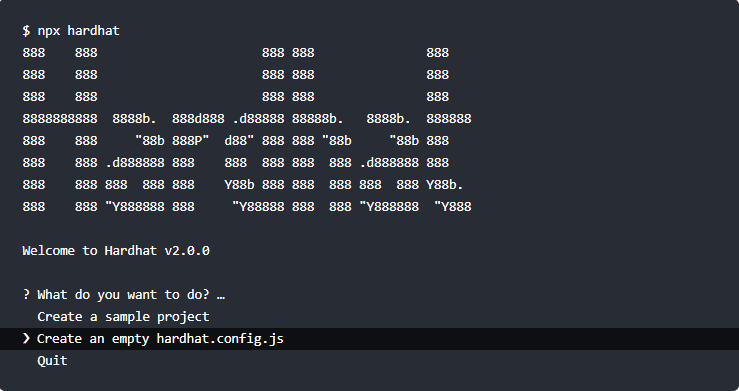
Select Create an empty hardhat.config.js when prompted. This will create an empty hardhat config file.
Installing plugins and dependencies
npm install --save-dev @nomiclabs/hardhat-ethers ethers @nomiclabs/hardhat-waffle ethereum-waffle chai
These plugins will allow us to interact with ethereum and test our contract.
npm install dotenv
We'll use dotenv to store our API Key and Private Key as environment variables.
Git
git init
Initialize a git reop, if you plan on using version control and uploading it to github, which will come handy at the end when we host our project.
Make sure you make regular commits when you see fit and push it to the remote server. Here is how to for the same.
For .gitignore configuration refer repo.
Writing and Compiling Smart Contract.
Create a directory called contracts and create a file inside it called Bank.sol. This is where smart contract goes.
// SPDX-License-Identifier: MIT
pragma solidity ^0.7.0;

contract Bank {

    // Mapping of user address to their balance
    mapping(address => uint256) private balance;


    // Deposit function (payable)
    function deposit() public payable {
        require(msg.value > 0);

        if (balance[msg.sender] > 0) {
            balance[msg.sender] = balance[msg.sender] + msg.value;
        }else{
            balance[msg.sender] = msg.value;
        }
    }

    // Withdraw function (payable)
    function withdraw(uint256 amount) public payable {
        address payable client = msg.sender;
        require(balance[msg.sender] >= amount);
        client.transfer(amount);
        balance[msg.sender] = balance[msg.sender] - amount;
    }

    // Check balance function (view)
    function getBalance() public view returns(uint256){
        return (balance[msg.sender]);
    }
}
Explanation for this contract is provided in part 1.
Now, add the following to hardhat.config.js
require("@nomiclabs/hardhat-waffle");

/**
 * @type import('hardhat/config').HardhatUserConfig
 */
module.exports = {
  solidity: "0.7.3",
};
In order to compile the smart contract, run
npx hardhat compile
If successful, you'll get an output like this
Compiling 1 file with 0.7.3
Compilation finished successfully
Deploying contract to test network
Before we are able to deploy our contract to a test network, we need to setup certain things.
Setup
- Install Metamask to your browser. Follow their instructions to setup an account.
- Go to rinkeby faucet and follow the instructions to receive some test ethers to your account.
- Signup on Alchemy.
- Create a new app with configurations as shown below.

Setting up .env file
Create a .env file in the root directory and add the following
ALCHEMY_API_URL = <YOUR_API_URL>
RINKEBY_PRIVATE_KEY = <YOUR_PRIVATE_KEY>
You can get the alchemy API URL from the app you created earlier, copy the http version.
And you can get your private key from metamask as shown here. This is needed to deploy our contract to the test network.
Private Key is a very sensitive information, so make sure not to reveal it to anyone. Do not forget to add
.envto.gitignorefile if you have a remote repository for the project on github.
Update hardhat.config.js
require('dotenv').config()
require('@nomiclabs/hardhat-waffle')

/**
 * @type import('hardhat/config').HardhatUserConfig
 */

const ALCHEMY_API_URL = process.env.ALCHEMY_API_URL
const RINKEBY_PRIVATE_KEY = process.env.RINKEBY_PRIVATE_KEY

module.exports = {
  solidity: '0.7.3',
  networks: {
    rinkeby: {
      url: ALCHEMY_API_URL,
      accounts: [`0x${RINKEBY_PRIVATE_KEY}`],
    },
  },
}
Writing script for deployment
Create a folder called scripts and inside it add a file deploy.js.
const { ethers, artifacts } = require('hardhat')

async function main() {
  const [deployer] = await ethers.getSigners()

  console.log('Deploying contracts with the account: ', deployer.address)

  const Bank = await ethers.getContractFactory('Bank')
  const bank = await Bank.deploy()

  console.log('Bank address: ', bank.address)

}

main()
  .then(() => process.exit(0))
  .catch((error) => {
    console.error(error)
    process.exit(1)
  })
This script will be used for deploying our contract. Here is a quick explanation.
const [deployer] = await ethers.getSigners()
A Signer in ethers.js is an object that represents an Ethereum account. It's used to send transactions to contracts and other accounts. Here we're getting a list of the accounts in the node we're connected to and only keeping the first one.
const Bank = await ethers.getContractFactory('Bank')
A ContractFactory in ethers.js is an abstraction used to deploy new smart contracts, so Bank here is a factory for instances of our bank contract.
const bank = await Bank.deploy()
Calling deploy() on aContractFactory will start the deployment, and return a Promise that resolves to a Contract.
Deploying contract
Now, we are all set to deploy our contract to rinkeby testnet.
npx hardhat run scripts/deploy.js --network rinkeby
If the deployment was successful, you'll get something similar
Deploying contracts with the account:  0xf39Fd6e51aad88F6F4ce6aB8827279cffFb92266
Bank address:  0x5FbDB2315678afecb367f032d93F642f64180aa3
Before running this command, ensure that you have received your test ethers to your account or else it will though an error saying insufficient fund.
We have successfully deployed our smart contract to rinkeby test network which your can verify by going to etherscan and searching for your deployed contract address.
In the next part, we'll build an frontend react application for our end users. Click here.

Top comments (0)